Owner's Manual (English)
Page 4
... Panel Information 5 Stand Installation 6 Attaching the TV to a Wall 7 Back Cover for PC Mode 25 AV Output Setup 26 ...Digital Audio Output Setup 27 WATCHING TV/PROGRAMME CONTROL Remote Control Key Functions 28 Turning on the TV 30 Initializing Setup 30 Programme Selection 31 Volume...PICTURE CONTROL Picture Size(Aspect Ratio) Control 49 Preset Picture Settings - Screen Setup for Wire Arrangement 8 Desktop Pedestal Installation 9 Wall Mount: Horizontal installation 10 Antenna Connection 11 EXTERNAL EQUIPMENT SETUP HD Receiver Setup 12 DVD Setup 15 ...VCR Setup 18 ...Other A/V...
... Panel Information 5 Stand Installation 6 Attaching the TV to a Wall 7 Back Cover for PC Mode 25 AV Output Setup 26 ...Digital Audio Output Setup 27 WATCHING TV/PROGRAMME CONTROL Remote Control Key Functions 28 Turning on the TV 30 Initializing Setup 30 Programme Selection 31 Volume...PICTURE CONTROL Picture Size(Aspect Ratio) Control 49 Preset Picture Settings - Screen Setup for Wire Arrangement 8 Desktop Pedestal Installation 9 Wall Mount: Horizontal installation 10 Antenna Connection 11 EXTERNAL EQUIPMENT SETUP HD Receiver Setup 12 DVD Setup 15 ...VCR Setup 18 ...Other A/V...
Owner's Manual (English)
Page 9
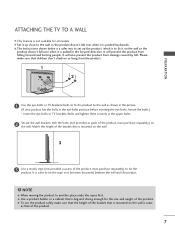
... make sure that is big and strong enough for all models. It will prevent the product from the product. 1 2 PREPARATION 1 Use the eye-bolts or TV brackets/bolts to fix the product to tie the product. It is safer to another place undo the ropes first. ATTACHING THE... forward and hurting people. NOTE G When moving the product to tie the rope so it is mounted on the wall. 3 3 Use a sturdy rope (not provided as parts of the product, must purchase separately) to the wall as shown in the picture. (If your product has the bolts in the eye-bolts position before...
... make sure that is big and strong enough for all models. It will prevent the product from the product. 1 2 PREPARATION 1 Use the eye-bolts or TV brackets/bolts to fix the product to tie the product. It is safer to another place undo the ropes first. ATTACHING THE... forward and hurting people. NOTE G When moving the product to tie the rope so it is mounted on the wall. 3 3 Use a sturdy rope (not provided as parts of the product, must purchase separately) to the wall as shown in the picture. (If your product has the bolts in the eye-bolts position before...
Owner's Manual (English)
Page 12
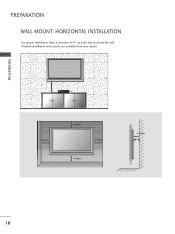
Detailed installation instructions are available from the wall. PREPARATION 4 inches 4 inches 4 inches 4 inches 4 inches 10 PREPARATION WALL MOUNT: HORIZONTAL INSTALLATION For proper ventilation, allow a clearance of 4" on each side and from your dealer.
Detailed installation instructions are available from the wall. PREPARATION 4 inches 4 inches 4 inches 4 inches 4 inches 10 PREPARATION WALL MOUNT: HORIZONTAL INSTALLATION For proper ventilation, allow a clearance of 4" on each side and from your dealer.


