Operation Guide
Page 3
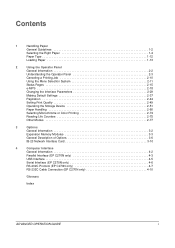
...44 Setting Print Quality 2-49 Operating the Storage Device 2-51 Paper Handling 2-60 Selecting Monochrome or Color Printing 2-74 Reading Life Counters 2-75 Other Modes 2-77 3 Options General Information 3-2 Expansion Memory Modules 3-3 General Description of Options 3-6 IB-23 Network Interface Card 3-10 4 Computer Interface General Information 4-2 Parallel Interface (EP C270N only 4-3 USB Interface 4-5 Serial Interface (EP C270N only 4-6 RS-232C Protocol (EP C270N only 4-7 RS-232C Cable Connection (EP C270N only 4-10 Glossary Index ADVANCED OPERATION GUIDE...
...44 Setting Print Quality 2-49 Operating the Storage Device 2-51 Paper Handling 2-60 Selecting Monochrome or Color Printing 2-74 Reading Life Counters 2-75 Other Modes 2-77 3 Options General Information 3-2 Expansion Memory Modules 3-3 General Description of Options 3-6 IB-23 Network Interface Card 3-10 4 Computer Interface General Information 4-2 Parallel Interface (EP C270N only 4-3 USB Interface 4-5 Serial Interface (EP C270N only 4-6 RS-232C Protocol (EP C270N only 4-7 RS-232C Cable Connection (EP C270N only 4-10 Glossary Index ADVANCED OPERATION GUIDE...
Operation Guide
Page 30
... Troubleshooting section in Auto Sleep. To cancel a job, see Canceling a Printing Job on the operator panel and [GO] is pressed, the cover is opened or closed, or a print job is receiving data to print. The printer is performing self-diagnostics after a waiting period. The printer is received. Pressing [GO] allows you powered on page 2-90. When the printer is skipping the data. For details on Auto Sleep, see Color Calibration on the printer. Using the Operator Panel Message...
... Troubleshooting section in Auto Sleep. To cancel a job, see Canceling a Printing Job on the operator panel and [GO] is pressed, the cover is opened or closed, or a print job is receiving data to print. The printer is performing self-diagnostics after a waiting period. The printer is received. Pressing [GO] allows you powered on page 2-90. When the printer is skipping the data. For details on Auto Sleep, see Color Calibration on the printer. Using the Operator Panel Message...
Operation Guide
Page 31
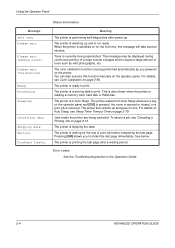
... on page 2-60. • While the printer is determined by the application software. Paper Size Indicator (SIZE) This indicator shows: • While the printer is in use. Parallel interface is in use. (EP C270N only) Option serial (RS-232C) interface is in use . Each interface has a timeout time of the current cassette. USB interface is in use . (EP C270N only) Network interface is in standby, the paper size of 30 seconds (factory default) during which the other interface begins printing the job...
... on page 2-60. • While the printer is determined by the application software. Paper Size Indicator (SIZE) This indicator shows: • While the printer is in use. Parallel interface is in use. (EP C270N only) Option serial (RS-232C) interface is in use . Each interface has a timeout time of the current cassette. USB interface is in use . (EP C270N only) Network interface is in standby, the paper size of 30 seconds (factory default) during which the other interface begins printing the job...
Operation Guide
Page 33
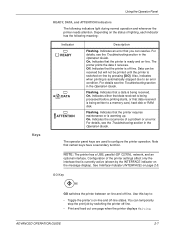
... Troubleshooting section in the Operation Guide. Data can be received but will not be printed until the printer is off -line. Also, indicates when printing is warming up. NOTE: The printer has a USB, parallel (EP C270N), network, and an optional interface. Indicates an error that the printer is switched on page 2-5. Flashing. See Interface Indicator (INTERFACE) on -line by pressing [GO]. Use this key to a memory card, hard disk or RAM disk. The printer prints the data it receives. The operator panel...
... Troubleshooting section in the Operation Guide. Data can be received but will not be printed until the printer is off -line. Also, indicates when printing is warming up. NOTE: The printer has a USB, parallel (EP C270N), network, and an optional interface. Indicates an error that the printer is switched on page 2-5. Flashing. See Interface Indicator (INTERFACE) on -line by pressing [GO]. Use this key to a memory card, hard disk or RAM disk. The printer prints the data it receives. The operator panel...
Operation Guide
Page 41
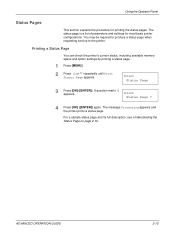
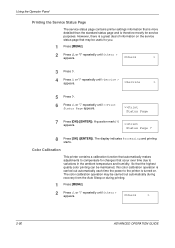
...can check the printer's current status, including available memory space and option settings by printing a status page. 1 Press [MENU]. 2 Press U or V repeatedly until Print Status Page appears. A question mark (?) appears. Using the Operator Panel Status Pages This section explains the procedure for most basic printer configurations. The status page is a list of parameters and settings for printing the status pages. For a sample status page and its full description, see Understanding the Status Page on page 2-16. The message Processing appears and the printer prints a status...
...can check the printer's current status, including available memory space and option settings by printing a status page. 1 Press [MENU]. 2 Press U or V repeatedly until Print Status Page appears. A question mark (?) appears. Using the Operator Panel Status Pages This section explains the procedure for most basic printer configurations. The status page is a list of parameters and settings for printing the status pages. For a sample status page and its full description, see Understanding the Status Page on page 2-16. The message Processing appears and the printer prints a status...
Operation Guide
Page 43
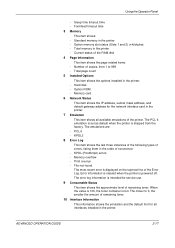
Current status of occurrence: - Hard disk - The PCL 6 emulation is set as default when the printer is full. Print overrun - Total page count 5 Installed Options This item shows the options installed in the printer - KPDL3 8 Error Log This item shows the last three instances of the following types of errors, listing them in the printer. Sleep time timeout time - Standard memory in the printer: - Total memory in kilobytes - The emulations are: - When the value is 100, the toner container...
Current status of occurrence: - Hard disk - The PCL 6 emulation is set as default when the printer is full. Print overrun - Total page count 5 Installed Options This item shows the options installed in the printer - KPDL3 8 Error Log This item shows the last three instances of the following types of errors, listing them in the printer. Sleep time timeout time - Standard memory in the printer: - Total memory in kilobytes - The emulations are: - When the value is 100, the toner container...
Operation Guide
Page 48
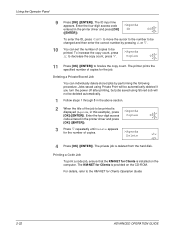
... if you turn the power off after printing, but jobs saved using Stored Job will not be deleted automatically. 1 Follow steps 1 through 8 in the above section. 2 When the title of copies. >Agenda Delete 001 4 Press [OK] ([ENTER]). The printer prints the specified number of copies to be printed is provided on the computer. Enter the four-digit access code >Agenda entered in the printer driver and...
... if you turn the power off after printing, but jobs saved using Stored Job will not be deleted automatically. 1 Follow steps 1 through 8 in the above section. 2 When the title of copies. >Agenda Delete 001 4 Press [OK] ([ENTER]). The printer prints the specified number of copies to be printed is provided on the computer. Enter the four-digit access code >Agenda entered in the printer driver and...
Operation Guide
Page 55
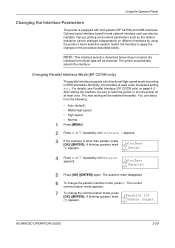
... new setting will be installed. A blinking question mark (?) appears. Using the Operator Panel Changing the Interface Parameters The printer is equipped with both parallel (EP C270N) and USB interfaces. Interface ? Changing Parallel Interface Mode (EP C270N only) The parallel interface supports a bi-directional/high-speed mode according to reset the printer or turn the power off at least once. Parallel 5 Press [OK] ([ENTER]) again. Optional serial interface board kit and network interface card can select from which data will be sure to IEEE standards. The printer...
... new setting will be installed. A blinking question mark (?) appears. Using the Operator Panel Changing the Interface Parameters The printer is equipped with both parallel (EP C270N) and USB interfaces. Interface ? Changing Parallel Interface Mode (EP C270N only) The parallel interface supports a bi-directional/high-speed mode according to reset the printer or turn the power off at least once. Parallel 5 Press [OK] ([ENTER]) again. Optional serial interface board kit and network interface card can select from which data will be sure to IEEE standards. The printer...
Operation Guide
Page 63
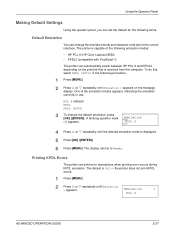
Printing KPDL Errors The printer can automatically switch between HP PCL 6 and KPDL3 depending on the message display. One of the following emulation modes: • HP PCL 6 (HP Color LaserJet 8550) • KPDL3 (compatible with PostScript 3) The printer can print error descriptions when printing error occurs during KPDL emulation. The display returns to Ready. PCL 6 (default) KPDL KPDL (AUTO) 3 To change the emulation mode and character code set for the current interface. Emulation ?PCL 6 4 Press U or V repeatedly...
Printing KPDL Errors The printer can automatically switch between HP PCL 6 and KPDL3 depending on the message display. One of the following emulation modes: • HP PCL 6 (HP Color LaserJet 8550) • KPDL3 (compatible with PostScript 3) The printer can print error descriptions when printing error occurs during KPDL emulation. The display returns to Ready. PCL 6 (default) KPDL KPDL (AUTO) 3 To change the emulation mode and character code set for the current interface. Emulation ?PCL 6 4 Press U or V repeatedly...
Operation Guide
Page 73
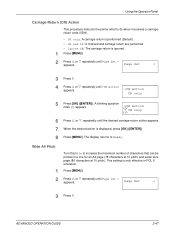
...] ([ENTER]). ADVANCED OPERATION GUIDE 2-47 Press [MENU]. A blinking question mark (?) appears. >CR Action ? This setting is displayed, press [OK] ([ENTER]). 8 Press [MENU]. Page Set > 3 Press Z. 4 Press U or V repeatedly until Page set > appears. Page Set > 3 Press Z. Using the Operator Panel Carriage-Return (CR) Action This procedure instructs the printer what to do when it receives a carriagereturn code (0DH). • CR only: A carriage-return is performed (Default). • CR and...
...] ([ENTER]). ADVANCED OPERATION GUIDE 2-47 Press [MENU]. A blinking question mark (?) appears. >CR Action ? This setting is displayed, press [OK] ([ENTER]). 8 Press [MENU]. Page Set > 3 Press Z. 4 Press U or V repeatedly until Page set > appears. Page Set > 3 Press Z. Using the Operator Panel Carriage-Return (CR) Action This procedure instructs the printer what to do when it receives a carriagereturn code (0DH). • CR only: A carriage-return is performed (Default). • CR and...

Operation Guide
Page 87
... V to print. Using the Operator Panel Setting MP Tray Paper Size When you use the MP tray in cassette mode, you should set the MP tray size to the paper size that you can cause paper jam. 1 Press [MENU]. 2 Press U or V repeatedly until >MP Tray Size appears. In this example, the current >MP Tray Size MP tray paper size is used to format the job to display the desired paper size. The default setting is Letter size for other countries. A4 5 To change the paper size, press...
... V to print. Using the Operator Panel Setting MP Tray Paper Size When you use the MP tray in cassette mode, you should set the MP tray size to the paper size that you can cause paper jam. 1 Press [MENU]. 2 Press U or V repeatedly until >MP Tray Size appears. In this example, the current >MP Tray Size MP tray paper size is used to format the job to display the desired paper size. The default setting is Letter size for other countries. A4 5 To change the paper size, press...
Operation Guide
Page 94
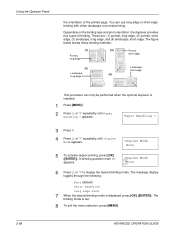
... Paper Handling > appears. The binding mode is displayed, press [OK] ([ENTER]). Using the Operator Panel the orientation of binding. Depending on the binding type and print orientation, the duplexer provides four types of the printed page. The message display toggles through the following: None (default) Short edge bind Long edge bind 7 When the desired binding mode is set. 8 To exit the menu selection, press [MENU]. 2-68 ADVANCED OPERATION GUIDE A blinking...
... Paper Handling > appears. The binding mode is displayed, press [OK] ([ENTER]). Using the Operator Panel the orientation of binding. Depending on the binding type and print orientation, the duplexer provides four types of the printed page. The message display toggles through the following: None (default) Short edge bind Long edge bind 7 When the desired binding mode is set. 8 To exit the menu selection, press [MENU]. 2-68 ADVANCED OPERATION GUIDE A blinking...
Operation Guide
Page 108
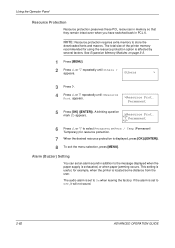
... even when you have switched back in addition to the message displayed when the paper supply is set to Off, it will not sound. 2-82 ADVANCED OPERATION GUIDE Others > 3 Press Z. 4 Press U or V repeatedly until Others > appears. Permanent 5 Press [OK] ([ENTER]). Alarm (Buzzer) Setting You can set an alarm sound in PCL 6. See Expansion Memory Modules on page 3-3. 1 Press [MENU]. 2 Press U or V repeatedly until...
... even when you have switched back in addition to the message displayed when the paper supply is set to Off, it will not sound. 2-82 ADVANCED OPERATION GUIDE Others > 3 Press Z. 4 Press U or V repeatedly until Others > appears. Permanent 5 Press [OK] ([ENTER]). Alarm (Buzzer) Setting You can set an alarm sound in PCL 6. See Expansion Memory Modules on page 3-3. 1 Press [MENU]. 2 Press U or V repeatedly until...
Operation Guide
Page 116
... that automatically makes adjustments to compensate for service purposes. So that the highest quality color printing can be maintained, this color calibration operation is carried out automatically each time the power to the printer is turned on the service status page that occur over time due to you. 1 Press [MENU]. 2 Press U or V repeatedly until Others > appears. However, there is therefore mostly for changes that may be useful to...
... that automatically makes adjustments to compensate for service purposes. So that the highest quality color printing can be maintained, this color calibration operation is carried out automatically each time the power to the printer is turned on the service status page that occur over time due to you. 1 Press [MENU]. 2 Press U or V repeatedly until Others > appears. However, there is therefore mostly for changes that may be useful to...

Operation Guide
Page 132
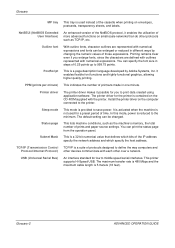
..., Online, and Error signals work only after you press [GO] to receive more data. Ground return 20 - Ground return 24 - Ground return 25 - Ground return 21 - Ground return 31 In - [nInit] 32 Out Error† [nFault] 33 - - 34 - - 35 Out Power Ready Ignored When the high-speed parallel line control is on, this line returns an error status.†† Not used...
..., Online, and Error signals work only after you press [GO] to receive more data. Ground return 20 - Ground return 24 - Ground return 25 - Ground return 21 - Ground return 31 In - [nInit] 32 Out Error† [nFault] 33 - - 34 - - 35 Out Power Ready Ignored When the high-speed parallel line control is on, this line returns an error status.†† Not used...
Operation Guide
Page 134
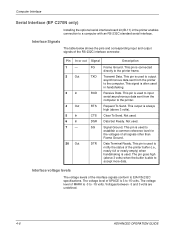
... often used . Data Set Ready. Not used in the printer enables connection to -15 volts. Voltages between -3 and 3 volts are undefined. 4-6 ADVANCED OPERATION GUIDE Interface Signals The table below shows the pins and corresponding input and output signals of SPACE is -3 to a computer with an RS-232C standard serial interface. Clear To Send. The voltage level of the RS-232C interface connector. Transmit Data. Receive Data. Not used...
... often used . Data Set Ready. Not used in the printer enables connection to -15 volts. Voltages between -3 and 3 volts are undefined. 4-6 ADVANCED OPERATION GUIDE Interface Signals The table below shows the pins and corresponding input and output signals of SPACE is -3 to a computer with an RS-232C standard serial interface. Clear To Send. The voltage level of the RS-232C interface connector. Transmit Data. Receive Data. Not used...
Operation Guide
Page 138
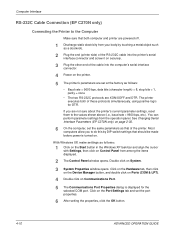
... Ports (COM & LPT). 4 Double click on Communications Port. 5 The Communications Port Properties dialog is turned on the printer. 5 The printer's parameters are set the same parameters as follows: • Baud rate = 9600 bps, data bits (character length) = 8, stop bits = 1, parity = none • The two RS-232C protocols are powered off. 1 Discharge static electricity from among the items displayed. 2 The Control Panel window opens. See Changing Serial Interface Parameters (EP C270N only) on page...
... Ports (COM & LPT). 4 Double click on Communications Port. 5 The Communications Port Properties dialog is turned on the printer. 5 The printer's parameters are set the same parameters as follows: • Baud rate = 9600 bps, data bits (character length) = 8, stop bits = 1, parity = none • The two RS-232C protocols are powered off. 1 Discharge static electricity from among the items displayed. 2 The Control Panel window opens. See Changing Serial Interface Parameters (EP C270N only) on page...
Operation Guide
Page 142
... cassette when printing on the CD-ROM supplied with numerical expressions and fonts can print the status page from the operation panel. This is a page description language developed by changing the numeric values of more advanced functions on the computer connected to print data created using application software. This printer supports Hi-Speed USB. Install the printer driver on small-scale networks than do other over a network. The default setting can specify the font size in steps...
... cassette when printing on the CD-ROM supplied with numerical expressions and fonts can print the status page from the operation panel. This is a page description language developed by changing the numeric values of more advanced functions on the computer connected to print data created using application software. This printer supports Hi-Speed USB. Install the printer driver on small-scale networks than do other over a network. The default setting can specify the font size in steps...
Operation Guide
Page 143
... color printing 2-74 Color paper 1-10 Conventions -iv Counters reading the life counters 2-75 reading the total printed pages 2-75 toner, how to reset 2-75 D Data dump receiving data for damping 2-80 dpi Glossary-1 Duplex printing binding modes 2-67 description 2-67 Duplex unit option, diagrammed 3-7 E e-MPS changing configuration 2-25 general information 2-18 how to change hard disk spaces 2-25 printing a list of code jobs 2-23 ADVANCED OPERATION GUIDE Emulation appearing on the status page 2-17 KPDL, printing errors 2-37 setting the default using the operator panel 2-37 Envelope 1-10 Error...
... color printing 2-74 Color paper 1-10 Conventions -iv Counters reading the life counters 2-75 reading the total printed pages 2-75 toner, how to reset 2-75 D Data dump receiving data for damping 2-80 dpi Glossary-1 Duplex printing binding modes 2-67 description 2-67 Duplex unit option, diagrammed 3-7 E e-MPS changing configuration 2-25 general information 2-18 how to change hard disk spaces 2-25 printing a list of code jobs 2-23 ADVANCED OPERATION GUIDE Emulation appearing on the status page 2-17 KPDL, printing errors 2-37 setting the default using the operator panel 2-37 Envelope 1-10 Error...
Installation Guide
Page 1
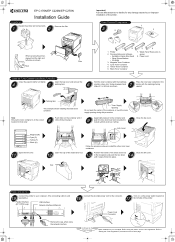
... page. Documentation and software • Installation Guide (this procedure. Packing Item This example shows installing the black toner container. Push down until it 5 or 6 times as shown. Open the top cover and remove the packing item. 1. Magenta Toner Container 4. Refer to "Setting the Color Registration" procedure on the Reverse page Basic installation is sold separately.) Parallel Interface (EP C270N only) USB Interface Network Interface (Ethernet) Remove the cap, when using the printer, set the color registration. Remove the filler. Printer...
... page. Documentation and software • Installation Guide (this procedure. Packing Item This example shows installing the black toner container. Push down until it 5 or 6 times as shown. Open the top cover and remove the packing item. 1. Magenta Toner Container 4. Refer to "Setting the Color Registration" procedure on the Reverse page Basic installation is sold separately.) Parallel Interface (EP C270N only) USB Interface Network Interface (Ethernet) Remove the cap, when using the printer, set the color registration. Remove the filler. Printer...

