User Guide
Page 6
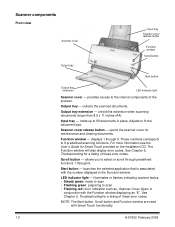
... Function window will also display error codes. Scroll button - Input tray - illuminates or flashes indicating scanner status. • Steady green: ready to scan • Flashing green: preparing to 50 documents in conjunction with the Function window displaying an "E". Scanner cover release button - allows you to 9 predefined scanning functions. These numbers correspond to select or...
... Function window will also display error codes. Scroll button - Input tray - illuminates or flashes indicating scanner status. • Steady green: ready to scan • Flashing green: preparing to 50 documents in conjunction with the Function window displaying an "E". Scanner cover release button - allows you to 9 predefined scanning functions. These numbers correspond to select or...

User Guide
Page 13
Please wait while the operating system synchronizes the scanner with the installed software. When the installation process is displayed in the Function window, refer to scan, the green LED indicator light will stop flashing and a number will flash as the scanner goes through a series of the scanner will be displayed in the Function window. NOTE: If the LED indicator light continues to flash or "E" is complete and ready to Chapter 5, Troubleshooting. 2-6 A-61602 February 2009 Turning on the scanner When you turn on the scanner, the green indicator on the front of self tests.
Please wait while the operating system synchronizes the scanner with the installed software. When the installation process is displayed in the Function window, refer to scan, the green LED indicator light will stop flashing and a number will flash as the scanner goes through a series of the scanner will be displayed in the Function window. NOTE: If the LED indicator light continues to flash or "E" is complete and ready to Chapter 5, Troubleshooting. 2-6 A-61602 February 2009 Turning on the scanner When you turn on the scanner, the green indicator on the front of self tests.
User Guide
Page 14
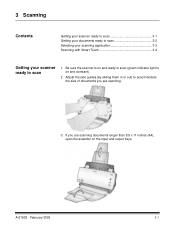
Adjust the side guides (by sliding them in or out) to scan 1. A-61602 February 2009 3-1 Be sure the scanner is on and ready to scan (green indicator light is on the input and output trays. If you are scanning documents longer than 8.5 x 11 inches (A4), open the extender on and constant). 2. 3 Scanning Contents Getting your scanner ready to scan 3-1 Getting your documents ready to scan 3-2 Selecting your scanning application 3-3 Scanning with Smart Touch 3-4 Getting your scanner ready to accommodate the size of documents you are scanning. 3.
Adjust the side guides (by sliding them in or out) to scan 1. A-61602 February 2009 3-1 Be sure the scanner is on and ready to scan (green indicator light is on the input and output trays. If you are scanning documents longer than 8.5 x 11 inches (A4), open the extender on and constant). 2. 3 Scanning Contents Getting your scanner ready to scan 3-1 Getting your documents ready to scan 3-2 Selecting your scanning application 3-3 Scanning with Smart Touch 3-4 Getting your scanner ready to accommodate the size of documents you are scanning. 3.
User Guide
Page 15
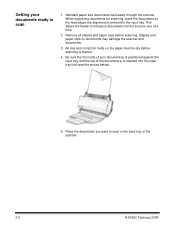
...and paper clips before scanning is inserted into the scanner one at a time. 2. Place the documents you want to introduce documents into the input tray first (see the arrows below). 5. Be sure the front side of your documents ready to scan 1. Staples and paper clips on the... paper must be dry before scanning. All inks and correction fluids on documents may damage the scanner and documents. 3. Getting your document(s) is positioned against the input tray and the top...
...and paper clips before scanning is inserted into the scanner one at a time. 2. Place the documents you want to introduce documents into the input tray first (see the arrows below). 5. Be sure the front side of your documents ready to scan 1. Staples and paper clips on the... paper must be dry before scanning. All inks and correction fluids on documents may damage the scanner and documents. 3. Getting your document(s) is positioned against the input tray and the top...
User Guide
Page 25
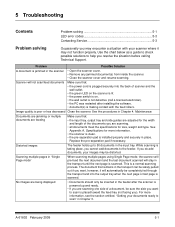
...Single Page mode" When scanning multiple pages using Single Page mode, the scanner will pre-feed the next document and the last document scanned will not scan/feed documents Make sure that : • the input tray, output tray and ...documents ready to the feeder. This is taking place, you cannot add documents to scan" in the input tray. 5 Troubleshooting Contents Problem solving 5-1 LED error codes 5-3 Contacting Service 5-3 Problem solving Occasionally you may encounter a situation with the feed rollers. While scanning is a normal scanning process. Scanner...
...Single Page mode" When scanning multiple pages using Single Page mode, the scanner will pre-feed the next document and the last document scanned will not scan/feed documents Make sure that : • the input tray, output tray and ...documents ready to the feeder. This is taking place, you cannot add documents to scan" in the input tray. 5 Troubleshooting Contents Problem solving 5-1 LED error codes 5-3 Contacting Service 5-3 Problem solving Occasionally you may encounter a situation with the feed rollers. While scanning is a normal scanning process. Scanner...
User Guide
Page 27
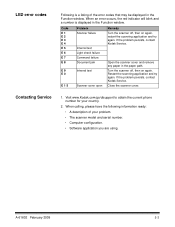
...Document jam Internal test Scanner cover open Remedy Turn the scanner off , then on again. restart the scanning application and try again. Open the scanner cover and remove any paper in the Function window. Turn the scanner off , then on again. Close the scanner cover. Contacting Service 1. If the problem persists, contact Kodak... error codes Following is displayed in the Function window. Visit www.Kodak.com/go/disupport to obtain the current phone number for your problem. • The scanner model and serial number. • Computer configuration. • Software...
...Document jam Internal test Scanner cover open Remedy Turn the scanner off , then on again. restart the scanning application and try again. Open the scanner cover and remove any paper in the Function window. Turn the scanner off , then on again. Close the scanner cover. Contacting Service 1. If the problem persists, contact Kodak... error codes Following is displayed in the Function window. Visit www.Kodak.com/go/disupport to obtain the current phone number for your problem. • The scanner model and serial number. • Computer configuration. • Software...


