User Guide
Page 2
...shielded interface cables have been provided with the product or specified additional components or accessories elsewhere defined to be used with the installation of consumable items that are designed to provide reasonable protection against harmful interference in accordance with the power cord and USB cable...the USA, visit the Electronics Industry Alliance website: www.eiae.org. • The product packaging is recyclable. • The Kodak ScanMate i1120 Scanner is Energy Star compliant and is encouraged to try to correct the interference by turning the equipment off and on, the user is...
...shielded interface cables have been provided with the product or specified additional components or accessories elsewhere defined to be used with the installation of consumable items that are designed to provide reasonable protection against harmful interference in accordance with the power cord and USB cable...the USA, visit the Electronics Industry Alliance website: www.eiae.org. • The product packaging is recyclable. • The Kodak ScanMate i1120 Scanner is Energy Star compliant and is encouraged to try to correct the interference by turning the equipment off and on, the user is...
User Guide
Page 3
Japan: This is used in a domestic environment, it may cause radio interference. If this equipment has obtained EMC registration for interference by information Technology Equipment (VCCI). Install and use , it can be used near a radio or television receiver in any area including residential areas. Acoustic emission Maschinenlärminformationsverordnung - 3, GSGV Der arbeitsplatzbezogene Emissionswert beträgt Korea: As this is a Class B product based on the standard of the Voluntary Control Council for household use the equipment according to the instruction manual.
Japan: This is used in a domestic environment, it may cause radio interference. If this equipment has obtained EMC registration for interference by information Technology Equipment (VCCI). Install and use , it can be used near a radio or television receiver in any area including residential areas. Acoustic emission Maschinenlärminformationsverordnung - 3, GSGV Der arbeitsplatzbezogene Emissionswert beträgt Korea: As this is a Class B product based on the standard of the Voluntary Control Council for household use the equipment according to the instruction manual.
User Guide
Page 4
OVERVIEW 1-1 INSTALLATION 2-1 SCANNING 3-1 MAINTENANCE 4-1 TROUBLESHOOTING 5-1 APPENDICES
OVERVIEW 1-1 INSTALLATION 2-1 SCANNING 3-1 MAINTENANCE 4-1 TROUBLESHOOTING 5-1 APPENDICES
User Guide
Page 5
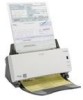
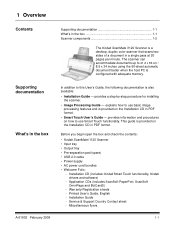
... - Miscellaneous flyers 1-1 explains how to this User's Guide, the following documentation is a desktop, duplex color scanner that scans two sides of a document in a single pass at 20 pages per minute. 1 Overview Contents Supporting documentation 1-1 What's in the box 1-1 Scanner components 1-2 The Kodak ScanMate i1120 Scanner is also available: • Installation Guide - Printed User's Guide, English - provides information and procedures...
... - Miscellaneous flyers 1-1 explains how to this User's Guide, the following documentation is a desktop, duplex color scanner that scans two sides of a document in a single pass at 20 pages per minute. 1 Overview Contents Supporting documentation 1-1 What's in the box 1-1 Scanner components 1-2 The Kodak ScanMate i1120 Scanner is also available: • Installation Guide - Printed User's Guide, English - provides information and procedures...
User Guide
Page 6
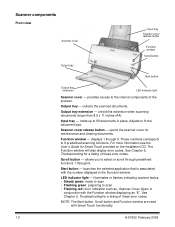
...a listing of these error codes. provides access to 50 documents in place. holds up to the internal components of these error codes. opens the scanner cover for Smart Touch provided on the Installation CD. allows you to 9 predefined scanning functions. launches ... button Function window Scroll button Start button Output tray extension LED indicator light Scanner cover - collects the scanned documents. unfold this extension when scanning documents longer than 8.5 x 11 inches (A4). Scanner cover release button - These numbers correspond to select or scroll through predefined ...
...a listing of these error codes. provides access to 50 documents in place. holds up to the internal components of these error codes. opens the scanner cover for Smart Touch provided on the Installation CD. allows you to 9 predefined scanning functions. launches ... button Function window Scroll button Start button Output tray extension LED indicator light Scanner cover - collects the scanned documents. unfold this extension when scanning documents longer than 8.5 x 11 inches (A4). Scanner cover release button - These numbers correspond to select or scroll through predefined ...
User Guide
Page 8
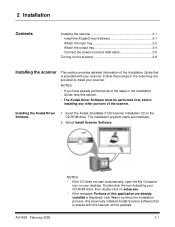
... the scanner 2-6 Installing the scanner This section provides detailed information of the scanner. Any previously installed Kodak Scanner software that is provided with this section. • The Kodak Driver Software must be updated. 2-1 Insert the Kodak ScanMate i1120 Scanner Installation CD in the order they are already installed is shared with your scanner. The installation program starts automatically. 2. Installing the Kodak Driver Software 1. 2 Installation Contents Installing the scanner 2-1 Install the Kodak Driver...
... the scanner 2-6 Installing the scanner This section provides detailed information of the scanner. Any previously installed Kodak Scanner software that is provided with this section. • The Kodak Driver Software must be updated. 2-1 Insert the Kodak ScanMate i1120 Scanner Installation CD in the order they are already installed is shared with your scanner. The installation program starts automatically. 2. Installing the Kodak Driver Software 1. 2 Installation Contents Installing the scanner 2-1 Install the Kodak Driver...
User Guide
Page 9
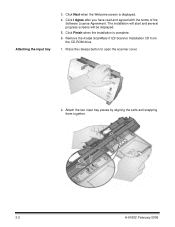
Remove the Kodak ScanMate i1120 Scanner Installation CD from the CD-ROM drive. 1. Click Finish when the installation is displayed. 4. Attach the two input tray pieces by aligning the slots and snapping them together. 2-2 A-61602 February 2009 Click Next when the Welcome screen is complete. 6. Click I Agree after you have read and agreed with the terms of the Software License Agreement. Press the release button to open the scanner cover. 2. The installation will start and several progress screens will be displayed. 5. Attaching the input tray 3.
Remove the Kodak ScanMate i1120 Scanner Installation CD from the CD-ROM drive. 1. Click Finish when the installation is displayed. 4. Attach the two input tray pieces by aligning the slots and snapping them together. 2-2 A-61602 February 2009 Click Next when the Welcome screen is complete. 6. Click I Agree after you have read and agreed with the terms of the Software License Agreement. Press the release button to open the scanner cover. 2. The installation will start and several progress screens will be displayed. 5. Attaching the input tray 3.
User Guide
Page 12
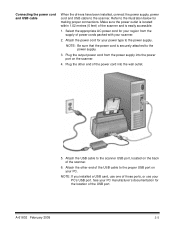
... attached to the scanner. Attach the other end of the USB port. Plug the output power cord from the supply of those ports, or use your PC. NOTE: If you installed a USB card, use one of power cords packed with your PC manufacturer's documentation for making proper connections.... See your scanner. 2. Connecting the power cord and USB cable When the drivers have been installed, connect the power supply, power cord and USB...
... attached to the scanner. Attach the other end of the USB port. Plug the output power cord from the supply of those ports, or use your PC. NOTE: If you installed a USB card, use one of power cords packed with your PC manufacturer's documentation for making proper connections.... See your scanner. 2. Connecting the power cord and USB cable When the drivers have been installed, connect the power supply, power cord and USB...

User Guide
Page 13
NOTE: If the LED indicator light continues to flash or "E" is complete and ready to Chapter 5, Troubleshooting. 2-6 A-61602 February 2009 When the installation process is displayed in the Function window, refer to scan, the green LED indicator light will stop flashing and a number will flash as the scanner goes through a series of self tests. Please wait while the operating system synchronizes the scanner with the installed software. Turning on the scanner When you turn on the scanner, the green indicator on the front of the scanner will be displayed in the Function window.
NOTE: If the LED indicator light continues to flash or "E" is complete and ready to Chapter 5, Troubleshooting. 2-6 A-61602 February 2009 When the installation process is displayed in the Function window, refer to scan, the green LED indicator light will stop flashing and a number will flash as the scanner goes through a series of self tests. Please wait while the operating system synchronizes the scanner with the installed software. Turning on the scanner When you turn on the scanner, the green indicator on the front of the scanner will be displayed in the Function window.

User Guide
Page 16
...custom tasks. complete with your documents into organized files that displays thumbnails of a printed report • scan and print/fax an invoice • scan a photo to add to a presentation Nine predefined task shortcuts are sent to scan your scanner. such as: • ... contact information from business cards into electronic files you can easily browse and locate information fast. Selecting your documents so you can edit search and share. Kodak provides Smart Touch functionality which allows you installed the Kodak Driver Software. ScanSoft OmniPage -
...custom tasks. complete with your documents into organized files that displays thumbnails of a printed report • scan and print/fax an invoice • scan a photo to add to a presentation Nine predefined task shortcuts are sent to scan your scanner. such as: • ... contact information from business cards into electronic files you can easily browse and locate information fast. Selecting your documents so you can edit search and share. Kodak provides Smart Touch functionality which allows you installed the Kodak Driver Software. ScanSoft OmniPage -
User Guide
Page 17
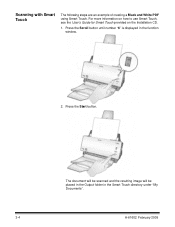
The document will be scanned and the resulting image will be placed in the Output folder in the function window. 2. Scanning with Smart Touch The following steps are an example of creating a Black and White PDF using Smart Touch. For more information on how to use Smart Touch, see the User's Guide for Smart Touch provided on the Installation CD. 1. Press the Start button. Press the Scroll button until number "6" is displayed in the Smart Touch directory under "My Documents". 3-4 A-61602 February 2009
The document will be scanned and the resulting image will be placed in the Output folder in the function window. 2. Scanning with Smart Touch The following steps are an example of creating a Black and White PDF using Smart Touch. For more information on how to use Smart Touch, see the User's Guide for Smart Touch provided on the Installation CD. 1. Press the Start button. Press the Scroll button until number "6" is displayed in the Smart Touch directory under "My Documents". 3-4 A-61602 February 2009
User Guide
Page 23
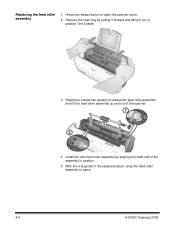
Set it out of the assembly in place. 4-6 A-61602 February 2009 Rotate the orange tab upward to open the scanner cover. 2. Replacing the feed roller assembly 1. Press the release button to release the feed roller assembly and lift the feed roller assembly up and out of the scanner. 4. Remove the input tray by aligning the shaft end of position. Install the new feed roller assembly by pulling it forward and lifting it aside. 3. With the orange tab in the upward position, snap the feed roller assembly in position. 5.
Set it out of the assembly in place. 4-6 A-61602 February 2009 Rotate the orange tab upward to open the scanner cover. 2. Replacing the feed roller assembly 1. Press the release button to release the feed roller assembly and lift the feed roller assembly up and out of the scanner. 4. Remove the input tray by aligning the shaft end of position. Install the new feed roller assembly by pulling it forward and lifting it aside. 3. With the orange tab in the upward position, snap the feed roller assembly in position. 5.
User Guide
Page 25
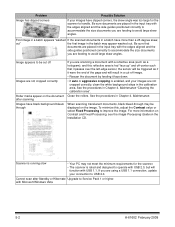
...may encounter a situation with the feed rollers. For more information. • the scanner is clean. • the pre-separation pad is installed properly and securely in Chapter 3. Scanner will not scan/feed documents Make sure that: • the power cord is plugged securely into the output tray... scanning. This is poor or has decreased Clean the scanner. While scanning is taking place, you are feeding Make sure that remains in the feeder after installing the software. • document(s) is making contact with your documents ready to scan" in place. Use the chart below...
...may encounter a situation with the feed rollers. For more information. • the scanner is clean. • the pre-separation pad is installed properly and securely in Chapter 3. Scanner will not scan/feed documents Make sure that: • the power cord is plugged securely into the output tray... scanning. This is poor or has decreased Clean the scanner. While scanning is taking place, you are feeding Make sure that remains in the feeder after installing the software. • document(s) is making contact with your documents ready to scan" in place. Use the chart below...
User Guide
Page 26
... have more information on Contrast and Fixed Processing, see the Image Processing Guide on the Installation CD. To minimize this reflective area is fed "face up" and off-center such that documents are not cropped correctly Roller marks appear on the image. Clean the rollers. If you.... Problem Image has clipped corners Possible Solution If your images have clipped corners, the skew angle was too large for the scanner. • The scanner is rated and designed to operate with USB 2.0, but will function with the edges aligned and the side guides positioned correctly...
... have more information on Contrast and Fixed Processing, see the Image Processing Guide on the Installation CD. To minimize this reflective area is fed "face up" and off-center such that documents are not cropped correctly Roller marks appear on the image. Clean the rollers. If you.... Problem Image has clipped corners Possible Solution If your images have clipped corners, the skew angle was too large for the scanner. • The scanner is rated and designed to operate with USB 2.0, but will function with the edges aligned and the side guides positioned correctly...

User Guide
Page 30
... Warranty prevail. Purchasers may determine the applicable Limited Warranty period for the particular Kodak Scanner. Purchasers of that manufacturer's product or system. Installation Warning and Disclaimer KODAK WILL NOT BE RESPONSIBLE FOR ANY CONSEQUENTIAL OR INCIDENTAL DAMAGES RESULTING FROM THE SALE, INSTALLATION, USE, SERVICING OR IMPROPER FUNCTIONING OF THIS PRODUCT, REGARDLESS OF THE CAUSE. Appendix...
... Warranty prevail. Purchasers may determine the applicable Limited Warranty period for the particular Kodak Scanner. Purchasers of that manufacturer's product or system. Installation Warning and Disclaimer KODAK WILL NOT BE RESPONSIBLE FOR ANY CONSEQUENTIAL OR INCIDENTAL DAMAGES RESULTING FROM THE SALE, INSTALLATION, USE, SERVICING OR IMPROPER FUNCTIONING OF THIS PRODUCT, REGARDLESS OF THE CAUSE. Appendix...
User Guide
Page 31
... enclosed Limited Warranty Registration Card at (800) 822-1414. Kodak advises the purchaser to 5 p.m. Kodak is the Kodak Scanner or another component and if the problem can be returned with the repaired or replacement Kodak Scanner. The purchaser must install the shipping restraint before the Kodak Scanner is not available, contact Kodak's Response Center at (800) 822-1414. adapters, cables...
... enclosed Limited Warranty Registration Card at (800) 822-1414. Kodak advises the purchaser to 5 p.m. Kodak is the Kodak Scanner or another component and if the problem can be returned with the repaired or replacement Kodak Scanner. The purchaser must install the shipping restraint before the Kodak Scanner is not available, contact Kodak's Response Center at (800) 822-1414. adapters, cables...
User Guide
Page 32
...credit of Kodak. Eligible purchasers seeking services for Kodak Scanners must be replaced by Kodak become the property of the defective product. Upon receipt of the above excluded parts or services are available to Kodak in the original shipping container, or in which include power cord, documentation, etc.)... product is to the nearest authorized Depot Repair Center. The Return Material Authorization Number ("RMA") must have the shipping restraint installed before it is shipped. The AUR provides advance replacement on service areas, please visit our website at terms then in which...
...credit of Kodak. Eligible purchasers seeking services for Kodak Scanners must be replaced by Kodak become the property of the defective product. Upon receipt of the above excluded parts or services are available to Kodak in the original shipping container, or in which include power cord, documentation, etc.)... product is to the nearest authorized Depot Repair Center. The Return Material Authorization Number ("RMA") must have the shipping restraint installed before it is shipped. The AUR provides advance replacement on service areas, please visit our website at terms then in which...


