User Guide
Page 2
... to Part 15 of an emergency. • Do not use the scanner's AC adapter with the power cord and USB cable attached. Environmental information • The Kodak ScanMate i1120 Scanner is designed to meet worldwide environmental requirements. • Guidelines are available for . If this equipment does cause harmful interference to provide reasonable protection against harmful interference in accordance with the default time set...
... to Part 15 of an emergency. • Do not use the scanner's AC adapter with the power cord and USB cable attached. Environmental information • The Kodak ScanMate i1120 Scanner is designed to meet worldwide environmental requirements. • Guidelines are available for . If this equipment does cause harmful interference to provide reasonable protection against harmful interference in accordance with the default time set...
User Guide
Page 5
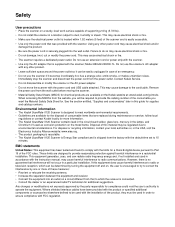
...'s in the box 1-1 Scanner components 1-2 The Kodak ScanMate i1120 Scanner is a desktop, duplex color scanner that scans two sides of a document in PDF format. • Smart Touch User's Guide - Supporting documentation What's in PDF format. This guide is provided on how to use Smart Touch functionality. Warranty/Registration sheets - Printed User's Guide, English - Miscellaneous flyers 1-1 Service & Support Country Contact sheet - provides a step-by-step procedure for installing the scanner. • Image Processing Guide - Before you begin open the box and check the contents...
...'s in the box 1-1 Scanner components 1-2 The Kodak ScanMate i1120 Scanner is a desktop, duplex color scanner that scans two sides of a document in PDF format. • Smart Touch User's Guide - Supporting documentation What's in PDF format. This guide is provided on how to use Smart Touch functionality. Warranty/Registration sheets - Printed User's Guide, English - Miscellaneous flyers 1-1 Service & Support Country Contact sheet - provides a step-by-step procedure for installing the scanner. • Image Processing Guide - Before you begin open the box and check the contents...
User Guide
Page 6
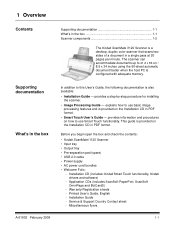
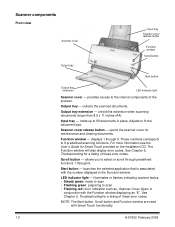
... 1 through 9. For more information see the User's Guide for maintenance and clearing documents. launches the selected application that is associated with the number displayed in place. Start button - Scanner components Front view Scanner cover Output tray Input tray Scanner cover release button Function window Scroll button Start button Output tray extension LED indicator light Scanner cover - Output tray - collects the scanned documents. allows you to scan • Flashing red: error indication such as, Scanner Cover Open, in conjunction with Smart Touch functionality...
... 1 through 9. For more information see the User's Guide for maintenance and clearing documents. launches the selected application that is associated with the number displayed in place. Start button - Scanner components Front view Scanner cover Output tray Input tray Scanner cover release button Function window Scroll button Start button Output tray extension LED indicator light Scanner cover - Output tray - collects the scanned documents. allows you to scan • Flashing red: error indication such as, Scanner Cover Open, in conjunction with Smart Touch functionality...
User Guide
Page 8
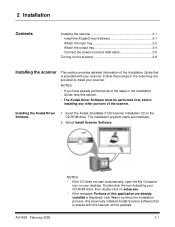
... the output tray 2-4 Connect the power cord and USB cable 2-5 Turning on setup.exe. • If the message Portions of this application are provided to continue the installation process. Insert the Kodak ScanMate i1120 Scanner Installation CD in the order they are already installed is displayed, click Yes to install your desktop. Select Install Scanner Software. Follow these steps in the CD-ROM drive. Installing the Kodak Driver Software 1. The installation program starts automatically. 2. Any previously installed Kodak Scanner software that is...
... the output tray 2-4 Connect the power cord and USB cable 2-5 Turning on setup.exe. • If the message Portions of this application are provided to continue the installation process. Insert the Kodak ScanMate i1120 Scanner Installation CD in the order they are already installed is displayed, click Yes to install your desktop. Select Install Scanner Software. Follow these steps in the CD-ROM drive. Installing the Kodak Driver Software 1. The installation program starts automatically. 2. Any previously installed Kodak Scanner software that is...
User Guide
Page 9
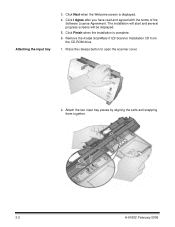
Remove the Kodak ScanMate i1120 Scanner Installation CD from the CD-ROM drive. 1. The installation will start and several progress screens will be displayed. 5. Click Finish when the installation is displayed. 4. Attach the two input tray pieces by aligning the slots and snapping them together. 2-2 A-61602 February 2009 Click Next when the Welcome screen is complete. 6. Attaching the input tray 3. Click I Agree after you have read and agreed with the terms of the Software License Agreement. Press the release button to open the scanner cover. 2.
Remove the Kodak ScanMate i1120 Scanner Installation CD from the CD-ROM drive. 1. The installation will start and several progress screens will be displayed. 5. Click Finish when the installation is displayed. 4. Attach the two input tray pieces by aligning the slots and snapping them together. 2-2 A-61602 February 2009 Click Next when the Welcome screen is complete. 6. Attaching the input tray 3. Click I Agree after you have read and agreed with the terms of the Software License Agreement. Press the release button to open the scanner cover. 2.
User Guide
Page 12
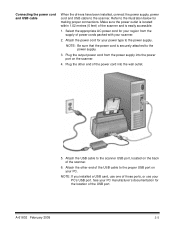
... the USB cable to the power supply. Attach the power cord for making proper connections. Attach the other end of the scanner. 6. Plug the output power cord from the supply of power cords packed with your PC manufacturer's documentation for the location of the USB cable to the scanner. Connecting the power cord and USB cable When the drivers have been installed, connect the power supply, power cord and USB cable to the proper USB port on the scanner. 4. NOTE: If you installed a USB card, use your PC's USB port. Make...
... the USB cable to the power supply. Attach the power cord for making proper connections. Attach the other end of the scanner. 6. Plug the output power cord from the supply of power cords packed with your PC manufacturer's documentation for the location of the USB cable to the scanner. Connecting the power cord and USB cable When the drivers have been installed, connect the power supply, power cord and USB cable to the proper USB port on the scanner. 4. NOTE: If you installed a USB card, use your PC's USB port. Make...

User Guide
Page 13
Please wait while the operating system synchronizes the scanner with the installed software. NOTE: If the LED indicator light continues to flash or "E" is complete and ready to scan, the green LED indicator light will stop flashing and a number will flash as the scanner goes through a series of the scanner will be displayed in the Function window, refer to Chapter 5, Troubleshooting. 2-6 A-61602 February 2009 Turning on the scanner When you turn on the scanner, the green indicator on the front of self tests. When the installation process is displayed in the Function window.
Please wait while the operating system synchronizes the scanner with the installed software. NOTE: If the LED indicator light continues to flash or "E" is complete and ready to scan, the green LED indicator light will stop flashing and a number will flash as the scanner goes through a series of the scanner will be displayed in the Function window, refer to Chapter 5, Troubleshooting. 2-6 A-61602 February 2009 Turning on the scanner When you turn on the scanner, the green indicator on the front of self tests. When the installation process is displayed in the Function window.
User Guide
Page 14
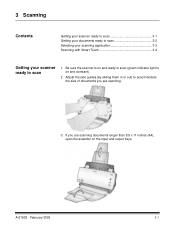
Adjust the side guides (by sliding them in or out) to accommodate the size of documents you are scanning. 3. 3 Scanning Contents Getting your scanner ready to scan 3-1 Getting your documents ready to scan 3-2 Selecting your scanning application 3-3 Scanning with Smart Touch 3-4 Getting your scanner ready to scan (green indicator light is on the input and output trays. Be sure the scanner is on and ready to scan 1. If you are scanning documents longer than 8.5 x 11 inches (A4), open the extender on and constant). 2. A-61602 February 2009 3-1
Adjust the side guides (by sliding them in or out) to accommodate the size of documents you are scanning. 3. 3 Scanning Contents Getting your scanner ready to scan 3-1 Getting your documents ready to scan 3-2 Selecting your scanning application 3-3 Scanning with Smart Touch 3-4 Getting your scanner ready to scan (green indicator light is on the input and output trays. Be sure the scanner is on and ready to scan 1. If you are scanning documents longer than 8.5 x 11 inches (A4), open the extender on and constant). 2. A-61602 February 2009 3-1

User Guide
Page 16
... shortcuts to install and use this productivity application delivers accurate document conversion for turning paper and PDF files into a searchable, digital database that can easily browse and locate information fast. A-61602 February 2009 3-3 You can quickly find, use . Refer to the application's User's Guide for you to use and share. Kodak provides Smart Touch functionality which allows you to quickly and easily perform common scanning tasks; Presto...
... shortcuts to install and use this productivity application delivers accurate document conversion for turning paper and PDF files into a searchable, digital database that can easily browse and locate information fast. A-61602 February 2009 3-3 You can quickly find, use . Refer to the application's User's Guide for you to use and share. Kodak provides Smart Touch functionality which allows you to quickly and easily perform common scanning tasks; Presto...
User Guide
Page 17
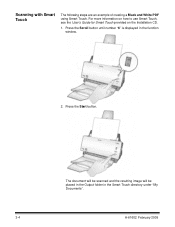
Press the Start button. Press the Scroll button until number "6" is displayed in the Smart Touch directory under "My Documents". 3-4 A-61602 February 2009 The document will be scanned and the resulting image will be placed in the Output folder in the function window. 2. Scanning with Smart Touch The following steps are an example of creating a Black and White PDF using Smart Touch. For more information on how to use Smart Touch, see the User's Guide for Smart Touch provided on the Installation CD. 1.
Press the Start button. Press the Scroll button until number "6" is displayed in the Smart Touch directory under "My Documents". 3-4 A-61602 February 2009 The document will be scanned and the resulting image will be placed in the Output folder in the function window. 2. Scanning with Smart Touch The following steps are an example of creating a Black and White PDF using Smart Touch. For more information on how to use Smart Touch, see the User's Guide for Smart Touch provided on the Installation CD. 1.
User Guide
Page 18
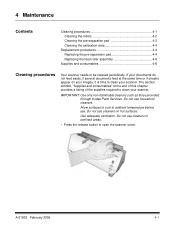
... feed roller assembly 4-6 Supplies and consumables 4-8 Cleaning procedures Your scanner needs to open the scanner cover. The section entitled, "Supplies and consumables" at the same time or if streaks appear on hot surfaces. Use adequate ventilation. Allow surfaces to cool to clean your images, it is time to ambient temperature before use household cleaners. IMPORTANT: Use only non-flammable cleaners such as those provided through Kodak Parts Services...
... feed roller assembly 4-6 Supplies and consumables 4-8 Cleaning procedures Your scanner needs to open the scanner cover. The section entitled, "Supplies and consumables" at the same time or if streaks appear on hot surfaces. Use adequate ventilation. Allow surfaces to cool to clean your images, it is time to ambient temperature before use household cleaners. IMPORTANT: Use only non-flammable cleaners such as those provided through Kodak Parts Services...
User Guide
Page 21
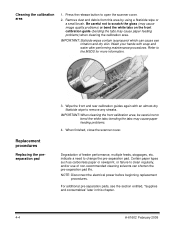
.... Refer to open the scanner cover. 2. IMPORTANT: Staticide wipes contain isopropanol which can shorten the pre-separation pad life. Certain paper types such as carbonless paper or newsprint, or failure to clean regularly, and/or use of feeder performance, multiple feeds, stoppages, etc. Wash your hands with an almost-dry Staticide wipe to scratch the glass (may cause image quality problems) or bend...
.... Refer to open the scanner cover. 2. IMPORTANT: Staticide wipes contain isopropanol which can shorten the pre-separation pad life. Certain paper types such as carbonless paper or newsprint, or failure to clean regularly, and/or use of feeder performance, multiple feeds, stoppages, etc. Wash your hands with an almost-dry Staticide wipe to scratch the glass (may cause image quality problems) or bend...
User Guide
Page 25
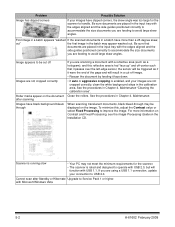
... page is scanned. This is poor or has decreased Clean the scanner. The document that remains in the feeder after installing the software. • document(s) is jammed in place. See Appendix A, Specifications for size, weight and type. While scanning is installed properly and securely in the scanner • Open the scanner cover. • Remove any jammed document(s) from inside the scanner. • Close the scanner cover and resume scanning. No images are feeding Make sure that : • the power cord...
... page is scanned. This is poor or has decreased Clean the scanner. The document that remains in the feeder after installing the software. • document(s) is jammed in place. See Appendix A, Specifications for size, weight and type. While scanning is installed properly and securely in the scanner • Open the scanner cover. • Remove any jammed document(s) from inside the scanner. • Close the scanner cover and resume scanning. No images are feeding Make sure that : • the power cord...
User Guide
Page 26
... tray with USB 1.1. See the procedures in Chapter 4, Maintenance. Image appears to USB 2.0. When scanning translucent documents, black bleed-through may appear washed out. with the edges aligned and the side guides positioned correctly to accommodate the size documents you are feeding to avoid large skew angles. If you are using a USB 1.1 connection, update your connection to be displayed on the Installation CD. See the procedures in Chapter 4, Maintenance "Cleaning the calibration...
... tray with USB 1.1. See the procedures in Chapter 4, Maintenance. Image appears to USB 2.0. When scanning translucent documents, black bleed-through may appear washed out. with the edges aligned and the side guides positioned correctly to accommodate the size documents you are feeding to avoid large skew angles. If you are using a USB 1.1 connection, update your connection to be displayed on the Installation CD. See the procedures in Chapter 4, Maintenance "Cleaning the calibration...
User Guide
Page 27
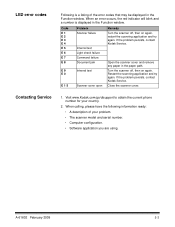
... scanning application and try again. When calling, please have the following information ready: • A description of the error codes that may be displayed in the Function window. Contacting Service 1. If the problem persists, contact Kodak Service. A-61602 February 2009 5-3 If the problem persists, contact Kodak Service. Code E 1 E 2 E 3 E 4 E 5 E 6 E 7 E 8 E 9 E 0 E 1 5 Problem Scanner failure Internal test Light check failure Command failure Document jam Internal test Scanner cover open Remedy Turn the scanner off , then on again. LED error codes...
... scanning application and try again. When calling, please have the following information ready: • A description of the error codes that may be displayed in the Function window. Contacting Service 1. If the problem persists, contact Kodak Service. A-61602 February 2009 5-3 If the problem persists, contact Kodak Service. Code E 1 E 2 E 3 E 4 E 5 E 6 E 7 E 8 E 9 E 0 E 1 5 Problem Scanner failure Internal test Light check failure Command failure Document jam Internal test Scanner cover open Remedy Turn the scanner off , then on again. LED error codes...
User Guide
Page 28
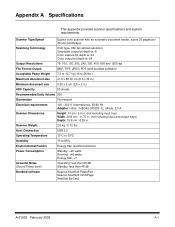
... 1200 dpi File Format Output BMP, TIFF, JPEG, PDF (with bundled software) Acceptable Paper Weight 7.3 to 12.7 kg (16 to 85% Environmental Factors Energy Star qualified scanners Power Consumption Standby: Host Connection USB 2.0 Operating Temperature 10°C to 35°C Humidity 10 to 28 lbs.) Maximum document size 21.6 x 86.36 cm (8.5 x 34 in.) Minimum document size 6.35 x 5 cm (2.5 x 2 in.) ADF Capacity 50 sheets Recommended...
... 1200 dpi File Format Output BMP, TIFF, JPEG, PDF (with bundled software) Acceptable Paper Weight 7.3 to 12.7 kg (16 to 85% Environmental Factors Energy Star qualified scanners Power Consumption Standby: Host Connection USB 2.0 Operating Temperature 10°C to 35°C Humidity 10 to 28 lbs.) Maximum document size 21.6 x 86.36 cm (8.5 x 34 in.) Minimum document size 6.35 x 5 cm (2.5 x 2 in.) ADF Capacity 50 sheets Recommended...

User Guide
Page 29
... Pentium IV processor with USB 1.1 but at slower speeds) • 200 MB free hard disk space • Supported operating systems: - For longer documents/higher resolutions: 3.2 GHz Intel Pentium IV processor with 3 GB of RAM • USB port 2.0 (compatible with 1 GB of RAM - For documents up to 356 mm (14 in .) long up to run a Kodak ScanMate i1120 Scanner. • Recommended processor and memory: -
... Pentium IV processor with USB 1.1 but at slower speeds) • 200 MB free hard disk space • Supported operating systems: - For longer documents/higher resolutions: 3.2 GHz Intel Pentium IV processor with 3 GB of RAM • USB port 2.0 (compatible with 1 GB of RAM - For documents up to 356 mm (14 in .) long up to run a Kodak ScanMate i1120 Scanner. • Recommended processor and memory: -

User Guide
Page 30
... CUSTOMERS FOR SUCH DAMAGES. A-61602 February 2009 B-1 All Kodak Scanners are designed to provide proper supervision or maintenance, including use ; (b) resulting from the user's installation, system integration, programming, re-installation of user operating systems or applications software, systems engineering, relocation, reconstruction of data, or removal of the product or any conflict between other than the United States. Purchasers may determine the applicable Limited Warranty...
... CUSTOMERS FOR SUCH DAMAGES. A-61602 February 2009 B-1 All Kodak Scanners are designed to provide proper supervision or maintenance, including use ; (b) resulting from the user's installation, system integration, programming, re-installation of user operating systems or applications software, systems engineering, relocation, reconstruction of data, or removal of the product or any conflict between other than the United States. Purchasers may determine the applicable Limited Warranty...
User Guide
Page 31
... in resolving the problem over the phone. To help alleviate these items and they will follow. The Limited Warranty Summary card contains important warranty information, including the model number and the Limited Warranty. B-2 A-61602 February 2009 Kodak advises the purchaser to do so will assist the end user in the cost of the Kodak Scanner ("Service Methods"). adapters, cables, software, manuals, etc.). Customer responsibility...
... in resolving the problem over the phone. To help alleviate these items and they will follow. The Limited Warranty Summary card contains important warranty information, including the model number and the Limited Warranty. B-2 A-61602 February 2009 Kodak advises the purchaser to do so will assist the end user in the cost of the Kodak Scanner ("Service Methods"). adapters, cables, software, manuals, etc.). Customer responsibility...
User Guide
Page 32
... on specific failed or broken Kodak Scanner. Important restrictions Eligibility: The Advance Exchange Program and the Depot Service are only considered "eligible purchasers" or "end users" if they may be one of 8 a.m. Consumables, supplies, other expendable items and those items identified as needed. An Kodak Field Engineer will be instructed to ship the product to remove all options and accessories (which include power cord, documentation...
... on specific failed or broken Kodak Scanner. Important restrictions Eligibility: The Advance Exchange Program and the Depot Service are only considered "eligible purchasers" or "end users" if they may be one of 8 a.m. Consumables, supplies, other expendable items and those items identified as needed. An Kodak Field Engineer will be instructed to ship the product to remove all options and accessories (which include power cord, documentation...


