
Setup Booklet
Page 1
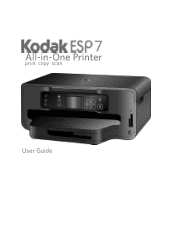
Available in -One Printer to your local retailer. Start Here Print Copy Scan 7 All-in-One Printer Note: For a USB cable connection, a USB 2.0 cable is required to connect your KODAK All-in the KODAK store or see your WINDOWS or MACINTOSH OS computer.
Available in -One Printer to your local retailer. Start Here Print Copy Scan 7 All-in-One Printer Note: For a USB cable connection, a USB 2.0 cable is required to connect your KODAK All-in the KODAK store or see your WINDOWS or MACINTOSH OS computer.
Setup Booklet
Page 2
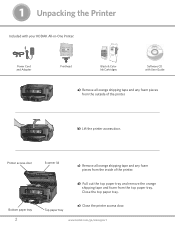
... shipping tape and foam from the top paper tray. Close the top paper tray. Printer access door. 1 Unpacking the Printer Included with your KODAK All-in-One Printer: Power Cord and Adapter Printhead 10 Color Ink Cartridge Black & Color Ink Cartridges Inkjet Printer Software FOR WINDOWS & MACINTOSH Software CD with User Guide a) Remove all orange shipping...
... shipping tape and foam from the top paper tray. Close the top paper tray. Printer access door. 1 Unpacking the Printer Included with your KODAK All-in-One Printer: Power Cord and Adapter Printhead 10 Color Ink Cartridge Black & Color Ink Cartridges Inkjet Printer Software FOR WINDOWS & MACINTOSH Software CD with User Guide a) Remove all orange shipping...
Setup Booklet
Page 3
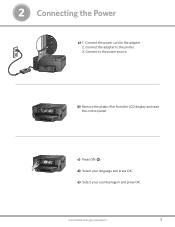
www.kodak.com/go/aiosupport 3 e) Select your language and press OK. c) Press ON . b) Remove the plastic film from the LCD display and raise the control panel. Connect the power cord to the power source. Connect to the adapter. 2. Connect the adapter to the printer. 3. d) Select your country/region and press OK. 2 Connecting the Power a) 1.
www.kodak.com/go/aiosupport 3 e) Select your language and press OK. c) Press ON . b) Remove the plastic film from the LCD display and raise the control panel. Connect the power cord to the power source. Connect to the adapter. 2. Connect the adapter to the printer. 3. d) Select your country/region and press OK. 2 Connecting the Power a) 1.

Setup Booklet
Page 4
c) Place the printhead into the carriage. Insert at the angle shown. b) Carefully remove the printhead from its bag. Remove the 3 plastic protective shields. d) Push firmly against the target label of the printhead until you hear a loud snap. 4 www.kodak.com/go/aiosupport Carriage. Do not touch the copper-colored contacts. 3 Inserting the Printhead a) Lift the printer access door.
c) Place the printhead into the carriage. Insert at the angle shown. b) Carefully remove the printhead from its bag. Remove the 3 plastic protective shields. d) Push firmly against the target label of the printhead until you hear a loud snap. 4 www.kodak.com/go/aiosupport Carriage. Do not touch the copper-colored contacts. 3 Inserting the Printhead a) Lift the printer access door.
Setup Booklet
Page 5
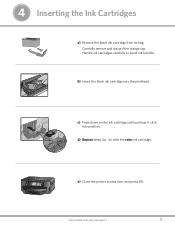
d) Repeat steps 4a - 4c with the color ink cartridge. Carefully remove and discard the orange cap. Handle ink cartridges carefully to avoid ink transfer. 10 Black Ink Cartridge b) Insert the black ink cartridge into position. e) Close the printer access door and press OK. www.kodak.com/go/aiosupport 5 Cartouche d'encre noire 10 10 c) Press down on the ink cartridge until you hear it click into the printhead. 4 Inserting the Ink Cartridges Black Ink Cartridge 10 a) Remove the black ink cartridge from its bag.
d) Repeat steps 4a - 4c with the color ink cartridge. Carefully remove and discard the orange cap. Handle ink cartridges carefully to avoid ink transfer. 10 Black Ink Cartridge b) Insert the black ink cartridge into position. e) Close the printer access door and press OK. www.kodak.com/go/aiosupport 5 Cartouche d'encre noire 10 10 c) Press down on the ink cartridge until you hear it click into the printhead. 4 Inserting the Ink Cartridges Black Ink Cartridge 10 a) Remove the black ink cartridge from its bag.

Setup Booklet
Page 7
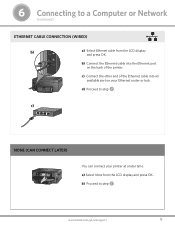
... computer. a) Select USB cable from the LCD display and press OK. www.kodak.com/go/aiosupport 7 ETHERNET CABLE CONNECTION Use this option if you will not be connecting to your printer using a wired network. USB CABLE CONNECTION- 6 Connecting to a Computer or ...Network Choose 1 of the following options to connect your new printer to your printer using a wireless network. b) Proceed to the printer until instructed during software install. WIRELESS (Wi-Fi) CONNECTION Use this time. NOTE: You can switch ...
... computer. a) Select USB cable from the LCD display and press OK. www.kodak.com/go/aiosupport 7 ETHERNET CABLE CONNECTION Use this option if you will not be connecting to your printer using a wired network. USB CABLE CONNECTION- 6 Connecting to a Computer or ...Network Choose 1 of the following options to connect your new printer to your printer using a wireless network. b) Proceed to the printer until instructed during software install. WIRELESS (Wi-Fi) CONNECTION Use this time. NOTE: You can switch ...
Setup Booklet
Page 9
c) Connect the other end of the Ethernet cable into the Ethernet port on your printer at a later time. 6 Connecting to step 7 . d) Proceed to a Computer or Network (continued) ETHERNET CABLE CONNECTION (WIRED) b) a) Select Ethernet cable from the LCD display and press OK. b) Proceed to step 7 . b) Connect the Ethernet cable into an available port on the back of the printer. c) NONE (CAN CONNECT LATER) You can connect your Ethernet router or hub. a) Select None from the LCD display and press OK. www.kodak.com/go/aiosupport 9
c) Connect the other end of the Ethernet cable into the Ethernet port on your printer at a later time. 6 Connecting to step 7 . d) Proceed to a Computer or Network (continued) ETHERNET CABLE CONNECTION (WIRED) b) a) Select Ethernet cable from the LCD display and press OK. b) Proceed to step 7 . b) Connect the Ethernet cable into an available port on the back of the printer. c) NONE (CAN CONNECT LATER) You can connect your Ethernet router or hub. a) Select None from the LCD display and press OK. www.kodak.com/go/aiosupport 9

Setup Booklet
Page 10
... WINDOWSWINDOWS WINDOWSWINDOWS WINDOWSWINDOWS WINDOWSWINDOWS WINDOWSWINDOWS WINDOWS Do not connect the USB cable to the printer until installation is located here: Start Programs Kodak User Guide Setting your KODAK All-in-One Printer as the default printer, and then click Set As Default Printer. b) If instructed, connect the USB cable to the USB port on -screen prompts until...
... WINDOWSWINDOWS WINDOWSWINDOWS WINDOWSWINDOWS WINDOWSWINDOWS WINDOWSWINDOWS WINDOWS Do not connect the USB cable to the printer until installation is located here: Start Programs Kodak User Guide Setting your KODAK All-in-One Printer as the default printer, and then click Set As Default Printer. b) If instructed, connect the USB cable to the USB port on -screen prompts until...

Setup Booklet
Page 11
... cable to the USB port on -screen MACINTOSHMACINTOSH prompts until installation is complete. MACINTOSHMACINTOSH b) Load the KODAK Inkjet Printer Software CD into the CD-ROM drive. NETWORK CONNECTION MACINTOSHMACINTOSH a) Make sure the printer and computer are prompted by your KODAK All-in-One Printer as the default on Print & Fax System Preferences and click (+) to www...
... cable to the USB port on -screen MACINTOSHMACINTOSH prompts until installation is complete. MACINTOSHMACINTOSH b) Load the KODAK Inkjet Printer Software CD into the CD-ROM drive. NETWORK CONNECTION MACINTOSHMACINTOSH a) Make sure the printer and computer are prompted by your KODAK All-in-One Printer as the default on Print & Fax System Preferences and click (+) to www...

Setup Booklet
Page 13
... mechanical hazards. - Pushing objects through the equipment openings can result in -One Printer on the equipment. Do not use of children. Excessive dust levels may result in -One Printer from the wall outlet before using KODAK Products. - Unplug the equipment from overheating, do not place it near ...water or spill liquid on it in -One Printer and its associated AC adapter will require repair by a ...
... mechanical hazards. - Pushing objects through the equipment openings can result in -One Printer on the equipment. Do not use of children. Excessive dust levels may result in -One Printer from the wall outlet before using KODAK Products. - Unplug the equipment from overheating, do not place it near ...water or spill liquid on it in -One Printer and its associated AC adapter will require repair by a ...

Setup Booklet
Page 14
...;c offer. You can use it to order supplies and configure your All-in -One Printer from your KODAK Inkjet Printer Software. Inkjet supplies offer valid for WINDOWS OS KODAK Home Center is installed with your computer. 14 www.kodak.com/go /register. Simply register right away when prompted during software installation or on inkjet...
...;c offer. You can use it to order supplies and configure your All-in -One Printer from your KODAK Inkjet Printer Software. Inkjet supplies offer valid for WINDOWS OS KODAK Home Center is installed with your computer. 14 www.kodak.com/go /register. Simply register right away when prompted during software installation or on inkjet...

Setup Booklet
Page 16
... the most up-to power cycle the printer by the Bluetooth SIG, Inc. Kodak provides several methods to download the latest files. THANK YOU FOR PURCHASING THIS KODAK ALL-IN-ONE PRINTER. Wait 5 seconds, and then plug the power cord back into the printer. PLEASE DO NOT RETURN IT TO THE... STORE. For additional Wi-Fi/Networking setup information, please go to: www.kodak.com/go /aiodownloads to help regarding your ...
... the most up-to power cycle the printer by the Bluetooth SIG, Inc. Kodak provides several methods to download the latest files. THANK YOU FOR PURCHASING THIS KODAK ALL-IN-ONE PRINTER. Wait 5 seconds, and then plug the power cord back into the printer. PLEASE DO NOT RETURN IT TO THE... STORE. For additional Wi-Fi/Networking setup information, please go to: www.kodak.com/go /aiodownloads to help regarding your ...
User Guide
Page 1
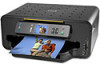
Kodak ESP 7 All-in-One Printer 7 All-in-One Printer print copy scan User Guide User Guide
Kodak ESP 7 All-in-One Printer 7 All-in-One Printer print copy scan User Guide User Guide
User Guide
Page 3
...Getting answers to frequently-asked questions...2 Contacting Kodak Customer Service & Support...2 Support at Kodak.com...2 2 Printer Overview All-in-one printer features...3 Major components of the ESP 7 all-in-one printer 4 Support for connecting digital memory devices to the printer 5 Memory card slots ...5 Memory cards... Home Center for Macintosh...18 3 Setting Up Your Printer Selecting a printer location...19 Configuring printer settings ...19 Configuring basic settings...19 Printer Settings options...20 Setting your printer as the default...20 Configuring network settings ...21 Networking...
...Getting answers to frequently-asked questions...2 Contacting Kodak Customer Service & Support...2 Support at Kodak.com...2 2 Printer Overview All-in-one printer features...3 Major components of the ESP 7 all-in-one printer 4 Support for connecting digital memory devices to the printer 5 Memory card slots ...5 Memory cards... Home Center for Macintosh...18 3 Setting Up Your Printer Selecting a printer location...19 Configuring printer settings ...19 Configuring basic settings...19 Printer Settings options...20 Setting your printer as the default...20 Configuring network settings ...21 Networking...

User Guide
Page 4
... for wireless networks ...26 Setting up an IP address ...27 Verifying network configuration...27 Printing network configuration ...28 Installing your printer on additional computers on the same network 28 Changing the printer connection type...29 For Windows ...29 For Macintosh ...30 4 Handling Paper Handling paper ...32 Loading the paper trays ...32 Things... 45 Transferring images to a Macintosh computer 46 6 Copying Simple copying ...47 Adjusting copy settings ...47 Copy Document options...48 Copy Photo options ...49 ii www.kodak.com/go/aiosupport
... for wireless networks ...26 Setting up an IP address ...27 Verifying network configuration...27 Printing network configuration ...28 Installing your printer on additional computers on the same network 28 Changing the printer connection type...29 For Windows ...29 For Macintosh ...30 4 Handling Paper Handling paper ...32 Loading the paper trays ...32 Things... 45 Transferring images to a Macintosh computer 46 6 Copying Simple copying ...47 Adjusting copy settings ...47 Copy Document options...48 Copy Photo options ...49 ii www.kodak.com/go/aiosupport
User Guide
Page 5
...pictures not scanned properly...69 No communication with computer ...70 No paper feed ...71 One or more of the colors on the calibration sheet is missing 71 Paper jam ...72 Printer not responding...72 Transfer pictures failure...72 User guide on the CD is obsolete ......upgrade 74 Print troubleshooting ...74 Envelope printing incorrect ...74 PictBridge camera not detected...75 Picture cropped ...76 Picture print smudged ...76 www.kodak.com/go/aiosupport iii for Macintosh 66 9 Troubleshooting Troubleshooting "quick start ...50 Simple scanning ...51 Simple document scans ...51 Simple image...
...pictures not scanned properly...69 No communication with computer ...70 No paper feed ...71 One or more of the colors on the calibration sheet is missing 71 Paper jam ...72 Printer not responding...72 Transfer pictures failure...72 User guide on the CD is obsolete ......upgrade 74 Print troubleshooting ...74 Envelope printing incorrect ...74 PictBridge camera not detected...75 Picture cropped ...76 Picture print smudged ...76 www.kodak.com/go/aiosupport iii for Macintosh 66 9 Troubleshooting Troubleshooting "quick start ...50 Simple scanning ...51 Simple document scans ...51 Simple image...
User Guide
Page 9
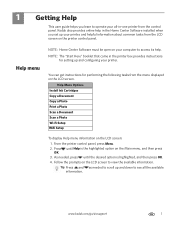
... Help This user guide helps you set up your printer. NOTE: The "Start Here" booklet that came in -one printer from the control panel. Tip: Press and as needed , press until Help is highlighted, and then press OK. 4. From the printer control panel, press Menu. 2. Follow the prompts on...to operate your all the available information. As needed to scroll up and configuring your printer, and helpful information about common tasks from the menu displayed on the LCD screen: 1. www.kodak.com/go/aiosupport 1 Press until the desired option is the highlighted option on your ...
... Help This user guide helps you set up your printer. NOTE: The "Start Here" booklet that came in -one printer from the control panel. Tip: Press and as needed , press until Help is highlighted, and then press OK. 4. From the printer control panel, press Menu. 2. Follow the prompts on...to operate your all the available information. As needed to scroll up and configuring your printer, and helpful information about common tasks from the menu displayed on the LCD screen: 1. www.kodak.com/go/aiosupport 1 Press until the desired option is the highlighted option on your ...
User Guide
Page 10
..., drivers, setup booklet, and user guide for your printer. www.kodak.com/go/downloads Software View online tutorials for using Home www.kodak.com/go /aiosupport www.kodak.com/go/register Locate Telephone Customer Support www.kodak.com/go/contact numbers in -one printer support Support Center home page www.kodak.com/go/support Get support for your...
..., drivers, setup booklet, and user guide for your printer. www.kodak.com/go/downloads Software View online tutorials for using Home www.kodak.com/go /aiosupport www.kodak.com/go/register Locate Telephone Customer Support www.kodak.com/go/contact numbers in -one printer support Support Center home page www.kodak.com/go/support Get support for your...
User Guide
Page 11
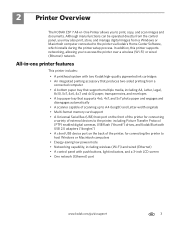
... pigmented ink cartridges • An integrated printing accessory that produces two-sided printing from a Windows or Macintosh computer connected to access the printer over a wireless (Wi-Fi) or wired (Ethernet) network. 2 Printer Overview The KODAK ESP 7 All-in -one printer features This printer includes: • A printhead system with push buttons, light indicators, and a 3-inch LCD screen •...
... pigmented ink cartridges • An integrated printing accessory that produces two-sided printing from a Windows or Macintosh computer connected to access the printer over a wireless (Wi-Fi) or wired (Ethernet) network. 2 Printer Overview The KODAK ESP 7 All-in -one printer features This printer includes: • A printhead system with push buttons, light indicators, and a 3-inch LCD screen •...
User Guide
Page 12
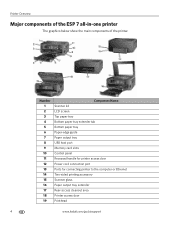
... components of the ESP 7 all-in-one printer The graphics below show the main components of the printer. Number 1 2 3 4 5 6 7 8 9 10 11 12 13 14 15 16 17 18 19 Component Name Scanner lid LCD screen Top paper tray Bottom paper tray extender tab ...Bottom paper tray Paper-edge guide Paper output tray USB host port Memory card slots Control panel Recessed handle for printer access door Power cord connection port Ports for connecting printer to the computer or Ethernet Two-sided printing accessory Scanner glass Paper output tray extender Rear-access cleanout area...
... components of the ESP 7 all-in-one printer The graphics below show the main components of the printer. Number 1 2 3 4 5 6 7 8 9 10 11 12 13 14 15 16 17 18 19 Component Name Scanner lid LCD screen Top paper tray Bottom paper tray extender tab ...Bottom paper tray Paper-edge guide Paper output tray USB host port Memory card slots Control panel Recessed handle for printer access door Power cord connection port Ports for connecting printer to the computer or Ethernet Two-sided printing accessory Scanner glass Paper output tray extender Rear-access cleanout area...


