User Guide
Page 1
Kodak ESP 7 All-in-One Printer 7 All-in-One Printer print copy scan User Guide User Guide
Kodak ESP 7 All-in-One Printer 7 All-in-One Printer print copy scan User Guide User Guide
User Guide
Page 11
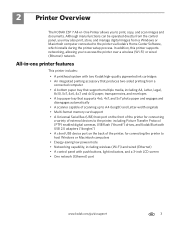
..., allowing you to print, copy, and scan images and documents. 2 Printer Overview The KODAK ESP 7 All-in -one printer features This printer includes: • A printhead system with push buttons, light indicators, and a 3-inch LCD screen • One network (Ethernet) port www.kodak.com/go/aiosupport 3 All-in -One Printer allows you may also print, store, and manage digital images from...
..., allowing you to print, copy, and scan images and documents. 2 Printer Overview The KODAK ESP 7 All-in -one printer features This printer includes: • A printhead system with push buttons, light indicators, and a 3-inch LCD screen • One network (Ethernet) port www.kodak.com/go/aiosupport 3 All-in -One Printer allows you may also print, store, and manage digital images from...
User Guide
Page 13
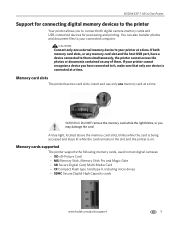
... High Capacity cards www.kodak.com/go/aiosupport 5 CAUTION: Connect only one memory card at a time. Memory card slots The printer has two card slots; Memory cards supported The printer supports the following memory cards, used in most digital cameras: - MS Memory Stick, Memory Stick Pro and Magic Gate - KODAK ESP 7 All-in-One Printer Support for previewing...
... High Capacity cards www.kodak.com/go/aiosupport 5 CAUTION: Connect only one memory card at a time. Memory card slots The printer has two card slots; Memory cards supported The printer supports the following memory cards, used in most digital cameras: - MS Memory Stick, Memory Stick Pro and Magic Gate - KODAK ESP 7 All-in-One Printer Support for previewing...
User Guide
Page 15
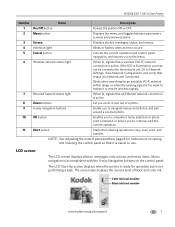
... receive wireless signals. Color ink level monitor Black ink level monitor www.kodak.com/go/aiosupport 7 Zoom buttons Let you zoom in -One Printer Number 1 2 3 4 5 6 7 8 9 10 11 Name Description On/Off button Powers the printer ON or OFF. LCD screen The LCD screen displays photos, messages, ...Start button Starts the following operations: copy, scan, print, and transfer. Screen Displays photos, messages, status, and menus. KODAK ESP 7 All-in and out of black and color ink. Menu button Displays the menu, and toggles between parameters screens and preview screens.
... receive wireless signals. Color ink level monitor Black ink level monitor www.kodak.com/go/aiosupport 7 Zoom buttons Let you zoom in -One Printer Number 1 2 3 4 5 6 7 8 9 10 11 Name Description On/Off button Powers the printer ON or OFF. LCD screen The LCD screen displays photos, messages, ...Start button Starts the following operations: copy, scan, print, and transfer. Screen Displays photos, messages, status, and menus. KODAK ESP 7 All-in and out of black and color ink. Menu button Displays the menu, and toggles between parameters screens and preview screens.
User Guide
Page 17
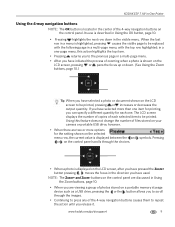
...scrolls through the choices. The LCD screen displays the number of copies of the 4-way navigation buttons on the control panel. in a one-page menu, this feature does not change the number of the 4-way navigation buttons causes them to repeat the action until you have initiated...you to scroll through the images. • Continuing to be printed, pressing or increases or decreases the output quantity. www.kodak.com/go/aiosupport 9 KODAK ESP 7 All-in-One Printer Using the 4-way navigation buttons NOTE: The OK button is shown on the LCD screen, pressing or pans the focus up ...
...scrolls through the choices. The LCD screen displays the number of copies of the 4-way navigation buttons on the control panel. in a one-page menu, this feature does not change the number of the 4-way navigation buttons causes them to repeat the action until you have initiated...you to scroll through the images. • Continuing to be printed, pressing or increases or decreases the output quantity. www.kodak.com/go/aiosupport 9 KODAK ESP 7 All-in-One Printer Using the 4-way navigation buttons NOTE: The OK button is shown on the LCD screen, pressing or pans the focus up ...
User Guide
Page 19
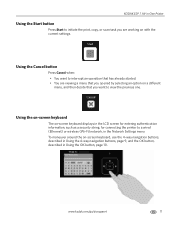
...displays in the LCD screen for entering authentication information, such as a security string, for connecting the printer to a wired (Ethernet) or wireless (Wi-Fi) network, in Using the OK button, page 10. KODAK ESP 7 All-in-One Printer Using the Start button Press Start to initiate the print, copy, or scan task you are viewing...the 4-way navigation buttons, page 9, and the OK button, described in the Network Settings menu To maneuver around the on with the current settings. www.kodak.com/go/aiosupport 11 Using the Cancel button Press Cancel when: • You want to view the previous...
...displays in the LCD screen for entering authentication information, such as a security string, for connecting the printer to a wired (Ethernet) or wireless (Wi-Fi) network, in Using the OK button, page 10. KODAK ESP 7 All-in-One Printer Using the Start button Press Start to initiate the print, copy, or scan task you are viewing...the 4-way navigation buttons, page 9, and the OK button, described in the Network Settings menu To maneuver around the on with the current settings. www.kodak.com/go/aiosupport 11 Using the Cancel button Press Cancel when: • You want to view the previous...
User Guide
Page 21
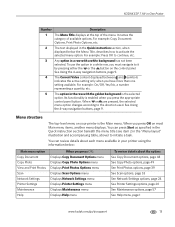
... options, page 39 See Scan options, page 53 See Network Settings options, page 24 See Printer Settings options, page 20 See Maintenance options, page 57 See Help menu, page 1 www.kodak.com/go/aiosupport 13 KODAK ESP 7 All-in a white row, you must navigate to it by pressing either the or ...: On/Off, Yes/No, a number representing a quantity, etc. 5 The option in a row with the golden background is enabled when you have more than one setting available. Menu structure The top-level menu on most Main menu items, another menu displays. For example: Press OK to the direction used. You...
... options, page 39 See Scan options, page 53 See Network Settings options, page 24 See Printer Settings options, page 20 See Maintenance options, page 57 See Help menu, page 1 www.kodak.com/go/aiosupport 13 KODAK ESP 7 All-in a white row, you must navigate to it by pressing either the or ...: On/Off, Yes/No, a number representing a quantity, etc. 5 The option in a row with the golden background is enabled when you have more than one setting available. Menu structure The top-level menu on most Main menu items, another menu displays. For example: Press OK to the direction used. You...

User Guide
Page 23
... initializing or communicating with a memory card. On A memory card is properly inserted in -One Printer Light Status Off Blinks (slow) The LCD screen describes the error. Ink cartridge not readable. Printhead not installed. Ink cartridge(s) not installed. Media sensor failure. KODAK ESP 7 All-in the None. Paper jam. Change ink cartridge. card slot. Paper... not calibrated. Scanner failure. improperly inserted in the card slot. Printhead failure. Blinks (slow) On Attention Light Error None. Paper size or type mismatch. www.kodak.com/go/aiosupport 15
... initializing or communicating with a memory card. On A memory card is properly inserted in -One Printer Light Status Off Blinks (slow) The LCD screen describes the error. Ink cartridge not readable. Printhead not installed. Ink cartridge(s) not installed. Media sensor failure. KODAK ESP 7 All-in the None. Paper jam. Change ink cartridge. card slot. Paper... not calibrated. Scanner failure. improperly inserted in the card slot. Printhead failure. Blinks (slow) On Attention Light Error None. Paper size or type mismatch. www.kodak.com/go/aiosupport 15

User Guide
Page 25
KODAK ESP 7 All-in-One Printer Home Center Software Home Center Software is described below : Returns you to print, copy, scan, and configure your printer from the Kodak Web site The functions of the three small icons located in the Start Menu. From the Home Center main menu, selecting one of the six menu items enables you to...
KODAK ESP 7 All-in-One Printer Home Center Software Home Center Software is described below : Returns you to print, copy, scan, and configure your printer from the Kodak Web site The functions of the three small icons located in the Start Menu. From the Home Center main menu, selecting one of the six menu items enables you to...
User Guide
Page 28
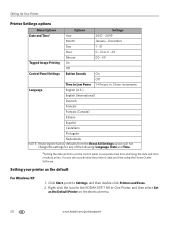
... Date and Timea Options Year Settings 2007 - 2099 Month January - You can also synchronize the printer's date and time using the Home Center Software. Click Start, point to Low Power 1-4 hours, in -One Printer, and then select Set as the default For Windows XP 1. December Day 1 - 31 Hour...: Language, Date and Time. Setting your printer as the Default Printer on photo prints. aSetting the date and time via the control panel is a separate task from the Reset All Settings option will not change the settings for the KODAK ESP 7 All-in .5 hour increments Language English...
... Date and Timea Options Year Settings 2007 - 2099 Month January - You can also synchronize the printer's date and time using the Home Center Software. Click Start, point to Low Power 1-4 hours, in -One Printer, and then select Set as the default For Windows XP 1. December Day 1 - 31 Hour...: Language, Date and Time. Setting your printer as the Default Printer on photo prints. aSetting the date and time via the control panel is a separate task from the Reset All Settings option will not change the settings for the KODAK ESP 7 All-in .5 hour increments Language English...
User Guide
Page 29
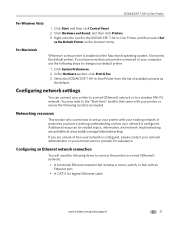
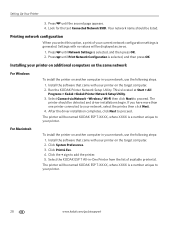
... the default. Click System Preferences. 2. Right-click the icon for the KODAK ESP 7 All-in -One Printer For Windows Vista 1. KODAK ESP 7 All-in -One Printer, and then select Set as the Default Printer on the Macintosh operating system, it becomes the default printer. Configuring network settings You can connect your printer to a wired (Ethernet) network or to set up your...
... the default. Click System Preferences. 2. Right-click the icon for the KODAK ESP 7 All-in -One Printer For Windows Vista 1. KODAK ESP 7 All-in -One Printer, and then select Set as the Default Printer on the Macintosh operating system, it becomes the default printer. Configuring network settings You can connect your printer to a wired (Ethernet) network or to set up your...
User Guide
Page 31
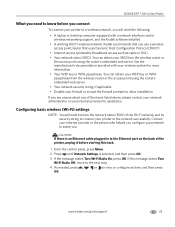
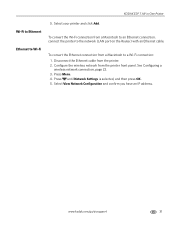
... installed • A working 802.11 wireless network. CAUTION: If there is selected, and then press OK. 3. KODAK ESP 7 All-in to the Ethernet port on the back of the printer, unplug it before you connect To connect your firewall or accept the firewall prompts to allow installation If you use a... wireless (Wi-Fi) settings NOTE: You will need to a wireless network, you . Press until Network Settings is an Ethernet cable plugged in -One Printer What you need to know the network name (SSID) of the items listed above, please contact your network administrator or your WEP Key or WPA...
... installed • A working 802.11 wireless network. CAUTION: If there is selected, and then press OK. 3. KODAK ESP 7 All-in to the Ethernet port on the back of the printer, unplug it before you connect To connect your firewall or accept the firewall prompts to allow installation If you use a... wireless (Wi-Fi) settings NOTE: You will need to a wireless network, you . Press until Network Settings is an Ethernet cable plugged in -One Printer What you need to know the network name (SSID) of the items listed above, please contact your network administrator or your WEP Key or WPA...
User Guide
Page 33
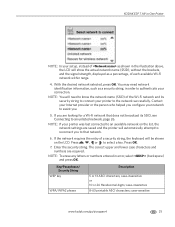
... assist you are looking for a Wi-Fi network that network. 6. NOTE: If your printer was last connected to an available network on the LCD. Enter the security string. KODAK ESP 7 All-in-One Printer NOTE: In your setup, instead of as shown in the illustration above, the LCD will show ... person who helped you configure your network to the network successfully. The correct upper and lower case characters and numbers are saved and the printer will need network identification information, such as a percentage, of the Wi-Fi network and its SSID, see Connecting to an unlisted network...
... assist you are looking for a Wi-Fi network that network. 6. NOTE: If your printer was last connected to an available network on the LCD. Enter the security string. KODAK ESP 7 All-in-One Printer NOTE: In your setup, instead of as shown in the illustration above, the LCD will show ... person who helped you configure your network to the network successfully. The correct upper and lower case characters and numbers are saved and the printer will need network identification information, such as a percentage, of the Wi-Fi network and its SSID, see Connecting to an unlisted network...
User Guide
Page 35
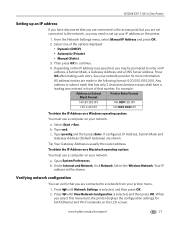
...Network Configuration is selected, and then press OK. When you select this menu item, the printer displays the configuration settings for more information. KODAK ESP 7 All-in-One Printer Setting up your IP address on the printer. 1. From the Network Settings menu, select Manual IP Address and press OK. 2. and ... address type specified, you are made in the following format: 000.000.000.000. www.kodak.com/go/aiosupport 27 a. Open System Preferences. Select one of that you may be shown. See your printer menu. 1. Type cmd. Then press OK to enter an IP address, a Subnet Mask,...
...Network Configuration is selected, and then press OK. When you select this menu item, the printer displays the configuration settings for more information. KODAK ESP 7 All-in-One Printer Setting up your IP address on the printer. 1. From the Network Settings menu, select Manual IP Address and press OK. 2. and ... address type specified, you are made in the following format: 000.000.000.000. www.kodak.com/go/aiosupport 27 a. Open System Preferences. Select one of that you may be shown. See your printer menu. 1. Type cmd. Then press OK to enter an IP address, a Subnet Mask,...
User Guide
Page 36
... Printing network configuration When you have more than one printer connected to proceed. Install the software that came with no values will be named KODAK ESP 7-XXXX, where XXXX is selected, and then...printer on another computer in -One Printer from the list of your network, use the following steps: 1. Press until Print Network Configuration is a number unique to your printer. Press until the second page appears. 4. Run the KODAK Printer Network Setup Utility. The printer will be named KODAK ESP 7-XXXX, where XXXX is located at Start > All Programs > Kodak >Kodak Printer...
... Printing network configuration When you have more than one printer connected to proceed. Install the software that came with no values will be named KODAK ESP 7-XXXX, where XXXX is selected, and then...printer on another computer in -One Printer from the list of your network, use the following steps: 1. Press until Print Network Configuration is a number unique to your printer. Press until the second page appears. 4. Run the KODAK Printer Network Setup Utility. The printer will be named KODAK ESP 7-XXXX, where XXXX is located at Start > All Programs > Kodak >Kodak Printer...
User Guide
Page 37
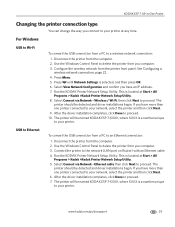
... driver installation completes, click Done to an Ethernet connection: 1. The printer will be named KODAK ESP 7-XXXX, where XXXX is located at Start > All Programs > Kodak >Kodak Printer Network Setup Utility. 5. For Windows USB to Wi-Fi To convert the USB connection from you have more than one printer connected to a wireless network connection: 1. See Configuring a wireless network...
... driver installation completes, click Done to an Ethernet connection: 1. The printer will be named KODAK ESP 7-XXXX, where XXXX is located at Start > All Programs > Kodak >Kodak Printer Network Setup Utility. 5. For Windows USB to Wi-Fi To convert the USB connection from you have more than one printer connected to a wireless network connection: 1. See Configuring a wireless network...
User Guide
Page 38
... 22. 3. Configure the wireless network from the printer front panel. Press until Network Settings is selected, and then press OK. 5. The printer will be named KODAK ESP 7-XXXX, where XXXX is a number unique to an Ethernet connection: 1. Connect the printer to a wireless network connection: 1. To convert ... to the network (LAN port on Router) with an Ethernet cable. Press Menu. 4. Select your printer. Connect the printer to your printer and click Add. The printer will be named KODAK ESP 7-XXXX, where XXXX is a number unique to the network (LAN port on the Router) with...
... 22. 3. Configure the wireless network from the printer front panel. Press until Network Settings is selected, and then press OK. 5. The printer will be named KODAK ESP 7-XXXX, where XXXX is a number unique to an Ethernet connection: 1. Connect the printer to a wireless network connection: 1. To convert ... to the network (LAN port on Router) with an Ethernet cable. Press Menu. 4. Select your printer. Connect the printer to your printer and click Add. The printer will be named KODAK ESP 7-XXXX, where XXXX is a number unique to the network (LAN port on the Router) with...
User Guide
Page 39
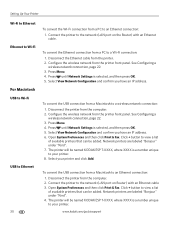
See Configuring a wireless network connection, page 22. 3. Select View Network Configuration and confirm you have an IP address. www.kodak.com/go/aiosupport 31 KODAK ESP 7 All-in-One Printer Wi-Fi to Ethernet Ethernet to the network (LAN port on the Router) with an Ethernet cable. Disconnect the Ethernet cable from a Macintosh to a Wi-...
See Configuring a wireless network connection, page 22. 3. Select View Network Configuration and confirm you have an IP address. www.kodak.com/go/aiosupport 31 KODAK ESP 7 All-in-One Printer Wi-Fi to Ethernet Ethernet to the network (LAN port on the Router) with an Ethernet cable. Disconnect the Ethernet cable from a Macintosh to a Wi-...
User Guide
Page 41
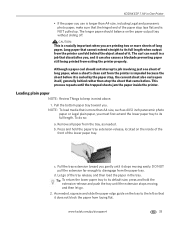
...paper output tray without sliding off. Let go /aiosupport 33 The longer paper should not interrupt a job involving just one sheet of long paper, when a sheet's clean exit from exiting the printer properly. NOTE: To load media that is more sheets of long paper. As needed . Long paper that cannot ... tray release, and then load the paper in the tray. b. Tip: To return the lower paper tray to keep in mind above. 1. KODAK ESP 7 All-in-One Printer • If the paper you use is longer than A4 size, including Legal and panoramic photo paper, make sure that the hinged end of...
...paper output tray without sliding off. Let go /aiosupport 33 The longer paper should not interrupt a job involving just one sheet of long paper, when a sheet's clean exit from exiting the printer properly. NOTE: To load media that is more sheets of long paper. As needed . Long paper that cannot ... tray release, and then load the paper in the tray. b. Tip: To return the lower paper tray to keep in mind above. 1. KODAK ESP 7 All-in-One Printer • If the paper you use is longer than A4 size, including Legal and panoramic photo paper, make sure that the hinged end of...

User Guide
Page 43
...Pull the tray extension toward the left side of the bottom paper tray. 3. Push the paper tray in towards the printer until it stops moving easily. KODAK ESP 7 All-in-One Printer Loading envelopes CAUTION: Do not load envelopes with the front side down and the envelope flaps pointing toward you plan to...paper. 7. Loading legal size paper 1. Squeeze the paper edge guide and move it to keep in this printer. NOTE: Review Things to the right until it towards the printer. Place one or more envelopes along the right edge of the paper tray, with cutouts or cellophane windows in mind,...
...Pull the tray extension toward the left side of the bottom paper tray. 3. Push the paper tray in towards the printer until it stops moving easily. KODAK ESP 7 All-in-One Printer Loading envelopes CAUTION: Do not load envelopes with the front side down and the envelope flaps pointing toward you plan to...paper. 7. Loading legal size paper 1. Squeeze the paper edge guide and move it to keep in this printer. NOTE: Review Things to the right until it towards the printer. Place one or more envelopes along the right edge of the paper tray, with cutouts or cellophane windows in mind,...


