Setup Booklet
Page 2
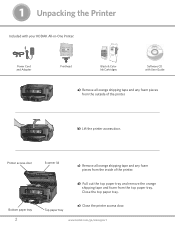
... any foam pieces from the inside of the printer. Top paper tray. e) Close the printer access door. Printer access door. Bottom paper tray. 2 Scanner lid. 1 Unpacking the Printer Included with your KODAK All-in-One Printer: Power Cord and Adapter Printhead 10 Color Ink Cartridge Black & Color Ink Cartridges Inkjet Printer Software FOR WINDOWS & MACINTOSH Software CD with User...
... any foam pieces from the inside of the printer. Top paper tray. e) Close the printer access door. Printer access door. Bottom paper tray. 2 Scanner lid. 1 Unpacking the Printer Included with your KODAK All-in-One Printer: Power Cord and Adapter Printhead 10 Color Ink Cartridge Black & Color Ink Cartridges Inkjet Printer Software FOR WINDOWS & MACINTOSH Software CD with User...

Setup Booklet
Page 4
3 Inserting the Printhead a) Lift the printer access door. Remove the 3 plastic protective shields. b) Carefully remove the printhead from its bag. c) Place the printhead into the carriage. Carriage. d) Push firmly against the target label of the printhead until you hear a loud snap. 4 www.kodak.com/go/aiosupport Insert at the angle shown. Do not touch the copper-colored contacts.
3 Inserting the Printhead a) Lift the printer access door. Remove the 3 plastic protective shields. b) Carefully remove the printhead from its bag. c) Place the printhead into the carriage. Carriage. d) Push firmly against the target label of the printhead until you hear a loud snap. 4 www.kodak.com/go/aiosupport Insert at the angle shown. Do not touch the copper-colored contacts.
Setup Booklet
Page 5
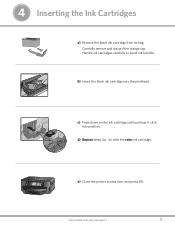
d) Repeat steps 4a - 4c with the color ink cartridge. Handle ink cartridges carefully to avoid ink transfer. 10 Black Ink Cartridge b) Insert the black ink cartridge into position. www.kodak.com/go/aiosupport 5 Cartouche d'encre noire 10 10 c) Press down on the ink cartridge until you hear it click into the printhead. 4 Inserting the Ink Cartridges Black Ink Cartridge 10 a) Remove the black ink cartridge from its bag. e) Close the printer access door and press OK. Carefully remove and discard the orange cap.
d) Repeat steps 4a - 4c with the color ink cartridge. Handle ink cartridges carefully to avoid ink transfer. 10 Black Ink Cartridge b) Insert the black ink cartridge into position. www.kodak.com/go/aiosupport 5 Cartouche d'encre noire 10 10 c) Press down on the ink cartridge until you hear it click into the printhead. 4 Inserting the Ink Cartridges Black Ink Cartridge 10 a) Remove the black ink cartridge from its bag. e) Close the printer access door and press OK. Carefully remove and discard the orange cap.
User Guide
Page 5
...Printer fails to power on Windows works incorrectly following software upgrade 74 Print troubleshooting ...74 Envelope printing incorrect ...74 PictBridge camera not detected...75 Picture cropped ...76 Picture print smudged ...76 www.kodak....com/go/aiosupport iii for Windows ...65 Upgrading the printer software - Table of the colors on the calibration sheet is missing 71 Paper jam ...72 Printer...No communication with computer ...70 No paper feed ...71 One or more of contents 7 Scanning Before you start ...50...Your Printer General care ...54 Cleaning the scanner glass...55 Cleaning ...
...Printer fails to power on Windows works incorrectly following software upgrade 74 Print troubleshooting ...74 Envelope printing incorrect ...74 PictBridge camera not detected...75 Picture cropped ...76 Picture print smudged ...76 www.kodak....com/go/aiosupport iii for Windows ...65 Upgrading the printer software - Table of the colors on the calibration sheet is missing 71 Paper jam ...72 Printer...No communication with computer ...70 No paper feed ...71 One or more of contents 7 Scanning Before you start ...50...Your Printer General care ...54 Cleaning the scanner glass...55 Cleaning ...
User Guide
Page 11
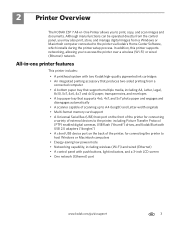
... device port on the back of the printer, for connecting the printer to access the printer over a wireless (Wi-Fi) or wired (Ethernet) network. 2 Printer Overview The KODAK ESP 7 All-in -one printer features This printer includes: • A printhead system with push buttons, light indicators, and a 3-inch LCD screen • One network (Ethernet) port www.kodak.com/go/aiosupport 3 Although many functions...
... device port on the back of the printer, for connecting the printer to access the printer over a wireless (Wi-Fi) or wired (Ethernet) network. 2 Printer Overview The KODAK ESP 7 All-in -one printer features This printer includes: • A printhead system with push buttons, light indicators, and a 3-inch LCD screen • One network (Ethernet) port www.kodak.com/go/aiosupport 3 Although many functions...
User Guide
Page 12
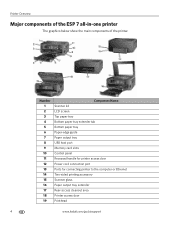
... components of the ESP 7 all-in-one printer The graphics below show the main components of the printer. Number 1 2 3 4 5 6 7 8 9 10 11 12 13 14 15 16 17 18 19 Component Name Scanner lid LCD screen Top paper tray Bottom paper tray extender tab... guide Paper output tray USB host port Memory card slots Control panel Recessed handle for printer access door Power cord connection port Ports for connecting printer to the computer or Ethernet Two-sided printing accessory Scanner glass Paper output tray extender Rear-access cleanout area Printer access door Printhead 4 www.kodak.com/go/aiosupport
... components of the ESP 7 all-in-one printer The graphics below show the main components of the printer. Number 1 2 3 4 5 6 7 8 9 10 11 12 13 14 15 16 17 18 19 Component Name Scanner lid LCD screen Top paper tray Bottom paper tray extender tab... guide Paper output tray USB host port Memory card slots Control panel Recessed handle for printer access door Power cord connection port Ports for connecting printer to the computer or Ethernet Two-sided printing accessory Scanner glass Paper output tray extender Rear-access cleanout area Printer access door Printhead 4 www.kodak.com/go/aiosupport

User Guide
Page 23
KODAK ESP 7 All-in the card slot. Paper carriage stall. Printhead not calibrated. Media sensor failure. Blinks The internal card reader is properly inserted in the None. Blinks (slow) On Attention Light Error None. Paper tray empty. Ink cartridge not readable. Too many image sources. Printhead not installed. improperly inserted in -One Printer... Light Status Off Blinks (slow) The LCD screen describes the error. www.kodak.com/go/aiosupport 15 Ink cartridge(s) not installed. Printhead failure. Unable...
KODAK ESP 7 All-in the card slot. Paper carriage stall. Printhead not calibrated. Media sensor failure. Blinks The internal card reader is properly inserted in the None. Blinks (slow) On Attention Light Error None. Paper tray empty. Ink cartridge not readable. Too many image sources. Printhead not installed. improperly inserted in -One Printer... Light Status Off Blinks (slow) The LCD screen describes the error. www.kodak.com/go/aiosupport 15 Ink cartridge(s) not installed. Printhead failure. Unable...
User Guide
Page 26
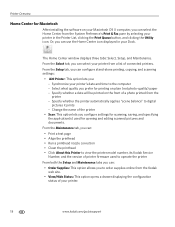
... drawer displaying the configuration status of your printer. 18 www.kodak.com/go/aiosupport Specify whether the printer automatically applies "scene balance" to view the printer model number, its Kodak Service Number, and the version of printer firmware used for opening and editing scanned ...tab, you can: • Print a test page • Align the printhead • Run a printhead nozzle correction • Clean the printhead • Click About this Printer to digital pictures it prints - Printer Overview Home Center for Macintosh After installing the software on your Macintosh OS ...
... drawer displaying the configuration status of your printer. 18 www.kodak.com/go/aiosupport Specify whether the printer automatically applies "scene balance" to view the printer model number, its Kodak Service Number, and the version of printer firmware used for opening and editing scanned ...tab, you can: • Print a test page • Align the printhead • Run a printhead nozzle correction • Clean the printhead • Click About this Printer to digital pictures it prints - Printer Overview Home Center for Macintosh After installing the software on your Macintosh OS ...
User Guide
Page 64
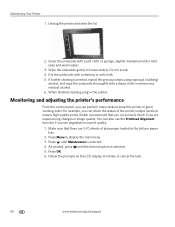
... Kodak recommends that there are experiencing changes in the printer. You can perform many tasks to ensure high-quality prints. Wipe the underside gently to display the main menu. 3. Monitoring and adjusting the printer's performance From the control panel, you can also use the Printhead ...Alignment function if you can check the status of plain paper loaded in print quality. 1. Maintaining Your Printer 1. Unplug the printer and raise the lid. 2. For example...
... Kodak recommends that there are experiencing changes in the printer. You can perform many tasks to ensure high-quality prints. Wipe the underside gently to display the main menu. 3. Monitoring and adjusting the printer's performance From the control panel, you can also use the Printhead ...Alignment function if you can check the status of plain paper loaded in print quality. 1. Maintaining Your Printer 1. Unplug the printer and raise the lid. 2. For example...
User Guide
Page 65
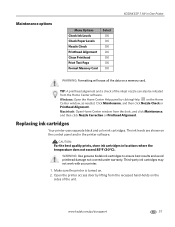
... not covered under warranty. Third-party ink cartridges may not work with your printer. 1. Make sure the printer is turned on a memory card. Maintenance options KODAK ESP 7 All-in-One Printer Menu Options Check Ink Levels Check Paper Levels Nozzle Check Printhead Alignment Clean Printhead Print Test Page Format Memory Card Select OK OK OK OK OK OK...
... not covered under warranty. Third-party ink cartridges may not work with your printer. 1. Make sure the printer is turned on a memory card. Maintenance options KODAK ESP 7 All-in-One Printer Menu Options Check Ink Levels Check Paper Levels Nozzle Check Printhead Alignment Clean Printhead Print Test Page Format Memory Card Select OK OK OK OK OK OK...
User Guide
Page 66
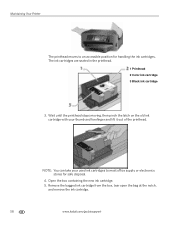
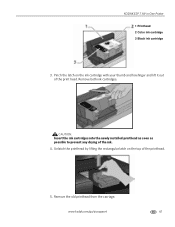
... bagged ink cartridge from the box, tear open the bag at the notch, and remove the ink cartridge. 58 www.kodak.com/go/aiosupport Wait until the printhead stops moving, then pinch the latch on the old ink cartridge with your used ink cartridges to an accessible position for... safe disposal. 4. Open the box containing the new ink cartridge. 5. Maintaining Your Printer The printhead moves to most office supply or electronics ...
... bagged ink cartridge from the box, tear open the bag at the notch, and remove the ink cartridge. 58 www.kodak.com/go/aiosupport Wait until the printhead stops moving, then pinch the latch on the old ink cartridge with your used ink cartridges to an accessible position for... safe disposal. 4. Open the box containing the new ink cartridge. 5. Maintaining Your Printer The printhead moves to most office supply or electronics ...
User Guide
Page 67
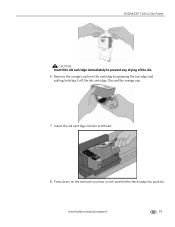
KODAK ESP 7 All-in-One Printer CAUTION: Insert the ink cartridge immediately to prevent any drying of the ink. 6. Press down on the tab until you hear a click and feel the latch snap into the printhead. 8. Remove the orange cap from the cartridge by grasping the top edge and pulling/rotating it off the ink cartridge. Insert the ink cartridge into position. www.kodak.com/go/aiosupport 59 Discard the orange cap. 7.
KODAK ESP 7 All-in-One Printer CAUTION: Insert the ink cartridge immediately to prevent any drying of the ink. 6. Press down on the tab until you hear a click and feel the latch snap into the printhead. 8. Remove the orange cap from the cartridge by grasping the top edge and pulling/rotating it off the ink cartridge. Insert the ink cartridge into position. www.kodak.com/go/aiosupport 59 Discard the orange cap. 7.
User Guide
Page 68
... the cartridges properly, and prevents ink from the recessed hand-holds on . 2. Make sure your printer is damaged or broken, you hear the ink cartridges click into place in the printhead. 60 www.kodak.com/go/aiosupport The printhead moves to an accessible position for use (this step; make sure you may replace it...
... the cartridges properly, and prevents ink from the recessed hand-holds on . 2. Make sure your printer is damaged or broken, you hear the ink cartridges click into place in the printhead. 60 www.kodak.com/go/aiosupport The printhead moves to an accessible position for use (this step; make sure you may replace it...
User Guide
Page 69
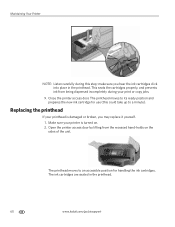
Remove both ink cartridges. CAUTION: Insert the ink cartridges into the newly installed printhead as soon as possible to prevent any drying of the print head. Remove the old printhead from the carriage. www.kodak.com/go/aiosupport 61 KODAK ESP 7 All-in-One Printer 1 Printhead 2 Color ink cartridge 3 Black ink cartridge 3. Pinch the latch on the top of the printhead. 5. Unlatch the printhead by lifting the rectangular latch on the ink cartridge with your thumb and forefinger and lift it out of the ink. 4.
Remove both ink cartridges. CAUTION: Insert the ink cartridges into the newly installed printhead as soon as possible to prevent any drying of the print head. Remove the old printhead from the carriage. www.kodak.com/go/aiosupport 61 KODAK ESP 7 All-in-One Printer 1 Printhead 2 Color ink cartridge 3 Black ink cartridge 3. Pinch the latch on the top of the printhead. 5. Unlatch the printhead by lifting the rectangular latch on the ink cartridge with your thumb and forefinger and lift it out of the ink. 4.
User Guide
Page 70
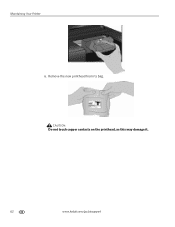
Maintaining Your Printer 6. CAUTION: Do not touch copper contacts on the printhead, as this may damage it. 62 www.kodak.com/go/aiosupport Remove the new printhead from its bag.
Maintaining Your Printer 6. CAUTION: Do not touch copper contacts on the printhead, as this may damage it. 62 www.kodak.com/go/aiosupport Remove the new printhead from its bag.
User Guide
Page 71
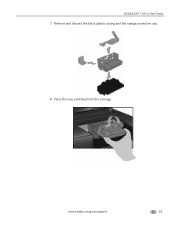
www.kodak.com/go/aiosupport 63 Place the new printhead into the carriage. KODAK ESP 7 All-in-One Printer 7. Remove and discard the black plastic casing and the orange protective cap. 8.
www.kodak.com/go/aiosupport 63 Place the new printhead into the carriage. KODAK ESP 7 All-in-One Printer 7. Remove and discard the black plastic casing and the orange protective cap. 8.
User Guide
Page 72
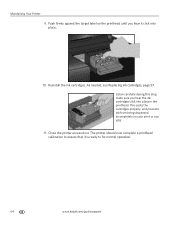
... Replacing ink cartridges, page 57. Reinstall the ink cartridges. The printer should now complete a printhead calibration to for normal operation. 64 www.kodak.com/go/aiosupport make sure you hear it is ready to ensure that it click into place in the printhead. Push firmly against the target label on your print or copy...
... Replacing ink cartridges, page 57. Reinstall the ink cartridges. The printer should now complete a printhead calibration to for normal operation. 64 www.kodak.com/go/aiosupport make sure you hear it is ready to ensure that it click into place in the printhead. Push firmly against the target label on your print or copy...
User Guide
Page 79
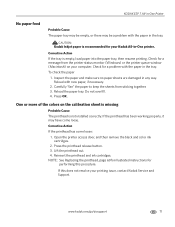
... then remove the black and color ink cartridges. 2. Check for a problem with the paper in the tray. Press the printhead release button. 3. Lift the printhead out. 4. Reload the paper tray. KODAK ESP 7 All-in-One Printer No paper feed Probable Cause The paper tray may be empty, or there may have come loose: 1. NOTE: See Replacing...
... then remove the black and color ink cartridges. 2. Check for a problem with the paper in the tray. Press the printhead release button. 3. Lift the printhead out. 4. Reload the paper tray. KODAK ESP 7 All-in-One Printer No paper feed Probable Cause The paper tray may be empty, or there may have come loose: 1. NOTE: See Replacing...

User Guide
Page 85
KODAK ESP 7 All-in -one printer. Corrective Action • Align the printhead (see Replacing the printhead, page 60.) Print skewed or slanted Probable Cause 1 The paper is clogged, the printouts should begin to wipe clean. For excessive dirt or debris, ... cloth to improve with the Home Center software. • Clean the printhead from Home Center, or from the Maintenance menu on the paper or inside the printer. Corrective Action Load only one type or size of paper at a time. CAUTION: Kodak Inkjet paper is loaded. Slide the paper-width guide away from collecting...
KODAK ESP 7 All-in -one printer. Corrective Action • Align the printhead (see Replacing the printhead, page 60.) Print skewed or slanted Probable Cause 1 The paper is clogged, the printouts should begin to wipe clean. For excessive dirt or debris, ... cloth to improve with the Home Center software. • Clean the printhead from Home Center, or from the Maintenance menu on the paper or inside the printer. Corrective Action Load only one type or size of paper at a time. CAUTION: Kodak Inkjet paper is loaded. Slide the paper-width guide away from collecting...
User Guide
Page 86
...operating in a high-temperature environment (higher than 95° Fahrenheit or 35° Celsius). • Close any unnecessary software applications. • Make sure your Kodak All-in-One printer. • Make sure the paper is not operating in a high-temperature environment. Inspect the paper supplies and reload with new paper if necessary. 78...Troubleshooting Print too dark Print too light Printing slow Printing stops • Try taking the picture again with the flash off. Refer to prevent the printhead from the printer. Paper stops feeding, and status light may slow down .
...operating in a high-temperature environment (higher than 95° Fahrenheit or 35° Celsius). • Close any unnecessary software applications. • Make sure your Kodak All-in-One printer. • Make sure the paper is not operating in a high-temperature environment. Inspect the paper supplies and reload with new paper if necessary. 78...Troubleshooting Print too dark Print too light Printing slow Printing stops • Try taking the picture again with the flash off. Refer to prevent the printhead from the printer. Paper stops feeding, and status light may slow down .


