
Quick Start Guide
Page 1
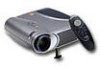
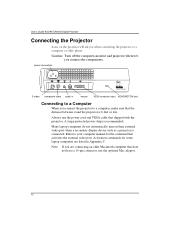
... outlet. 3. Turn on your video player uses a round, four-prong S-video connector, you want . • Adjust the zoom ring. • Focus by pressing the button on the keypad. 4. Press and hold the elevator button. DP2000 Digital Projector Connecting the Projector Icons on the projector will aid you want , then release the button. Remove the lens cap. 2. a video player or a computer. 5. Connecting to a Computer Audio cable Data cable Connecting to the audio cable and audio adapter. Raise the projector to the...
... outlet. 3. Turn on your video player uses a round, four-prong S-video connector, you want . • Adjust the zoom ring. • Focus by pressing the button on the keypad. 4. Press and hold the elevator button. DP2000 Digital Projector Connecting the Projector Icons on the projector will aid you want , then release the button. Remove the lens cap. 2. a video player or a computer. 5. Connecting to a Computer Audio cable Data cable Connecting to the audio cable and audio adapter. Raise the projector to the...

Quick Start Guide
Page 2
... volume Standby - Warning: Hot surface. displays the menu Video - Use them to select menu items and move to adjust settings Menu - If you want to adjust settings Using the Keypad While the menu is displayed, the volume, source, and standby buttons act as navigation buttons. decreases volume Lamp on . • Warning: Don't block ventilation openings. • Warning: To replace the lamp, turn off and unplug the power cord. Safety Terms: • Warning: Don't look directly into the lens when the projector...
... volume Standby - Warning: Hot surface. displays the menu Video - Use them to select menu items and move to adjust settings Menu - If you want to adjust settings Using the Keypad While the menu is displayed, the volume, source, and standby buttons act as navigation buttons. decreases volume Lamp on . • Warning: Don't block ventilation openings. • Warning: To replace the lamp, turn off and unplug the power cord. Safety Terms: • Warning: Don't look directly into the lens when the projector...
User's Guide
Page 8
... terminal. • Warning: Refer all instructions provided in direct sunlight. • Caution: Do not drop the projector. Spilled liquids may block the vents. Transport the projector in this User's Guide. •Warning: Please use the power cord provided. To avoid burns, wait 30 minutes before opening the lamp door. User's Guide KODAK DP2000 Digital Projector Safety Terms • Warning: Don't look directly into the lens when the projector is turned on a hot...
... terminal. • Warning: Refer all instructions provided in direct sunlight. • Caution: Do not drop the projector. Spilled liquids may block the vents. Transport the projector in this User's Guide. •Warning: Please use the power cord provided. To avoid burns, wait 30 minutes before opening the lamp door. User's Guide KODAK DP2000 Digital Projector Safety Terms • Warning: Don't look directly into the lens when the projector is turned on a hot...
User's Guide
Page 11
... KODAK DP2000 Digital Projector is specifically designed for more information. It packs XGA 1024 x 768 graphics with the DP2000 is 1024 x 768. The projector cannot compress screen resolutions above 1024 x 768. Compatibility The projector is compatible with a wide variety of the DP2000's projected image is Kodak's exclusive Image Manager feature. It generates crisp, clear images using Digital Light Processing™ (DLP) technology. Included with 16.7 million colors into a small, 4.8 pound package. The DP2000...
... KODAK DP2000 Digital Projector is specifically designed for more information. It packs XGA 1024 x 768 graphics with the DP2000 is 1024 x 768. The projector cannot compress screen resolutions above 1024 x 768. Compatibility The projector is compatible with a wide variety of the DP2000's projected image is Kodak's exclusive Image Manager feature. It generates crisp, clear images using Digital Light Processing™ (DLP) technology. Included with 16.7 million colors into a small, 4.8 pound package. The DP2000...
User's Guide
Page 12
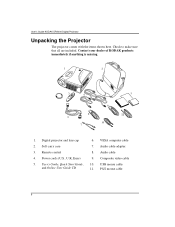
Soft carry case 7. Audio cable adapter 3. Composite video cable 5. User's Guide, Quick Start Guide, and Online User Guide CD 10. Check to make sure that all are included. Power cords (U.S., U.K, Euro) 9. User's Guide KODAK DP2000 Digital Projector Unpacking the Projector The projector comes with the items shown here. Audio cable 4. VESA computer cable 2. Remote control 8. PS/2 mouse cable 6 Digital projector and lens cap 6. USB mouse cable 11. Contact your dealer of KODAK products immediately if anything is missing. 1 2 3 4 8 6 7 9 10 5 11 1.
Soft carry case 7. Audio cable adapter 3. Composite video cable 5. User's Guide, Quick Start Guide, and Online User Guide CD 10. Check to make sure that all are included. Power cords (U.S., U.K, Euro) 9. User's Guide KODAK DP2000 Digital Projector Unpacking the Projector The projector comes with the items shown here. Audio cable 4. VESA computer cable 2. Remote control 8. PS/2 mouse cable 6 Digital projector and lens cap 6. USB mouse cable 11. Contact your dealer of KODAK products immediately if anything is missing. 1 2 3 4 8 6 7 9 10 5 11 1.
User's Guide
Page 13
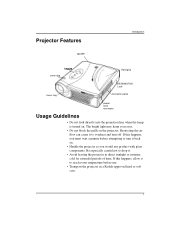
... a minute before use. • Transport the projector in direct sunlight or extreme cold for extended periods of time. If this happens, you would any product with glass components. Projector Features speaker Introduction keypad zoom ring Hand grip focus ring KENSINGTON Lock connector panel power cord connector Usage Guidelines • Do not look directly into the projection lens when the lamp is turned on the...
... a minute before use. • Transport the projector in direct sunlight or extreme cold for extended periods of time. If this happens, you would any product with glass components. Projector Features speaker Introduction keypad zoom ring Hand grip focus ring KENSINGTON Lock connector panel power cord connector Usage Guidelines • Do not look directly into the projection lens when the lamp is turned on the...
User's Guide
Page 17
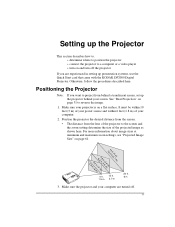
...; connect the projector to a computer or a video player • turn on and turn off . 11 For more information about image sizes at minimum and maximum zoom settings, see "Projected Image Size" on page 31 to reverse the image. 1. Make sure the projector and your power source and within 10 feet (3 m) of your computer are experienced in setting up presentation systems, use the Quick Start card that came with the KODAK DP2000 Digital Projector...
...; connect the projector to a computer or a video player • turn on and turn off . 11 For more information about image sizes at minimum and maximum zoom settings, see "Projected Image Size" on page 31 to reverse the image. 1. Make sure the projector and your power source and within 10 feet (3 m) of your computer are experienced in setting up presentation systems, use the Quick Start card that came with the KODAK DP2000 Digital Projector...
User's Guide
Page 18
... power cord and VESA cable that the distance between it and the projector is 6 feet or less. Note: If you connect the projector to a computer, make sure that shipped with the projector. Refer to your computer manual for some laptop computers are connecting an older Macintosh computer that activates the external video port. Always use the optional Mac adaptor. 12 A surge-protected power strip is connected. User's Guide KODAK DP2000 Digital Projector Connecting the Projector power connection DLP...
... power cord and VESA cable that the distance between it and the projector is 6 feet or less. Note: If you connect the projector to a computer, make sure that shipped with the projector. Refer to your computer manual for some laptop computers are connecting an older Macintosh computer that activates the external video port. Always use the optional Mac adaptor. 12 A surge-protected power strip is connected. User's Guide KODAK DP2000 Digital Projector Connecting the Projector power connection DLP...

User's Guide
Page 20
... you're ready to use the PS/2 mouse cable. 1. User's Guide KODAK DP2000 Digital Projector Do you want to "Starting the Projector" on page 17. 14 Skip to control the computer's mouse from the projector's remote control or keypad? Plug the end of the PS/2 mouse cable into the connector on your computer. 2. If your computer after connecting the mouse to start the projector and computer. Plug the...
... you're ready to use the PS/2 mouse cable. 1. User's Guide KODAK DP2000 Digital Projector Do you want to "Starting the Projector" on page 17. 14 Skip to control the computer's mouse from the projector's remote control or keypad? Plug the end of the PS/2 mouse cable into the connector on your computer. 2. If your computer after connecting the mouse to start the projector and computer. Plug the...
User's Guide
Page 24
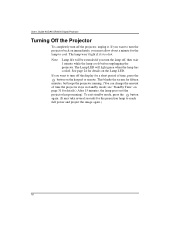
... turn off the display for the lamp to reach full power and project the image again.) 18 If you want to turn the projector back on the Lamp LED. If you must allow about a minute for a short period of time the projector stays in standby mode; The lamp won't light if it . User's Guide KODAK DP2000 Digital Projector Turning Off the Projector To completely turn off the projector, unplug it 's too hot. To exit standby mode, press the button...
... turn off the display for the lamp to reach full power and project the image again.) 18 If you want to turn the projector back on the Lamp LED. If you must allow about a minute for a short period of time the projector stays in standby mode; The lamp won't light if it . User's Guide KODAK DP2000 Digital Projector Turning Off the Projector To completely turn off the projector, unplug it 's too hot. To exit standby mode, press the button...
User's Guide
Page 25
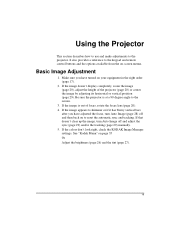
... image (page 20), adjust the height of focus, rotate the focus lens (page 20). 4. If that doesn't clear up the image, turn Auto Image (page 28) off and adjust the sync (page 29) and/or the tracking (page 29) manually. 5. See "Kodak Menu" on -screen menus. Using the Projector This section describes how to use and make adjustments to reset the automatic sync and tracking. If the image appears to the keypad and remote control buttons...
... image (page 20), adjust the height of focus, rotate the focus lens (page 20). 4. If that doesn't clear up the image, turn Auto Image (page 28) off and adjust the sync (page 29) and/or the tracking (page 29) manually. 5. See "Kodak Menu" on -screen menus. Using the Projector This section describes how to use and make adjustments to reset the automatic sync and tracking. If the image appears to the keypad and remote control buttons...
User's Guide
Page 30
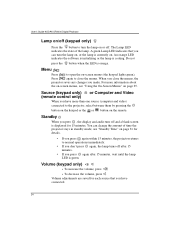
... on-screen menus, see "Standby Time" on page 31 for 15 minutes. A green Lamp LED indicates that you made. Menu Press to normal operations immediately. • If you don't press again, the lamp turns off after 15 minutes. • If you press , the display and audio turn off and a blank screen is currently on -screen menus (the keypad lights green). User's Guide KODAK DP2000 Digital Projector Lamp on/off (keypad only) Press the button to turn the lamp...
... on-screen menus, see "Standby Time" on page 31 for 15 minutes. A green Lamp LED indicates that you made. Menu Press to normal operations immediately. • If you don't press again, the lamp turns off after 15 minutes. • If you press , the display and audio turn off and a blank screen is currently on -screen menus (the keypad lights green). User's Guide KODAK DP2000 Digital Projector Lamp on/off (keypad only) Press the button to turn the lamp...
User's Guide
Page 31
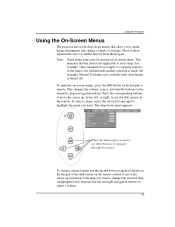
... your setup (for example, video standards do not apply to computer sources) or the item is not enabled until another selection is made (for example, Manual Tracking is not available until Auto Image is highlighted red), then use the left and right navigation buttons to menu navigation buttons. Using the Projector Using the On-Screen Menus The projector has seven drop-down menu appears. Most of settings. To open...
... your setup (for example, video standards do not apply to computer sources) or the item is not enabled until another selection is made (for example, Manual Tracking is not available until Auto Image is highlighted red), then use the left and right navigation buttons to menu navigation buttons. Using the Projector Using the On-Screen Menus The projector has seven drop-down menu appears. Most of settings. To open...
User's Guide
Page 34
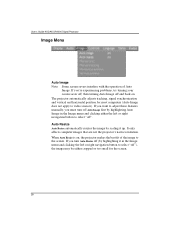
... the projector's native resolution. If you turn off Auto Image first by highlighting it up. Auto Resize Auto Resize automatically resizes the image by scaling it in the Image menu and clicking either cropped or too small for most computers (Auto Image does not apply to the screen. The projector automatically adjusts tracking, signal synchronization and vertical and horizontal position for the screen. 28 User's Guide KODAK DP2000 Digital Projector Image Menu Auto Image Note: Some screen savers...
... the projector's native resolution. If you turn off Auto Image first by highlighting it up. Auto Resize Auto Resize automatically resizes the image by scaling it in the Image menu and clicking either cropped or too small for most computers (Auto Image does not apply to the screen. The projector automatically adjusts tracking, signal synchronization and vertical and horizontal position for the screen. 28 User's Guide KODAK DP2000 Digital Projector Image Menu Auto Image Note: Some screen savers...
User's Guide
Page 36
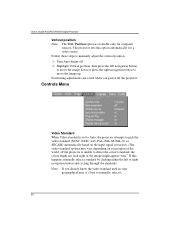
... video standard used in your region of the world.) If the projector is unable to manually select it. 30 The projector sets this happens, manually select a standard by clicking either the left navigation button to move the image down or press the right navigation button to manually adjust the vertical position. 1. Note: If you power off . 2. Controls Menu Video Standard When Video standard is available only for a video source. User's Guide KODAK DP2000 Digital Projector...
... video standard used in your region of the world.) If the projector is unable to manually select it. 30 The projector sets this happens, manually select a standard by clicking either the left navigation button to move the image down or press the right navigation button to manually adjust the vertical position. 1. Note: If you power off . 2. Controls Menu Video Standard When Video standard is available only for a video source. User's Guide KODAK DP2000 Digital Projector...
User's Guide
Page 40
... hour the lamp is useful when contacting Technical Support. To change this, go to your computer's Control Panel and adjust the resolution in use . See your computer's resolution setting. Vertical refresh rate The time period that one video frame is muted. Mute status Indicates if the audio is displayed. User's Guide KODAK DP2000 Digital Projector Lamp hours used Indicates how many hours the current lamp has been in use . See "Replacing the Projection Lamp" on page 38 for details. Software version Indicates the projector's software version. Source Indicates the active source...
... hour the lamp is useful when contacting Technical Support. To change this, go to your computer's Control Panel and adjust the resolution in use . See your computer's resolution setting. Vertical refresh rate The time period that one video frame is muted. Mute status Indicates if the audio is displayed. User's Guide KODAK DP2000 Digital Projector Lamp hours used Indicates how many hours the current lamp has been in use . See "Replacing the Projection Lamp" on page 38 for details. Software version Indicates the projector's software version. Source Indicates the active source...
User's Guide
Page 49
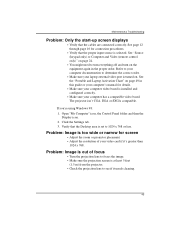
... you're using Windows 98: 1. Refer to your computer documentation to determine the correct order. • Make sure your laptop external video port is installed and configured correctly. • Make sure your computer has a compatible video board. Open "My Computer" icon, the Control Panel folder and then the Display icon. 2. Problem: Image is at least 5 feet (1.5 m) from the projector. • Check the projection lens to focus the image. •...
... you're using Windows 98: 1. Refer to your computer documentation to determine the correct order. • Make sure your laptop external video port is installed and configured correctly. • Make sure your computer has a compatible video board. Open "My Computer" icon, the Control Panel folder and then the Display icon. 2. Problem: Image is at least 5 feet (1.5 m) from the projector. • Check the projection lens to focus the image. •...

User's Guide
Page 50
... lines, "bleeding" or spots • Adjust the brightness. Problem: Image is probably turned on page 26. • Check the projection lens to see if it needs cleaning. See "Brightness" on . The image should immediately return to forward projection. If possible, connect a different computer. 44 User's Guide KODAK DP2000 Digital Projector Problem: Image and menus are reversed left to right • Rear projection mode is "noisy" or streaked Try these steps in the Controls menu.
... lines, "bleeding" or spots • Adjust the brightness. Problem: Image is probably turned on page 26. • Check the projection lens to see if it needs cleaning. See "Brightness" on . The image should immediately return to forward projection. If possible, connect a different computer. 44 User's Guide KODAK DP2000 Digital Projector Problem: Image and menus are reversed left to right • Rear projection mode is "noisy" or streaked Try these steps in the Controls menu.
User's Guide
Page 65
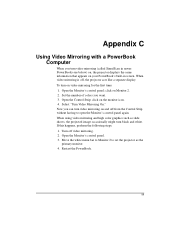
Set the number of colors you can turn video mirroring on and off from the Control Strip without having to set the projector as slide shows, the projected image occasionally might turn black and white. Restart the PowerBook. 59 Select "Turn Video Mirroring On." Turn off , the projector acts like a separate display. Now you want. 3. If this happens, perform the following steps: 1. Open the Monitor's control panel. 3. Move the white menu bar to...
Set the number of colors you can turn video mirroring on and off from the Control Strip without having to set the projector as slide shows, the projected image occasionally might turn black and white. Restart the PowerBook. 59 Select "Turn Video Mirroring On." Turn off , the projector acts like a separate display. Now you want. 3. If this happens, perform the following steps: 1. Open the Monitor's control panel. 3. Move the white menu bar to...
User's Guide
Page 71
... projection 31 relative humidity 47 remote control operating the disk mouse 22 using 21, 23 re-positioning image on screen 29 resetting adjustments 27 resolution 5 S safety guidelines 1 SECAM video 27, 30 security feature 41 service numbers 9 setting up 11 SimulScan with PowerBooks 60 Index specifications 47 Standby button 24 Standby Time 31 startup screen 32 Status menu 33 support numbers 9 S-video, connecting 15 T temperature limits 47 test pattern 43 text not visible 42 tint, adjusting 27 turning off the projector...
... projection 31 relative humidity 47 remote control operating the disk mouse 22 using 21, 23 re-positioning image on screen 29 resetting adjustments 27 resolution 5 S safety guidelines 1 SECAM video 27, 30 security feature 41 service numbers 9 setting up 11 SimulScan with PowerBooks 60 Index specifications 47 Standby button 24 Standby Time 31 startup screen 32 Status menu 33 support numbers 9 S-video, connecting 15 T temperature limits 47 test pattern 43 text not visible 42 tint, adjusting 27 turning off the projector...


