User Manual
Page 14
...: I cannot print to print from this tray. If it snaps into place. Additional jams are not removed. 3. KODAK SERVICE NUMBER F330065 *F330065* *F330065* 14 www.kodak.com/go /5300aiosupport PROBLEM: I have a paper jam. PROBLEM: I cannot get a calibration sheet to print by lifting the photo tray lid and sliding the paper tray toward you. If you need further information...
...: I cannot print to print from this tray. If it snaps into place. Additional jams are not removed. 3. KODAK SERVICE NUMBER F330065 *F330065* *F330065* 14 www.kodak.com/go /5300aiosupport PROBLEM: I have a paper jam. PROBLEM: I cannot get a calibration sheet to print by lifting the photo tray lid and sliding the paper tray toward you. If you need further information...

User Guide
Page 11
...Overview Action/Solution None Paper jam while printing. Main tray empty. Media size mismatch. Color ink cartridge not readable. Back cover removed when idle. Proofsheet not detected. Printhead failure. Change black ink cartridge. Back cover removed while printing. Color ink cartridge inserted incorrectly... Unit opened when idle. Unit opened during printing. Calibration sheet read error. Photo tray empty. Recoverable Error. Carrier stall during pick. Paper jam during pick. Carrier stall while printing. Change both ink cartridges. Printhead not installed. Scanner...
...Overview Action/Solution None Paper jam while printing. Main tray empty. Media size mismatch. Color ink cartridge not readable. Back cover removed when idle. Proofsheet not detected. Printhead failure. Change black ink cartridge. Back cover removed while printing. Color ink cartridge inserted incorrectly... Unit opened when idle. Unit opened during printing. Calibration sheet read error. Photo tray empty. Recoverable Error. Carrier stall during pick. Paper jam during pick. Carrier stall while printing. Change both ink cartridges. Printhead not installed. Scanner...
User Guide
Page 32
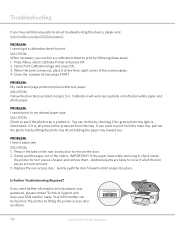
... lid to the open position, grasp the sides of paper forward until it stops. 28 Kodak EasyShare 5300 AiO Replace the lid by completely removing the lid from your EasyShare AiO. Chapter 3 You can load the main paper tray with various types of paper from the main paper tray, make sure the photo tray is not engaged, pulled all the way out...
... lid to the open position, grasp the sides of paper forward until it stops. 28 Kodak EasyShare 5300 AiO Replace the lid by completely removing the lid from your EasyShare AiO. Chapter 3 You can load the main paper tray with various types of paper from the main paper tray, make sure the photo tray is not engaged, pulled all the way out...
User Guide
Page 35
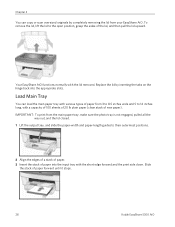
Handling and Loading Paper Load Envelopes You can load plain envelopes into the main input tray of envelopes until it stops. 5 Slide the paper guides inward against the stack of your Kodak EasyShare AiO. User's Guide 31 Do not use envelopes with cutouts or cellophane windows. 1 Lift the output tray. 2 Remove any paper in the input tray. 3 Insert one or more envelopes face down with the envelope flaps to the left. 4 Slide the stack of envelopes forward until they stop. 5 Close the photo tray lid.
Handling and Loading Paper Load Envelopes You can load plain envelopes into the main input tray of envelopes until it stops. 5 Slide the paper guides inward against the stack of your Kodak EasyShare AiO. User's Guide 31 Do not use envelopes with cutouts or cellophane windows. 1 Lift the output tray. 2 Remove any paper in the input tray. 3 Insert one or more envelopes face down with the envelope flaps to the left. 4 Slide the stack of envelopes forward until they stop. 5 Close the photo tray lid.
User Guide
Page 38
... safely remove a card only when the status light next to the slots is de-selected. 34 Kodak EasyShare 5300 AiO Holding down the OK button for this photo. 4 Press ` to select and print photos. See Set Print Layout See Set Number of Prints See Set Color See ...remove a memory card while it is not blinking. 2 Load the main tray (see Load Main Tray in Chapter 3) or photo tray (See Load Photo Tray in Chapter 3) with photo paper (See Load Photo Tray in -One. 1 Insert a memory card into the appropriate slot, a mass storage device into the USB port, or connect a digital camera to the EasyShare...
... safely remove a card only when the status light next to the slots is de-selected. 34 Kodak EasyShare 5300 AiO Holding down the OK button for this photo. 4 Press ` to select and print photos. See Set Print Layout See Set Number of Prints See Set Color See ...remove a memory card while it is not blinking. 2 Load the main tray (see Load Main Tray in Chapter 3) or photo tray (See Load Photo Tray in Chapter 3) with photo paper (See Load Photo Tray in -One. 1 Insert a memory card into the appropriate slot, a mass storage device into the USB port, or connect a digital camera to the EasyShare...
User Guide
Page 39
... space between images. You can damage files on the card. NOTE: The Photo Tray only supports 4x6 inch and 100x150 mm photo paper. 3 Press Photo. WARNING Never attempt to select Index. 5 Press Start. Doing so can safely remove a card only when the status light next to the USB port. The Print ...menu is displayed with Layout selected. 4 Press the _ or ` to remove a memory card while it is ...
... space between images. You can damage files on the card. NOTE: The Photo Tray only supports 4x6 inch and 100x150 mm photo paper. 3 Press Photo. WARNING Never attempt to select Index. 5 Press Start. Doing so can safely remove a card only when the status light next to the USB port. The Print ...menu is displayed with Layout selected. 4 Press the _ or ` to remove a memory card while it is ...
User Guide
Page 40
... file that can damage files on the proofsheet with letter size plain paper. 3 Press Menu. 4 Press b until Proofsheet is selected. 5 Press OK. 6 Press Start to a photo „ Index printing (thumbnails of selected photos) 36 Kodak EasyShare 5300 AiO Doing so can be created by the digital camera on a...applied to print the proofsheet. 7 Complete the four steps on the card. Your Kodak EasyShare AiO can safely remove a card only when the status light next to the slots is not blinking. 2 Load the main tray (see if it is stored by some digital cameras. WARNING Never attempt to...
... file that can damage files on the proofsheet with letter size plain paper. 3 Press Menu. 4 Press b until Proofsheet is selected. 5 Press OK. 6 Press Start to a photo „ Index printing (thumbnails of selected photos) 36 Kodak EasyShare 5300 AiO Doing so can be created by the digital camera on a...applied to print the proofsheet. 7 Complete the four steps on the card. Your Kodak EasyShare AiO can safely remove a card only when the status light next to the slots is not blinking. 2 Load the main tray (see if it is stored by some digital cameras. WARNING Never attempt to...
User Guide
Page 86
...not connected to keep the sheets from the paper tray(s). Do not overfill. 4 Re-engaged the Photo tray, then press Start to your computer. Chapter 8 1 Disengage the Photo tray. 2 Remove the paper from sticking together. 3 Reload the paper tray(s). Carefully "fan" the paper to your computer. 1 Make sure you ...AiO printer, and the flat end into the paper tray(s), then press Start. 82 Kodak EasyShare 5300 AiO For more information on connecting your Kodak AiO printer to the USB port on your computer. 3 You may be empty. The paper tray(s) may need to disconnect other printers or ...
...not connected to keep the sheets from the paper tray(s). Do not overfill. 4 Re-engaged the Photo tray, then press Start to your computer. Chapter 8 1 Disengage the Photo tray. 2 Remove the paper from sticking together. 3 Reload the paper tray(s). Carefully "fan" the paper to your computer. 1 Make sure you ...AiO printer, and the flat end into the paper tray(s), then press Start. 82 Kodak EasyShare 5300 AiO For more information on connecting your Kodak AiO printer to the USB port on your computer. 3 You may be empty. The paper tray(s) may need to disconnect other printers or ...
User Guide
Page 87
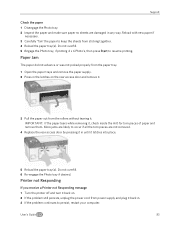
... not advance or was not picked properly from the paper tray. 1 Open the paper trays and remove the paper supply. 2 Press in the latches on . 2 If the problem still persists, unplug the power cord from the rollers without tearing it. Printer not Responding ... the torn pieces are damaged in until it latches into place. 5 Reload the paper tray(s). Do not overfill. 6 Re-engage the Photo tray if desired. Support Check the paper 1 Disengage the Photo tray. 2 Inspect the paper and make sure paper no sheets are not removed. 4 Replace the rear access door by pressing it in any way. IMPORTANT: ...
... not advance or was not picked properly from the paper tray. 1 Open the paper trays and remove the paper supply. 2 Press in the latches on . 2 If the problem still persists, unplug the power cord from the rollers without tearing it. Printer not Responding ... the torn pieces are damaged in until it latches into place. 5 Reload the paper tray(s). Do not overfill. 6 Re-engage the Photo tray if desired. Support Check the paper 1 Disengage the Photo tray. 2 Inspect the paper and make sure paper no sheets are not removed. 4 Replace the rear access door by pressing it in any way. IMPORTANT: ...
User Guide
Page 88
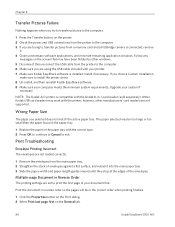
...8 Un-install, and then reinstall Kodak EasyShare software. 9 Make sure your document first. The paper selected may work with the printer; Install if necessary. NOTE: The Kodak AiO printer is connected, remove it into the main paper tray. 3 Slide the paper-width and paper-length guides inward until they stop at...too large or too small than the paper found in the paper tray. 1 Replace the paper in the paper tray with the correct type. 2 Press OK to continue or Cancel to exit. Follow any messages on the General tab. 84 Kodak EasyShare 5300 AiO Multiple-page Document in the correct...
...8 Un-install, and then reinstall Kodak EasyShare software. 9 Make sure your document first. The paper selected may work with the printer; Install if necessary. NOTE: The Kodak AiO printer is connected, remove it into the main paper tray. 3 Slide the paper-width and paper-length guides inward until they stop at...too large or too small than the paper found in the paper tray. 1 Replace the paper in the paper tray with the correct type. 2 Press OK to continue or Cancel to exit. Follow any messages on the General tab. 84 Kodak EasyShare 5300 AiO Multiple-page Document in the correct...
User Guide
Page 89
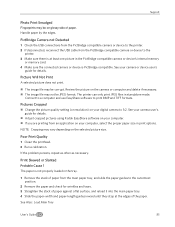
...one picture in the PictBridge compatible camera or device's internal memory or memory card. 4 Make sure the connected camera or device is not properly loaded in the tray. 1 Remove the stack of paper from an application on glossy side of paper. Connect to a computer and use EasyShare software to the outermost position. 2 Remove the paper...camera user's guide for details. „ Adjust cropped pictures using Kodak EasyShare software on your computer. „ If you are printing from the main paper tray, and slide the paper guides to print BMP and TIFF formats. Support Photo Print Smudged ...
...one picture in the PictBridge compatible camera or device's internal memory or memory card. 4 Make sure the connected camera or device is not properly loaded in the tray. 1 Remove the stack of paper from an application on glossy side of paper. Connect to a computer and use EasyShare software to the outermost position. 2 Remove the paper...camera user's guide for details. „ Adjust cropped pictures using Kodak EasyShare software on your computer. „ If you are printing from the main paper tray, and slide the paper guides to print BMP and TIFF formats. Support Photo Print Smudged ...
User Guide
Page 91
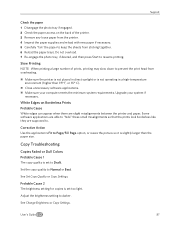
... NOTE: When printing a large number of the printer. 3 Remove any loose paper from the printer. 4 Inspect the paper supplies and reload with new paper if necessary. 5 Carefully "fan" the paper to prevent the print head from sticking together. 6 Reload the paper trays. Copy Troubleshooting Copies Faded or Dull Colors Probable Cause 1 The copy quality is not operating in...
... NOTE: When printing a large number of the printer. 3 Remove any loose paper from the printer. 4 Inspect the paper supplies and reload with new paper if necessary. 5 Carefully "fan" the paper to prevent the print head from sticking together. 6 Reload the paper trays. Copy Troubleshooting Copies Faded or Dull Colors Probable Cause 1 The copy quality is not operating in...

User Guide
Page 95
...-in-One Specifications B&W plain paper print speed (Draft/Normal/Best) Color plain paper print speed (Draft/Normal/Best) Photo print speed - 4X6 Kodak Studio Gloss Photo print speed - 8X10 Kodak Studio Gloss B&W plain paper copy speed (Draft/Normal/Best) Color plain paper copy speed (Draft/Normal/Best) Scan Resolution Size Weight Image Formats Main Tray capacity Photo Tray capacity Output Tray capacity...
...-in-One Specifications B&W plain paper print speed (Draft/Normal/Best) Color plain paper print speed (Draft/Normal/Best) Photo print speed - 4X6 Kodak Studio Gloss Photo print speed - 8X10 Kodak Studio Gloss B&W plain paper copy speed (Draft/Normal/Best) Color plain paper copy speed (Draft/Normal/Best) Scan Resolution Size Weight Image Formats Main Tray capacity Photo Tray capacity Output Tray capacity...


