
User Manual
Page 5
c) Pull on the orange tab to remove the protective retainer. IMPORTANT: Insert the printhead immediately upon opening sealed bag. 3 Install Printhead IMPORTANT: The printhead is removed from its bag. b) Remove the printhead from the carriage. Handle carefully. www.kodak.com/go/aiosupport 5 a) Lift the printer access door. Make sure the orange tape is fragile.
c) Pull on the orange tab to remove the protective retainer. IMPORTANT: Insert the printhead immediately upon opening sealed bag. 3 Install Printhead IMPORTANT: The printhead is removed from its bag. b) Remove the printhead from the carriage. Handle carefully. www.kodak.com/go/aiosupport 5 a) Lift the printer access door. Make sure the orange tape is fragile.

User Manual
Page 6
Insert at the angle shown. IMPORTANT: Do not touch the copper-colored contacts. f) Push firmly against the back wall of the printhead until it clicks into place. 6 www.kodak.com/go/aiosupport Install Printhead d) Carefully remove and discard the black plastic shield and the orange protective cap. Tip: The printhead requires a firm push and makes an audible click when locked into place. e) Place the printhead into the carriage.
Insert at the angle shown. IMPORTANT: Do not touch the copper-colored contacts. f) Push firmly against the back wall of the printhead until it clicks into place. 6 www.kodak.com/go/aiosupport Install Printhead d) Carefully remove and discard the black plastic shield and the orange protective cap. Tip: The printhead requires a firm push and makes an audible click when locked into place. e) Place the printhead into the carriage.

User Manual
Page 7
4 Install Ink Cartridges a) Remove the black ink cartridge from its bag. www.kodak.com/go/aiosupport 7 IMPORTANT: Insert ink cartridges immediately upon opening sealed bag. 10 Black Ink Cartridge Black Ink Cartridge 10 b) Carefully remove and discard the orange cap. Handle ink cartridges carefully to avoid ink transfer. 10 Black Ink Cartridge c) Insert the black ink cartridge into the printhead.
4 Install Ink Cartridges a) Remove the black ink cartridge from its bag. www.kodak.com/go/aiosupport 7 IMPORTANT: Insert ink cartridges immediately upon opening sealed bag. 10 Black Ink Cartridge Black Ink Cartridge 10 b) Carefully remove and discard the orange cap. Handle ink cartridges carefully to avoid ink transfer. 10 Black Ink Cartridge c) Insert the black ink cartridge into the printhead.

User Manual
Page 8
Insert it into position. Install Ink Cartridges Black Ink Cartridge 10 10 d) Press down firmly on the ink cartridge until you hear it click into the printhead. It is normal for the printhead to flex when inserting the cartridge. You will not damage the printer. f) Press down on the ink cartridge until you hear it click into position. Black Ink Cartridge Color Ink Cartridge 10 10 Black Ink Cartridge 10 10 Color Ink Cartridge e) Open and uncap the color ink cartridge. Close the printer access door. 8 www.kodak.com/go/aiosupport
Insert it into position. Install Ink Cartridges Black Ink Cartridge 10 10 d) Press down firmly on the ink cartridge until you hear it click into the printhead. It is normal for the printhead to flex when inserting the cartridge. You will not damage the printer. f) Press down on the ink cartridge until you hear it click into position. Black Ink Cartridge Color Ink Cartridge 10 10 Black Ink Cartridge 10 10 Color Ink Cartridge e) Open and uncap the color ink cartridge. Close the printer access door. 8 www.kodak.com/go/aiosupport
User Guide
Page 3
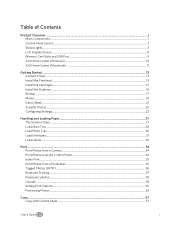
... Screen...8 Memory Card Slots and USB Port ...9 AiO Home Center (Windows) ...10 AiO Home Center (Macintosh) ...11 Getting Started ...13 Connect Power ...13 Install the Printhead ...13 Install Ink Cartridges ...15 Install the Duplexer ...16 Startup ...17 Menus ...18 Demo Sheet...21 Transfer Photos ...22 Configuring Settings...22 Handling and Loading...
... Screen...8 Memory Card Slots and USB Port ...9 AiO Home Center (Windows) ...10 AiO Home Center (Macintosh) ...11 Getting Started ...13 Connect Power ...13 Install the Printhead ...13 Install Ink Cartridges ...15 Install the Duplexer ...16 Startup ...17 Menus ...18 Demo Sheet...21 Transfer Photos ...22 Configuring Settings...22 Handling and Loading...
User Guide
Page 4
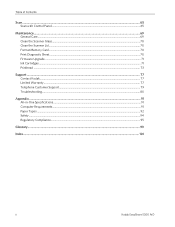
Table of Contents Scan ...65 Scan with Control Panel...65 Maintenance ...69 General Care...69 Clean the Scanner Glass...70 Clean the Scanner Lid...70 Format Memory Card...70 Print Diagnostic Sheet...70 Firmware Upgrade ...71 Ink Cartridges ...71 Printhead ...73 Support ...77 Contact Kodak...77 Limited Warranty ...77 Telephone Customer Support...79 Troubleshooting...80 Appendix ...91 All-in-One Specifications ...91 Computer Requirements ...91 Paper Types ...92 Safety ...94 Regulatory Compliance...95 Glossary...99 Index...101 ii Kodak EasyShare 5300 AiO
Table of Contents Scan ...65 Scan with Control Panel...65 Maintenance ...69 General Care...69 Clean the Scanner Glass...70 Clean the Scanner Lid...70 Format Memory Card...70 Print Diagnostic Sheet...70 Firmware Upgrade ...71 Ink Cartridges ...71 Printhead ...73 Support ...77 Contact Kodak...77 Limited Warranty ...77 Telephone Customer Support...79 Troubleshooting...80 Appendix ...91 All-in-One Specifications ...91 Computer Requirements ...91 Paper Types ...92 Safety ...94 Regulatory Compliance...95 Glossary...99 Index...101 ii Kodak EasyShare 5300 AiO
User Guide
Page 9
... Light is a flashing green. The printer is a flashing yellow. Check the light on , contact Kodak for a message. If the flashing green persists, you may have power applied. Please install a Printhead and ink cartridges. Light is initializing. The printer is turned off . If the Photo Tray light does...The printer is properly powered up, on for a message. If the Photo Tray light is installed. The printer has not detected that a Printhead is on , and ready. Check the LCD display or status monitor on . Flashing a rotating pattern of red, yellow, and green. Check...
... Light is a flashing green. The printer is a flashing yellow. Check the light on , contact Kodak for a message. If the flashing green persists, you may have power applied. Please install a Printhead and ink cartridges. Light is initializing. The printer is turned off . If the Photo Tray light does...The printer is properly powered up, on for a message. If the Photo Tray light is installed. The printer has not detected that a Printhead is on , and ready. Check the LCD display or status monitor on . Flashing a rotating pattern of red, yellow, and green. Check...

User Guide
Page 11
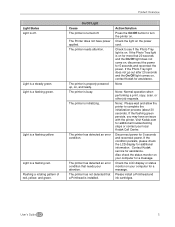
... failure. Light Status Light is on. Light is off. Paper jam during pick. Color ink cartridge not readable. Printhead not calibrated. Back cover removed while printing. Color ink cartridge inserted incorrectly. Media sensor failure. Attention Light Cause No Error. Recoverable Error...Black ink cartridge not installed. User's Guide 7 Light is blinking rapidly. Change black ink cartridge. Change both ink cartridges. Printhead failure. Media size mismatch. Calibration sheet read error. Main tray empty. Photo tray empty. Unit opened during printing. Light ...
... failure. Light Status Light is on. Light is off. Paper jam during pick. Color ink cartridge not readable. Printhead not calibrated. Back cover removed while printing. Color ink cartridge inserted incorrectly. Media sensor failure. Attention Light Cause No Error. Recoverable Error...Black ink cartridge not installed. User's Guide 7 Light is blinking rapidly. Change black ink cartridge. Change both ink cartridges. Printhead failure. Media size mismatch. Calibration sheet read error. Main tray empty. Photo tray empty. Unit opened during printing. Light ...

User Guide
Page 15
... where you to configure your AiO printer from the Printer Setup Utility by selecting your Kodak AiO printer. The Setup and Maintenance tabs let you: „ Configure Settings „ Calibration and Printhead Cleaning Select: Provides a list of your Kodak AiO Printer in the Printer List and clicking the Utility icon. Product Overview AiO...
... where you to configure your AiO printer from the Printer Setup Utility by selecting your Kodak AiO printer. The Setup and Maintenance tabs let you: „ Configure Settings „ Calibration and Printhead Cleaning Select: Provides a list of your Kodak AiO Printer in the Printer List and clicking the Utility icon. Product Overview AiO...

User Guide
Page 17
...flat surface, in a dry location, and out of the EasyShare AiO to the back of dust and debris. Place the printer on all sides of direct sunlight. Airborne particles can affect picture quality. Install the Printhead The printhead dispenses the ink from the cartridges onto the paper. 1 ...Make sure the EasyShare AiO is important to a center position. User's Guide 13 Connect Power RISK OF ELECTRICAL SHOCK ...
...flat surface, in a dry location, and out of the EasyShare AiO to the back of dust and debris. Place the printer on all sides of direct sunlight. Airborne particles can affect picture quality. Install the Printhead The printhead dispenses the ink from the cartridges onto the paper. 1 ...Make sure the EasyShare AiO is important to a center position. User's Guide 13 Connect Power RISK OF ELECTRICAL SHOCK ...
User Guide
Page 18
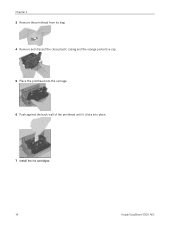
Chapter 2 3 Remove the printhead from its bag. 4 Remove and discard the clear plastic casing and the orange protective cap. 5 Place the printhead into the carriage. 6 Push against the back wall of the printhead until it clicks into place. 7 Install the ink cartridges. 14 Kodak EasyShare 5300 AiO
Chapter 2 3 Remove the printhead from its bag. 4 Remove and discard the clear plastic casing and the orange protective cap. 5 Place the printhead into the carriage. 6 Push against the back wall of the printhead until it clicks into place. 7 Install the ink cartridges. 14 Kodak EasyShare 5300 AiO
User Guide
Page 19
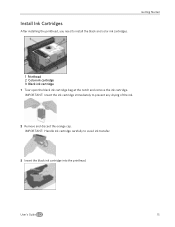
User's Guide 15 Install Ink Cartridges After installing the printhead, you need to prevent any drying of the ink. 2 Remove and discard the orange cap. Getting Started 1 Printhead 2 Color ink cartridge 3 Black ink cartridge 1 Tear open the black ink cartridge bag at the notch and remove the ink cartridge. IMPORTANT: Insert the ink cartridge immediately to install the black and color ink cartridges. IMPORTANT: Handle ink cartridge carefully to avoid ink transfer. 3 Insert the black ink cartridge into the printhead.
User's Guide 15 Install Ink Cartridges After installing the printhead, you need to prevent any drying of the ink. 2 Remove and discard the orange cap. Getting Started 1 Printhead 2 Color ink cartridge 3 Black ink cartridge 1 Tear open the black ink cartridge bag at the notch and remove the ink cartridge. IMPORTANT: Insert the ink cartridge immediately to install the black and color ink cartridges. IMPORTANT: Handle ink cartridge carefully to avoid ink transfer. 3 Insert the black ink cartridge into the printhead.
User Guide
Page 20
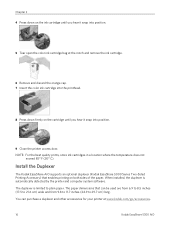
... 5 Tear open the color ink cartridge bag at www.kodak.com/go/accessories. 16 Kodak EasyShare 5300 AiO When installed, the duplexer is limited to 29.7 cm) long. Install the Duplexer The Kodak EasyShare AiO supports an optional duplexer (Kodak EasyShare 5000 Series Two-Sided ...Printing Accessory) that can purchase a duplexer and other accessories for your printer at the notch and remove the ink cartridge. 6 Remove and discard the orange cap. 7 Insert the color ink cartridge into the printhead...
... 5 Tear open the color ink cartridge bag at www.kodak.com/go/accessories. 16 Kodak EasyShare 5300 AiO When installed, the duplexer is limited to 29.7 cm) long. Install the Duplexer The Kodak EasyShare AiO supports an optional duplexer (Kodak EasyShare 5000 Series Two-Sided ...Printing Accessory) that can purchase a duplexer and other accessories for your printer at the notch and remove the ink cartridge. 6 Remove and discard the orange cap. 7 Insert the color ink cartridge into the printhead...
User Guide
Page 22
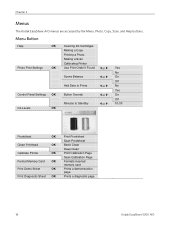
... menus are accessed by the Menu, Photo, Copy, Scan, and Help buttons. Prints a demonstration page. Prints a diagnostic page. 18 Kodak EasyShare 5300 AiO Menu Button Help OK Photo Print Settings OK Control Panel Settings OK Ink Levels OK Inserting Ink Cartridges Making a Copy Printing a Photo... Prints _ or ` Button Sounds _ or ` Minutes to Standby _ or ` Yes No On Off No Yes On Off 10-30 Proofsheet OK Clean Printhead OK Calibrate Printer OK Format Memory Card OK Print Demo Sheet OK Print Diagnostic Sheet OK Print Proofsheet Scan Proofsheet Basic Clean Deep Clean Print...
... menus are accessed by the Menu, Photo, Copy, Scan, and Help buttons. Prints a demonstration page. Prints a diagnostic page. 18 Kodak EasyShare 5300 AiO Menu Button Help OK Photo Print Settings OK Control Panel Settings OK Ink Levels OK Inserting Ink Cartridges Making a Copy Printing a Photo... Prints _ or ` Button Sounds _ or ` Minutes to Standby _ or ` Yes No On Off No Yes On Off 10-30 Proofsheet OK Clean Printhead OK Calibrate Printer OK Format Memory Card OK Print Demo Sheet OK Print Diagnostic Sheet OK Print Proofsheet Scan Proofsheet Basic Clean Deep Clean Print...
User Guide
Page 73
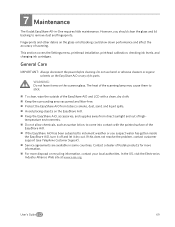
...the Settings menu, printhead installation, printhead calibration, checking ink levels, and changing ink cartridges. The heat of the scanning lamp may cause them to stick. „ To clean, wipe the outside of the EasyShare AiO and LCD with the painted surface of Kodak products for more ...). „ Service agreements are available in -One requires little maintenance. WARNING: Do not leave items on the glass or lid backing could slow down performance and affect the accuracy of high- 7 Maintenance Maintenance The Kodak EasyShare All-in some countries. However, you suspect ...
...the Settings menu, printhead installation, printhead calibration, checking ink levels, and changing ink cartridges. The heat of the scanning lamp may cause them to stick. „ To clean, wipe the outside of the EasyShare AiO and LCD with the painted surface of Kodak products for more ...). „ Service agreements are available in -One requires little maintenance. WARNING: Do not leave items on the glass or lid backing could slow down performance and affect the accuracy of high- 7 Maintenance Maintenance The Kodak EasyShare All-in some countries. However, you suspect ...
User Guide
Page 76
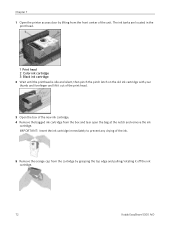
... located in the print head. 1 Print head 2 Color ink cartridge 3 Black ink cartridge 2 Wait until the printhead is idle and silent, then pinch the pinch latch on the old ink cartridge with your thumb and forefinger and lift it off the ink cartridge. 72 Kodak EasyShare 5300 AiO IMPORTANT: Insert the ink cartridge immediately to...
... located in the print head. 1 Print head 2 Color ink cartridge 3 Black ink cartridge 2 Wait until the printhead is idle and silent, then pinch the pinch latch on the old ink cartridge with your thumb and forefinger and lift it off the ink cartridge. 72 Kodak EasyShare 5300 AiO IMPORTANT: Insert the ink cartridge immediately to...
User Guide
Page 77
... on the tab until you install or replace a printhead. Maintenance 7 Press down on the calibration print to enable high-quality prints. Printer maintenance involves: „ Calibration „ Clean the printhead Calibration The Kodak EasyShare AiO performs a calibration every time you hear a click... and feel the latch snap into the printhead. To calibrate from the ink cartridges onto the paper. Printhead The printhead dispenses the ink from computer 1 ...
... on the tab until you install or replace a printhead. Maintenance 7 Press down on the calibration print to enable high-quality prints. Printer maintenance involves: „ Calibration „ Clean the printhead Calibration The Kodak EasyShare AiO performs a calibration every time you hear a click... and feel the latch snap into the printhead. To calibrate from the ink cartridges onto the paper. Printhead The printhead dispenses the ink from computer 1 ...

User Guide
Page 78
... position. 74 Kodak EasyShare 5300 AiO Chapter 7 To calibrate from computer 1 Start the AiO Home Center. 2 Click to open the Help panel. 3 Under General Links, click Maintenance. 4 Click Printhead Cleaning. Replace Printhead 1 Make sure the EasyShare AiO is selected. 4 Press OK. To clean printhead from control panel... photo paper, you notice a degradation in the quality of prints, the printhead may need cleaning. A new screen appears with photo paper. The carriage moves to perform a Deep Clean. To clean printhead from control panel 1 Press Menu to display the Main Menu. 2 Press...
... position. 74 Kodak EasyShare 5300 AiO Chapter 7 To calibrate from computer 1 Start the AiO Home Center. 2 Click to open the Help panel. 3 Under General Links, click Maintenance. 4 Click Printhead Cleaning. Replace Printhead 1 Make sure the EasyShare AiO is selected. 4 Press OK. To clean printhead from control panel... photo paper, you notice a degradation in the quality of prints, the printhead may need cleaning. A new screen appears with photo paper. The carriage moves to perform a Deep Clean. To clean printhead from control panel 1 Press Menu to display the Main Menu. 2 Press...

User Guide
Page 79
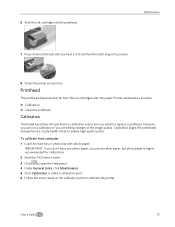
Maintenance 3 Wait until the printhead is idle and silent, then pinch the pinch latch on the ink cartridge with your thumb and forefinger and lift it out of the carriage. 5 Remove the old printhead. 6 Remove the printhead from its bag. 7 Remove and discard the clear plastic casing and the orange protective cap. Remove both ink cartridges. 4 Unlatch the printhead by pressing the button in the upper-left corner of the print head. User's Guide 75
Maintenance 3 Wait until the printhead is idle and silent, then pinch the pinch latch on the ink cartridge with your thumb and forefinger and lift it out of the carriage. 5 Remove the old printhead. 6 Remove the printhead from its bag. 7 Remove and discard the clear plastic casing and the orange protective cap. Remove both ink cartridges. 4 Unlatch the printhead by pressing the button in the upper-left corner of the print head. User's Guide 75
User Guide
Page 80
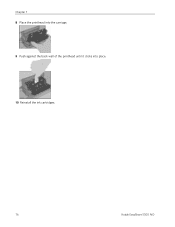
Chapter 7 8 Place the printhead into the carriage. 9 Push against the back wall of the printhead until it clicks into place. 10 Reinstall the ink cartridges. 76 Kodak EasyShare 5300 AiO
Chapter 7 8 Place the printhead into the carriage. 9 Push against the back wall of the printhead until it clicks into place. 10 Reinstall the ink cartridges. 76 Kodak EasyShare 5300 AiO


