
Instruction Manual
Page 3
...manual are examples used to the Source Control Screen Remote Control Function 54 Installation Accessories 56 Installation Procedure 57 Connection 58 Installation 62 Troubleshooting Guide 65 Specifications 68 The ...Title Display for Discs •To Scroll Manually •Selecting the Time Display for CDs •Switching to the Name Set Screen •Magazine Random Play Function •Switching... Quality Factor •Adjusting the Gain •Setting the Speaker Type •Recalling the Kenwood Preset Sound •Storing Your Sound Settings •Returning to the Sound Effect Menu Screen...
...manual are examples used to the Source Control Screen Remote Control Function 54 Installation Accessories 56 Installation Procedure 57 Connection 58 Installation 62 Troubleshooting Guide 65 Specifications 68 The ...Title Display for Discs •To Scroll Manually •Selecting the Time Display for CDs •Switching to the Name Set Screen •Magazine Random Play Function •Switching... Quality Factor •Adjusting the Gain •Setting the Speaker Type •Recalling the Kenwood Preset Sound •Storing Your Sound Settings •Returning to the Sound Effect Menu Screen...
Instruction Manual
Page 5
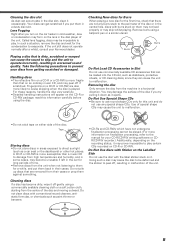
... precautions to prevent your Kenwood dealer. You may be played. (For more likely to play . Do not pile up discs that are not any special shape CDs. Called lens fogging, ... the disc player of the disc. In such a situation, remove the disc and wait for your CD-R/CD-RW writing software or CDR/CD-RW recorder.) Additionally, depending on a CD-R or a CD-RW is more... soft cotton cloth, starting from the centre of special shape CDs may form on the Labelled Side Do not use commercially available CD accessories that there are removed from high temperatures and humidity, and in...
... precautions to prevent your Kenwood dealer. You may be played. (For more likely to play . Do not pile up discs that are not any special shape CDs. Called lens fogging, ... the disc player of the disc. In such a situation, remove the disc and wait for your CD-R/CD-RW writing software or CDR/CD-RW recorder.) Additionally, depending on a CD-R or a CD-RW is more... soft cotton cloth, starting from the centre of special shape CDs may form on the Labelled Side Do not use commercially available CD accessories that there are removed from high temperatures and humidity, and in...

Instruction Manual
Page 56
Make sure only to the unit. Installation Accessories A K B L C M D N E O F G H WICTAHR BDOIOVSETRESRITY O BOFF OSTON CX-AAN3T3E0NNA P WICTAHR BDOIOVSETRESRITY O BOFF OSTON CX-AAN3T3E0NNA I Q J R 2CAUTION The use of any accessories except for those provided might result in damage to use the accessories shipped with the unit, as shown above. 56
Make sure only to the unit. Installation Accessories A K B L C M D N E O F G H WICTAHR BDOIOVSETRESRITY O BOFF OSTON CX-AAN3T3E0NNA P WICTAHR BDOIOVSETRESRITY O BOFF OSTON CX-AAN3T3E0NNA I Q J R 2CAUTION The use of any accessories except for those provided might result in damage to use the accessories shipped with the unit, as shown above. 56

Instruction Manual
Page 57
... unit under the carpet. Reconnect the · terminal of the battery. 2. Press the reset button. (See p. 4) 2CAUTION • If your car. 6. Using the Relay Connector (Accessory G) 1 Plug the vehicle's harness into the relay connector. 2 Plug the parking brake detection wire into the relay connector. 3 Lock the cable clamp. Installation Procedure 1. To...
... unit under the carpet. Reconnect the · terminal of the battery. 2. Press the reset button. (See p. 4) 2CAUTION • If your car. 6. Using the Relay Connector (Accessory G) 1 Plug the vehicle's harness into the relay connector. 2 Plug the parking brake detection wire into the relay connector. 3 Lock the cable clamp. Installation Procedure 1. To...
Instruction Manual
Page 58
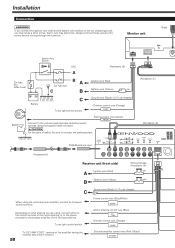
...vehicle's parking brake detection switch harness using the supplied relay connector. 2 CAUTION For the sake of safety, be sure to connect the parking sensor. (Accessory E) FM/AM antenna input TO MONITOR UNIT L R FM /AM ANTENNA AV OUTPUT VIDEO L R AV INPUT 1 VIDEO L R AV INPUT ... L R PREOUT REAR L R NON-FAD L R POWER (AccessoryF) Receiver unit (front side) A Ignition wire (Red) Battery wire (Yellow) B Wiring harness (Accessory A) ( 3A ) ( 10A ) C When using , connect either to the control terminal of the motor antenna, or to the power terminal for the booster amplifier ...
...vehicle's parking brake detection switch harness using the supplied relay connector. 2 CAUTION For the sake of safety, be sure to connect the parking sensor. (Accessory E) FM/AM antenna input TO MONITOR UNIT L R FM /AM ANTENNA AV OUTPUT VIDEO L R AV INPUT 1 VIDEO L R AV INPUT ... L R PREOUT REAR L R NON-FAD L R POWER (AccessoryF) Receiver unit (front side) A Ignition wire (Red) Battery wire (Yellow) B Wiring harness (Accessory A) ( 3A ) ( 10A ) C When using , connect either to the control terminal of the motor antenna, or to the power terminal for the booster amplifier ...

Instruction Manual
Page 59
... speaker Purple C 59 Optical cable (Provided with the KDS-P900/P901) (AccessoryD) Receiver unit (rear side) 30R Green (front side) DIGITAL IN TV/DVD TO NAV.I/F TO ANTENNA TO MONITOR TO 5L I/F TO MZ-BUS TO MZ-BUS Connection cable (Provided with the KDS-P900/P901) NOTE Do not... remove the protection caps of the unused BUS terminals. (rear side) KDS-P900/P901 (Optional) Accessory P Protection cap Ignition wire (Red) ( 1A ) A ( 1A ) Ground wire (Black) - (To car chassis) TEL mute wire (Brown) TEL MUTE Connect to the terminal ...
... speaker Purple C 59 Optical cable (Provided with the KDS-P900/P901) (AccessoryD) Receiver unit (rear side) 30R Green (front side) DIGITAL IN TV/DVD TO NAV.I/F TO ANTENNA TO MONITOR TO 5L I/F TO MZ-BUS TO MZ-BUS Connection cable (Provided with the KDS-P900/P901) NOTE Do not... remove the protection caps of the unused BUS terminals. (rear side) KDS-P900/P901 (Optional) Accessory P Protection cap Ignition wire (Red) ( 1A ) A ( 1A ) Ground wire (Black) - (To car chassis) TEL mute wire (Brown) TEL MUTE Connect to the terminal ...

Instruction Manual
Page 62
...-tapping screw (commercially available) Bend the tabs of the mounting sleeve with the accessory screws. L ø5mm 6mm MAX. Tapping screw (ø4 × 16 mm) (Accessory O) ;;;;;;;;;;;; When installing the DVD player unit on the vehicle, ensure that the unit is used with the KDS-P900/P901) 2 CAUTION When handling an optical cable for wiring...
...-tapping screw (commercially available) Bend the tabs of the mounting sleeve with the accessory screws. L ø5mm 6mm MAX. Tapping screw (ø4 × 16 mm) (Accessory O) ;;;;;;;;;;;; When installing the DVD player unit on the vehicle, ensure that the unit is used with the KDS-P900/P901) 2 CAUTION When handling an optical cable for wiring...

Instruction Manual
Page 63
... the catch pins on the removal tool and remove the two locks on the removal tool. Lower the frame and pull it . 63 Lock Catch Accessory J Catch facing up 5 Pull the unit all the way out with integral washer (M4×6) on the back panel. 3 Insert the two removal tools deeply...
... the catch pins on the removal tool and remove the two locks on the removal tool. Lower the frame and pull it . 63 Lock Catch Accessory J Catch facing up 5 Pull the unit all the way out with integral washer (M4×6) on the back panel. 3 Insert the two removal tools deeply...

Instruction Manual
Page 64
... the glass of the rear window is to be attached.Clean off any grease or dirt from the installation location using the supplied glass cleaner (Accessory Q), clean the area with water and allow to dry. 2 CAUTION Clean the glass thoroughly as failure to clean the glass can not only weaken the... in a location where it may also cause it to receiver unit. Attach the doublesided tape by turning on a day with the clamper bar Rear window (Accessory R) Rear seat 64
... the glass of the rear window is to be attached.Clean off any grease or dirt from the installation location using the supplied glass cleaner (Accessory Q), clean the area with water and allow to dry. 2 CAUTION Clean the glass thoroughly as failure to clean the glass can not only weaken the... in a location where it may also cause it to receiver unit. Attach the doublesided tape by turning on a day with the clamper bar Rear window (Accessory R) Rear seat 64


