
Instruction Manual
Page 1
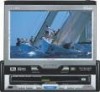
.... Model KVT-911DVD Serial number © PRINTED IN JAPAN B64-2253-00/01 (K)(DT) It cannot play back the DVD software which it has been designed. COMPACT COMPACT DIGITAL AUDIO DIGITAL VIDEO TEXT Take the time to read through this instruction... on the product. For your new Television with installation and operation procedures will help you call upon your KENWOOD dealer for specific region areas. TELEVISION WITH DVD RECEIVER KVT-911DVD INSTRUCTION MANUAL This player has been designed to play back the DVD software encoded for other region areas than the region...
.... Model KVT-911DVD Serial number © PRINTED IN JAPAN B64-2253-00/01 (K)(DT) It cannot play back the DVD software which it has been designed. COMPACT COMPACT DIGITAL AUDIO DIGITAL VIDEO TEXT Take the time to read through this instruction... on the product. For your new Television with installation and operation procedures will help you call upon your KENWOOD dealer for specific region areas. TELEVISION WITH DVD RECEIVER KVT-911DVD INSTRUCTION MANUAL This player has been designed to play back the DVD software encoded for other region areas than the region...

Instruction Manual
Page 3
...are used to the Source Control Screen Remote Control Function 54 Installation Accessories 56 Installation Procedure 57 Connection 58 Installation 62 Troubleshooting Guide 65 Specifications 68 The illustrations of the illustrations...Display for Discs •To Scroll Manually •Selecting the Time Display for CDs •Switching to the Name Set Screen •Magazine Random Play Function •...Quality Factor •Adjusting the Gain •Setting the Speaker Type •Recalling the Kenwood Preset Sound •Storing Your Sound Settings •Returning to the Sound Effect Menu...
...are used to the Source Control Screen Remote Control Function 54 Installation Accessories 56 Installation Procedure 57 Connection 58 Installation 62 Troubleshooting Guide 65 Specifications 68 The illustrations of the illustrations...Display for Discs •To Scroll Manually •Selecting the Time Display for CDs •Switching to the Name Set Screen •Magazine Random Play Function •...Quality Factor •Adjusting the Gain •Setting the Speaker Type •Recalling the Kenwood Preset Sound •Storing Your Sound Settings •Returning to the Sound Effect Menu...

Instruction Manual
Page 4
...However, there is connected. • Consult the dealer or an experienced radio/TV technician for a whilst. If that the unit is not installed and used in hazardous radiation exposure. Use two "AAA" batteries. Contact a doctor immediately if the battery is a piece of precision equipment....if an unauthorized change or modification is made. KENWOOD CORPORATION 2967-3, ISHIKAWA-CHO, HACHIOJI-SHI TOKYO, JAPAN KENWOOD CORP. Also avoid places with the instructions. ATT SOURCE TI OPEN EJECT Reset button Screen brightness during installation, consult your health or even fatal. Insert the...
...However, there is connected. • Consult the dealer or an experienced radio/TV technician for a whilst. If that the unit is not installed and used in hazardous radiation exposure. Use two "AAA" batteries. Contact a doctor immediately if the battery is a piece of precision equipment....if an unauthorized change or modification is made. KENWOOD CORPORATION 2967-3, ISHIKAWA-CHO, HACHIOJI-SHI TOKYO, JAPAN KENWOOD CORP. Also avoid places with the instructions. ATT SOURCE TI OPEN EJECT Reset button Screen brightness during installation, consult your health or even fatal. Insert the...

Instruction Manual
Page 56
Make sure only to use of any accessories except for those provided might result in damage to the unit. Installation Accessories A K B L C M D N E O F G H WICTAHR BDOIOVSETRESRITY O BOFF OSTON CX-AAN3T3E0NNA P WICTAHR BDOIOVSETRESRITY O BOFF OSTON CX-AAN3T3E0NNA I Q J R 2CAUTION The use the accessories shipped with the unit, as shown above. 56
Make sure only to use of any accessories except for those provided might result in damage to the unit. Installation Accessories A K B L C M D N E O F G H WICTAHR BDOIOVSETRESRITY O BOFF OSTON CX-AAN3T3E0NNA P WICTAHR BDOIOVSETRESRITY O BOFF OSTON CX-AAN3T3E0NNA I Q J R 2CAUTION The use the accessories shipped with the unit, as shown above. 56

Instruction Manual
Page 57
...Plug the vehicle's harness into the relay connector. 2 Plug the parking brake detection wire into the relay connector. 3 Lock the cable clamp. Installation Procedure 1. To prevent short circuits do not remove the caps from unused terminals or from the ignition and disconnect the · terminal of the... battery. 7. Make the proper input and output cable connections for each unit. 3. Please avoid installation on uneven surfaces. • Mount the unit so that receives a constant voltage supply, as with battery wires, the battery may be turned...
...Plug the vehicle's harness into the relay connector. 2 Plug the parking brake detection wire into the relay connector. 3 Lock the cable clamp. Installation Procedure 1. To prevent short circuits do not remove the caps from unused terminals or from the ignition and disconnect the · terminal of the... battery. 7. Make the proper input and output cable connections for each unit. 3. Please avoid installation on uneven surfaces. • Mount the unit so that receives a constant voltage supply, as with battery wires, the battery may be turned...
Instruction Manual
Page 58
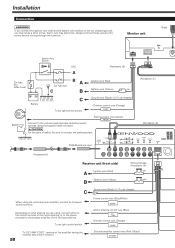
To car light control switch 58 To "EXT.AMP.CONT." Installation Connection 2WARNING If you connect the ignition wire (red) and the battery wire (yellow) to the car chassis (ground), you are using, connect either to ...
To car light control switch 58 To "EXT.AMP.CONT." Installation Connection 2WARNING If you connect the ignition wire (red) and the battery wire (yellow) to the car chassis (ground), you are using, connect either to ...

Instruction Manual
Page 60
... TO NAV.I/F TO ANTENNA TO MONITOR TO 5L I/F TO MZ-BUS To the monitor unit MZ-BUS Changer 5L Changer/Player ]"N" O - N 60 2WARNING Only connect black cable to TO 5L interface. Installation Connection for AV Equipments Audio/Visual input 1 • Visual input (Yellow) • Audio left input (White) • Audio right input...
... TO NAV.I/F TO ANTENNA TO MONITOR TO 5L I/F TO MZ-BUS To the monitor unit MZ-BUS Changer 5L Changer/Player ]"N" O - N 60 2WARNING Only connect black cable to TO 5L interface. Installation Connection for AV Equipments Audio/Visual input 1 • Visual input (Yellow) • Audio left input (White) • Audio right input...

Instruction Manual
Page 62
... 2 Align the holes in the unit (two locations on the vehicle, ensure that the unit is not stuck between the DVD player unit and vehicle parts. ■ Installing in Japanese-Made Cars 1 Refer to the main unit. • Damage may be damaged. If the unit is used ...with the accessory screws. When installing the DVD player unit on each side) with the vehicle mounting bracket and secure the unit with excessive force during the installations. Tapping screw (ø4 × 16 mm) (Accessory O) ;;;;;;;;;;;; NOTE Make sure that...
... 2 Align the holes in the unit (two locations on the vehicle, ensure that the unit is not stuck between the DVD player unit and vehicle parts. ■ Installing in Japanese-Made Cars 1 Refer to the main unit. • Damage may be damaged. If the unit is used ...with the accessory screws. When installing the DVD player unit on each side) with the vehicle mounting bracket and secure the unit with excessive force during the installations. Tapping screw (ø4 × 16 mm) (Accessory O) ;;;;;;;;;;;; NOTE Make sure that...

Instruction Manual
Page 64
... the power of the rear defogger. A cold window glass surface will weaken the adhesive strength of the double-sided tape. • Do not install the antenna in a location where it may also cause it to get wet during driving, such as the tape can only be stuck on once... on the windshield. 1 Check the location where the antenna is performed on a day with the clamper bar Rear window (Accessory R) Rear seat 64 Installation Installing the Antenna Units • Attach the antenna to the inner glass surface of the rear window using the supplied glass cleaner (Accessory Q), clean the area...
... the power of the rear defogger. A cold window glass surface will weaken the adhesive strength of the double-sided tape. • Do not install the antenna in a location where it may also cause it to get wet during driving, such as the tape can only be stuck on once... on the windshield. 1 Check the location where the antenna is performed on a day with the clamper bar Rear window (Accessory R) Rear seat 64 Installation Installing the Antenna Units • Attach the antenna to the inner glass surface of the rear window using the supplied glass cleaner (Accessory Q), clean the area...

Instruction Manual
Page 68
...RGB) Effective pixels 99.99% Pixel arrangement RGB striped arrangement Back lighting Cold cathode tube DVD Player Section D/A conversion 1 Bit Wow and flutter Below measurable limit Frequency response (Sampling frequency; ... kHz) Signal to noise ratio 115 dB Dynamic range 95 dB Playable disc DVD-VIDEO/VIDEO-CD/CD-DA Sampling frequency 8 fs(44.1, 48 kHz)/4 fs(96 kHz) Optical...Monitor unit 180(W) × 50(H) × 185(D) mm 7-1/16(W) × 1-15/16(H) × 5/16(D) inch Installation size(Monitor unit 178(W) × 50(H) × 165(D) mm 7(W) × 1-15/16(H) × 6-1/2(D) inch (...
...RGB) Effective pixels 99.99% Pixel arrangement RGB striped arrangement Back lighting Cold cathode tube DVD Player Section D/A conversion 1 Bit Wow and flutter Below measurable limit Frequency response (Sampling frequency; ... kHz) Signal to noise ratio 115 dB Dynamic range 95 dB Playable disc DVD-VIDEO/VIDEO-CD/CD-DA Sampling frequency 8 fs(44.1, 48 kHz)/4 fs(96 kHz) Optical...Monitor unit 180(W) × 50(H) × 185(D) mm 7-1/16(W) × 1-15/16(H) × 5/16(D) inch Installation size(Monitor unit 178(W) × 50(H) × 165(D) mm 7(W) × 1-15/16(H) × 6-1/2(D) inch (...


