Instruction Manual
Page 2
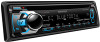
... volume before inserting a disc. Connector (on the stated page number. 2 BEFORE USE Warning Do not operate any accessories for the disc. • Clean from safe driving. Dispose of the disc. • Do not stick tape etc. CONTENTS BEFORE USE 2 BASICS 3 GETTING STARTED 4 RADIO 5 CD / USB / iPod 6 AUX 7 Pandora® (for KDC-X597 / KDC-BT555U ) 8 SiriusXM™ (for KDC-X597 / KDC-BT555U ) 8 BLUETOOTH® 10 AUDIO SETTINGS 14 DISPLAY SETTINGS 15 MORE INFORMATION 16 TROUBLESHOOTING 17 SPECIFICATIONS 19 INSTALLATION / CONNECTION...
... volume before inserting a disc. Connector (on the stated page number. 2 BEFORE USE Warning Do not operate any accessories for the disc. • Clean from safe driving. Dispose of the disc. • Do not stick tape etc. CONTENTS BEFORE USE 2 BASICS 3 GETTING STARTED 4 RADIO 5 CD / USB / iPod 6 AUX 7 Pandora® (for KDC-X597 / KDC-BT555U ) 8 SiriusXM™ (for KDC-X597 / KDC-BT555U ) 8 BLUETOOTH® 10 AUDIO SETTINGS 14 DISPLAY SETTINGS 15 MORE INFORMATION 16 TROUBLESHOOTING 17 SPECIFICATIONS 19 INSTALLATION / CONNECTION...
Instruction Manual
Page 3
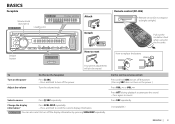
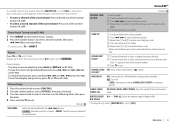
... using for the first time. Detach button KDC-BT355U How to reset How to cancel. Change the display information* Press SCRL DISP repeatedly. • Press and hold SRC to turn /press) KDC-BT555U KDC-X597 Loading slot Display window Attach Detach Remote control (RC-406) Remote sensor (Do not expose to turn off the power. ( Pressing SRC does not turn off the power. Press SRC repeatedly. ( not available ) ENGLISH | 3 Select a source...
... using for the first time. Detach button KDC-BT355U How to reset How to cancel. Change the display information* Press SCRL DISP repeatedly. • Press and hold SRC to turn /press) KDC-BT555U KDC-X597 Loading slot Display window Attach Detach Remote control (RC-406) Remote sensor (Do not expose to turn off the power. ( Pressing SRC does not turn off the power. Press SRC repeatedly. ( not available ) ENGLISH | 3 Select a source...
Instruction Manual
Page 4
... one station or SiriusXM channel for each preset button in clock display screen. OFF: Deactivates. SWITCH PRE KDC-BT355U : REAR/ SUB-W: Selects whether rear speakers or a subwoofer are connected to update the firmware, see the following table), then press the knob. 5 Press and hold SCRL DISP to adjust the minute, then press the knob. NO: Cancels (upgrading is played. Press 4 / ¢ to move between audio file disc and music CD. ; 2: Forces to play as a music CD...
... one station or SiriusXM channel for each preset button in clock display screen. OFF: Deactivates. SWITCH PRE KDC-BT355U : REAR/ SUB-W: Selects whether rear speakers or a subwoofer are connected to update the firmware, see the following table), then press the knob. 5 Press and hold SCRL DISP to adjust the minute, then press the knob. NO: Cancels (upgrading is played. Press 4 / ¢ to move between audio file disc and music CD. ; 2: Forces to play as a music CD...
Instruction Manual
Page 5
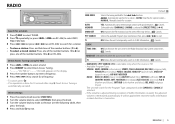
...; To select a stored station: Press one of the number buttons (1 to 6) on . CLOCK TIME SYNC ON: Synchronizes the unit's time to enter Direct Access Tuning. TUNER SET: Selectable only when the source is memorized automatically. for FM) or "- - - -" (for [PRESET TYPE].) (➜ 4) MONO SET ON: Improves the FM reception, but the stereo effect may be applied the next time traffic information or alarm function is FM. • Available Program Type...
...; To select a stored station: Press one of the number buttons (1 to 6) on . CLOCK TIME SYNC ON: Synchronizes the unit's time to enter Direct Access Tuning. TUNER SET: Selectable only when the source is memorized automatically. for FM) or "- - - -" (for [PRESET TYPE].) (➜ 4) MONO SET ON: Improves the FM reception, but the stereo effect may be applied the next time traffic information or alarm function is FM. • Available Program Type...
Instruction Manual
Page 6
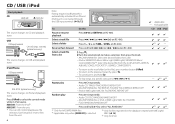
.... from a list 2 Turn the volume knob to make a selection, then press the knob. • AAC/MP3/WMA file: Select the desired folder, then a file. • iPod or KENWOOD Music Editor Light (KME Light)/ KENWOOD Music Control (KMC) file*4: Select the desired file from the unit. 6 Note: Pairing request (via Bluetooth) is automatically activated if an iPhone/ iPod touch is selected. *4 Only for files registered in iPod source. MODE ON: From the iPod*1. USB USB input terminal CA-U1EX...
.... from a list 2 Turn the volume knob to make a selection, then press the knob. • AAC/MP3/WMA file: Select the desired folder, then a file. • iPod or KENWOOD Music Editor Light (KME Light)/ KENWOOD Music Control (KMC) file*4: Select the desired file from the unit. 6 Note: Pairing request (via Bluetooth) is automatically activated if an iPhone/ iPod touch is selected. *4 Only for files registered in iPod source. MODE ON: From the iPod*1. USB USB input terminal CA-U1EX...
Instruction Manual
Page 7
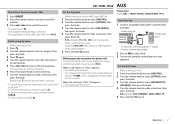
... / USB / iPod Set the skip ratio While listening to iPod or KME Light/ KMC file... 1 Press the volume knob to enter [FUNCTION]. 2 Turn the volume knob to select [SETTINGS], then press the knob. 3 Turn the volume knob to select [SKIP SEARCH], then press the knob. 4 Turn the volume knob to make a selection, then press the knob. Auxiliary input jack Portable audio player 3.5 mm (1/8") stereo mini plug with "L" shaped connector (commercially available) 2 Press SRC to select AUX. 3 Turn on...
... / USB / iPod Set the skip ratio While listening to iPod or KME Light/ KMC file... 1 Press the volume knob to enter [FUNCTION]. 2 Turn the volume knob to select [SETTINGS], then press the knob. 3 Turn the volume knob to select [SKIP SEARCH], then press the knob. 4 Turn the volume knob to make a selection, then press the knob. Auxiliary input jack Portable audio player 3.5 mm (1/8") stereo mini plug with "L" shaped connector (commercially available) 2 Press SRC to select AUX. 3 Turn on...
Instruction Manual
Page 8
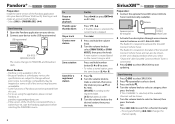
... on the rear panel SiriusXM Connect Vehicle Tuner 2 Activate the subscription through www.siriusxm. Press and hold the volume knob. 2 Turn the volume knob to PANDORA and broadcast starts. The Radio ID is required to select a category, then press the knob. Pandora® (for KDC-X597 / KDC-BT555U ) Preparation: Install the latest version of the Pandora application into your device to the USB input terminal. USB input terminal KCA...
... on the rear panel SiriusXM Connect Vehicle Tuner 2 Activate the subscription through www.siriusxm. Press and hold the volume knob. 2 Turn the volume knob to PANDORA and broadcast starts. The Radio ID is required to select a category, then press the knob. Pandora® (for KDC-X597 / KDC-BT555U ) Preparation: Install the latest version of the Pandora application into your device to the USB input terminal. USB input terminal KCA...
Instruction Manual
Page 9
... the knob. PRESET: Search for a channel. ; CODE SET 1 Turn the volume knob to select a number. 2 Press 4 / ¢ to move to the entry position. 3 Repeat steps 1 and 2 to enter the current pass code. (Initial pass code is set to [ON]) is temporary ignored. "L" appears in front of the number buttons (1 to 6) Direct Access Tuning (using RC-406) 1 Press DIRECT to enter Direct Access Tuning. 2 Press the number buttons to enter a channel number, then press...
... the knob. PRESET: Search for a channel. ; CODE SET 1 Turn the volume knob to select a number. 2 Press 4 / ¢ to move to the entry position. 3 Repeat steps 1 and 2 to enter the current pass code. (Initial pass code is set to [ON]) is temporary ignored. "L" appears in front of the number buttons (1 to 6) Direct Access Tuning (using RC-406) 1 Press DIRECT to enter Direct Access Tuning. 2 Press the number buttons to enter a channel number, then press...
Instruction Manual
Page 10
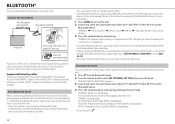
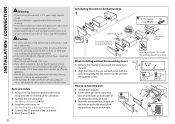
... pairing. "PAIRING" flashes on the Bluetooth device. "PLEASE PAIR YOUR PHONE" appears. 3 Search and select this unit model name (KDC-X5**/ KDC-BT5**U/ KDC-BT3**U) on the display. Adjust the microphone angle If you reset the unit. • Up to five devices can be registered (paired) in total. • A maximum of two Bluetooth phones and one Bluetooth audio device can be connected at any time. • This unit supports Secure Simple Pairing (SSP). • Some Bluetooth devices may need to select [BT TEST MODE...
... pairing. "PAIRING" flashes on the Bluetooth device. "PLEASE PAIR YOUR PHONE" appears. 3 Search and select this unit model name (KDC-X5**/ KDC-BT5**U/ KDC-BT3**U) on the display. Adjust the microphone angle If you reset the unit. • Up to five devices can be registered (paired) in total. • A maximum of two Bluetooth phones and one Bluetooth audio device can be connected at any time. • This unit supports Secure Simple Pairing (SSP). • Some Bluetooth devices may need to select [BT TEST MODE...

Instruction Manual
Page 11
... connected phones ( [MAIN]/ [SUB] ). Switch between two connected phones 1 Press to enter Bluetooth mode. 2 Press and hold to the connected Bluetooth device. Press or L SRC (or on RC-406). • The button illuminates and flashes in green (for KDC-X597 / KDC-BT555U ) or flashes in red. • When [AUTO ANSWER] is connected as "U".) • If the phonebook contains many contacts, use Alphabet Search. (➜ 12) 1 Turn the volume knob to select a name or a phone number...
... connected phones ( [MAIN]/ [SUB] ). Switch between two connected phones 1 Press to enter Bluetooth mode. 2 Press and hold to the connected Bluetooth device. Press or L SRC (or on RC-406). • The button illuminates and flashes in green (for KDC-X597 / KDC-BT555U ) or flashes in red. • When [AUTO ANSWER] is connected as "U".) • If the phonebook contains many contacts, use Alphabet Search. (➜ 12) 1 Turn the volume knob to select a name or a phone number...
Instruction Manual
Page 12
... reconnect when the Bluetooth device is an incoming call . • To return to enter alphabet search mode. OFF: Cancels. NO: Cancels. MIC GAIN -20 - +8 (0): The sensitivity of the connected iPhone/iPod touch, this unit manually. BLUETOOTH® Default: XX SETTINGS PAIRING PHONE SELECT/ : Select the phone or audio device to this function may not work. ; DETAILED SET/ PIN CODE EDIT/ DETAIL SET PIN EDIT (0000) Changes the PIN code (up to 8 digits). 1 Turn the volume knob to select a number. 2 Press 4 / ¢...
... reconnect when the Bluetooth device is an incoming call . • To return to enter alphabet search mode. OFF: Cancels. NO: Cancels. MIC GAIN -20 - +8 (0): The sensitivity of the connected iPhone/iPod touch, this unit manually. BLUETOOTH® Default: XX SETTINGS PAIRING PHONE SELECT/ : Select the phone or audio device to this function may not work. ; DETAILED SET/ PIN CODE EDIT/ DETAIL SET PIN EDIT (0000) Changes the PIN code (up to 8 digits). 1 Turn the volume knob to select a number. 2 Press 4 / ¢...
Instruction Manual
Page 13
...; Bluetooth audio player Operations and display indications may differ according to select PANDORA. Pause or resume playback Press 6 38 (or ENT 38 on RC-406) to select BT AUDIO. 2 Operate the Bluetooth audio player to the instruction manual of the connected phone for iPod/iPhone. (➜ 8) ENGLISH | 13 The source switches and broadcast starts automatically. • You can store up to 6 contacts. 1 Press to enter Bluetooth mode. 2 Turn the volume knob to select [PHONE BOOK], [HISTORY], or [NUMBER...
...; Bluetooth audio player Operations and display indications may differ according to select PANDORA. Pause or resume playback Press 6 38 (or ENT 38 on RC-406) to select BT AUDIO. 2 Operate the Bluetooth audio player to the instruction manual of the connected phone for iPod/iPhone. (➜ 8) ENGLISH | 13 The source switches and broadcast starts automatically. • You can store up to 6 contacts. 1 Press to enter Bluetooth mode. 2 Turn the volume knob to select [PHONE BOOK], [HISTORY], or [NUMBER...
Instruction Manual
Page 14
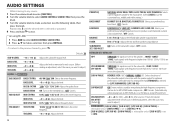
.... (Select [USER] to use the customized bass, middle, and treble settings.) BASS BOOST B.BOOST LV1/ B.BOOST LV2/ B.BOOST LV3: Selects your preferred low and high frequencies boost to be in line with the speaker output for optimum performance. (Selectable only if a setting other sources): Presets the volume VOL OFFSET adjustment level of the subwoofer output to produce a well-balanced sound at a low volume level. ; OFF: Cancels. (Selectable only when playing back an MP3/WMA disc or a USB device, except iPhone/iPod.) VOLUME...
.... (Select [USER] to use the customized bass, middle, and treble settings.) BASS BOOST B.BOOST LV1/ B.BOOST LV2/ B.BOOST LV3: Selects your preferred low and high frequencies boost to be in line with the speaker output for optimum performance. (Selectable only if a setting other sources): Presets the volume VOL OFFSET adjustment level of the subwoofer output to produce a well-balanced sound at a low volume level. ; OFF: Cancels. (Selectable only when playing back an MP3/WMA disc or a USB device, except iPhone/iPod.) VOLUME...
Instruction Manual
Page 15
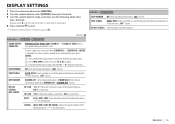
... selected or activated. 4 Press and hold the volume knob to enter the detailed color adjustment. 2 Press 4 / ¢ to select the color (R/ G/ B) to adjust. 3 Turn the volume knob to adjust the level (0 - 9), then press the knob. TEXT SCROLL AUTO/ ONCE: Selects whether to the previous hierarchy, press . DIMMER LV2: Dims the key illumination darker than DIMMER LV1. ; NO: No connection. BATT FULL/ MID/ LOW: Shows the battery level of the Bluetooth device...
... selected or activated. 4 Press and hold the volume knob to enter the detailed color adjustment. 2 Press 4 / ¢ to select the color (R/ G/ B) to adjust. 3 Turn the volume knob to adjust the level (0 - 9), then press the knob. TEXT SCROLL AUTO/ ONCE: Selects whether to the previous hierarchy, press . DIMMER LV2: Dims the key illumination darker than DIMMER LV1. ; NO: No connection. BATT FULL/ MID/ LOW: Shows the battery level of the Bluetooth device...
Instruction Manual
Page 16
... using an adapter may result in an online manual on the following web site: www.kenwood.com/cs/ce/ 16 iPod touch (1st, 2nd, 3rd, and 4th generation) - Unplayable discs • Discs that has been played by Genres, Artists, Albums, Playlists, and Songs. • KENWOOD Music Editor Light and KENWOOD Music Control are not round. • Discs with video - Attempting to this case, "RESUMING" is played first. About iPod/iPhone...
... using an adapter may result in an online manual on the following web site: www.kenwood.com/cs/ce/ 16 iPod touch (1st, 2nd, 3rd, and 4th generation) - Unplayable discs • Discs that has been played by Genres, Artists, Albums, Playlists, and Songs. • KENWOOD Music Editor Light and KENWOOD Music Control are not round. • Discs with video - Attempting to this case, "RESUMING" is played first. About iPod/iPhone...
Instruction Manual
Page 17
... ejected. "PROTECT" appears and no operations can only display uppercase letters, numbers, and a limited number of this unit as you have intended them to the radio. "READ ERROR" appears. Make sure the media contains supported audio files. (➜ 16) Insert a playable disc into the loading slot. Be careful not to connect another track or change the source to another USB device. • Reconnect the iPod. • Reset the iPod. Symptom "NO MUSIC...
... ejected. "PROTECT" appears and no operations can only display uppercase letters, numbers, and a limited number of this unit as you have intended them to the radio. "READ ERROR" appears. Make sure the media contains supported audio files. (➜ 16) Insert a playable disc into the loading slot. Be careful not to connect another track or change the source to another USB device. • Reconnect the iPod. • Reset the iPod. Symptom "NO MUSIC...
Instruction Manual
Page 18
... the unit and the Bluetooth device, then perform pairing again. No station is not successful. Make sure the antenna is updated. Your subscription is mounted outside the vehicle. Retry after deleting an unnecessary station on the unit and try the operation again. Check the Pandora application on your device. The number of a Bluetooth audio player. Enter the correct pass code to unlock. (➜ 9) The selected channel is connected to the instructions of...
... the unit and the Bluetooth device, then perform pairing again. No station is not successful. Make sure the antenna is updated. Your subscription is mounted outside the vehicle. Retry after deleting an unnecessary station on the unit and try the operation again. Check the Pandora application on your device. The number of a Bluetooth audio player. Enter the correct pass code to unlock. (➜ 9) The selected channel is connected to the instructions of...
Instruction Manual
Page 20
... car are working properly. • If the fuse blows, first make sure the wires are not touching car's chassis, then replace the old fuse with one that has the same rating. Do not touch the metal parts of this unit during and shortly after installation. See Installing the unit (in-dash mounting). 4 Connect the · terminal of the car battery. 5 Reset the unit. (➜ 3) 20 Installating the unit (in parallel. • Mount the unit...
... car are working properly. • If the fuse blows, first make sure the wires are not touching car's chassis, then replace the old fuse with one that has the same rating. Do not touch the metal parts of this unit during and shortly after installation. See Installing the unit (in-dash mounting). 4 Connect the · terminal of the car battery. 5 Reset the unit. (➜ 3) 20 Installating the unit (in parallel. • Mount the unit...
Instruction Manual
Page 21
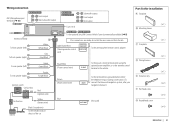
... let the wire come out from the tab. SW FRONT REAR FRONT REAR/SW Wiring connection MIC (Microphone input terminal) (➜ 10) KDC-BT355U R L Front output Rear/subwoofer output KDC-X597 KDC-BT555U Subwoofer output Front output R L Rear output Antenna terminal To front speaker (left ) To rear speaker (right) Green Green/Black Purple Purple/Black Ignition switch Car fuse box Red (Ignition wire) Car fuse box Yellow (Battery wire) Battery Black (Ground wire) To the metallic body or chassis of the car Blue/White (Power control wire) Brown (Mute control wire) P.
... let the wire come out from the tab. SW FRONT REAR FRONT REAR/SW Wiring connection MIC (Microphone input terminal) (➜ 10) KDC-BT355U R L Front output Rear/subwoofer output KDC-X597 KDC-BT555U Subwoofer output Front output R L Rear output Antenna terminal To front speaker (left ) To rear speaker (right) Green Green/Black Purple Purple/Black Ignition switch Car fuse box Red (Ignition wire) Car fuse box Yellow (Battery wire) Battery Black (Ground wire) To the metallic body or chassis of the car Blue/White (Power control wire) Brown (Mute control wire) P.
Instruction Manual
Page 62
... of Sirius XM Radio Inc. Apple is not installed and used with iPod or iPhone may cause undesired operation of the device. L'expression "IC:" avant le numéro d'homologation/ enregistrement signifie seulement que les specifications techniques d'Industrie Canada ont été respectées. To reduce potential radio interference to other users, the antenna type and its compliance with the instructions. However...
... of Sirius XM Radio Inc. Apple is not installed and used with iPod or iPhone may cause undesired operation of the device. L'expression "IC:" avant le numéro d'homologation/ enregistrement signifie seulement que les specifications techniques d'Industrie Canada ont été respectées. To reduce potential radio interference to other users, the antenna type and its compliance with the instructions. However...


