Instruction Manual
Page 2
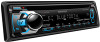
... sources to damage the connector. CONTENTS BEFORE USE 2 BASICS 3 GETTING STARTED 4 RADIO 5 CD / USB / iPod 6 AUX 7 Pandora® (for KDC-X597 / KDC-BT555U ) 8 SiriusXM™ (for the moisture to evaporate. Replace it might hinder driving safety. • Make sure all important data has been backed up... horizontally. • Remove burrs from the center of explosion if replaced incorrectly. We shall bear no responsibility for any loss of the faceplate) on the disc, or use a disc with tape stuck on the reverse side of recorded data. • Never put or leave...
... sources to damage the connector. CONTENTS BEFORE USE 2 BASICS 3 GETTING STARTED 4 RADIO 5 CD / USB / iPod 6 AUX 7 Pandora® (for KDC-X597 / KDC-BT555U ) 8 SiriusXM™ (for the moisture to evaporate. Replace it might hinder driving safety. • Make sure all important data has been backed up... horizontally. • Remove burrs from the center of explosion if replaced incorrectly. We shall bear no responsibility for any loss of the faceplate) on the disc, or use a disc with tape stuck on the reverse side of recorded data. • Never put or leave...
Instruction Manual
Page 3
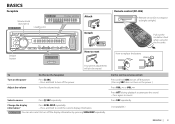
... BASICS Faceplate Volume knob (turn off the power. Press ATT during playback to attenuate the sound. • Press again to replace the battery Your preset adjustments will also be erased. Change the display information* Press SCRL DISP repeatedly. • Press and hold to turn /press) KDC-BT555U KDC-X597 Loading ...the volume Do this (on the remote control) Press and hold SRC to turn on the faceplate) Press L SRC. • Press and hold to scroll the current display information. * KDC-BT355U : You can also select to bright sunlight.) Pull out the insulation sheet when using for...
... BASICS Faceplate Volume knob (turn off the power. Press ATT during playback to attenuate the sound. • Press again to replace the battery Your preset adjustments will also be erased. Change the display information* Press SCRL DISP repeatedly. • Press and hold to turn /press) KDC-BT555U KDC-X597 Loading ...the volume Do this (on the remote control) Press and hold SRC to turn on the faceplate) Press L SRC. • Press and hold to scroll the current display information. * KDC-BT355U : You can also select to bright sunlight.) Pull out the insulation sheet when using for...
Instruction Manual
Page 20
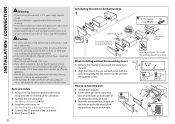
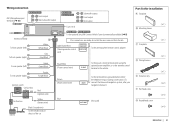
... connect the · wires of speaker to prevent a short circuit. • Insulate unconnected wires with the supplied screws. How to remove the unit 1 Detach the faceplate. 2 Fit the catch pin on the extraction keys into the slots on each side, then follow the arrows as shown on the right.
... connect the · wires of speaker to prevent a short circuit. • Insulate unconnected wires with the supplied screws. How to remove the unit 1 Detach the faceplate. 2 Fit the catch pin on the extraction keys into the slots on each side, then follow the arrows as shown on the right.
Instruction Manual
Page 21
... P. To the terminal that is grounded when either the telephone rings or during conversation. (To MUTE connect the Kenwood navigation system, refer your navigation manual.) Blue (Not used) ANT CONT Part list for installation A Faceplate B Mounting sleeve ( ×1 ) C Trim plate ( ×1 ) D Wiring harness ( ×1 ... remote control adapter To rear speaker (left ) To front speaker (right) White White/Black Gray Gray/Black Fuse (10 A) KDC-X597 / KDC-BT555U : To the optional SiriusXM Connect Vehicle Tuner (commercially available) (➜ 8) If no connections are made, do not let...
... P. To the terminal that is grounded when either the telephone rings or during conversation. (To MUTE connect the Kenwood navigation system, refer your navigation manual.) Blue (Not used) ANT CONT Part list for installation A Faceplate B Mounting sleeve ( ×1 ) C Trim plate ( ×1 ) D Wiring harness ( ×1 ... remote control adapter To rear speaker (left ) To front speaker (right) White White/Black Gray Gray/Black Fuse (10 A) KDC-X597 / KDC-BT555U : To the optional SiriusXM Connect Vehicle Tuner (commercially available) (➜ 8) If no connections are made, do not let...


