Instruction Manual
Page 7
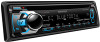
... during a call, press SRC. You can enter up to three characters. 6 Press the volume knob to the entry position. When the call Connect the MUTE wire to your telephone using RC-406) 1 Press DIRECT. 2 Press the number buttons to enter a track/file number. 3 Press 4 / ¢ (+) to search for music. • To...
... during a call, press SRC. You can enter up to three characters. 6 Press the volume knob to the entry position. When the call Connect the MUTE wire to your telephone using RC-406) 1 Press DIRECT. 2 Press the number buttons to enter a track/file number. 3 Press 4 / ¢ (+) to search for music. • To...
Instruction Manual
Page 17
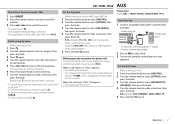
... this unit is incorrect. Playback order is generated. "PROTECT" appears and no operations can only display uppercase letters, numbers, and a limited number of the speaker wires are not counted on this unit as you have intended them to USB again. "NO DEVICE" appears. Check to be heard. • The unit does...
... this unit is incorrect. Playback order is generated. "PROTECT" appears and no operations can only display uppercase letters, numbers, and a limited number of the speaker wires are not counted on this unit as you have intended them to USB again. "NO DEVICE" appears. Check to be heard. • The unit does...
Instruction Manual
Page 20
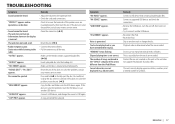
...; Install this unit in place. Metal parts such as the heat sink and enclosure become hot. • Do not connect the · wires of speaker to the car chassis, Ground wire (black), or in parallel. • Mount the unit with the angle of 30º or less. • If your car Bend... the appropriate tabs to hold the mounting sleeve firmly in the console of your car. Caution • For safety's sake, leave wiring and mounting to the car's chassis again after use of the unit. on and off by the ignition key. • After the unit is turned...
...; Install this unit in place. Metal parts such as the heat sink and enclosure become hot. • Do not connect the · wires of speaker to the car chassis, Ground wire (black), or in parallel. • Mount the unit with the angle of 30º or less. • If your car Bend... the appropriate tabs to hold the mounting sleeve firmly in the console of your car. Caution • For safety's sake, leave wiring and mounting to the car's chassis again after use of the unit. on and off by the ignition key. • After the unit is turned...
Instruction Manual
Page 21
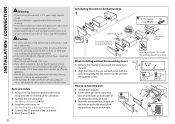
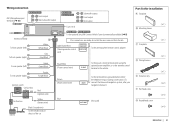
... either the telephone rings or during conversation. (To MUTE connect the Kenwood navigation system, refer your navigation manual.) Blue (Not used) ANT CONT Part list for installation A Faceplate B Mounting sleeve ( ×1 ) C Trim plate ( ×1 ) D Wiring harness ( ×1 ) E Extraction key F Flat head screw ... blue/yellow (Steering remote control wire) STEERING WHEEL REMOTE INPUT REMOTE CONT To the steering wheel remote control adapter To rear speaker (left ) To front speaker (right) White White/Black Gray Gray/Black Fuse (10 A) KDC-X597 / KDC-BT555U : To the optional SiriusXM...
... either the telephone rings or during conversation. (To MUTE connect the Kenwood navigation system, refer your navigation manual.) Blue (Not used) ANT CONT Part list for installation A Faceplate B Mounting sleeve ( ×1 ) C Trim plate ( ×1 ) D Wiring harness ( ×1 ) E Extraction key F Flat head screw ... blue/yellow (Steering remote control wire) STEERING WHEEL REMOTE INPUT REMOTE CONT To the steering wheel remote control adapter To rear speaker (left ) To front speaker (right) White White/Black Gray Gray/Black Fuse (10 A) KDC-X597 / KDC-BT555U : To the optional SiriusXM...


