Instruction Manual
Page 2
...Control CRSC (Clean Reception System Circuit) Receive mode Setting SIRIUS 10 (ESN) display Auxiliary Input Display Setting Text Scroll Built-in Amp Setting Dual Zone System Setting B.M.S. (Bass Management System) B.M.5. Seek TextlTitle Scroll HD Radio control... Tuning CD/USB device/Audio file/External disc control features 19 Playing CD & Audio file Playing USB device Playing External Disc ...CDs 7 About AAC, MP3 and WMA 8 About USB device 10 General features 11 Power Selecting the Source Volume Attenuator System Q Audio Control Adjusting the detail of remote control 35 Accessories...
...Control CRSC (Clean Reception System Circuit) Receive mode Setting SIRIUS 10 (ESN) display Auxiliary Input Display Setting Text Scroll Built-in Amp Setting Dual Zone System Setting B.M.S. (Bass Management System) B.M.5. Seek TextlTitle Scroll HD Radio control... Tuning CD/USB device/Audio file/External disc control features 19 Playing CD & Audio file Playing USB device Playing External Disc ...CDs 7 About AAC, MP3 and WMA 8 About USB device 10 General features 11 Power Selecting the Source Volume Attenuator System Q Audio Control Adjusting the detail of remote control 35 Accessories...
Instruction Manual
Page 5
...USB devices, refer to KDC-X590/KDC...MP632U - Normal operation should be displayed by "Media Manager". -Refer to this unit. - Refer to the user's manual recorded in the,CD-ROM attached to thefollowingositefor.theupdated information of this ul1itfor the first ti't,lf! En:gl.ishlS If you purchase optional accessories, check with your Kenwood...·ationmanualfor the installation method of (page 28) to explain more clearly how the controls are A-Z 0-9 @ III 1 I 1\ - {} ~. - No USB device comes with a dry soft doth such asasiliconcloth. For the types of PhatNoise. ...
...USB devices, refer to KDC-X590/KDC...MP632U - Normal operation should be displayed by "Media Manager". -Refer to this unit. - Refer to the user's manual recorded in the,CD-ROM attached to thefollowingositefor.theupdated information of this ul1itfor the first ti't,lf! En:gl.ishlS If you purchase optional accessories, check with your Kenwood...·ationmanualfor the installation method of (page 28) to explain more clearly how the controls are A-Z 0-9 @ III 1 I 1\ - {} ~. - No USB device comes with a dry soft doth such asasiliconcloth. For the types of PhatNoise. ...

Instruction Manual
Page 6
... radio tuner: Refer to the sections ofA models for operations. Select the preset band for -thi,s' llnitmay .bedifferent from the Instructionmanual;therefore,referto the following control methods of DAB Tuner function. However, the following supplemental·instruction. 1.. Open Auto Ensemble Memdry Entry. After storing in , iii ..... ----I . 1-6 AM SRC DISPIC.S. Press ...optionalaccessory) for at ·Ieast 2 seconds. for the operation method. • Refer to the instruction manualof SIRIUS Satellite radio tuner KTC-SR901 /SR902/SR903 (optional accessory), when connected;
... radio tuner: Refer to the sections ofA models for operations. Select the preset band for -thi,s' llnitmay .bedifferent from the Instructionmanual;therefore,referto the following control methods of DAB Tuner function. However, the following supplemental·instruction. 1.. Open Auto Ensemble Memdry Entry. After storing in , iii ..... ----I . 1-6 AM SRC DISPIC.S. Press ...optionalaccessory) for at ·Ieast 2 seconds. for the operation method. • Refer to the instruction manualof SIRIUS Satellite radio tuner KTC-SR901 /SR902/SR903 (optional accessory), when connected;

Instruction Manual
Page 7
CDs that cannot be used • CDs that are not round cannot be used. • CD-R and CD-RW are easier to damagethan a normalmusictb. LJse'aCD-R or a'ED-RW' after" reading the caution items oh:the pat.kage et Removing CDs When removing CDs from this unit, pullthem out horizontally. About CDs Handling CDs • Do not touch the recording surface of the CD.
CDs that cannot be used • CDs that are not round cannot be used. • CD-R and CD-RW are easier to damagethan a normalmusictb. LJse'aCD-R or a'ED-RW' after" reading the caution items oh:the pat.kage et Removing CDs When removing CDs from this unit, pullthem out horizontally. About CDs Handling CDs • Do not touch the recording surface of the CD.
Instruction Manual
Page 11
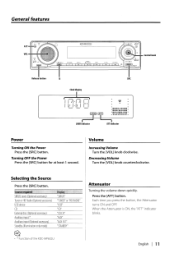
... ON the Power Press the [SRC] button. SIRIUS tuner (Optional accessory) Tuner or HD Radio (Optional accessory) USB device CD External disc (Optional accessory) Auxiliary input oXAuxiliary input (Optional accessory) Standby (Illumination only mode) "SIRIUS" "TUNER" or "HD RADIO" "USB" "CD" "CD CH" "AUX" "AUX EXT' "STANDBY" ~ ~ . * Function of the KDC-MP632U. Turning OFF the Power Press the [SRC] button for at...
... ON the Power Press the [SRC] button. SIRIUS tuner (Optional accessory) Tuner or HD Radio (Optional accessory) USB device CD External disc (Optional accessory) Auxiliary input oXAuxiliary input (Optional accessory) Standby (Illumination only mode) "SIRIUS" "TUNER" or "HD RADIO" "USB" "CD" "CD CH" "AUX" "AUX EXT' "STANDBY" ~ ~ . * Function of the KDC-MP632U. Turning OFF the Power Press the [SRC] button for at...

Instruction Manual
Page 16
... faceplate is locked in its faceplate case while detached. • Do not expose the faceplate (and the faceplate case) to your telephone using a commercial telephone accessory. Removing the Faceplate 1 Press the Release button. Listening to use the TEL Mute feature, you to the audio during a call comes in until it . The...
... faceplate is locked in its faceplate case while detached. • Do not expose the faceplate (and the faceplate case) to your telephone using a commercial telephone accessory. Removing the Faceplate 1 Press the Release button. Listening to use the TEL Mute feature, you to the audio during a call comes in until it . The...

Instruction Manual
Page 20
...ACDrive media. (KDC-X590/MP632U only) Pause and play Press the Control knob. Removing the USB device 1 Select a source other than the USB device Press the [SRC] button. 2 Remove the USB device. & • Removing the USB device with it will differ depending on AAC file ...accessory disc player connected to this unit. CD/USB device/Audio file/External disc control features Playing USB device Playing USB device 1 Select a source other than the USB device Press the [SRC] button. 2 Connect the USB device. 3 Select USB source Press the [SRC] button. Even after removing the USB...
...ACDrive media. (KDC-X590/MP632U only) Pause and play Press the Control knob. Removing the USB device 1 Select a source other than the USB device Press the [SRC] button. 2 Remove the USB device. & • Removing the USB device with it will differ depending on AAC file ...accessory disc player connected to this unit. CD/USB device/Audio file/External disc control features Playing USB device Playing USB device 1 Select a source other than the USB device Press the [SRC] button. 2 Connect the USB device. 3 Select USB source Press the [SRC] button. Even after removing the USB...

Instruction Manual
Page 38
... ignition wires to a rear output terminal. on the ends of the wiring harness. 4. If your car. 7. After the unit is 30° or less. Accessories/ Installation Procedure Accessories .......... 1 ..........2 ® ..........4 ..........4 ® ..........2 ® .......... 1 .......... 1 Installation Procedure 1. Connect the speaker wires of the unconnected wires or the terminals. Always connect those wires to the power source...
... ignition wires to a rear output terminal. on the ends of the wiring harness. 4. If your car. 7. After the unit is 30° or less. Accessories/ Installation Procedure Accessories .......... 1 ..........2 ® ..........4 ..........4 ® ..........2 ® .......... 1 .......... 1 Installation Procedure 1. Connect the speaker wires of the unconnected wires or the terminals. Always connect those wires to the power source...

Instruction Manual
Page 39
... changer/ External optional accessory If no connections are using the optional power amplifier, connect to the terminal that the cable will cause the unit to ~ the relevant instruction manuals. Connect to its power control terminal. When using , connect either the telephone rings or during conversation. ~ To connect the Kenwood navigation ~ system, consult your car...
... changer/ External optional accessory If no connections are using the optional power amplifier, connect to the terminal that the cable will cause the unit to ~ the relevant instruction manuals. Connect to its power control terminal. When using , connect either the telephone rings or during conversation. ~ To connect the Kenwood navigation ~ system, consult your car...
Instruction Manual
Page 40
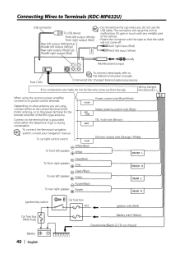
...KDC-MP632U) USB connector [0 To USB device ~ • Do not remove the cap when you are made, do not use the ~ USB cable. When using , connect either the telephone rings or during conversation. ~ To connect the Kenwood... left output (Wh ite) of the film-type antenna. To Kenwood disc changer/ External optional accessory If no connections are using the optional power amplifier, connect to ... (Main fuse) Battery 40 I English Ground wire Batter wire (Yellow) To car light control switch 8 White/Black To front left speaker (±) ..;.W;.;.h.;.;,.;it gets in touch with the...
...KDC-MP632U) USB connector [0 To USB device ~ • Do not remove the cap when you are made, do not use the ~ USB cable. When using , connect either the telephone rings or during conversation. ~ To connect the Kenwood... left output (Wh ite) of the film-type antenna. To Kenwood disc changer/ External optional accessory If no connections are using the optional power amplifier, connect to ... (Main fuse) Battery 40 I English Ground wire Batter wire (Yellow) To car light control switch 8 White/Black To front left speaker (±) ..;.W;.;.h.;.;,.;it gets in touch with the...

Instruction Manual
Page 42
...frame. 2 Align the holes in the unit (two locations on each side) with the vehicle mounting bracket and secure the unit with the accessory screws. \ Bend the tabs of different screws might result in damage to the main unit. • Damage may occur if a screwdriver... any screws except for example, the sound may malfunction (for those provided. If the unit is installed securely in place. I~@ \-10 05mm 05mm Accessory@...for Nissan car Accessory0 ...for Toyota car ~ • During installation, do not use of the mounting sleeve with excessive force during the installations. ...
...frame. 2 Align the holes in the unit (two locations on each side) with the vehicle mounting bracket and secure the unit with the accessory screws. \ Bend the tabs of different screws might result in damage to the main unit. • Damage may occur if a screwdriver... any screws except for example, the sound may malfunction (for those provided. If the unit is installed securely in place. I~@ \-10 05mm 05mm Accessory@...for Nissan car Accessory0 ...for Toyota car ~ • During installation, do not use of the mounting sleeve with excessive force during the installations. ...

Instruction Manual
Page 43
... open the faceplate by pressing the Release button. 4 Tighten the screw (02 x 5 mm) (Accessory@) and bracket (Accessory0) in the hole shown on the diagram. ~ ~ ~ ~ L ~Accessory(J) I Accessory@ ~~ 3 Tighten the screw (02 x 5 mm) (Accessory@) and bracket (Accessory @) in the hole shown on the diagram. ~ Accessory@ "'-I 43 Screwing the Faceplate on the Unit If you screw them in any...
... open the faceplate by pressing the Release button. 4 Tighten the screw (02 x 5 mm) (Accessory@) and bracket (Accessory0) in the hole shown on the diagram. ~ ~ ~ ~ L ~Accessory(J) I Accessory@ ~~ 3 Tighten the screw (02 x 5 mm) (Accessory@) and bracket (Accessory @) in the hole shown on the diagram. ~ Accessory@ "'-I 43 Screwing the Faceplate on the Unit If you screw them in any...

Instruction Manual
Page 44
... the inside. ~ ~ • The frame can be removed from the bottom side in the figure. Removing the Unit 1 Refer to drop it forward as shown. Accessory@ Removal tool 2 When the upper level is removed, remove the lower two locations. Upper the frame and pull it . 44 I English Removing the Unit Removing...
... the inside. ~ ~ • The frame can be removed from the bottom side in the figure. Removing the Unit 1 Refer to drop it forward as shown. Accessory@ Removal tool 2 When the upper level is removed, remove the lower two locations. Upper the frame and pull it . 44 I English Removing the Unit Removing...


