Instruction Manual
Page 2
... Adjustment DSI (Disabled System Indicator) Display Illumination Control Dimmer Switching preout Built-in Auxiliary input Setting CD Read Setti ng Voice Index Firmware version display Unique 10 display Audio Preset Memory Audio Preset Recall Demonstration mode Setting Basic Operations of Audio Control Audio Setup Speaker Setting Subwoofer Output Switching Display Theft Deterrent Faceplate TEL Mute Tuner features 17 Tuning Tuning Mode Direct Access Tuning Station Preset Memory Auto Memory Entry Preset Tuning CD/USB device/Audio file/External disc control features 19 Playing CD & Audio...
... Adjustment DSI (Disabled System Indicator) Display Illumination Control Dimmer Switching preout Built-in Auxiliary input Setting CD Read Setti ng Voice Index Firmware version display Unique 10 display Audio Preset Memory Audio Preset Recall Demonstration mode Setting Basic Operations of Audio Control Audio Setup Speaker Setting Subwoofer Output Switching Display Theft Deterrent Faceplate TEL Mute Tuner features 17 Tuning Tuning Mode Direct Access Tuning Station Preset Memory Auto Memory Entry Preset Tuning CD/USB device/Audio file/External disc control features 19 Playing CD & Audio...
Instruction Manual
Page 5
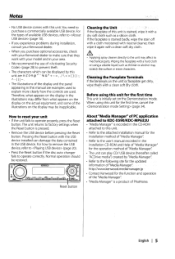
... this unit. Pressing the Reset button with a dry soft doth such asasiliconcloth. Refer to the user's manual recorded in the installation CD~ROM and Help, of "Media Manager" for the function and operation of this unit are used. For the types of the illustrations on the actual equipment, and some of available USB devices, refer to KDC-X590/KDC...MP632U - Therefore, what appears on the display in the USB device. stained...
... this unit. Pressing the Reset button with a dry soft doth such asasiliconcloth. Refer to the user's manual recorded in the installation CD~ROM and Help, of "Media Manager" for the function and operation of this unit are used. For the types of the illustrations on the actual equipment, and some of available USB devices, refer to KDC-X590/KDC...MP632U - Therefore, what appears on the display in the USB device. stained...
Instruction Manual
Page 10
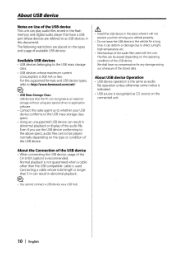
... referred to the USB mass storage class. • USB devices whose total length is recognized as CD source on the connected unit. For the supported formats and USB device types, refer to direct sunlight, high temperature, etc. About USB device Notes on Use of the USB device This unit can play audio files stored in the flash memory and digital audio player that the PC can recognize as an external storage without using any damage...
... referred to the USB mass storage class. • USB devices whose total length is recognized as CD source on the connected unit. For the supported formats and USB device types, refer to direct sunlight, high temperature, etc. About USB device Notes on Use of the USB device This unit can play audio files stored in the flash memory and digital audio player that the PC can recognize as an external storage without using any damage...
Instruction Manual
Page 12
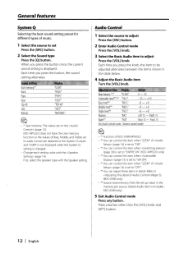
...; *5 You can adjust these items in the memory per source. (Detail Audio item is included: KDC-X590 only) 5 Exit Audio Control mode Press any button. General features System Q Selecting the best sound setting preset for different types of music. 1 Select the source to the System Q values and "USER" is not displayed when the System Q setting is changed. • Change each setting value with the Speaker setting. KDC-MP532U does not have the User memory function so the values...
...; *5 You can adjust these items in the memory per source. (Detail Audio item is included: KDC-X590 only) 5 Exit Audio Control mode Press any button. General features System Q Selecting the best sound setting preset for different types of music. 1 Select the source to the System Q values and "USER" is not displayed when the System Q setting is changed. • Change each setting value with the Speaker setting. KDC-MP532U does not have the User memory function so the values...

Instruction Manual
Page 14
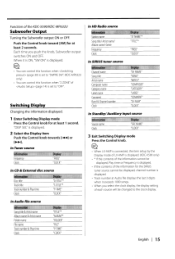
... low volume. • *1 Function of KDC-X590/MP632U. • *2 You can control this item when (page 30) is set to "SWPRE SW". (KDC-MP632U only) • *2 You can control this item when (page 15) is set to Through. • *5 KDC-X590 only • Dual Zone System Main source and sub source (Auxiliary input) output Front channel and Rear channel separately. - Select the IISTANDBYII display. 2 Enter Speaker Setting mode Press the [VOL] knob. 3 Select the Speaker type Turn the...
... low volume. • *1 Function of KDC-X590/MP632U. • *2 You can control this item when (page 30) is set to "SWPRE SW". (KDC-MP632U only) • *2 You can control this item when (page 15) is set to Through. • *5 KDC-X590 only • Dual Zone System Main source and sub source (Auxiliary input) output Front channel and Rear channel separately. - Select the IISTANDBYII display. 2 Enter Speaker Setting mode Press the [VOL] knob. 3 Select the Speaker type Turn the...
Instruction Manual
Page 15
... Track number &Play time Clock IITITLE II * IIFOLDERII IIFILEII IIP-TIMEII IICLOCKII English I .....] or [~]. Each time you select the clock display, the display setting of the information for the SIRIUS tuner source cannot be changed to "OFF". IIDISP SELl is set to "SWPRE SW". (KDC-MP632U only) • You can control this function when "2 ZONE" of the KDC-X590/KDC-MP632U Subwoofer Output Turning the Subwooferoutput ON or OFF. Function of (page 14) is displayed. 2 Select the Display item...
... Track number &Play time Clock IITITLE II * IIFOLDERII IIFILEII IIP-TIMEII IICLOCKII English I .....] or [~]. Each time you select the clock display, the display setting of the information for the SIRIUS tuner source cannot be changed to "OFF". IIDISP SELl is set to "SWPRE SW". (KDC-MP632U only) • You can control this function when "2 ZONE" of the KDC-X590/KDC-MP632U Subwoofer Output Turning the Subwooferoutput ON or OFF. Function of (page 14) is displayed. 2 Select the Display item...

Instruction Manual
Page 20
...] button. 2 Remove the USB device. & • Removing the USB device with the Control knob. Display examples: "CD CH" "MDCW CD changer MD changer Pause and play Press the Control knob. Fast Forwarding and Reversing Fast Forwarding Hold down toward [~] with it will differ depending on AAC file format. 20 I English Reversing Hold down toward [~] with the unit power turned off. Select the display for the disc player you press the knob, the audio pauses...
...] button. 2 Remove the USB device. & • Removing the USB device with the Control knob. Display examples: "CD CH" "MDCW CD changer MD changer Pause and play Press the Control knob. Fast Forwarding and Reversing Fast Forwarding Hold down toward [~] with it will differ depending on AAC file format. 20 I English Reversing Hold down toward [~] with the unit power turned off. Select the display for the disc player you press the knob, the audio pauses...

Instruction Manual
Page 29
... Clock Adjust mode Press the Control knob for at night. In Standby mode Dimmer Dimming this unit's display automatically when the vehicle light switch is off, you perform no operation for the following: • Volume • Attenuator • Selecting the source • Ejecting the disc • Turning off the display when you are driving at least 1 second. In Standby mode Touch Sensor Tone Setting the operation check sound (beep sound) ON/OFF. In Standby mode Manual Clock Adjustment 1 Select Clock Adjustment mode...
... Clock Adjust mode Press the Control knob for at night. In Standby mode Dimmer Dimming this unit's display automatically when the vehicle light switch is off, you perform no operation for the following: • Volume • Attenuator • Selecting the source • Ejecting the disc • Turning off the display when you are driving at least 1 second. In Standby mode Touch Sensor Tone Setting the operation check sound (beep sound) ON/OFF. In Standby mode Manual Clock Adjustment 1 Select Clock Adjustment mode...
Instruction Manual
Page 30
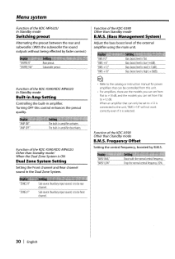
... control.) "SWPRE R" "SWPRE SW" Rear preout. Subwoofer preout. Bass boost level is low (+6dB). Function of the external amplifier using the main unit. 'IBMS FLT" "BMS +6" "BMS + 12" "BMS + 18" Bass boost level is to be front channel. 30 I English Function of the KDC-X590IKDC-MP632U In Standby mode Built-in Amp Setting Controlling the built-in the Dual Zone System. Sub source (Auxiliary input source) is fiat. The built-in amplifier activates. "Z0NE2 R" "Z0NE2 F" Sub source (Auxiliary input source) is selected. "AMPOW "AMP...
... control.) "SWPRE R" "SWPRE SW" Rear preout. Subwoofer preout. Bass boost level is low (+6dB). Function of the external amplifier using the main unit. 'IBMS FLT" "BMS +6" "BMS + 12" "BMS + 18" Bass boost level is to be front channel. 30 I English Function of the KDC-X590IKDC-MP632U In Standby mode Built-in Amp Setting Controlling the built-in the Dual Zone System. Sub source (Auxiliary input source) is fiat. The built-in amplifier activates. "Z0NE2 R" "Z0NE2 F" Sub source (Auxiliary input source) is selected. "AMPOW "AMP...
Instruction Manual
Page 31
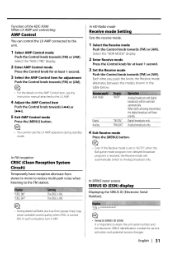
...]. Analog broadcasts only. 4 Exit Receive mode Press the [MENU] button. ~ ~ • Even if the Receive mode is set to "AUTO", when the Ball game mode program (non-delayed broadcast program) is turned ON. English I ....] or [~]. 5 Exit AMP Control mode Press the [MENU] button. ~ • You cannot use the LX AMP operation during standby mode. Function of the KDC-X590 When LX AMP unit connecting AMP Control You can control the LX AMP connected to the unit. 1 Select AMP Control mode Push the Control knob towards [FM] or...
...]. Analog broadcasts only. 4 Exit Receive mode Press the [MENU] button. ~ ~ • Even if the Receive mode is set to "AUTO", when the Ball game mode program (non-delayed broadcast program) is turned ON. English I ....] or [~]. 5 Exit AMP Control mode Press the [MENU] button. ~ • You cannot use the LX AMP operation during standby mode. Function of the KDC-X590 When LX AMP unit connecting AMP Control You can control the LX AMP connected to the unit. 1 Select AMP Control mode Push the Control knob towards [FM] or...
Instruction Manual
Page 33
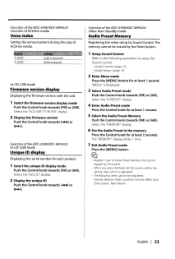
...]. Function of the KDC-X590IKDC-MP632U In COl USB mode Unique ID display Displaying the serial number for at least 1 second. Volume, Balance, Fader, Loudness, Volume offset, Dual Zone System, Rear Volume English I 33 The memory cannot be erased by the Reset button. 1 Setup Sound Control Refer to the following items cannot be registered. Select the "MEMORY" display. 6 Put the Audio Preset in the memory Press the Control knob for at least 1 second. In COl USB mode Firmware version display Displaying...
...]. Function of the KDC-X590IKDC-MP632U In COl USB mode Unique ID display Displaying the serial number for at least 1 second. Volume, Balance, Fader, Loudness, Volume offset, Dual Zone System, Rear Volume English I 33 The memory cannot be erased by the Reset button. 1 Setup Sound Control Refer to the following items cannot be registered. Select the "MEMORY" display. 6 Put the Audio Preset in the memory Press the Control knob for at least 1 second. In COl USB mode Firmware version display Displaying...

Instruction Manual
Page 35
... refer to the previous level. English I t [O]-[9]-~~ 4_ _ Loading and Replacing the battery Basic operations [VOL] buttons Adjusts the volume. [SRC] button Each time you press the button, the source alternates. DIRECT I 35 When the button is accidentally swallowed. ~ • Do not set the remote control in hot places such as on the dashboard. I AWARNING I • Store unused batteries out of the reach of remote control VOL--~AUD-~--em SRC...
... refer to the previous level. English I t [O]-[9]-~~ 4_ _ Loading and Replacing the battery Basic operations [VOL] buttons Adjusts the volume. [SRC] button Each time you press the button, the source alternates. DIRECT I 35 When the button is accidentally swallowed. ~ • Do not set the remote control in hot places such as on the dashboard. I AWARNING I • Store unused batteries out of the reach of remote control VOL--~AUD-~--em SRC...

Instruction Manual
Page 36
... (page 18) mode. 36 I [T] buttons Adjusts the volume of the rear channel. Each time you press the [FM] button, the band alternates between track! file/disc number. In Disc/USB source [~]/ [~] buttons Going forwards and backwards between the FM 1, FM2, and FM3 bands. [~]I [..,] buttons Tune up or down channels. [0] - [9] buttons Press buttons [1] - [6] to recall preset channels. [DIRECT] button Enters and cancels the mode. In Tuner source [FM]/ [AM] buttons Selects the band. Basic Operations of remote control Audio Control [AUD] button Selects the Audio item to...
... (page 18) mode. 36 I [T] buttons Adjusts the volume of the rear channel. Each time you press the [FM] button, the band alternates between track! file/disc number. In Disc/USB source [~]/ [~] buttons Going forwards and backwards between the FM 1, FM2, and FM3 bands. [~]I [..,] buttons Tune up or down channels. [0] - [9] buttons Press buttons [1] - [6] to recall preset channels. [DIRECT] button Enters and cancels the mode. In Tuner source [FM]/ [AM] buttons Selects the band. Basic Operations of remote control Audio Control [AUD] button Selects the Audio item to...

Instruction Manual
Page 38
... chasis of the left speaker to a front output terminal, do not connect the 8 connector to a power source that in the car. Install the unit in the following order: ground, battery, ignition. 38 I English 5. If you connect the ignition wire to the unit. 6. If the fuse blows, first make sure to any metal part in turn may have an ACC position, connect the ignition wires to a rear output terminal. To prevent a short...
... chasis of the left speaker to a front output terminal, do not connect the 8 connector to a power source that in the car. Install the unit in the following order: ground, battery, ignition. 38 I English 5. If you connect the ignition wire to the unit. 6. If the fuse blows, first make sure to any metal part in turn may have an ACC position, connect the ignition wires to a rear output terminal. To prevent a short...
Instruction Manual
Page 40
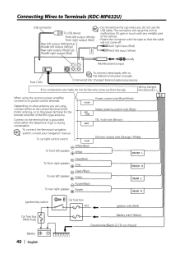
... switch @=:> @ Carfuse box ACC . . . 1'-n_it_io_n_w_ire.......;...(R_e_d)'--- .......... 1I Car fuse box (Main fuse) Battery 40 I English Ground wire Batter wire (Yellow) Connecting Wires to Terminals (KDC-MP632U) USB connector [0 To USB device ~ • Do not remove the cap when you are made, do not use the ~ USB cable. When using , connect either the telephone rings or during conversation. ~ To connect the Kenwood navigation ~ system, consult your navigation manual. Connect to its power control terminal. AUX right input (Red) Rear right output (Red)/Sub...
... switch @=:> @ Carfuse box ACC . . . 1'-n_it_io_n_w_ire.......;...(R_e_d)'--- .......... 1I Car fuse box (Main fuse) Battery 40 I English Ground wire Batter wire (Yellow) Connecting Wires to Terminals (KDC-MP632U) USB connector [0 To USB device ~ • Do not remove the cap when you are made, do not use the ~ USB cable. When using , connect either the telephone rings or during conversation. ~ To connect the Kenwood navigation ~ system, consult your navigation manual. Connect to its power control terminal. AUX right input (Red) Rear right output (Red)/Sub...

Instruction Manual
Page 41
... the cable will cause the unit to Terminals (KDC-MP532Uj USB connector [0 To USB device Rear left speaker ® Green/Black Green 8 To rear right speaker ® Purple/Black Purple Ignition key switch ([)= @ Car fuse box ACC Ignition wire (Red) 11 Car fuse box (Main fuse) Battery wire (Yellow) Ground wire (Black) 8 (To car chassis) English I 41 When using , connect either the telephone rings or during conversation. ~ To connect the Kenwood navigation ~ system, consult your navigation manual.
... the cable will cause the unit to Terminals (KDC-MP532Uj USB connector [0 To USB device Rear left speaker ® Green/Black Green 8 To rear right speaker ® Purple/Black Purple Ignition key switch ([)= @ Car fuse box ACC Ignition wire (Red) 11 Car fuse box (Main fuse) Battery wire (Yellow) Ground wire (Black) 8 (To car chassis) English I 41 When using , connect either the telephone rings or during conversation. ~ To connect the Kenwood navigation ~ system, consult your navigation manual.

Instruction Manual
Page 45
... the wiring harness correctly. The memory is erased when the ignition is connected to one with one side. (@" Center the fader and balance settings. 1/ The input/output wires or wiring harness are not wired correctly. (@" Reconnect the speaker wires so that each source. 1/ The Disc changer isn't connected. (@" Connect the Disc changer. No sound can 't be the result of Volume offset are incorrectly connected. (@" Connect the wire correctly, referring to an external disc source. ? The power does not turn ON. 1/ The fuse...
... the wiring harness correctly. The memory is erased when the ignition is connected to one with one side. (@" Center the fader and balance settings. 1/ The input/output wires or wiring harness are not wired correctly. (@" Reconnect the speaker wires so that each source. 1/ The Disc changer isn't connected. (@" Connect the Disc changer. No sound can 't be the result of Volume offset are incorrectly connected. (@" Connect the wire correctly, referring to an external disc source. ? The power does not turn ON. 1/ The fuse...
Instruction Manual
Page 46
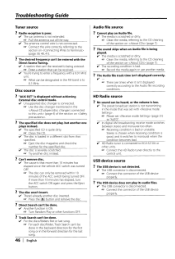
... 7). ? Troubleshooting Guide Tuner source ? V' Unsupported disc changer is scratched or dirty. 1& Clean the media, referring to monaural when the condition becomes bad. V' The specified CD is displayed without achieving External disc control mode. V' The media is connected. 1& Use the disc changer mentioned in the forward direction for the first song or in the (page 4) of the ACC switch being played. Stereo is chosen when receiving condition is to the control unit. V' The car antenna is ON. 1& Turn Random Play...
... 7). ? Troubleshooting Guide Tuner source ? V' Unsupported disc changer is scratched or dirty. 1& Clean the media, referring to monaural when the condition becomes bad. V' The specified CD is displayed without achieving External disc control mode. V' The media is connected. 1& Use the disc changer mentioned in the forward direction for the first song or in the (page 4) of the ACC switch being played. Stereo is chosen when receiving condition is to the control unit. V' The car antenna is ON. 1& Turn Random Play...
Instruction Manual
Page 47
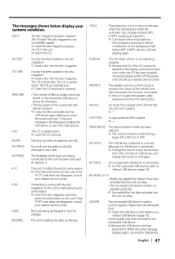
... then the protection function is still displayed, initialize the USB device or use another USB device. If the error message is activated. ¢ Wire or insulate the speaker cable properly and press the reset button. If the "E-77" code does not disappear, consult your nearest service center. LOAD: Discs are recorded on the unit. COPY PRO: A copy-protected file is upsidedown. READING: The unit is connected. ¢ Change the source to any source other USB devices. As...
... then the protection function is still displayed, initialize the USB device or use another USB device. If the error message is activated. ¢ Wire or insulate the speaker cable properly and press the reset button. If the "E-77" code does not disappear, consult your nearest service center. LOAD: Discs are recorded on the unit. COPY PRO: A copy-protected file is upsidedown. READING: The unit is connected. ¢ Change the source to any source other USB devices. As...
Instruction Manual
Page 48
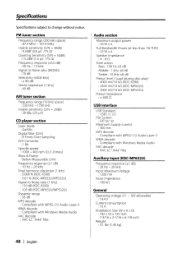
... output power : 50 W x 4 Full Bandwidth Power (at less than 1% THO) : 22 W x 4 Speaker impedance :4 -80 Tone action Bass: 100 Hz ±8 dB Middle: 1 kHz ±8 dB Treble: 10kHz ±8 dB Preout level I English Specifications Specifications subject to Noise ratio (1 kHz) : 110 dB (KDC-X590) : 105 dB (KDC-MP632U/MP532U) Dynamic range : 93 dB MP3 decode : Compliant with MPEG-l/2 Audio Layer-3 WMA decode : Compliant with Windows Media Audio AAC decode : AAC...
... output power : 50 W x 4 Full Bandwidth Power (at less than 1% THO) : 22 W x 4 Speaker impedance :4 -80 Tone action Bass: 100 Hz ±8 dB Middle: 1 kHz ±8 dB Treble: 10kHz ±8 dB Preout level I English Specifications Specifications subject to Noise ratio (1 kHz) : 110 dB (KDC-X590) : 105 dB (KDC-MP632U/MP532U) Dynamic range : 93 dB MP3 decode : Compliant with MPEG-l/2 Audio Layer-3 WMA decode : Compliant with Windows Media Audio AAC decode : AAC...


