
Instruction Manual
Page 6
...character set can be used . • This unit can damage the data contained in the disc player of the unit. For how to remove the USB device, refer to load a 3-inch-disc ...situation, remove the disc and wait for any broadcasting station. 6 DNX7120/DDX712/DDX7032 Other notes • If you experience problems during installation, consult your Kenwood dealer. • When you turn on the recording surface or ... disc. • Do not stick tape etc. The unit returns to operate properly, press the Reset button. on the disc, or use a disc with tape stuck on it. • Do not use...
...character set can be used . • This unit can damage the data contained in the disc player of the unit. For how to remove the USB device, refer to load a 3-inch-disc ...situation, remove the disc and wait for any broadcasting station. 6 DNX7120/DDX712/DDX7032 Other notes • If you experience problems during installation, consult your Kenwood dealer. • When you turn on the recording surface or ... disc. • Do not stick tape etc. The unit returns to operate properly, press the Reset button. on the disc, or use a disc with tape stuck on it. • Do not use...

Instruction Manual
Page 65
...code number. ⁄ • The number you enter first is set as your code number. • You can clear the code number by pressing the Reset button. 3 Display the Parental Level SETUP screen 4 Select a parental level and complete the setup 6 6 7 6 Selects a parental level. 7 Complete ...the parental level setup and returns to the "DVD SETUP 2" screen. ⁄ • If a disc has higher parental lock level, you need to enter the code number. • The parental lock level varies...
...code number. ⁄ • The number you enter first is set as your code number. • You can clear the code number by pressing the Reset button. 3 Display the Parental Level SETUP screen 4 Select a parental level and complete the setup 6 6 7 6 Selects a parental level. 7 Complete ...the parental level setup and returns to the "DVD SETUP 2" screen. ⁄ • If a disc has higher parental lock level, you need to enter the code number. • The parental lock level varies...
Instruction Manual
Page 72
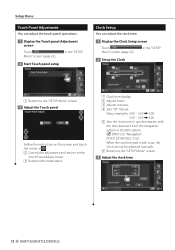
... on the screen and touch the center of . 2 Cancels the adjustment and returns to the Touch Panel Adjust screen. 3 Resets to the "SETUP Menu" screen. 3 Adjust the clock time 72 DNX7120/DDX712/DDX7032 Setup examples: 3:00 - 3:29 \ 3:00 3:30 - 3:59 \ 4:00 5 Sets the clock time in... operations. 1 Display the Touch panel Adjustment screen Touch Menu" screen (page 62). in synchronization with the time data sent from the navigation system or the RDS station. ( DNX7120: "Navigatoin", DDX712/DDX7032: "On") When the synchronized mode is set, the clock cannot be adjusted manually. 6 Returns to the...
... on the screen and touch the center of . 2 Cancels the adjustment and returns to the Touch Panel Adjust screen. 3 Resets to the "SETUP Menu" screen. 3 Adjust the clock time 72 DNX7120/DDX712/DDX7032 Setup examples: 3:00 - 3:29 \ 3:00 3:30 - 3:59 \ 4:00 5 Sets the clock time in... operations. 1 Display the Touch panel Adjustment screen Touch Menu" screen (page 62). in synchronization with the time data sent from the navigation system or the RDS station. ( DNX7120: "Navigatoin", DDX712/DDX7032: "On") When the synchronized mode is set, the clock cannot be adjusted manually. 6 Returns to the...

Instruction Manual
Page 75
...same security code as that you need to Step 3 (for the first code entry). 6 Register the security code again If you have pressed the Reset button or if you have disconnected the Receiver from the battery after the code registration, you have entered in Step 3. 2 Enter the security code ...Now, your Receiver. English 75 If you press the Reset button or if you disconnect your receiver from battery... 1 Enter the correct security code You must enter the same security code as that you have...
...same security code as that you need to Step 3 (for the first code entry). 6 Register the security code again If you have pressed the Reset button or if you have disconnected the Receiver from the battery after the code registration, you have entered in Step 3. 2 Enter the security code ...Now, your Receiver. English 75 If you press the Reset button or if you disconnect your receiver from battery... 1 Enter the correct security code You must enter the same security code as that you have...

Instruction Manual
Page 98
...vehicle. Refer to operate correctly, the cause of USB Device Control (page 36). 98 DNX7120/DDX712/DDX7032 No Device (USB device)/Disconnected (iPod): The USB device/iPod is connected. ...connected USB device contains no USB device/iPod is selected as appropriate and then push the Reset button. Media was played that doesn't have occurred to the connected USB device. &#...Eject the disc and try inserting it again. Mecha Error : The disc player is different from operating. Contact the Kenwood dealer if this indicator continues blinking or the disc cannot be played with ...
...vehicle. Refer to operate correctly, the cause of USB Device Control (page 36). 98 DNX7120/DDX712/DDX7032 No Device (USB device)/Disconnected (iPod): The USB device/iPod is connected. ...connected USB device contains no USB device/iPod is selected as appropriate and then push the Reset button. Media was played that doesn't have occurred to the connected USB device. &#...Eject the disc and try inserting it again. Mecha Error : The disc player is different from operating. Contact the Kenwood dealer if this indicator continues blinking or the disc cannot be played with ...
Instruction Manual
Page 101
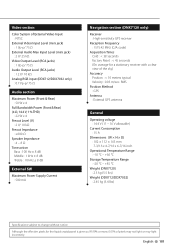
...+60 °C Storage Temperature Range : -20 °C - +85 °C Weight (DNX7120) : 2.5 kg (5.5 lbs) Weight (DDX712/DDX7032) : 2.45 kg (5.4 lbs) Specifications subject to change without notice. Video section Color System of External Video Input : NTSC External Video Input Level (mini jack) : 1 Vp-p/ ...177; 8 dB External SW Maximum Power Supply Current : 500 mA Navigation section (DNX7120 only) Receiver : High-sensitivity GPS receiver Reception Frequency : 1575.42 MHz (C/A code) Acquisition Times Cold : < 38 seconds Factory Reset : < 45 seconds (On average for the liquid crystal panel is...
...+60 °C Storage Temperature Range : -20 °C - +85 °C Weight (DNX7120) : 2.5 kg (5.5 lbs) Weight (DDX712/DDX7032) : 2.45 kg (5.4 lbs) Specifications subject to change without notice. Video section Color System of External Video Input : NTSC External Video Input Level (mini jack) : 1 Vp-p/ ...177; 8 dB External SW Maximum Power Supply Current : 500 mA Navigation section (DNX7120 only) Receiver : High-sensitivity GPS receiver Reception Frequency : 1575.42 MHz (C/A code) Acquisition Times Cold : < 38 seconds Factory Reset : < 45 seconds (On average for the liquid crystal panel is...


