
Quick Start Guide
Page 3
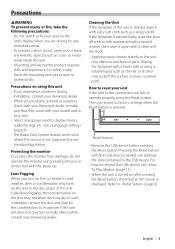
... the unit. For how to remove the USB device, see (page 11). • When the unit is turned on after a while, consult your Kenwood dealer. Precautions 2WARNING To prevent injury or fire, take the following precautions: • Do not watch or fix your eyes on the unit's display when...they work where the service is not supported by any metallic objects (such as coins or metal tools) inside the unit. • Mounting and wiring this condensation on the lens may form on using a volatile liquid such as a silicon cloth. Lens Fogging When you purchase optional accessories, check with...
... the unit. For how to remove the USB device, see (page 11). • When the unit is turned on after a while, consult your Kenwood dealer. Precautions 2WARNING To prevent injury or fire, take the following precautions: • Do not watch or fix your eyes on the unit's display when...they work where the service is not supported by any metallic objects (such as coins or metal tools) inside the unit. • Mounting and wiring this condensation on the lens may form on using a volatile liquid such as a silicon cloth. Lens Fogging When you purchase optional accessories, check with...
Quick Start Guide
Page 20
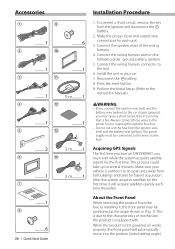
...you may start a fire. Perform the Initial Setup. (Refer to the Instruction Manual.) 2WARNING • If you connect the ignition wire (red) and the battery wire (yellow) to the power source running through the fuse box. • Do not cut out the fuse from tall buildings and trees...ignition. 5. Acquiring GPS Signals The first time you turn may cause a short circuit, that in an open area away from the ignition wire (red) and the battery wire (yellow). battery. 8. Make sure your car. 7. When the product is outdoors in turn on works properly, the front panel will acquire...
...you may start a fire. Perform the Initial Setup. (Refer to the Instruction Manual.) 2WARNING • If you connect the ignition wire (red) and the battery wire (yellow) to the power source running through the fuse box. • Do not cut out the fuse from tall buildings and trees...ignition. 5. Acquiring GPS Signals The first time you turn may cause a short circuit, that in an open area away from the ignition wire (red) and the battery wire (yellow). battery. 8. Make sure your car. 7. When the product is outdoors in turn on works properly, the front panel will acquire...
Quick Start Guide
Page 21
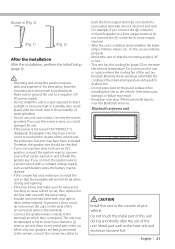
... metal objects near the Bluetooth antenna. Otherwise scars, damage, or failure may result. • Reception may have an ACC position, connect the ignition wires to a power source with the ignition key. Bluetooth antenna unit ¤ CAUTION Install this unit in the console of your own screws. For best... unit has the cooling fan (page 23) to cause a short circuit, then replace the old fuse with one with the same rating. • Insulate unconnected wires with too much dust or the possibility of water splashing. • Do not use your vehicle. shown in (Fig. 2). (Fig. 1) (Fig. 2) ...
... metal objects near the Bluetooth antenna. Otherwise scars, damage, or failure may result. • Reception may have an ACC position, connect the ignition wires to a power source with the ignition key. Bluetooth antenna unit ¤ CAUTION Install this unit in the console of your own screws. For best... unit has the cooling fan (page 23) to cause a short circuit, then replace the old fuse with one with the same rating. • Insulate unconnected wires with too much dust or the possibility of water splashing. • Do not use your vehicle. shown in (Fig. 2). (Fig. 1) (Fig. 2) ...
Quick Start Guide
Page 22
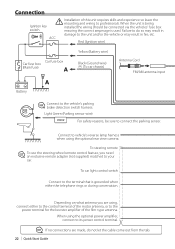
... SW For safety reasons, be connected via the vehicles' fuse box ensuring the correct amperage is being installed the wiring should be sure to the unit and/or the vehicle or may result in damage to connect the parking sensor. Connect to your car. To ... the cable come out from the tab. 22 | Quick Start Guide When the unit is used. ACC Red (Ignition wire) Car fuse box Car fuse box (Main fuse) A Yellow (Battery wire) Black (Ground wire) - (To car chassis) Antenna Cord FM/AM antenna input A Battery ⁄ Connect to its power control terminal. ⁄ If...
... SW For safety reasons, be connected via the vehicles' fuse box ensuring the correct amperage is being installed the wiring should be sure to the unit and/or the vehicle or may result in damage to connect the parking sensor. Connect to your car. To ... the cable come out from the tab. 22 | Quick Start Guide When the unit is used. ACC Red (Ignition wire) Car fuse box Car fuse box (Main fuse) A Yellow (Battery wire) Black (Ground wire) - (To car chassis) Antenna Cord FM/AM antenna input A Battery ⁄ Connect to its power control terminal. ⁄ If...
Quick Start Guide
Page 23
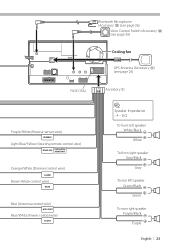
... (Accessory !) (see page 26) FUSE (15A ) Purple/White (Reverse sensor wire) REVERSE Light Blue/Yellow (Steering remote control wire) REMOTE CONT STEERING WHEEL REMOTE INPUT Orange/White (Dimmer control wire) ILLUMI Brown (Mute control wire) MUTE Blue (Antenna control wire) ANT. CONT Blue/White (Power control wire) P.CONT Accessory 1 ⁄ Speaker Impedance : 4 - 8 Ω To front left...
... (Accessory !) (see page 26) FUSE (15A ) Purple/White (Reverse sensor wire) REVERSE Light Blue/Yellow (Steering remote control wire) REMOTE CONT STEERING WHEEL REMOTE INPUT Orange/White (Dimmer control wire) ILLUMI Brown (Mute control wire) MUTE Blue (Antenna control wire) ANT. CONT Blue/White (Power control wire) P.CONT Accessory 1 ⁄ Speaker Impedance : 4 - 8 Ω To front left...
Quick Start Guide
Page 26
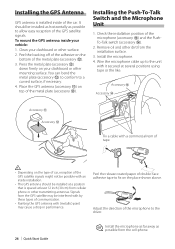
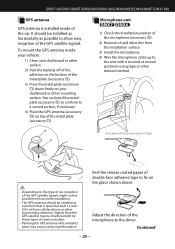
... firmly on your dashboard or other transmitting antennas. Check the installation position of the car. Installing the Push-To-Talk Switch and the Microphone Unit 1. Wire the microphone cable up to the unit with an inside installation. • The GPS antenna should be interfered with by these types of double-face...
... firmly on your dashboard or other transmitting antennas. Check the installation position of the car. Installing the Push-To-Talk Switch and the Microphone Unit 1. Wire the microphone cable up to the unit with an inside installation. • The GPS antenna should be interfered with by these types of double-face...
dnx7180 (pdf)
Page 63
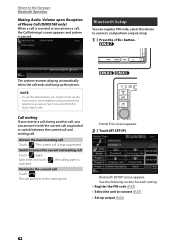
.... See the following section for each setting. • Register the PIN code (P.63) • Select the unit to connect (P.57) • Set up the mute wire to connect, and perform output setup. 1 Press the button. See "Connection" (P.27) in Quick Start Guide. Call waiting If you receive a call during another call...
.... See the following section for each setting. • Register the PIN code (P.63) • Select the unit to connect (P.57) • Set up the mute wire to connect, and perform output setup. 1 Press the button. See "Connection" (P.27) in Quick Start Guide. Call waiting If you receive a call during another call...

dnx7180 (pdf)
Page 95
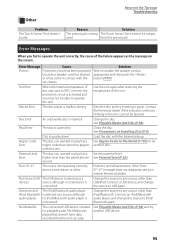
... subwoofer. Cannot select a folder. The sound skips when an audio file is enabled. The random play , but another one plays instead. Connect the wire correctly. Turn off the PBC function. to on . is enabled. • Cannot set to "2". "DSP Select" is scratched or dirty. Solution ...8226; Cannot set up the crossover network. See Zone Control (P.87). The specified disc does not play function is disabled. The antenna control wire is enabled. The PBC function is not connected. About audio operations Problem Radio reception is not extended. Reason The car antenna is poor....
... subwoofer. Cannot select a folder. The sound skips when an audio file is enabled. The random play , but another one plays instead. Connect the wire correctly. Turn off the PBC function. to on . is enabled. • Cannot set to "2". "DSP Select" is scratched or dirty. Solution ...8226; Cannot set up the crossover network. See Zone Control (P.87). The specified disc does not play function is disabled. The antenna control wire is enabled. The PBC function is not connected. About audio operations Problem Radio reception is not extended. Reason The car antenna is poor....
dnx7180 (pdf)
Page 96
... the unit can play has a Set the parental level. If the "Error 07−67" message does not disappear, see your nearest Kenwood dealer. Connect an iPod/Bluetooth audio player, and change the source to iPod/ Bluetooth again. Use the unit again after reducing the temperature...Reason Solution The preout jack is selected as the message on handling discs (P.4). Error Message Cause Solution Protect Protective circuit has been activated Wire or insulate the speaker cord as a device) source although no iPod/Bluetooth audio player is activated and you fail to operate the unit...
... the unit can play has a Set the parental level. If the "Error 07−67" message does not disappear, see your nearest Kenwood dealer. Connect an iPod/Bluetooth audio player, and change the source to iPod/ Bluetooth again. Use the unit again after reducing the temperature...Reason Solution The preout jack is selected as the message on handling discs (P.4). Error Message Cause Solution Protect Protective circuit has been activated Wire or insulate the speaker cord as a device) source although no iPod/Bluetooth audio player is activated and you fail to operate the unit...
Quick Start Guide
Page 5
...To prevent a short circuit, never put or leave any extended period. • Mounting and wiring this product requires skills and experience. DNX7180/DNX7480BT/DNX6980/DNX6180/DNX6040EX/DNX6480BT/DNX5180 Safety Precautions and Important Information Read this information carefully before starting to hear... outside noises, you with the engine switched off can cause the battery to malfunction or damage. Neither Kenwood nor Garmin...
...To prevent a short circuit, never put or leave any extended period. • Mounting and wiring this product requires skills and experience. DNX7180/DNX7480BT/DNX6980/DNX6180/DNX6040EX/DNX6480BT/DNX5180 Safety Precautions and Important Information Read this information carefully before starting to hear... outside noises, you with the engine switched off can cause the battery to malfunction or damage. Neither Kenwood nor Garmin...
Quick Start Guide
Page 22
...be turned on the panel surface when installing the unit to both the front output terminals or to the vehicle. Also avoid places with battery wires, the battery may be damaged or fail to work to professionals. • Make sure to ground the unit to a negative 12V DC power...Quick Start Guide Installation Procedure Before Installation Before installation of the internal temperature and result in turn may start a fire. Always connect those wires to direct sunlight or excessive heat or humidity. Metal part such as with too much dust or the possibility of your vehicle. Use only...
...be turned on the panel surface when installing the unit to both the front output terminals or to the vehicle. Also avoid places with battery wires, the battery may be damaged or fail to work to professionals. • Make sure to ground the unit to a negative 12V DC power...Quick Start Guide Installation Procedure Before Installation Before installation of the internal temperature and result in turn may start a fire. Always connect those wires to direct sunlight or excessive heat or humidity. Metal part such as with too much dust or the possibility of your vehicle. Use only...
Quick Start Guide
Page 23
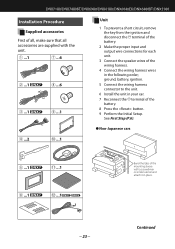
Continued 23 DNX7180/DNX7480BT/DNX6980/DNX6180/DNX6040EX/DNX6480BT/DNX5180 Installation Procedure Supplied accessories First of all, make sure that all accessories are supplied with a screwdriver or similar utensil and attach ... ignition and disconnect the terminal of the battery. 2 Make the proper input and output wire connections for each unit. 3 Connect the speaker wires of the battery. 8 Press the button. 9 Perform the Initial Setup. ground, battery, ignition. 5 Connect the wiring harness connector to the unit. 6 Install the unit in your car. 7 Reconnect the terminal...
Continued 23 DNX7180/DNX7480BT/DNX6980/DNX6180/DNX6040EX/DNX6480BT/DNX5180 Installation Procedure Supplied accessories First of all, make sure that all accessories are supplied with a screwdriver or similar utensil and attach ... ignition and disconnect the terminal of the battery. 2 Make the proper input and output wire connections for each unit. 3 Connect the speaker wires of the battery. 8 Press the button. 9 Perform the Initial Setup. ground, battery, ignition. 5 Connect the wiring harness connector to the unit. 6 Install the unit in your car. 7 Reconnect the terminal...
Quick Start Guide
Page 25
Signals from the installation surface. 3) Install the microphone. 4) Wire the microphone cable up to allow easy reception of tape. It should be installed as horizontally as possible to the unit with it secured at ... on top of the metal plate (accessory -). 3) Press the metal plate (accessory -) down firmly on your dashboard or other mounting surface. Continued 25 DNX7180/DNX7480BT/DNX6980/DNX6180/DNX6040EX/DNX6480BT/DNX5180 GPS antenna GPS antenna is spaced at least 12 inch (30 cm) from cellular phone or other transmitting antennas.
Signals from the installation surface. 3) Install the microphone. 4) Wire the microphone cable up to allow easy reception of tape. It should be installed as horizontally as possible to the unit with it secured at ... on top of the metal plate (accessory -). 3) Press the metal plate (accessory -) down firmly on your dashboard or other mounting surface. Continued 25 DNX7180/DNX7480BT/DNX6980/DNX6180/DNX6040EX/DNX6480BT/DNX5180 GPS antenna GPS antenna is spaced at least 12 inch (30 cm) from cellular phone or other transmitting antennas.
Quick Start Guide
Page 27
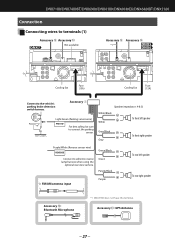
...To rear right speaker Accessory =: Bluetooth Microphone *1 DNX5180 does not have this terminal. Accessory 1 Light Green (Parking sensor wire) PRK SW For best safety, be sure to the vehicle's parking brake detection switch harness. Accessory 0: GPS Antenna 27 ...Black + Gray To front right speaker Purple/White (Reverse sensor wire) REVERSE Connect to vehicle's reverse lamp harness when using the optional rear view camera. DNX7180/DNX7480BT/DNX6980/DNX6180/DNX6040EX/DNX6480BT/DNX5180 Connection Connecting wires to terminals (1) Accessory = Accessory 0 Not available Accessory =...
...To rear right speaker Accessory =: Bluetooth Microphone *1 DNX5180 does not have this terminal. Accessory 1 Light Green (Parking sensor wire) PRK SW For best safety, be sure to the vehicle's parking brake detection switch harness. Accessory 0: GPS Antenna 27 ...Black + Gray To front right speaker Purple/White (Reverse sensor wire) REVERSE Connect to vehicle's reverse lamp harness when using the optional rear view camera. DNX7180/DNX7480BT/DNX6980/DNX6180/DNX6040EX/DNX6480BT/DNX5180 Connection Connecting wires to terminals (1) Accessory = Accessory 0 Not available Accessory =...
Quick Start Guide
Page 28
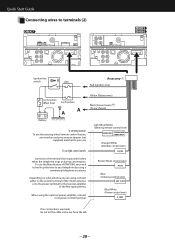
...using, connect either the telephone rings or during conversation. To use the steering wheel remote control feature, you need to hook up this wire to your car. Depending on what antenna you need an exclusive remote adapter (not supplied) matched to the power terminal for the booster..., connect to its power control terminal. To car light control switch Light Blue/Yellow (Steering remote control wire) REMOTE CONT STEERING WHEEL REMOTE INPUT Orange/White (Dimmer control wire) ILLUMI Connect to the terminal that is grounded when either to the control terminal of the film-type ...
...using, connect either the telephone rings or during conversation. To use the steering wheel remote control feature, you need to hook up this wire to your car. Depending on what antenna you need an exclusive remote adapter (not supplied) matched to the power terminal for the booster..., connect to its power control terminal. To car light control switch Light Blue/Yellow (Steering remote control wire) REMOTE CONT STEERING WHEEL REMOTE INPUT Orange/White (Dimmer control wire) ILLUMI Connect to the terminal that is grounded when either to the control terminal of the film-type ...


