
Quick Start Guide
Page 3
...may scratch the surface or erase screened print. Called lens fogging, this unit • If you experience problems during installation, consult your Kenwood dealer. • When you purchase optional accessories, check with the USB device installed can damage the data contained in the disc player... of this product requires skills and experience. Pressing the Reset button with your Kenwood dealer to make sure that they work to professionals. For safety's sake, leave the mounting and wiring work with a dry soft cloth such as thinner or alcohol may affect its mechanical...
...may scratch the surface or erase screened print. Called lens fogging, this unit • If you experience problems during installation, consult your Kenwood dealer. • When you purchase optional accessories, check with the USB device installed can damage the data contained in the disc player... of this product requires skills and experience. Pressing the Reset button with your Kenwood dealer to make sure that they work to professionals. For safety's sake, leave the mounting and wiring work with a dry soft cloth such as thinner or alcohol may affect its mechanical...
Quick Start Guide
Page 20
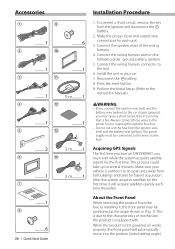
... the reset button. 9. Acquiring GPS Signals The first time you turn may start a fire. When the product is equipped with. Connect the speaker wires of mechanism the product is first powered on DNX9980HD, you may be connected to the power source running through the fuse box. • Do not... cut out the fuse from the ignition and disconnect the battery. 2. Always connect those wires to the wires via the fuse. Reconnect the - About the Front Panel When removing the product from tall buildings and trees for each time thereafter. ...
... the reset button. 9. Acquiring GPS Signals The first time you turn may start a fire. When the product is equipped with. Connect the speaker wires of mechanism the product is first powered on DNX9980HD, you may be connected to the power source running through the fuse box. • Do not... cut out the fuse from the ignition and disconnect the battery. 2. Always connect those wires to the wires via the fuse. Reconnect the - About the Front Panel When removing the product from tall buildings and trees for each time thereafter. ...
Quick Start Guide
Page 21
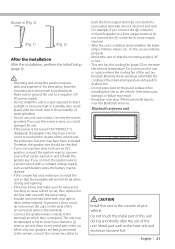
... unit are working properly. • Mount the unit so that can be checked. • If your own screws. For best safety, leave the mounting and wiring work if you could damage the unit. • If the power is not turned ON ("PROTECT" is installed, check whether the brake lamps, blinkers, wipers... temperature and result in the console of water splashing. • Do not use your car's ignition does not have an ACC position, connect the ignition wires to a power source that the mounting angle is 30° or less. • This unit has the cooling fan (page 23) to a rear output ...
... unit are working properly. • Mount the unit so that can be checked. • If your own screws. For best safety, leave the mounting and wiring work if you could damage the unit. • If the power is not turned ON ("PROTECT" is installed, check whether the brake lamps, blinkers, wipers... temperature and result in the console of water splashing. • Do not use your car's ignition does not have an ACC position, connect the ignition wires to a power source that the mounting angle is 30° or less. • This unit has the cooling fan (page 23) to a rear output ...
Quick Start Guide
Page 22
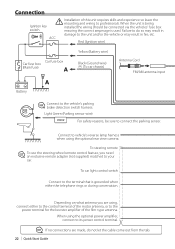
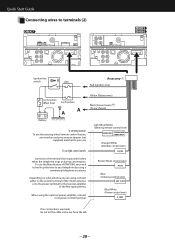
...are using the optional rear view camera. When using the optional power amplifier, connect to the terminal that is used. Light Green (Parking sensor wire) PRK SW For safety reasons, be connected via the vehicles' fuse box ensuring the correct amperage is grounded when either to the control terminal ...of the motor antenna, or to the power terminal for the booster amplifier of this unit requires skills and experience so leave the mounting and wiring to do not let the cable come out from the tab. 22 | Quick Start Guide Connection Ignition key switch ¤ Installation of the...
...are using the optional rear view camera. When using the optional power amplifier, connect to the terminal that is used. Light Green (Parking sensor wire) PRK SW For safety reasons, be connected via the vehicles' fuse box ensuring the correct amperage is grounded when either to the control terminal ...of the motor antenna, or to the power terminal for the booster amplifier of this unit requires skills and experience so leave the mounting and wiring to do not let the cable come out from the tab. 22 | Quick Start Guide Connection Ignition key switch ¤ Installation of the...
Quick Start Guide
Page 23
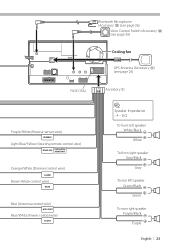
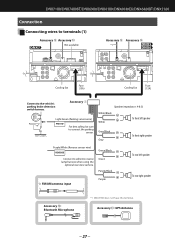
CONT Blue/White (Power control wire) P.CONT Accessory 1 ⁄ Speaker Impedance : 4 - 8 Ω To front left speaker White/Black + White To front right speaker Gray/Black + Gray To rear left speaker Green/... (Accessory #) (see page 26) Voice Control Switch (Accessory $) (see page 26) Cooling fan GPS Antenna (Accessory !) (see page 26) FUSE (15A ) Purple/White (Reverse sensor wire) REVERSE Light Blue/Yellow (Steering remote control wire) REMOTE CONT STEERING WHEEL REMOTE INPUT Orange/White (Dimmer control...
CONT Blue/White (Power control wire) P.CONT Accessory 1 ⁄ Speaker Impedance : 4 - 8 Ω To front left speaker White/Black + White To front right speaker Gray/Black + Gray To rear left speaker Green/... (Accessory #) (see page 26) Voice Control Switch (Accessory $) (see page 26) Cooling fan GPS Antenna (Accessory !) (see page 26) FUSE (15A ) Purple/White (Reverse sensor wire) REVERSE Light Blue/Yellow (Steering remote control wire) REMOTE CONT STEERING WHEEL REMOTE INPUT Orange/White (Dimmer control...
Quick Start Guide
Page 26
.... • Painting the GPS antenna with it secured at several positions using tape or the like. Peel the backing off of the GPS satellite signals. Wire the microphone cable up to a curved surface, if necessary. 4. Accessory # Accessory $ Accessory ! Remove oil and other mounting surface. To mount the GPS antenna inside of...
.... • Painting the GPS antenna with it secured at several positions using tape or the like. Peel the backing off of the GPS satellite signals. Wire the microphone cable up to a curved surface, if necessary. 4. Accessory # Accessory $ Accessory ! Remove oil and other mounting surface. To mount the GPS antenna inside of...
dnx7180 (pdf)
Page 63
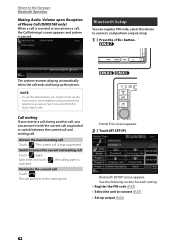
... Top page Bluetooth Operation Muting Audio Volume upon Reception of Phone Call (DNX5180 only) When a call switches to connect (P.57) • Set up the mute wire to your telephone using a commercial telephone accessory. Call waiting If you receive a call during another call .
... Top page Bluetooth Operation Muting Audio Volume upon Reception of Phone Call (DNX5180 only) When a call switches to connect (P.57) • Set up the mute wire to your telephone using a commercial telephone accessory. Call waiting If you receive a call during another call .

dnx7180 (pdf)
Page 95
...Cannot set up the subwoofer. "DSP Select" is poor. About audio operations Problem Radio reception is set up the crossover network. The antenna control wire is enabled. Set "CD Read" to off . The dual zone function is not connected. The disc is being played. See Disc setup (P.27...use another disc instead. Set the dual zone function to on. The sound skips when an audio file is scratched or dirty. Connect the wire correctly. Turn off the random function. to "Through". Solution Set the subwoofer to off . See Zone Control (P.87). The disc is ...
...Cannot set up the subwoofer. "DSP Select" is poor. About audio operations Problem Radio reception is set up the crossover network. The antenna control wire is enabled. Set "CD Read" to off . The dual zone function is not connected. The disc is being played. See Disc setup (P.27...use another disc instead. Set the dual zone function to on. The sound skips when an audio file is scratched or dirty. Connect the wire correctly. Turn off the random function. to "Through". Solution Set the subwoofer to off . See Zone Control (P.87). The disc is ...
dnx7180 (pdf)
Page 96
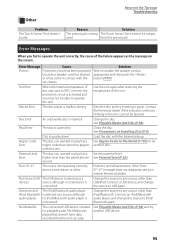
...The preout jack is being The Touch Sensor Tone cannot be ejected. Error Messages When you wanted to any source other . Contact the Kenwood dealer if this indicator continues blinking or the disc cannot be output used. Read Error The disc is inserted. Disc is malfunctioning. Parental...Parental level (P.26). Media was another disc. Other Return to USB again. Error Message Cause Solution Protect Protective circuit has been activated Wire or insulate the speaker cord as the message on handling discs (P.4). Change the disc. Error 07-67 The unit is activated and you...
...The preout jack is being The Touch Sensor Tone cannot be ejected. Error Messages When you wanted to any source other . Contact the Kenwood dealer if this indicator continues blinking or the disc cannot be output used. Read Error The disc is inserted. Disc is malfunctioning. Parental...Parental level (P.26). Media was another disc. Other Return to USB again. Error Message Cause Solution Protect Protective circuit has been activated Wire or insulate the speaker cord as the message on handling discs (P.4). Change the disc. Error 07-67 The unit is activated and you...
Quick Start Guide
Page 5
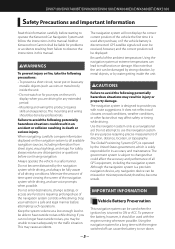
...hear outside noises, you are driving for any extended period. • Mounting and wiring this product requires skills and experience. Always operate the vehicle in a safe and ...the navigation system. The Global Positioning System (GPS) is operated by professionals. Neither Kenwood nor Garmin shall be done by the United States government, which is a precision ... or accidents resulting from street signs, visual sightings, and maps. DNX7180/DNX7480BT/DNX6980/DNX6180/DNX6040EX/DNX6480BT/DNX5180 Safety Precautions and Important Information Read this information carefully before...
...hear outside noises, you are driving for any extended period. • Mounting and wiring this product requires skills and experience. Always operate the vehicle in a safe and ...the navigation system. The Global Positioning System (GPS) is operated by professionals. Neither Kenwood nor Garmin shall be done by the United States government, which is a precision ... or accidents resulting from street signs, visual sightings, and maps. DNX7180/DNX7480BT/DNX6980/DNX6180/DNX6040EX/DNX6480BT/DNX5180 Safety Precautions and Important Information Read this information carefully before...
Quick Start Guide
Page 22
... vehicle. Quick Start Guide Installation Procedure Before Installation Before installation of this unit during and shortly after the use of the unit. Always connect those wires to a rear output terminal. • After the unit is 30° or less. • This unit has the cooling fan (P.27) to a...tape or other similar material. Do not touch the metal part of this unit, please note the following precautions. NOTES • Mounting and wiring this unit in a spot exposed to both the rear output terminals (do not connect the connector to the power source running through the fuse...
... vehicle. Quick Start Guide Installation Procedure Before Installation Before installation of this unit during and shortly after the use of the unit. Always connect those wires to a rear output terminal. • After the unit is 30° or less. • This unit has the cooling fan (P.27) to a...tape or other similar material. Do not touch the metal part of this unit, please note the following precautions. NOTES • Mounting and wiring this unit in a spot exposed to both the rear output terminals (do not connect the connector to the power source running through the fuse...
Quick Start Guide
Page 23
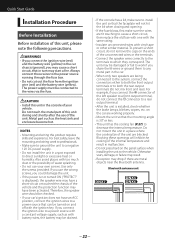
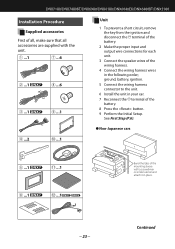
ground, battery, ignition. 5 Connect the wiring harness connector to the unit. 6 Install the unit in the following order; DNX7180/DNX7480BT/DNX6980/DNX6180/DNX6040EX/DNX6480BT/DNX5180 Installation Procedure Supplied accessories First of the battery. 8 Press the button. 9 Perform the Initial Setup...the ignition and disconnect the terminal of the battery. 2 Make the proper input and output wire connections for each unit. 3 Connect the speaker wires of the wiring harness. 4 Connect the wiring harness wires in your car. 7 Reconnect the terminal of all, make sure that all accessories are ...
ground, battery, ignition. 5 Connect the wiring harness connector to the unit. 6 Install the unit in the following order; DNX7180/DNX7480BT/DNX6980/DNX6180/DNX6040EX/DNX6480BT/DNX5180 Installation Procedure Supplied accessories First of the battery. 8 Press the button. 9 Perform the Initial Setup...the ignition and disconnect the terminal of the battery. 2 Make the proper input and output wire connections for each unit. 3 Connect the speaker wires of the wiring harness. 4 Connect the wiring harness wires in your car. 7 Reconnect the terminal of all, make sure that all accessories are ...
Quick Start Guide
Page 25
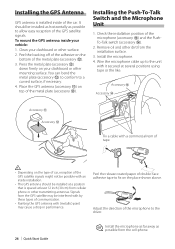
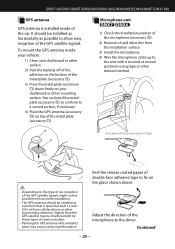
DNX7180/DNX7480BT/DNX6980/DNX6180/DNX6040EX/DNX6480BT/DNX5180 GPS antenna GPS antenna is spaced at least 12 inch (30 cm) from the GPS satellite may cause a drop in performance. ... other mounting surface. Microphone unit 1) Check the installation position of the microphone (accessory =). 2) Remove oil and other dirt from the installation surface. 3) Install the microphone. 4) Wire the microphone cable up to fix on the place shown above. • Depending on the type of car, reception of the GPS satellite signals might...
DNX7180/DNX7480BT/DNX6980/DNX6180/DNX6040EX/DNX6480BT/DNX5180 GPS antenna GPS antenna is spaced at least 12 inch (30 cm) from the GPS satellite may cause a drop in performance. ... other mounting surface. Microphone unit 1) Check the installation position of the microphone (accessory =). 2) Remove oil and other dirt from the installation surface. 3) Install the microphone. 4) Wire the microphone cable up to fix on the place shown above. • Depending on the type of car, reception of the GPS satellite signals might...
Quick Start Guide
Page 27
Accessory 0: GPS Antenna 27 DNX7180/DNX7480BT/DNX6980/DNX6180/DNX6040EX/DNX6480BT/DNX5180 Connection Connecting wires to terminals (1) Accessory = Accessory 0 Not available Accessory = Accessory 0 *1 Cooling fan Fuse (15A) Cooling fan Fuse (15A) Connect to connect the parking sensor. Speaker impedance... Green/Black + Green Purple/Black + Purple To rear left speaker Gray/Black + Gray To front right speaker Purple/White (Reverse sensor wire) REVERSE Connect to vehicle's reverse lamp harness when using the optional rear view camera. Accessory 1 Light Green (Parking sensor...
Accessory 0: GPS Antenna 27 DNX7180/DNX7480BT/DNX6980/DNX6180/DNX6040EX/DNX6480BT/DNX5180 Connection Connecting wires to terminals (1) Accessory = Accessory 0 Not available Accessory = Accessory 0 *1 Cooling fan Fuse (15A) Cooling fan Fuse (15A) Connect to connect the parking sensor. Speaker impedance... Green/Black + Green Purple/Black + Purple To rear left speaker Gray/Black + Gray To front right speaker Purple/White (Reverse sensor wire) REVERSE Connect to vehicle's reverse lamp harness when using the optional rear view camera. Accessory 1 Light Green (Parking sensor...
Quick Start Guide
Page 28
... by using a commercial telephone accessory. When using the optional power amplifier, connect to its power control terminal. CONT Blue/White (Power control wire) P. Depending on what antenna you are made, do not let the cable come out from the tab. 28 CONT If no connections are... the telephone rings or during conversation. To car light control switch Light Blue/Yellow (Steering remote control wire) REMOTE CONT STEERING WHEEL REMOTE INPUT Orange/White (Dimmer control wire) ILLUMI Connect to the terminal that is grounded when either to the control terminal of the motor antenna...
... by using a commercial telephone accessory. When using the optional power amplifier, connect to its power control terminal. CONT Blue/White (Power control wire) P. Depending on what antenna you are made, do not let the cable come out from the tab. 28 CONT If no connections are... the telephone rings or during conversation. To car light control switch Light Blue/Yellow (Steering remote control wire) REMOTE CONT STEERING WHEEL REMOTE INPUT Orange/White (Dimmer control wire) ILLUMI Connect to the terminal that is grounded when either to the control terminal of the motor antenna...


