
Quick Start Guide
Page 3
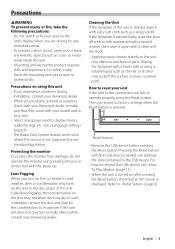
... to make sure that they work with a clean soft dry cloth. • Applying spray cleaner directly to reset your Kenwood dealer. Precautions on using a volatile liquid such as coins or metal tools) inside the unit. • Mounting and wiring this condensation on the lens ... to professionals. See (page 6). • The Radio Data System feature won't work to play. If the unit still does not operate normally after pressing the Reset button, the Initial SETUP screen is pressed. In such a situation, remove the disc and wait for any extended period. • To prevent a short circuit,...
... to make sure that they work with a clean soft dry cloth. • Applying spray cleaner directly to reset your Kenwood dealer. Precautions on using a volatile liquid such as coins or metal tools) inside the unit. • Mounting and wiring this condensation on the lens ... to professionals. See (page 6). • The Radio Data System feature won't work to play. If the unit still does not operate normally after pressing the Reset button, the Initial SETUP screen is pressed. In such a situation, remove the disc and wait for any extended period. • To prevent a short circuit,...
Quick Start Guide
Page 6
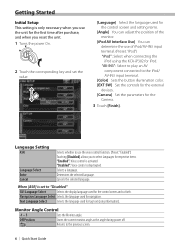
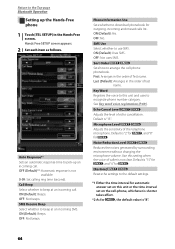
Language Setting ASR Language Select Enter Cancel Selects whether to use the voice control function. (Preset: "Enabled") Touching [Disabled] allows you reset the unit. 1 Turns the power On. 2 Touch the corresponding key and set to "Disabled" GUI Language Select Selects the display language used for the control ...
Language Setting ASR Language Select Enter Cancel Selects whether to use the voice control function. (Preset: "Enabled") Touching [Disabled] allows you reset the unit. 1 Turns the power On. 2 Touch the corresponding key and set to "Disabled" GUI Language Select Selects the display language used for the control ...

Quick Start Guide
Page 7
... buttons changes one after another. Up to "Reverse". Camera Setup Rear Camera R-CAM Interruption Front Camera Selects the type of the external device. Initialize Initialization resets the settings made using the Panel Color SET process to use. (Preset: "Other") "CMOS-300": When the CMOS-300 with ID 1 set at the factory...
... buttons changes one after another. Up to "Reverse". Camera Setup Rear Camera R-CAM Interruption Front Camera Selects the type of the external device. Initialize Initialization resets the settings made using the Panel Color SET process to use. (Preset: "Other") "CMOS-300": When the CMOS-300 with ID 1 set at the factory...
Quick Start Guide
Page 20
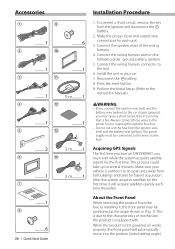
... wires via the fuse. Connect the wiring harness wires in turn on works properly, the front panel will acquire satellites quickly each unit. 3. Press the reset button. 9. Acquiring GPS Signals The first time you must be positioned at the angle shown in an open area away from the ignition and disconnect...
... wires via the fuse. Connect the wiring harness wires in turn on works properly, the front panel will acquire satellites quickly each unit. 3. Press the reset button. 9. Acquiring GPS Signals The first time you must be positioned at the angle shown in an open area away from the ignition and disconnect...
dnx9980hd (pdf)
Page 2
... Viewing Saved Places 15 Editing Saved Places 15 Deleting a Favorite 15 The Main Pages 16 Viewing the Map Page 16 Trip Computer 16 Resetting Trip Information 16 Turn List Page 17 Next Turn Page 17 About Junction View 17 GPS Info Page 17 Creating and Editing Routes 18...18 Adding a Detour to a Route 19 Using Multiple Route Preview 19 Using ecoRoute™ 20 About ecoRoute 20 Creating a Vehicle Profile 20 Resetting Your Vehicle Profile 20 Calibrating Fuel Economy 20 Taking the ecoChallenge 20 About ecoChallenge Scores 20 Hiding Your ecoChallenge Score 21...
... Viewing Saved Places 15 Editing Saved Places 15 Deleting a Favorite 15 The Main Pages 16 Viewing the Map Page 16 Trip Computer 16 Resetting Trip Information 16 Turn List Page 17 Next Turn Page 17 About Junction View 17 GPS Info Page 17 Creating and Editing Routes 18...18 Adding a Detour to a Route 19 Using Multiple Route Preview 19 Using ecoRoute™ 20 About ecoRoute 20 Creating a Vehicle Profile 20 Resetting Your Vehicle Profile 20 Calibrating Fuel Economy 20 Taking the ecoChallenge 20 About ecoChallenge Scores 20 Hiding Your ecoChallenge Score 21...
dnx9980hd (pdf)
Page 16
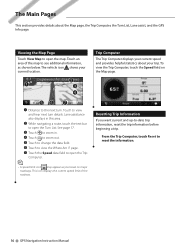
...the map to see additional information, as you want current and up-to view and hear next turn . Resetting Trip Information If you travel on the Map page. Touch to -date trip information, reset the trip information before beginning a trip. page. ➐ Touch the Speed data field to open the ... provides helpful statistics about the Map page, the Trip Computer, the Turn List, Lane assist, and the GPS Info page. From the Trip Computer, touch Reset to open the Turn List. Lane assistance also displays in . ➍ Touch to zoom out. ➎ Touch to change the data field. ➏...
...the map to see additional information, as you want current and up-to view and hear next turn . Resetting Trip Information If you travel on the Map page. Touch to -date trip information, reset the trip information before beginning a trip. page. ➐ Touch the Speed data field to open the ... provides helpful statistics about the Map page, the Trip Computer, the Turn List, Lane assist, and the GPS Info page. From the Trip Computer, touch Reset to open the Turn List. Lane assistance also displays in . ➍ Touch to zoom out. ➎ Touch to change the data field. ➏...
dnx9980hd (pdf)
Page 20
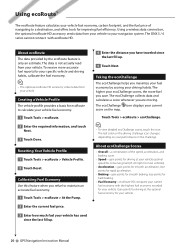
... Touch Tools > ecoRoute > ecoChallenge. ⁄ • To view detailed ecoChallenge scores, touch the icon. The data is only an estimate. Resetting Your Vehicle Profile 1 Touch Tools > ecoRoute > Vehicle Profile. 2 Touch Reset. The leaf color on the driving challenge icon changes depending on the map. Using a wireless data connection, the optional ecoRoute HD...
... Touch Tools > ecoRoute > ecoChallenge. ⁄ • To view detailed ecoChallenge scores, touch the icon. The data is only an estimate. Resetting Your Vehicle Profile 1 Touch Tools > ecoRoute > Vehicle Profile. 2 Touch Reset. The leaf color on the driving challenge icon changes depending on the map. Using a wireless data connection, the optional ecoRoute HD...
dnx9980hd (pdf)
Page 21
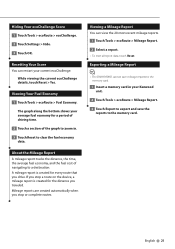
...clear the fuel economy data. English 21 A mileage report is created for every route that you drive. Viewing a Mileage Report You can restart your Kenwood unit. 2 Touch Tools > ecoRoute > Mileage Report. 3 Touch Export to export and save mileage reports to the memory card. 1 Insert a memory card ...in . 3 Touch Reset to the memory card. Mileage reports are created automatically when you stop a route on the device, a mileage report is created for the distance you ...
...clear the fuel economy data. English 21 A mileage report is created for every route that you drive. Viewing a Mileage Report You can restart your Kenwood unit. 2 Touch Tools > ecoRoute > Mileage Report. 3 Touch Export to export and save mileage reports to the memory card. 1 Insert a memory card ...in . 3 Touch Reset to the memory card. Mileage reports are created automatically when you stop a route on the device, a mileage report is created for the distance you ...
dnx9980hd (pdf)
Page 22
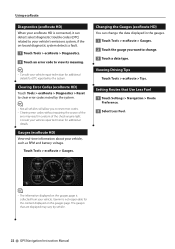
Setting Routes that are displayed may result in the gauges. 1 Touch Tools > ecoRoute > Gauges. 2 Touch the gauge you to reset error codes. • Clearing error codes without repairing the source of the check engine light. Gauges (ecoRoute HD) View real-time .... 1 Touch Tools > ecoRoute > Diagnostics. 2 Touch an error code to change. 3 Touch a data type. Clearing Error Codes (ecoRoute HD) Touch Tools > ecoRoute > Diagnostics > Reset to clear error codes noted by the system. ⁄ • Not all vehicles will allow you want to view its meaning. ⁄ • Consult your...
Setting Routes that are displayed may result in the gauges. 1 Touch Tools > ecoRoute > Gauges. 2 Touch the gauge you to reset error codes. • Clearing error codes without repairing the source of the check engine light. Gauges (ecoRoute HD) View real-time .... 1 Touch Tools > ecoRoute > Diagnostics. 2 Touch an error code to change. 3 Touch a data type. Clearing Error Codes (ecoRoute HD) Touch Tools > ecoRoute > Diagnostics > Reset to clear error codes noted by the system. ⁄ • Not all vehicles will allow you want to view its meaning. ⁄ • Consult your...
dnx7180 (pdf)
Page 4
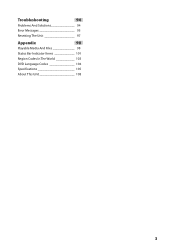
Troubleshooting 94 Problems And Solutions 94 Error Messages 95 Resetting The Unit 97 Appendix 98 Playable Media And Files 98 Status Bar Indicator Items 101 Region Codes In The World 103 DVD Language Codes 104 Specifications 105 About This Unit 108 3
Troubleshooting 94 Problems And Solutions 94 Error Messages 95 Resetting The Unit 97 Appendix 98 Playable Media And Files 98 Status Bar Indicator Items 101 Region Codes In The World 103 DVD Language Codes 104 Specifications 105 About This Unit 108 3

dnx7180 (pdf)
Page 8
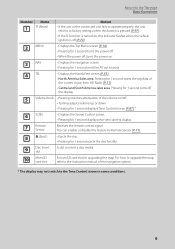
Return to the Top page Basic Operations Number Name 1 fi (Reset) 2 ATT 3 ∞, 5 (Vol) 4 AUD 5 NAV 6 MENU 7 TEL 8 0 (Eject) 9 Remote Sensor 10 Disc insert slot 11 SD card slot Motion • If the unit or the ...
Return to the Top page Basic Operations Number Name 1 fi (Reset) 2 ATT 3 ∞, 5 (Vol) 4 AUD 5 NAV 6 MENU 7 TEL 8 0 (Eject) 9 Remote Sensor 10 Disc insert slot 11 SD card slot Motion • If the unit or the ...
dnx7180 (pdf)
Page 10
... navigation system. * The display may not switch to the Tone Control screen in some conditions. 9 Return to the Top page Basic Operations Number Name 1 fi (Reset) Motion • If the unit or the connected unit fails to operate properly, the unit returns to factory settings when this button is pressed (P.97...
... navigation system. * The display may not switch to the Tone Control screen in some conditions. 9 Return to the Top page Basic Operations Number Name 1 fi (Reset) Motion • If the unit or the connected unit fails to operate properly, the unit returns to factory settings when this button is pressed (P.97...
dnx7180 (pdf)
Page 12
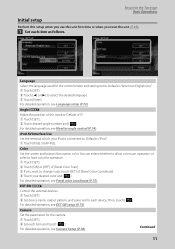
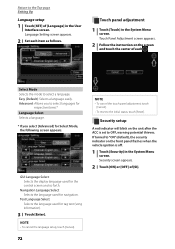
... Set the screen and button illumination color. Camera Set the parameters for operation. 1 Touch [SET]. 2 Touch [ON] or [OFF] of [Panel Color Scan]. 3 If you reset the unit (P.97). 1 Set each item as follows. Language Select the language used for each item and touch [ ]. For detailed operation, see Panel color coordinate...
... Set the screen and button illumination color. Camera Set the parameters for operation. 1 Touch [SET]. 2 Touch [ON] or [OFF] of [Panel Color Scan]. 3 If you reset the unit (P.97). 1 Set each item as follows. Language Select the language used for each item and touch [ ]. For detailed operation, see Panel color coordinate...
dnx7180 (pdf)
Page 65
... value is not clear. Noise Reduction Level Reduces the noises generated by surrounding environment without changing the microphone volume. Default is "2" for , and "8" for . [Restore] Resets the settings to recognize phone number category. See Key word voice registration (P.69). ON (Default): Yes. ON (Default): Beeps. Default is "15" for , and "4" for...
... value is not clear. Noise Reduction Level Reduces the noises generated by surrounding environment without changing the microphone volume. Default is "2" for , and "8" for . [Restore] Resets the settings to recognize phone number category. See Key word voice registration (P.69). ON (Default): Yes. ON (Default): Beeps. Default is "15" for , and "4" for...
dnx7180 (pdf)
Page 73
... the language setup, touch [Cancel]. 72 NOTE • To cancel the touch panel adjustment, touch [Cancel]. • To reset to select a language. Select Mode Selects the mode to the initial status, touch [Reset]. Navigation Language Select: Selects the language used for the control screen and so forth. If turned to OFF, warning...
... the language setup, touch [Cancel]. 72 NOTE • To cancel the touch panel adjustment, touch [Cancel]. • To reset to select a language. Select Mode Selects the mode to the initial status, touch [Reset]. Navigation Language Select: Selects the language used for the control screen and so forth. If turned to OFF, warning...
dnx7180 (pdf)
Page 76
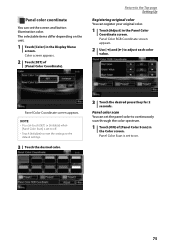
... Coordinate screen. Panel color scan You can set the screen and button illumination color. Panel Color Scan is set to off. • Touch [Initialize] to reset the settings to the default settings. 3 Touch the desired color. 3 Touch the desired preset key for 2 seconds. Color screen appears. 2 Touch [SET] of [Panel Color...
... Coordinate screen. Panel color scan You can set the screen and button illumination color. Panel Color Scan is set to off. • Touch [Initialize] to reset the settings to the default settings. 3 Touch the desired color. 3 Touch the desired preset key for 2 seconds. Color screen appears. 2 Touch [SET] of [Panel Color...
dnx7180 (pdf)
Page 96
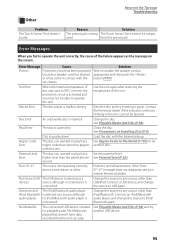
...the screen. Load the disc with the button (P.97). If the "Error 07−67" message does not disappear, see your nearest Kenwood dealer. Disconnected The iPod/Bluetooth audio player (iPod, Bluetooth is selected as because a speaker cord has shorted appropriate and then push the...;C or more, the protection circuit is inserted. Media was another disc. Error 07-67 The unit is connected. Push the unit's Reset button. Other Return to iPod/ Bluetooth again. Reason Solution The preout jack is malfunctioning. Error Message Cause Solution Protect Protective circuit has...
...the screen. Load the disc with the button (P.97). If the "Error 07−67" message does not disappear, see your nearest Kenwood dealer. Disconnected The iPod/Bluetooth audio player (iPod, Bluetooth is selected as because a speaker cord has shorted appropriate and then push the...;C or more, the protection circuit is inserted. Media was another disc. Error 07-67 The unit is connected. Push the unit's Reset button. Other Return to iPod/ Bluetooth again. Reason Solution The preout jack is malfunctioning. Error Message Cause Solution Protect Protective circuit has...
dnx7180 (pdf)
Page 98
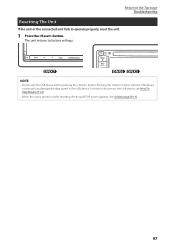
Pressing the button with the USB device connected can damage the data stored in the USB device. See Initial setup (P.11). 97 NOTE • Disconnect the USB device before pressing the button. Return to the Top page Troubleshooting Resetting The Unit If the unit or the connected unit fails to disconnect the USB device, see How To Play Media (P.13). • When the unit is turned on after resetting, the Initial SETUP screen appears. For how to operate properly, reset the unit. 1 Press the button. The unit returns to factory settings.
Pressing the button with the USB device connected can damage the data stored in the USB device. See Initial setup (P.11). 97 NOTE • Disconnect the USB device before pressing the button. Return to the Top page Troubleshooting Resetting The Unit If the unit or the connected unit fails to disconnect the USB device, see How To Play Media (P.13). • When the unit is turned on after resetting, the Initial SETUP screen appears. For how to operate properly, reset the unit. 1 Press the button. The unit returns to factory settings.
Quick Start Guide
Page 2
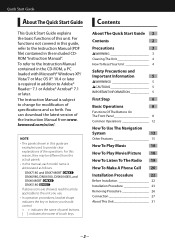
...Contents About The Quick Start Guide 2 Contents 2 Precautions 3 2WARNING 3 Cleaning The Unit 4 How To Reset Your Unit 4 Safety Precautions and Important Information 5 2WARNINGS 5 2CAUTIONS 5 IMPORTANT INFORMATION 5 First Step 6 ...This Unit 31 2 The Instruction Manual is abbreviated as follows. DNX7180 and DNX7480BT: DNX6980, DNX6180, DNX6040EX, and DNX6480BT: DNX5180: If above icons are examples used to ...provide clear explanations of touch keys. For functions not covered in this unit. kenwood.com/cs/ce/. For this reason, they may be different from www. You...
...Contents About The Quick Start Guide 2 Contents 2 Precautions 3 2WARNING 3 Cleaning The Unit 4 How To Reset Your Unit 4 Safety Precautions and Important Information 5 2WARNINGS 5 2CAUTIONS 5 IMPORTANT INFORMATION 5 First Step 6 ...This Unit 31 2 The Instruction Manual is abbreviated as follows. DNX7180 and DNX7480BT: DNX6980, DNX6180, DNX6040EX, and DNX6480BT: DNX5180: If above icons are examples used to ...provide clear explanations of touch keys. For functions not covered in this unit. kenwood.com/cs/ce/. For this reason, they may be different from www. You...
Quick Start Guide
Page 4
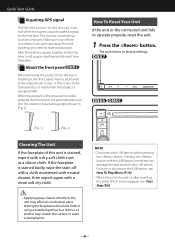
...is due to factory settings. (Fig. 1) (Fig. 2) Cleaning The Unit If the faceplate of mechanism the product is first powered on after resetting, the Initial SETUP screen appears. NOTE • Disconnect the USB device before pressing the button. Make sure your vehicle is stained, wipe it ... thereafter. About the front panel When removing the product from tall buildings and trees for fastest acquisition. See First Step (P.6). 4 How To Reset Your Unit If the unit or the connected unit fails to several minutes. Pressing the button with a clean soft dry cloth. • ...
...is due to factory settings. (Fig. 1) (Fig. 2) Cleaning The Unit If the faceplate of mechanism the product is first powered on after resetting, the Initial SETUP screen appears. NOTE • Disconnect the USB device before pressing the button. Make sure your vehicle is stained, wipe it ... thereafter. About the front panel When removing the product from tall buildings and trees for fastest acquisition. See First Step (P.6). 4 How To Reset Your Unit If the unit or the connected unit fails to several minutes. Pressing the button with a clean soft dry cloth. • ...


