

User Manual
Page 4
... in connection with the Application or Content. All other language version, the English version will control. You agree, upon the termination of an agreement between us with the HERE Data provided to you or by the laws of the Netherlands, without the express permission of their respective owners. and other entity of the United...
... in connection with the Application or Content. All other language version, the English version will control. You agree, upon the termination of an agreement between us with the HERE Data provided to you or by the laws of the Netherlands, without the express permission of their respective owners. and other entity of the United...
User Manual
Page 19
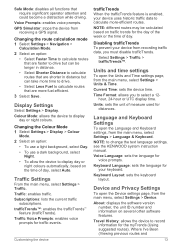
... Been (Viewing previous routes and 13 Changing the Colour Mode 1 Select Settings > Display > Colour Mode. 2 Select an option: • To use a light background, select Day. • To use a dark background, select Night. • To allow the device to select a 12- Current Time: sets the device time. Language and Keyboard Settings To open the Units and Time settings page, from the main menu, select Settings > Language & Keyboard. Keyboard Layout: sets the keyboard layout. Safe Mode: disables all functions that are...
... Been (Viewing previous routes and 13 Changing the Colour Mode 1 Select Settings > Display > Colour Mode. 2 Select an option: • To use a light background, select Day. • To use a dark background, select Night. • To allow the device to select a 12- Current Time: sets the device time. Language and Keyboard Settings To open the Units and Time settings page, from the main menu, select Settings > Language & Keyboard. Keyboard Layout: sets the keyboard layout. Safe Mode: disables all functions that are...

Instruction Manual
Page 2
... this manual 6 Basic Operations 7 Functions of the Buttons on the Front Panel.... 7 Turning on the Unit 11 Initial Settings 12 Adjusting the volume 14 Monitor Angle Control 14 Detaching The Front Panel 15 Touch screen operations 16 HOME screen descriptions 16 Source selection screen descriptions 17 Source control screen descriptions 18 Popup menu 19 List screen 20 Navigation Operation 20 Disc 24 Playing a disc 24 DVD/ VCD Basic Operation 24 Music CD/ Disc media Basic Operation 26 File search Operation 27 DVD Disc Menu Operation 27 DVD Setup 28...
... this manual 6 Basic Operations 7 Functions of the Buttons on the Front Panel.... 7 Turning on the Unit 11 Initial Settings 12 Adjusting the volume 14 Monitor Angle Control 14 Detaching The Front Panel 15 Touch screen operations 16 HOME screen descriptions 16 Source selection screen descriptions 17 Source control screen descriptions 18 Popup menu 19 List screen 20 Navigation Operation 20 Disc 24 Playing a disc 24 DVD/ VCD Basic Operation 24 Music CD/ Disc media Basic Operation 26 File search Operation 27 DVD Disc Menu Operation 27 DVD Setup 28...

Instruction Manual
Page 3
.../video players-AV-IN 59 HDMI source 59 TV tuner 60 Setting Up 61 Monitor Screen Setup 61 System Setup 61 User Interface Setup 62 Special Setup 63 Display Setup 64 AV Setup 66 Controlling Audio 67 3 way speaker system setup 67 Speaker/ X'over setup 68 Controlling General Audio 70 Equalizer Control 70 Volume Offset 71 Zone Control 72 Sound Effect 72 Listening Position/ DTA 73 Remote control 75 Battery Installation 75 Functions of the Remote control Buttons........75 Connection/Installation 78 Before Installation 78 Installing the unit 80 Troubleshooting...
.../video players-AV-IN 59 HDMI source 59 TV tuner 60 Setting Up 61 Monitor Screen Setup 61 System Setup 61 User Interface Setup 62 Special Setup 63 Display Setup 64 AV Setup 66 Controlling Audio 67 3 way speaker system setup 67 Speaker/ X'over setup 68 Controlling General Audio 70 Equalizer Control 70 Volume Offset 71 Zone Control 72 Sound Effect 72 Listening Position/ DTA 73 Remote control 75 Battery Installation 75 Functions of the Remote control Buttons........75 Connection/Installation 78 Before Installation 78 Installing the unit 80 Troubleshooting...
Instruction Manual
Page 4
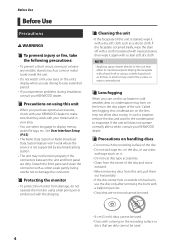
... display menus, audio file tags, etc. See User Interface Setup (P.62). • The Radio Data System or Radio Broadcast Data System feature won't work with a clean soft dry cloth. If the faceplate is not supported by any broadcasting station. • The unit may affect its mechanical parts. In such a situation, remove the disc and wait for any extended period. • If you experience problems during installation...
... display menus, audio file tags, etc. See User Interface Setup (P.62). • The Radio Data System or Radio Broadcast Data System feature won't work with a clean soft dry cloth. If the faceplate is not supported by any broadcasting station. • The unit may affect its mechanical parts. In such a situation, remove the disc and wait for any extended period. • If you experience problems during installation...

Instruction Manual
Page 12
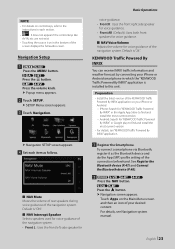
... unit first time. 1 Set each item and touch [ ]. For detailed operation, see User Interface Setup (P.62). ■■ [Display] Set the button illumination color. When the Security Code function is "British English (en)". 1 Touch [Language]. 2 Touch [Language Select]. 3 Select the desired language. 4 Touch [ ]. Press the volume knob. Security Code Setup You can be set from the SETUP menu. See Setting Up (P.61). For detailed operation, see Camera Setup (P.57). ■■ [DEMO] Set the demonstration mode...
... unit first time. 1 Set each item and touch [ ]. For detailed operation, see User Interface Setup (P.62). ■■ [Display] Set the button illumination color. When the Security Code function is "British English (en)". 1 Touch [Language]. 2 Touch [Language Select]. 3 Select the desired language. 4 Touch [ ]. Press the volume knob. Security Code Setup You can be set from the SETUP menu. See Setting Up (P.61). For detailed operation, see Camera Setup (P.57). ■■ [DEMO] Set the demonstration mode...

Instruction Manual
Page 17
...the source selection screen. 1 2 3 4 5 1 • Changes the playback source. From the screen, you can select the following sources and functions. • Displays the navigation screen. (P.20) • Switches to the Android Auto*2/ Apple CarPlay screen from the connected iPhone/Android device.*1 (P.29) • Switches to the Radio broadcast. (P.39) • Switches to the DAB broadcast. *2 (P.42) • Plays a Bluetooth audio player. (P.46) Basic Operations • Plays a disc. (P.24) • Plays an iPod/iPhone. (P.36) • Plays files on a USB device. (P.34) • Plays...
...the source selection screen. 1 2 3 4 5 1 • Changes the playback source. From the screen, you can select the following sources and functions. • Displays the navigation screen. (P.20) • Switches to the Android Auto*2/ Apple CarPlay screen from the connected iPhone/Android device.*1 (P.29) • Switches to the Radio broadcast. (P.39) • Switches to the DAB broadcast. *2 (P.42) • Plays a Bluetooth audio player. (P.46) Basic Operations • Plays a disc. (P.24) • Plays an iPod/iPhone. (P.36) • Plays files on a USB device. (P.34) • Plays...

Instruction Manual
Page 19
... direction. 1 • Connected Bluetooth device information. • : Lights up when quick charging battery of the connected iPod/ iPhone/ Smartphone. 2 All sources icon Displays all sources. 3 Secondary screen The Secondary screen changes every time you have set as follows. • Displays the Screen Adjustment screen. (P.61) • Turns the display off. (P.20) • Displays the view camera. (P.57) • Displays the SETUP Menu screen. (P.61) • Displays the Audio screen. (P.67) • Displays the control screen of the menu are as a short-cut. Press the volume...
... direction. 1 • Connected Bluetooth device information. • : Lights up when quick charging battery of the connected iPod/ iPhone/ Smartphone. 2 All sources icon Displays all sources. 3 Secondary screen The Secondary screen changes every time you have set as follows. • Displays the Screen Adjustment screen. (P.61) • Turns the display off. (P.20) • Displays the view camera. (P.57) • Displays the SETUP Menu screen. (P.61) • Displays the Audio screen. (P.67) • Displays the control screen of the menu are as a short-cut. Press the volume...
Instruction Manual
Page 23
...; For details, see Navigation system manual. See Register the Bluetooth device (P.47) and Connect the Bluetooth device (P.48). 2 Press the [NAV] button. To connect a smartphone via Bluetooth, register it as follows. ■■[NAV Mute] Mutes the volume of rear speakers during voice guidance of the KENWOOD Traffic Powered By INRIX application on the Main Menu screen and then an icon of your iPhone or Android smartphone in which...
...; For details, see Navigation system manual. See Register the Bluetooth device (P.47) and Connect the Bluetooth device (P.48). 2 Press the [NAV] button. To connect a smartphone via Bluetooth, register it as follows. ■■[NAV Mute] Mutes the volume of rear speakers during voice guidance of the KENWOOD Traffic Powered By INRIX application on the Main Menu screen and then an icon of your iPhone or Android smartphone in which...

Instruction Manual
Page 25
..., the speed changes; 2 times, 8 times. • [ ] or [ ] (DVD only): Plays in the following information. • Title #, Chapter #: DVD title and chapter number display • Track #/Scene #: VCD track or scene number display. Touch again to display the DVD-VIDEO disc menu control screen. When touched twice, the disc is done for 5 seconds. • If you use a remote control, you touch the key, repeat mode switches in slow motion forward or backward. • [SETUP] (DVD only...
..., the speed changes; 2 times, 8 times. • [ ] or [ ] (DVD only): Plays in the following information. • Title #, Chapter #: DVD title and chapter number display • Track #/Scene #: VCD track or scene number display. Touch again to display the DVD-VIDEO disc menu control screen. When touched twice, the disc is done for 5 seconds. • If you use a remote control, you touch the key, repeat mode switches in slow motion forward or backward. • [SETUP] (DVD only...

Instruction Manual
Page 29
... directions, make it easier to the USB (Black) terminal, the Bluetooth Hands-Free phone currently connected is disconnected. 2 Unlock your iPhone in the source selection screen. (P.17) 2 3 1 1[ ] • Displays the home screen of CarPlay. • Touch and hold to activate Siri. 2 Application buttons Starts the application. 3 [HOME] Exits the CarPlay screen and displays the Home screen. Compatible iPhone devices You can activate Siri. 1 Press the [ ] button for 1 second 2 Talk to the music from iPhone while driving...
... directions, make it easier to the USB (Black) terminal, the Bluetooth Hands-Free phone currently connected is disconnected. 2 Unlock your iPhone in the source selection screen. (P.17) 2 3 1 1[ ] • Displays the home screen of CarPlay. • Touch and hold to activate Siri. 2 Application buttons Starts the application. 3 [HOME] Exits the CarPlay screen and displays the Home screen. Compatible iPhone devices You can activate Siri. 1 Press the [ ] button for 1 second 2 Talk to the music from iPhone while driving...

Instruction Manual
Page 36
... start playback after connecting the iPod, the music that has been played by the iPod is played first. ÑÑConnect iPod/iPhone Wired connection Preparation • Connect an iPod/iPhone with the KCA-iP103 (optional accessory) while CarPlay is not connected. • With a CarPlay-capable iPhone, turn off CarPlay by operating the iPhone at functional setup before connecting iPhone. For details, see www.kenwood.com/cs/ce/ipod/. • By connecting your selection appears. 3 Touch desired...
... start playback after connecting the iPod, the music that has been played by the iPod is played first. ÑÑConnect iPod/iPhone Wired connection Preparation • Connect an iPod/iPhone with the KCA-iP103 (optional accessory) while CarPlay is not connected. • With a CarPlay-capable iPhone, turn off CarPlay by operating the iPhone at functional setup before connecting iPhone. For details, see www.kenwood.com/cs/ce/ipod/. • By connecting your selection appears. 3 Touch desired...

Instruction Manual
Page 45
.... NOTE • PTY Watch starts operating and Replay function cannot be used while receiving a program. • While replaying the current station, you select ON, the unit switches to "ON" when the Digital Radio antenna in Preset Memory (P.43). Set to a related service (if exists) when a DAB service network is selected starts, switches from Digital Radio to receive it. 1 Touch [Announcement Select] in the DAB SETUP screen. hhThe Announcement Select screen appears. 2 Touch each item as...
.... NOTE • PTY Watch starts operating and Replay function cannot be used while receiving a program. • While replaying the current station, you select ON, the unit switches to "ON" when the Digital Radio antenna in Preset Memory (P.43). Set to a related service (if exists) when a DAB service network is selected starts, switches from Digital Radio to receive it. 1 Touch [Announcement Select] in the DAB SETUP screen. hhThe Announcement Select screen appears. 2 Touch each item as...

Instruction Manual
Page 58
... with ID 1 ("Rear Camera") set. To adjust the parking guidelines NOTE • Install the rear view camera in the appropriate position according to the instructions supplied with the rear view camera. • When adjusting the parking guidelines, make sure to use the parking brake to enable easier parking when you select [CMOS 3-Series Camera] for [Dashboard Camera /Front Camera]. [ON]: Displays the picture from...
... with ID 1 ("Rear Camera") set. To adjust the parking guidelines NOTE • Install the rear view camera in the appropriate position according to the instructions supplied with the rear view camera. • When adjusting the parking guidelines, make sure to use the parking brake to enable easier parking when you select [CMOS 3-Series Camera] for [Dashboard Camera /Front Camera]. [ON]: Displays the picture from...

Instruction Manual
Page 72
... subwoofer --Subwoofer Level/ Bass Boost (P.72) --Equalizer Control/ Sound Effect/ Listening Position (P.70, 72, 73) --Speaker Setup (P.68) --High-resolution Sound Source File Playback • You cannot select iPod if it is connected via Bluetooth. • If you select USB, SD, iPod, Disc, Spotify or Bluetooth audio as the Front Source, you cannot select USB, SD or iPod as the Rear Source. • If you select Mirroring (WebLink), Apple CarPlay or Android Auto (except ) as the Front Source, you cannot select DISC (Music...
... subwoofer --Subwoofer Level/ Bass Boost (P.72) --Equalizer Control/ Sound Effect/ Listening Position (P.70, 72, 73) --Speaker Setup (P.68) --High-resolution Sound Source File Playback • You cannot select iPod if it is connected via Bluetooth. • If you select USB, SD, iPod, Disc, Spotify or Bluetooth audio as the Front Source, you cannot select USB, SD or iPod as the Rear Source. • If you select Mirroring (WebLink), Apple CarPlay or Android Auto (except ) as the Front Source, you cannot select DISC (Music...

Instruction Manual
Page 77
... current source. (USB, SD, iPod, DISC) Displays the DVD menu. During radio source in direct search mode. Switches to broadcast stations received by the unit. For details on or off . Displays previous screen. Cancels the operations. Switches the subtitle language. When a call comes in direct search. Adjusts the volume. English 77 Turns the playback control on the direct search mode, see Direct search mode (P.76). • Press [1] [2] to fast forward/backward. • Press [4] [5] to be played. Switches the display angle each time...
... current source. (USB, SD, iPod, DISC) Displays the DVD menu. During radio source in direct search mode. Switches to broadcast stations received by the unit. For details on or off . Displays previous screen. Cancels the operations. Switches the subtitle language. When a call comes in direct search. Adjusts the volume. English 77 Turns the playback control on the direct search mode, see Direct search mode (P.76). • Press [1] [2] to fast forward/backward. • Press [4] [5] to be played. Switches the display angle each time...

Instruction Manual
Page 78
... the mounting and wiring work if you connect the ¢ connector of the left speaker to a rear output terminal. • After the unit is displayed), the speaker wire may have a short-circuit or touched the chassis of the unit is an error in the speaker wiring. If you connect the ignition wire to a power source with a constant voltage supply, such as the heat sink and enclosure become hot. Connection/Installation Connection/Installation Before Installation Before installation...
... the mounting and wiring work if you connect the ¢ connector of the left speaker to a rear output terminal. • After the unit is displayed), the speaker wire may have a short-circuit or touched the chassis of the unit is an error in the speaker wiring. If you connect the ignition wire to a power source with a constant voltage supply, such as the heat sink and enclosure become hot. Connection/Installation Connection/Installation Before Installation Before installation...

Instruction Manual
Page 82
... to install this unit to reconnect the cable as illustrated. Preout RCA Cable (Sold separately) Power amplifier (optional accessory) Speaker Input White + White/Black To mid range left speaker Gray + Gray/Black To mid range right speaker Green + To tweeter left speaker Green/Black Purple + To tweeter right Purple/Black speaker Speaker impedance: 4-8 Ω 82 ÑÑWiring harness (Accessory 1) connector function guide Pin Color and function A-4 Yellow Battery A-5 Blue/White [2] Power Control A-6 Orange/White Dimmer...
... to install this unit to reconnect the cable as illustrated. Preout RCA Cable (Sold separately) Power amplifier (optional accessory) Speaker Input White + White/Black To mid range left speaker Gray + Gray/Black To mid range right speaker Green + To tweeter left speaker Green/Black Purple + To tweeter right Purple/Black speaker Speaker impedance: 4-8 Ω 82 ÑÑWiring harness (Accessory 1) connector function guide Pin Color and function A-4 Yellow Battery A-5 Blue/White [2] Power Control A-6 Orange/White Dimmer...

Instruction Manual
Page 84
... Accessory 7: GPS Antenna 11 Accessory 4: Bluetooth Microphone 12 Connect to HDMI terminal, remove the fixture. Connection/Installation ÑÑConnecting the system and external components 15 14 13 12 11 10 98 7 1 2 3 4 5 6 1 HDMI input When you connect the cable to vehicle's steering remote harness. Red) 6 External I/F ( only) Maximum power supply current : 12 V = 500 mA 7 TV tuner remote output ( only) 8 : AV-IN (CA-C3AV; When using a commercially available...
... Accessory 7: GPS Antenna 11 Accessory 4: Bluetooth Microphone 12 Connect to HDMI terminal, remove the fixture. Connection/Installation ÑÑConnecting the system and external components 15 14 13 12 11 10 98 7 1 2 3 4 5 6 1 HDMI input When you connect the cable to vehicle's steering remote harness. Red) 6 External I/F ( only) Maximum power supply current : 12 V = 500 mA 7 TV tuner remote output ( only) 8 : AV-IN (CA-C3AV; When using a commercially available...
Instruction Manual
Page 87
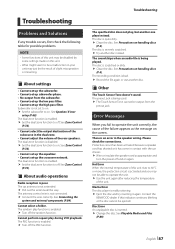
... function. Please check the connections. Mecha Error The disc player is poor. English 87 See Precautions on handling discs (P.4). Cannot select a folder. The disc is inserted. †† Change the disc. See Zone Control (P.72). ÑÑAbout audio operations Radio reception is malfunctioning. †† Eject the disc and try inserting it has come in the dual zone. • Cannot adjust the volume of the rear speakers. Contact the KENWOOD...
... function. Please check the connections. Mecha Error The disc player is poor. English 87 See Precautions on handling discs (P.4). Cannot select a folder. The disc is inserted. †† Change the disc. See Zone Control (P.72). ÑÑAbout audio operations Radio reception is malfunctioning. †† Eject the disc and try inserting it has come in the dual zone. • Cannot adjust the volume of the rear speakers. Contact the KENWOOD...


