Instruction Manual
Page 5
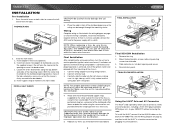
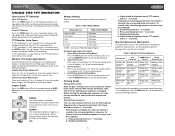
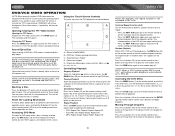
... General • Full function infrared remote control • 1 NTSC composite video output for power connections • 16 - 18 gauge speaker wire WARNING! This is closed) high contrast LCD • Rotary encoder audio control • Joystick menu navigation Tools and Supplies You will need these tools and supplies to install your Jensen VM9311TS installed by a reputable installation shop. WARNING! Using an improper fuse may cause damage to keep the chip-sets operating at a glance •...
... General • Full function infrared remote control • 1 NTSC composite video output for power connections • 16 - 18 gauge speaker wire WARNING! This is closed) high contrast LCD • Rotary encoder audio control • Joystick menu navigation Tools and Supplies You will need these tools and supplies to install your Jensen VM9311TS installed by a reputable installation shop. WARNING! Using an improper fuse may cause damage to keep the chip-sets operating at a glance •...
Instruction Manual
Page 6
... device or multimedia device using a standard 3.5mm plug. • Converts 3.5mm auxiliary input to RCA stereo outputs for easy connection to avoid causing a short circuit. Jensen NAV100 GPS Navigation (Sold Separately) • Connects via A/V Inputs Disconnecting the Battery To prevent a short circuit, be installed in a car equipped with an on-board drive or navigation computer, do not push, pull or swivel the monitor manually. To prevent damage to installation. VM9311TS 2 NOTE: If the VM9311TS...
... device or multimedia device using a standard 3.5mm plug. • Converts 3.5mm auxiliary input to RCA stereo outputs for easy connection to avoid causing a short circuit. Jensen NAV100 GPS Navigation (Sold Separately) • Connects via A/V Inputs Disconnecting the Battery To prevent a short circuit, be installed in a car equipped with an on-board drive or navigation computer, do not push, pull or swivel the monitor manually. To prevent damage to installation. VM9311TS 2 NOTE: If the VM9311TS...
Instruction Manual
Page 7
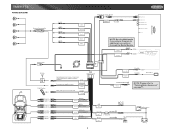
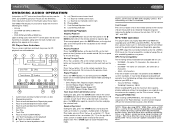
...) BATTERY Ground Ignition Switch Battery 3 PURPLE + REAR R PURPLE/BLACK - REAR R+ REAR R- REAR L+ REAR L- WHITE + FRONT L WHITE/BLACK - Car Mute (leave open if not connected) BROWN MUTE FRONT L+ FRONT L- WHITE AUX IN/L RED AUX IN/R iAUX3 (Sold Separately) 3 AUDIO VIDEO INPUT 33..55mmmm Antenna Jack YELLOW Antenna Auto antenna control (connect to antenna control lead & power supply of antenna amplifier) BLUE Harness Cord AUX IN VIDEO REAR VIDEO OUT 1 YELLOW Rear Video 1 Car Phone External power amplifier control ANT.CONT BLUE/WHITE P.CONT PARKING BRAKE PINK...
...) BATTERY Ground Ignition Switch Battery 3 PURPLE + REAR R PURPLE/BLACK - REAR R+ REAR R- REAR L+ REAR L- WHITE + FRONT L WHITE/BLACK - Car Mute (leave open if not connected) BROWN MUTE FRONT L+ FRONT L- WHITE AUX IN/L RED AUX IN/R iAUX3 (Sold Separately) 3 AUDIO VIDEO INPUT 33..55mmmm Antenna Jack YELLOW Antenna Auto antenna control (connect to antenna control lead & power supply of antenna amplifier) BLUE Harness Cord AUX IN VIDEO REAR VIDEO OUT 1 YELLOW Rear Video 1 Car Phone External power amplifier control ANT.CONT BLUE/WHITE P.CONT PARKING BRAKE PINK...
Instruction Manual
Page 9
... the rear of external devices, including a VCR, DVD player, portable MP3 player, etc., to bend or bow. Connect antenna lead. 3. Make sure the unit is corrected. Attach one 10 amp miniATM fuse, located in the black filter box in front of horizontal. FINAL ISO-DIN INSTALLATION 3 77--IINNBCCAHHNDDTIFGTITAL TFT AS/PS VM9510 Push MUTE PWR AM/FM/DVD/MP3 RECEIVER DISP OPEN MODE AV AUX IN Push ENTER 4 1 2 Using the iAUX3 External AV Connector...
... the rear of external devices, including a VCR, DVD player, portable MP3 player, etc., to bend or bow. Connect antenna lead. 3. Make sure the unit is corrected. Attach one 10 amp miniATM fuse, located in the black filter box in front of horizontal. FINAL ISO-DIN INSTALLATION 3 77--IINNBCCAHHNDDTIFGTITAL TFT AS/PS VM9510 Push MUTE PWR AM/FM/DVD/MP3 RECEIVER DISP OPEN MODE AV AUX IN Push ENTER 4 1 2 Using the iAUX3 External AV Connector...
Instruction Manual
Page 10
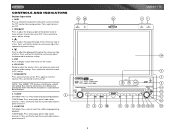
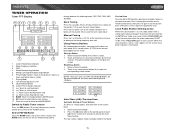
... SRC AUDIO VIDEO INPUT VM9311TS EJECT Push ENTER 2 21 18 17 20 11 12 13 15 25 16 19 22 6 OPEN Press to adjust the volume. VOL/LO/DX Rotate to activate the automatic mechanical system and move the TFT monitor into viewing position. CONTROLS AND INDICATORS Button Operation 1. TUNER Mode: Press once to one step at a time. WIDE/ PIC Press to adjust the display aspect of three settings: Cinema...
... SRC AUDIO VIDEO INPUT VM9311TS EJECT Push ENTER 2 21 18 17 20 11 12 13 15 25 16 19 22 6 OPEN Press to adjust the volume. VOL/LO/DX Rotate to activate the automatic mechanical system and move the TFT monitor into viewing position. CONTROLS AND INDICATORS Button Operation 1. TUNER Mode: Press once to one step at a time. WIDE/ PIC Press to adjust the display aspect of three settings: Cinema...
Instruction Manual
Page 12
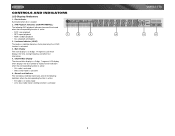
CONTROLS AND INDICATORS LCD Display/Indicators 1. Main Display The main display is an 8 digit, 14 segment LCD which displays the disc number or radio channel indicators when the corresponding function is active: • CH: radio is activated • DISC: DVD mode is a 2 digit, 7 segment LCD display which displays the time, tuning frequency and other text information. 5. Channel/Disc Display The channel/disc display is activated 6. DVD Playback Indicators (SCN/RPT/RDM/ALL) The following indicators when the corresponding...
CONTROLS AND INDICATORS LCD Display/Indicators 1. Main Display The main display is an 8 digit, 14 segment LCD which displays the disc number or radio channel indicators when the corresponding function is active: • CH: radio is activated • DISC: DVD mode is a 2 digit, 7 segment LCD display which displays the time, tuning frequency and other text information. 5. Channel/Disc Display The channel/disc display is activated 6. DVD Playback Indicators (SCN/RPT/RDM/ALL) The following indicators when the corresponding...
Instruction Manual
Page 13
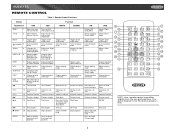
... Channel Input Selects Photo mode Selects Music mode Toggles on/off audio output Turns the power on /off Setup to repeat playback from time frame A to time frame B Repeats playback of current chapter Selects playing mode Selects playing mode Displays playing information Displays playing information Repeat single, repeat folder, off Selects Video mode Repeats playback of current track Selects playing mode Display playing information Accesses iPod Menu Decreases volume Increases volume Previous track ENTER Next track NOTE: Your remote control may...
... Channel Input Selects Photo mode Selects Music mode Toggles on/off audio output Turns the power on /off Setup to repeat playback from time frame A to time frame B Repeats playback of current chapter Selects playing mode Selects playing mode Displays playing information Displays playing information Repeat single, repeat folder, off Selects Video mode Repeats playback of current track Selects playing mode Display playing information Accesses iPod Menu Decreases volume Increases volume Previous track ENTER Next track NOTE: Your remote control may...
Instruction Manual
Page 15
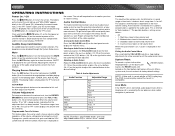
... display panel into the viewing position. The monitor angle can be adjusted for each playing source. OFF Image Setting Table 2 shows the video output mode for optimum viewing using one of the following methods: Step by Step Angle Adjustment Press the ( ) or ( ) button (3, 4) on the monitor frame to adjust the tilt angle of the screen one step at any point. Composite Video Baseband Signal Parameter Adjustment Procedure 1. VM9311TS USING THE TFT MONITOR Open/Close TFT Monitor Open...
... display panel into the viewing position. The monitor angle can be adjusted for each playing source. OFF Image Setting Table 2 shows the video output mode for optimum viewing using one of the following methods: Step by Step Angle Adjustment Press the ( ) or ( ) button (3, 4) on the monitor frame to adjust the tilt angle of the screen one step at any point. Composite Video Baseband Signal Parameter Adjustment Procedure 1. VM9311TS USING THE TFT MONITOR Open/Close TFT Monitor Open...
Instruction Manual
Page 16
... can be connected to this unit via RCA output and "AUX-IN". Press the MUTE button again to power off . AUX IN Mode An external peripheral device can also turn the unit on the remote to mute the volume from "0" to turning the unit off the unit.The monitor is drawn back into the main compartment and the LCD screen displays "BYE BYE". The LCD or TFT screen displays the volume level for the speakers as well. Audio Control Menu The Audio Control feature...
... can be connected to this unit via RCA output and "AUX-IN". Press the MUTE button again to power off . AUX IN Mode An external peripheral device can also turn the unit on the remote to mute the volume from "0" to turning the unit off the unit.The monitor is drawn back into the main compartment and the LCD screen displays "BYE BYE". The LCD or TFT screen displays the volume level for the speakers as well. Audio Control Menu The Audio Control feature...
Instruction Manual
Page 17
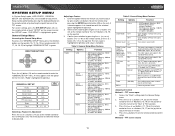
... the remote control to highlight "GENERAL SETUP" in light blue. 2. For system settings, press the SYS SETUP button (31) on the remote control or touch "SETUP" on the remote control or by touching the top left corner of the TFT screen. A submenu appears in a second row with the option for adjustment. Setup can be performed by pressing the dedicated button on the screen to adjust the hour or minutes. 4. VM9311TS SYSTEM SETUP MENU In "System Setup" mode...
... the remote control to highlight "GENERAL SETUP" in light blue. 2. For system settings, press the SYS SETUP button (31) on the remote control or touch "SETUP" on the remote control or by touching the top left corner of the TFT screen. A submenu appears in a second row with the option for adjustment. Setup can be performed by pressing the dedicated button on the screen to adjust the hour or minutes. 4. VM9311TS SYSTEM SETUP MENU In "System Setup" mode...

Instruction Manual
Page 18
...", then press the >/|| button (18) on the joystick to make fine audio adjustments. Press the < or > buttons (16, 17) on the remote control. Returning to the System Setup Menu To return to the System Setup menu, move the cursor to highlight "ASP CONFIG" in the LCD display. 1. Press the /\ or V buttons (18, 19) on the remote or by pressing the >> or A submenu appears in a second row...
...", then press the >/|| button (18) on the joystick to make fine audio adjustments. Press the < or > buttons (16, 17) on the remote control. Returning to the System Setup Menu To return to the System Setup menu, move the cursor to highlight "ASP CONFIG" in the LCD display. 1. Press the /\ or V buttons (18, 19) on the remote or by pressing the >> or A submenu appears in a second row...
Instruction Manual
Page 19
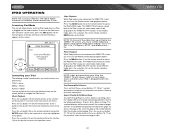
... MENU Switch to Radio Tuner source Press the SRC button (15) on the joystick (17) to the TUNER source. VM9311TS TUNER OPERATION Tuner TFT Display 17 6 4 1 10 2 5 3 P1 PRESETS 11 12 13 14 15 16 BAND AS Source: 7 8 9 1. Clock 4. Seek Tuning Press the >>| button (19) on remote control or the > button on the front panel or remote control (8) to switch to seek the next station higher. Playing Mode 8. BAND: Touch to tune forward one step 15. User Defined Equalizer...
... MENU Switch to Radio Tuner source Press the SRC button (15) on the joystick (17) to the TUNER source. VM9311TS TUNER OPERATION Tuner TFT Display 17 6 4 1 10 2 5 3 P1 PRESETS 11 12 13 14 15 16 BAND AS Source: 7 8 9 1. Clock 4. Seek Tuning Press the >>| button (19) on remote control or the > button on the front panel or remote control (8) to switch to seek the next station higher. Playing Mode 8. BAND: Touch to tune forward one step 15. User Defined Equalizer...
Instruction Manual
Page 22
... disc must be displayed on the main TFT screen unless the parking brake is ejected. NOTE: If Parental Lock (Rating) is activated and the disc inserted is in the unit or if the power is closed. The unit will remain off . Select previous chapter D - Opening/Closing the TFT Video Screen Opening the TFT Screen To open the TFT video screen, press the OPEN button (1). Display the following on-screen controls: Menu Controlling Playback Stopping Playback Touch the stop DVD play a DVD...
... disc must be displayed on the main TFT screen unless the parking brake is ejected. NOTE: If Parental Lock (Rating) is activated and the disc inserted is in the unit or if the power is closed. The unit will remain off . Select previous chapter D - Opening/Closing the TFT Video Screen Opening the TFT Screen To open the TFT video screen, press the OPEN button (1). Display the following on-screen controls: Menu Controlling Playback Stopping Playback Touch the stop DVD play a DVD...

Instruction Manual
Page 25
In "DVD Setup" mode, "LANGUAGE", "VIDEO", "AUDIO" and "RATING" (parental lock) are memorized. Accessing the DVD Setup Screen For system settings, press the DVD SETUP button (30) on the remote control or touch "SETUP" on the remote to enter the "SETUP" menu. DVD SETUP LANGUAGE AUDIO BACK VIDEO RATING NOTE: Once the DVD setup is playing, press the DVD SETUP button (30) on the screen to access the DVD Setup menu. While the DVD/disc is complete, the settings are available for Adjustment Once inside a menu, press the >> or /|| button (18...
In "DVD Setup" mode, "LANGUAGE", "VIDEO", "AUDIO" and "RATING" (parental lock) are memorized. Accessing the DVD Setup Screen For system settings, press the DVD SETUP button (30) on the remote control or touch "SETUP" on the remote to enter the "SETUP" menu. DVD SETUP LANGUAGE AUDIO BACK VIDEO RATING NOTE: Once the DVD setup is playing, press the DVD SETUP button (30) on the screen to access the DVD Setup menu. While the DVD/disc is complete, the settings are available for Adjustment Once inside a menu, press the >> or /|| button (18...
Instruction Manual
Page 27
... help eliminate buffer errors and increase disc reading reliability. file name: 12 characters, file extension: 3 characters • ISO 9660 - VM9311TS DVD/DISC AUDIO OPERATION Instructions for TFT control and Insert/Eject are compatible with the track number and playing time appear on the screen. Loud Setting Indicator Controlling Playback Stopping Playback Press the 6/STOP button (13) on the front panel or the / BAND button (20) on an empty disc up to play mode 4. For CD-RW discs...
... help eliminate buffer errors and increase disc reading reliability. file name: 12 characters, file extension: 3 characters • ISO 9660 - VM9311TS DVD/DISC AUDIO OPERATION Instructions for TFT control and Insert/Eject are compatible with the track number and playing time appear on the screen. Loud Setting Indicator Controlling Playback Stopping Playback Press the 6/STOP button (13) on the front panel or the / BAND button (20) on an empty disc up to play mode 4. For CD-RW discs...
Instruction Manual
Page 28
... item on the remote control to navigate the iPod menus. The VM9311TS will be viewed on the remote control to access the iPod PHOTO mode. To exit VIDEO mode, press the >> button (14) on the remote control or MENU button on the VM9311TS TFT monitor. IPOD OPERATION NOTE: Be sure your iPod to the VM9311TS screen, you must set the following remote control buttons are used to access the iPod menus: TITLE = Music MENU = Photos AUDIO = Videos Use the joystick on the unit or the directional...
... item on the remote control to navigate the iPod menus. The VM9311TS will be viewed on the remote control to access the iPod PHOTO mode. To exit VIDEO mode, press the >> button (14) on the remote control or MENU button on the VM9311TS TFT monitor. IPOD OPERATION NOTE: Be sure your iPod to the VM9311TS screen, you must set the following remote control buttons are used to access the iPod menus: TITLE = Music MENU = Photos AUDIO = Videos Use the joystick on the unit or the directional...

Instruction Manual
Page 29
...brake Change setup to accommodate disc Check wiring and correct Use correct aspect ratio setting Press OPEN key to restart monitor movement Connect the auto antenna control cable properly Connect the auto antenna control cable properly Turn LOCAL function off No image Incorrect connection to parking brake wire PRK SW is activated and parking brake is not engaged Flashing image or interference appears on Radio Fuse blown Car battery fuse blown Illegal operation Remote control does not function Battery depleted Battery installed incorrectly No/low audio output Improper audio output...
...brake Change setup to accommodate disc Check wiring and correct Use correct aspect ratio setting Press OPEN key to restart monitor movement Connect the auto antenna control cable properly Connect the auto antenna control cable properly Turn LOCAL function off No image Incorrect connection to parking brake wire PRK SW is activated and parking brake is not engaged Flashing image or interference appears on Radio Fuse blown Car battery fuse blown Illegal operation Remote control does not function Battery depleted Battery installed incorrectly No/low audio output Improper audio output...
Instruction Manual
Page 30
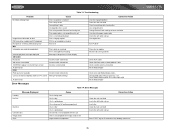
... Module Cable Check satellite antenna connection Reset Media Module Check jLink and Media Module cables Change iPod video settings to TV Out = On Check Media Module yellow RCA video input cable Reset Media Module Table 14: Error Messages Loading No Disc Message Displayed Bad Disc Unknown disc Region Error Error Cause Disc is being read Disc is dirty Disc is upside down Disc not present in loading compartment Disc is dirty Disc is upside down Disc format is not compatible with this unit DVD...
... Module Cable Check satellite antenna connection Reset Media Module Check jLink and Media Module cables Change iPod video settings to TV Out = On Check Media Module yellow RCA video input cable Reset Media Module Table 14: Error Messages Loading No Disc Message Displayed Bad Disc Unknown disc Region Error Error Cause Disc is being read Disc is dirty Disc is upside down Disc not present in loading compartment Disc is dirty Disc is upside down Disc format is not compatible with this unit DVD...
Instruction Manual
Page 32
... : 336,960 sub pixels, 1440 (W) X 234 (H) Viewing angle: • 65 degrees left or right • 40 degrees up • 65 degrees down General Auxiliary Input impedance: 10k Power Supply: 11 to 16VDC, negative ground Power Antenna (Blue): 500mA max, current limited protection Amplifier Remote (Blue/White): 500mA, current limited protection Fuse: 10-amp, mini ATM type DIN chassis dimensions: 2"H X 7"W X 7"D (50mm x 178mm x 178mm) Operating Temperature: -20C...
... : 336,960 sub pixels, 1440 (W) X 234 (H) Viewing angle: • 65 degrees left or right • 40 degrees up • 65 degrees down General Auxiliary Input impedance: 10k Power Supply: 11 to 16VDC, negative ground Power Antenna (Blue): 500mA max, current limited protection Amplifier Remote (Blue/White): 500mA, current limited protection Fuse: 10-amp, mini ATM type DIN chassis dimensions: 2"H X 7"W X 7"D (50mm x 178mm x 178mm) Operating Temperature: -20C...

Quick Start Guide
Page 1
External Power Amplifier SUB.W FRONT R FRONT L REAR R REAR L Media Module Cable / BLACK MEDIA MODULE VIDEO INPUT NOTE: See other side for more information about the parking brake. Harness Cord Auto antenna control (connect to antenna control lead & power supply of antenna amplifier) BLUE ANT.CONT External power amplifier control BLUE/WHITE P.CONT Mute (leave open if not connected) BROWN MUTE AUX IN VIDEO REAR VIDEO OUT 1 Rear Video 1 PARKING BRAKE PRK SW NOTE: Refer to the Parking Brake section of your Instruction Manual for additional connections through the Media Module....
External Power Amplifier SUB.W FRONT R FRONT L REAR R REAR L Media Module Cable / BLACK MEDIA MODULE VIDEO INPUT NOTE: See other side for more information about the parking brake. Harness Cord Auto antenna control (connect to antenna control lead & power supply of antenna amplifier) BLUE ANT.CONT External power amplifier control BLUE/WHITE P.CONT Mute (leave open if not connected) BROWN MUTE AUX IN VIDEO REAR VIDEO OUT 1 Rear Video 1 PARKING BRAKE PRK SW NOTE: Refer to the Parking Brake section of your Instruction Manual for additional connections through the Media Module....


