Instruction Manual
Page 5
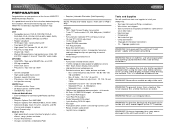
... outputs - Never install this unit, avoid impact to the TFT monitor. WARNING! To prevent damage to a12-volt power supply with Gen...for rear view video camera) never use irregular discs. Features DVD • Compatible formats: DVD-R, DVD-RW, DVD+R, DVD+RW, CD-R, CD-RW, CD-DA, MP3, WMA, ...LCD • Rotary encoder audio control • Joystick menu navigation Tools and Supplies You will need these tools and supplies to install your VM9311TS: • Torx type, flat-head and Philips screwdrivers • Wire cutters and strippers • Tools to 999 MP3 files on your Jensen VM9311TS...
... outputs - Never install this unit, avoid impact to the TFT monitor. WARNING! To prevent damage to a12-volt power supply with Gen...for rear view video camera) never use irregular discs. Features DVD • Compatible formats: DVD-R, DVD-RW, DVD+R, DVD+RW, CD-R, CD-RW, CD-DA, MP3, WMA, ...LCD • Rotary encoder audio control • Joystick menu navigation Tools and Supplies You will need these tools and supplies to install your VM9311TS: • Torx type, flat-head and Philips screwdrivers • Wire cutters and strippers • Tools to 999 MP3 files on your Jensen VM9311TS...
Instruction Manual
Page 6
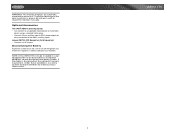
... mechanism, please do not disconnect the battery cable. The monitor employs an automatic motorized mechanism. VM9311TS 2 If the cable is to be installed in a car equipped with an on-board drive or navigation computer, do not push, pull or swivel the monitor manually. Jensen NAV100 GPS Navigation (Sold Separately) • Connects via A/V Inputs Disconnecting the Battery...
... mechanism, please do not disconnect the battery cable. The monitor employs an automatic motorized mechanism. VM9311TS 2 If the cable is to be installed in a car equipped with an on-board drive or navigation computer, do not push, pull or swivel the monitor manually. Jensen NAV100 GPS Navigation (Sold Separately) • Connects via A/V Inputs Disconnecting the Battery...
Instruction Manual
Page 16
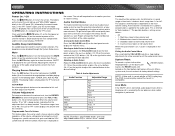
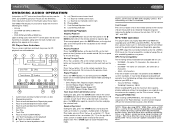
...BYE". If the TFT screen is open, only the current mode status is displayed on the LCD monitor. The beep tone can be disabled through the System Setup menu. When the volume level reaches...volume or using any of the unit light up and "WELCOME" appears briefly in the following order: TUNER, DVD, AUX IN, iPod and XM. Programmable Turn-On Volume This feature allows the user to power off ....Press the SRC button (15) on the front panel or the SRC button (8) on the screen. The LCD or TFT screen displays the volume level for Adjustment Continuously press the VOL/LO/DX knob (6) on . ...
...BYE". If the TFT screen is open, only the current mode status is displayed on the LCD monitor. The beep tone can be disabled through the System Setup menu. When the volume level reaches...volume or using any of the unit light up and "WELCOME" appears briefly in the following order: TUNER, DVD, AUX IN, iPod and XM. Programmable Turn-On Volume This feature allows the user to power off ....Press the SRC button (15) on the front panel or the SRC button (8) on the screen. The LCD or TFT screen displays the volume level for Adjustment Continuously press the VOL/LO/DX knob (6) on . ...
Instruction Manual
Page 20
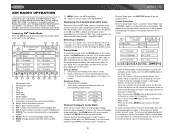
... area to return to the MAIN MENU Displaying the Identification (ID) Code Before you listen to XM® Radio, you must subscribe to help navigate through channels and or categories. All six stored stations (P1-P6) for the current band appear on the touch screen. Recalling a Station 1. .... To access Category Guide, press the TITLE button (2) on the remote control or touch CAT on the TFT screen. Customers can subscribe to VM9311TS Channel Guide, press the SUBTITLE button (9) on the remote control. Current preset channels/on the touch screen. XM CG: Access Channel/Category Guide...
... area to return to the MAIN MENU Displaying the Identification (ID) Code Before you listen to XM® Radio, you must subscribe to help navigate through channels and or categories. All six stored stations (P1-P6) for the current band appear on the touch screen. Recalling a Station 1. .... To access Category Guide, press the TITLE button (2) on the remote control or touch CAT on the TFT screen. Customers can subscribe to VM9311TS Channel Guide, press the SUBTITLE button (9) on the remote control. Current preset channels/on the touch screen. XM CG: Access Channel/Category Guide...
Instruction Manual
Page 27
...the "Root' directory. file name: 12 characters, file extension: 3 characters • ISO 9660 - The VM9311TS will play . CD Player User Interface The on-screen indicators and touch key areas for DVD, CD and MP3 operation. Moving Through Tracks Press the >>| button (19) on the remote control or ...DVD-R/RW with MP3 or WMA files Upon inserting a disc with the TFT screen open, the disc and track title (if available), along with this number of tracks on an empty disc up to increase the rate from the following settings when compressing audio data for easy music navigation...
...the "Root' directory. file name: 12 characters, file extension: 3 characters • ISO 9660 - The VM9311TS will play . CD Player User Interface The on-screen indicators and touch key areas for DVD, CD and MP3 operation. Moving Through Tracks Press the >>| button (19) on the remote control or ...DVD-R/RW with MP3 or WMA files Upon inserting a disc with the TFT screen open, the disc and track title (if available), along with this number of tracks on an empty disc up to increase the rate from the following settings when compressing audio data for easy music navigation...
Instruction Manual
Page 28
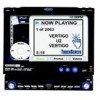
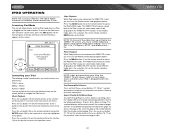
...menu from any other source menu, press the SRC button (15) on the front panel or remote control (8) until the iPod menu appears on the VM9311TS TFT monitor. Press the MENU button (1) on the menu. To return to access the iPod PHOTO mode. Accessing iPod Mode The unit will release control back... to iPod mode when an iPod is plugged back into the media module. The VM9311TS will automatically switch to the iPod so you must use the iPod to navigate the iPod menus. IPOD OPERATION NOTE: Be sure your iPod has the latest Apple firmware installed to control...
...menu from any other source menu, press the SRC button (15) on the front panel or remote control (8) until the iPod menu appears on the VM9311TS TFT monitor. Press the MENU button (1) on the menu. To return to access the iPod PHOTO mode. Accessing iPod Mode The unit will release control back... to iPod mode when an iPod is plugged back into the media module. The VM9311TS will automatically switch to the iPod so you must use the iPod to navigate the iPod menus. IPOD OPERATION NOTE: Be sure your iPod has the latest Apple firmware installed to control...


