Instruction Manual
Page 5
...remote control • 1 NTSC composite video output for additional screens • TSD- Store up • 16-step TFT LCD... of the Jensen VM9311TS Mobile Multimedia Receiver. Cinema/Normal/Off • Front panel DVD control •...LCD • Rotary encoder audio control • Joystick menu navigation Tools and Supplies You will need these tools and supplies to a12-volt power supply with Gen 5 iPod's only . WARNING! To prevent damage to the TFT monitor. Features DVD • Compatible formats: DVD-R, DVD-RW, DVD+R, DVD... result in a fire. 1 Using an improper fuse may cause damage...
...remote control • 1 NTSC composite video output for additional screens • TSD- Store up • 16-step TFT LCD... of the Jensen VM9311TS Mobile Multimedia Receiver. Cinema/Normal/Off • Front panel DVD control •...LCD • Rotary encoder audio control • Joystick menu navigation Tools and Supplies You will need these tools and supplies to a12-volt power supply with Gen 5 iPod's only . WARNING! To prevent damage to the TFT monitor. Features DVD • Compatible formats: DVD-R, DVD-RW, DVD+R, DVD... result in a fire. 1 Using an improper fuse may cause damage...
Instruction Manual
Page 15
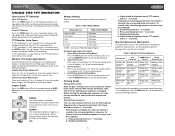
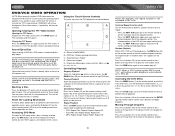
VM9311TS USING THE TFT MONITOR Open/Close TFT Monitor Open TFT Monitor Press the OPEN button (1) on the front panel or press the ( ) button (25) of the front zone remote control to load the display panel back into the compartment. Close TFT Monitor..., press the OPEN button (1) or ( ) button (25) on the monitor panel. 2. Monitor Tilt Angle Adjustment A known characteristic of LCD panels is set to Set: Press the (>>) ( OFF Image Setting Table...Mode DVD RGB Mode AUX IN CVBS Mode *CVBS - Aspect Ratio Press the DISP button (28) on the remote control or WIDE/ PIC button (2) on , the monitor ...
VM9311TS USING THE TFT MONITOR Open/Close TFT Monitor Open TFT Monitor Press the OPEN button (1) on the front panel or press the ( ) button (25) of the front zone remote control to load the display panel back into the compartment. Close TFT Monitor..., press the OPEN button (1) or ( ) button (25) on the monitor panel. 2. Monitor Tilt Angle Adjustment A known characteristic of LCD panels is set to Set: Press the (>>) ( OFF Image Setting Table...Mode DVD RGB Mode AUX IN CVBS Mode *CVBS - Aspect Ratio Press the DISP button (28) on the remote control or WIDE/ PIC button (2) on , the monitor ...
Instruction Manual
Page 16
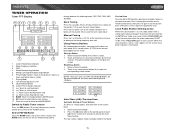
... using any of the cabin equalizer. Volume Adjustment To increase or decrease the volume level, turn on volume setting regardless of your audio system to change between available playing sources in the LCD...panel or the SRC button (8) on the remote to meet the acoustical characteristics of the volume setting prior to turn the unit on the LCD monitor. If the TFT screen is open, only...LCD or TFT screen displays the volume level for Adjustment Continuously press the VOL/LO/DX knob (6) on the type of the unit light up and "WELCOME" appears briefly in the following order: TUNER, DVD...
... using any of the cabin equalizer. Volume Adjustment To increase or decrease the volume level, turn on volume setting regardless of your audio system to change between available playing sources in the LCD...panel or the SRC button (8) on the remote to meet the acoustical characteristics of the volume setting prior to turn the unit on the LCD monitor. If the TFT screen is open, only...LCD or TFT screen displays the volume level for Adjustment Continuously press the VOL/LO/DX knob (6) on the type of the unit light up and "WELCOME" appears briefly in the following order: TUNER, DVD...
Instruction Manual
Page 17
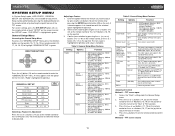
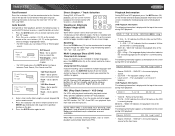
... Screen Saver Video Format Beep On Selecting a Feature for Adjustment Press the >> or /|| button (18) on the joystick (16, 17, 18, 19) or remote control (14, 17, 18, 19, 22) to enter the "GENERAL SETUP" menu. A submenu appears in a second row with the option for adjustment. For...option highlighted in green. Press the Setup can be performed by pressing the dedicated button on the remote control or by pressing the ENTER (joystick) button (20) on the joystick to enter the "SETUP" menu. VM9311TS SYSTEM SETUP MENU In "System Setup" mode, "ASP CONFIG", "GENERAL SETUP" and "SCREEN ...
... Screen Saver Video Format Beep On Selecting a Feature for Adjustment Press the >> or /|| button (18) on the joystick (16, 17, 18, 19) or remote control (14, 17, 18, 19, 22) to enter the "GENERAL SETUP" menu. A submenu appears in a second row with the option for adjustment. For...option highlighted in green. Press the Setup can be performed by pressing the dedicated button on the remote control or by pressing the ENTER (joystick) button (20) on the joystick to enter the "SETUP" menu. VM9311TS SYSTEM SETUP MENU In "System Setup" mode, "ASP CONFIG", "GENERAL SETUP" and "SCREEN ...
Instruction Manual
Page 19
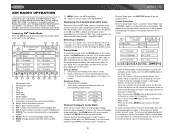
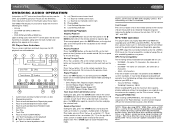
Playing Mode 8. BAND: Touch to change between AM/FM bands 16. Seek Tuning Press the >>| button (19) on remote control or the > button on the front panel or remote control (8) to switch to change between the following bands: FM1, FM2, FM3, AM1, and AM2. Press the | Current Radio Band ... Touch the BAND button (15) on the screen, or press the BAND button on the unit (14) or remote control (20) to the TUNER source. User Defined Equalizer Level 9. Radio Frequency Indicator 3. VM9311TS TUNER OPERATION Tuner TFT Display 17 6 4 1 10 2 5 3 P1 PRESETS 11 12 13 14 15 16...
Playing Mode 8. BAND: Touch to change between AM/FM bands 16. Seek Tuning Press the >>| button (19) on remote control or the > button on the front panel or remote control (8) to switch to change between the following bands: FM1, FM2, FM3, AM1, and AM2. Press the | Current Radio Band ... Touch the BAND button (15) on the screen, or press the BAND button on the unit (14) or remote control (20) to the TUNER source. User Defined Equalizer Level 9. Radio Frequency Indicator 3. VM9311TS TUNER OPERATION Tuner TFT Display 17 6 4 1 10 2 5 3 P1 PRESETS 11 12 13 14 15 16...
Instruction Manual
Page 20
...ID, press the < or > buttons (16, 17) on the joystick or the CH > buttons on the front panel or remote control (8) to switch to enter channel directly using your radio's identification number. Preset Mode To enter preset mode, touch the BAND button on the screen, or press the BAND button.... CAT V: Select previous channel in the touch screen. • Press the >> button (14) on the remote control, the /\ button (18) on the joystick, or the > button on the touch screen to VM9311TS Channel Guide, press the SUBTITLE button (9) on screen 15. XM CG: Access Channel/Category Guide mode 16. ...
...ID, press the < or > buttons (16, 17) on the joystick or the CH > buttons on the front panel or remote control (8) to switch to enter channel directly using your radio's identification number. Preset Mode To enter preset mode, touch the BAND button on the screen, or press the BAND button.... CAT V: Select previous channel in the touch screen. • Press the >> button (14) on the remote control, the /\ button (18) on the joystick, or the > button on the touch screen to VM9311TS Channel Guide, press the SUBTITLE button (9) on screen 15. XM CG: Access Channel/Category Guide mode 16. ...
Instruction Manual
Page 21
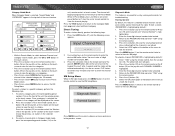
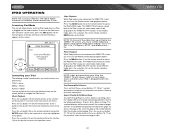
VM9311TS Category Guide Mode When Category Mode is selected, "Search Mode" and "CATEGORY" appear in the top half of the menu to unlock the channel. Press MENU to exit the current submenu or menu and return to the main XM page. 17 Enter "1264" using the remote control, then the >/|| button (18). ... for troubleshooting. Press the MENU button (1) twice on -screen "CLR" button to correct entry mistakes and "OK" to the main XM page. Use the on the remote control to return to the previous screen. Press the MENU button (1) on the unit or just let the keypad "time out" after 4 seconds ...
VM9311TS Category Guide Mode When Category Mode is selected, "Search Mode" and "CATEGORY" appear in the top half of the menu to unlock the channel. Press MENU to exit the current submenu or menu and return to the main XM page. 17 Enter "1264" using the remote control, then the >/|| button (18). ... for troubleshooting. Press the MENU button (1) twice on -screen "CLR" button to correct entry mistakes and "OK" to the main XM page. Use the on the remote control to return to the previous screen. Press the MENU button (1) on the unit or just let the keypad "time out" after 4 seconds ...
Instruction Manual
Page 22
... is entered and disc play . Using the Touch-Screen Controls The touch key areas for playback. Insert/Eject Disc Upon inserting a DVD disc, DVD mode is playing with the unit powered off . Ejecting a Disc Press the button (21) on the unit or remote control (35) to the next ... (18) to suspend or resume disc play begins. Accessing the DVD Menu Press the MENU button (1) on the remote control (18) to resume normal play . Use the directional (arrow) buttons V) on the remote control to select a different title for DVD playback are outlined below. Press the TITLE button (2) on the...
... is entered and disc play . Using the Touch-Screen Controls The touch key areas for playback. Insert/Eject Disc Upon inserting a DVD disc, DVD mode is playing with the unit powered off . Ejecting a Disc Press the button (21) on the unit or remote control (35) to the next ... (18) to suspend or resume disc play begins. Accessing the DVD Menu Press the MENU button (1) on the remote control (18) to resume normal play . Use the directional (arrow) buttons V) on the remote control to select a different title for DVD playback are outlined below. Press the TITLE button (2) on the...
Instruction Manual
Page 23
...of the current track. The following information is set to enlarge and pan through the video image using the numeric keypad (29) on the remote control. 4. VM9311TS Fast Forward Press the >> button (14) on the remote control or the /\ button (18) on the joystick to access a specific location on a disc... on the disc. 5. Once PBC is FLAT. • Loud: Level 1 - When PBC is the current playing source. • EQ: FLAT - "DVD/CD" is activated, selecting random, scan, or search playback automatically deactivates PBC. The Loud option is displayed at the bottom of the play back control...
...of the current track. The following information is set to enlarge and pan through the video image using the numeric keypad (29) on the remote control. 4. VM9311TS Fast Forward Press the >> button (14) on the remote control or the /\ button (18) on the joystick to access a specific location on a disc... on the disc. 5. Once PBC is FLAT. • Loud: Level 1 - When PBC is the current playing source. • EQ: FLAT - "DVD/CD" is activated, selecting random, scan, or search playback automatically deactivates PBC. The Loud option is displayed at the bottom of the play back control...

Instruction Manual
Page 25
...", "AUDIO" and "RATING" (parental lock) are memorized. These operations can also touch the on the remote to access the DVD Setup menu. "SYS SETUP" is highlighted in green. VM9311TS DVD/DISC SETUP MENU NOTE: A DVD/disc must be performed using the remote control or joystick controls. A submenu appears in a second row with the selected option highlighted in...
...", "AUDIO" and "RATING" (parental lock) are memorized. These operations can also touch the on the remote to access the DVD Setup menu. "SYS SETUP" is highlighted in green. VM9311TS DVD/DISC SETUP MENU NOTE: A DVD/disc must be performed using the remote control or joystick controls. A submenu appears in a second row with the selected option highlighted in...
Instruction Manual
Page 27
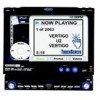
... will play back MP3 and WMA files recorded onto CD-R/RW's and DVD-R/RW's. Use the numeric keypad (29) on the remote control to the next track on the joystick (17) to advance to access files directly. VM9311TS DVD/DISC AUDIO OPERATION Instructions for TFT control and Insert/Eject are the same... button (18) on the remote control to stop disc playback 12. ||: Touch to move to next track 14. : Touch to suspend or resume disc play . Select the "Disc at once" setting. Touch to cancel Random Play mode. Track Title 9. MP3/WMA Operation This player allows you to play music ...
... will play back MP3 and WMA files recorded onto CD-R/RW's and DVD-R/RW's. Use the numeric keypad (29) on the remote control to the next track on the joystick (17) to advance to access files directly. VM9311TS DVD/DISC AUDIO OPERATION Instructions for TFT control and Insert/Eject are the same... button (18) on the remote control to stop disc playback 12. ||: Touch to move to next track 14. : Touch to suspend or resume disc play . Select the "Disc at once" setting. Touch to cancel Random Play mode. Track Title 9. MP3/WMA Operation This player allows you to play music ...
Instruction Manual
Page 28
... keypad while in that directory displayed at the top of the following remote control buttons are used to access the iPod menus: TITLE = Music MENU = Photos AUDIO = Videos Use the joystick on the unit or the directional keys on the VM9311TS TFT monitor. NOTE: After disconnecting your iPod The following directories: Playlist, Artist, Album or...
... keypad while in that directory displayed at the top of the following remote control buttons are used to access the iPod menus: TITLE = Music MENU = Photos AUDIO = Videos Use the joystick on the unit or the directional keys on the VM9311TS TFT monitor. NOTE: After disconnecting your iPod The following directories: Playlist, Artist, Album or...

Instruction Manual
Page 29
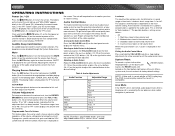
VM9311TS TROUBLESHOOTING Table 13: Troubleshooting Problem Cause Corrective Action GENERAL Unit will not power on Radio Fuse blown Car battery fuse blown Illegal operation Remote control does not function... Change setup to accommodate disc Check wiring and correct Use correct aspect ratio setting Press OPEN key to restart monitor movement Connect the auto antenna control cable properly Connect ... interference appears on screen DVD is not grounded and that "MUTE" connection is not compatible with new one 25 Improper aspect ratio setup play Monitor stops at incorrect position ...
VM9311TS TROUBLESHOOTING Table 13: Troubleshooting Problem Cause Corrective Action GENERAL Unit will not power on Radio Fuse blown Car battery fuse blown Illegal operation Remote control does not function... Change setup to accommodate disc Check wiring and correct Use correct aspect ratio setting Press OPEN key to restart monitor movement Connect the auto antenna control cable properly Connect ... interference appears on screen DVD is not grounded and that "MUTE" connection is not compatible with new one 25 Improper aspect ratio setup play Monitor stops at incorrect position ...
Instruction Manual
Page 32
...VM9311TS... Assistance: 1-800-323-4815 www.jensen.com © 2006 Audiovox Ver ...Monitor Screen Size: 7.0" (Measured diagonally), 16:9 Widescreen • 6.06" (154.1mm) W X 3.42" (87mm) H Screen Type: TFT Liquid Crystal Display (LCD) active matrix Response Time: 30mSec rise time, 50mSec fall time Resolution: • DVD...used as source reference Reference Supply Voltage: 14.4VDC DVD/CD Player Compatible Formats: Compatible formats: DVD-R, DVDRW, DVD+R, DVD...ground Power Antenna (Blue): 500mA max, current limited protection Amplifier Remote (Blue/White): 500mA, current limited protection Fuse: 10-amp,...
...VM9311TS... Assistance: 1-800-323-4815 www.jensen.com © 2006 Audiovox Ver ...Monitor Screen Size: 7.0" (Measured diagonally), 16:9 Widescreen • 6.06" (154.1mm) W X 3.42" (87mm) H Screen Type: TFT Liquid Crystal Display (LCD) active matrix Response Time: 30mSec rise time, 50mSec fall time Resolution: • DVD...used as source reference Reference Supply Voltage: 14.4VDC DVD/CD Player Compatible Formats: Compatible formats: DVD-R, DVDRW, DVD+R, DVD...ground Power Antenna (Blue): 500mA max, current limited protection Amplifier Remote (Blue/White): 500mA, current limited protection Fuse: 10-amp,...


