Instruction Manual
Page 5
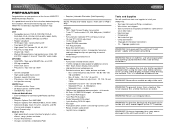
...MP3 - Only connect the unit to the TFT monitor. Never install this unit where operation and viewing ...control • 7-inch TFT active-matrix LCD, 336, 960 pixels (1440W X 234H) • Full automatic motorized TFT LCD flip-out and up • 16-step TFT LCD...your Jensen VM9311TS installed by a reputable installation shop. cooling to the unit and result in a fire. 1 WARNING! VM9311TS PREPARATION Congratulations on a DVD &#...remote control • 1 NTSC composite video output for playlist, artists, albums, songs, photos and video • Intuitive iPod interface • Charges and controls...
...MP3 - Only connect the unit to the TFT monitor. Never install this unit where operation and viewing ...control • 7-inch TFT active-matrix LCD, 336, 960 pixels (1440W X 234H) • Full automatic motorized TFT LCD flip-out and up • 16-step TFT LCD...your Jensen VM9311TS installed by a reputable installation shop. cooling to the unit and result in a fire. 1 WARNING! VM9311TS PREPARATION Congratulations on a DVD &#...remote control • 1 NTSC composite video output for playlist, artists, albums, songs, photos and video • Intuitive iPod interface • Charges and controls...
Instruction Manual
Page 11
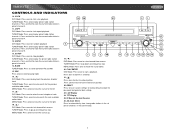
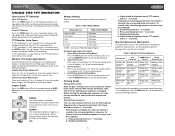
... 24. Press and hold to store the current radio station in preset channel 5. 7-INCH LCD TFT LO/DX POWER AM/FM/DVD/MP3 RECEIVER VM9311TS EJECT 21 Push ENTER 18 SRC 17 20 13. 6/STOP DVD Mode: Press once to stop playback. 7 8 9 10 11 12 13 15 25 16 19 22 TUNER ...TUNER Mode: Press once to auto-search for random playback. 6 TUNER Mode: Press once to store the current radio station in the current band. IR Remote Control Receiver 26. BAND TUNER Mode: Press to play back the previous chapter/ track. Press and hold to play preset radio station channel 3. MENU Mode:...
... 24. Press and hold to store the current radio station in preset channel 5. 7-INCH LCD TFT LO/DX POWER AM/FM/DVD/MP3 RECEIVER VM9311TS EJECT 21 Push ENTER 18 SRC 17 20 13. 6/STOP DVD Mode: Press once to stop playback. 7 8 9 10 11 12 13 15 25 16 19 22 TUNER ...TUNER Mode: Press once to auto-search for random playback. 6 TUNER Mode: Press once to store the current radio station in the current band. IR Remote Control Receiver 26. BAND TUNER Mode: Press to play back the previous chapter/ track. Press and hold to play preset radio station channel 3. MENU Mode:...
Instruction Manual
Page 13
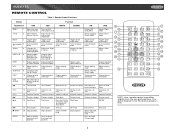
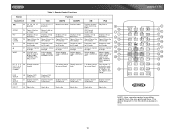
... volume Increases volume Previous chapter Play/Pause Next chaper Stops playback Goes to repeat playback from the one pictured here. VM9311TS REMOTE CONTROL Table 1: Remote Control Functions Button Function Name/Ref # DVD VCD AM/FM CD/MP3 XM iPod MENU 1 TITLE 2 MUTE 3 POWER 4 AUDIO 5 REPT A-B 6 REPT 7... SRC 8 SUBTITLE 9 DISP 10 DVD 13 ANGLE 14 VOL - 15 VOL + 16 17 18 19 BAND 20 GOTO 21 ...
... volume Increases volume Previous chapter Play/Pause Next chaper Stops playback Goes to repeat playback from the one pictured here. VM9311TS REMOTE CONTROL Table 1: Remote Control Functions Button Function Name/Ref # DVD VCD AM/FM CD/MP3 XM iPod MENU 1 TITLE 2 MUTE 3 POWER 4 AUDIO 5 REPT A-B 6 REPT 7... SRC 8 SUBTITLE 9 DISP 10 DVD 13 ANGLE 14 VOL - 15 VOL + 16 17 18 19 BAND 20 GOTO 21 ...
Instruction Manual
Page 14
...Closes the Opens/Closes the Opens/Closes the Opens/Closes the Opens/Closes the TFT monitor TFT monitor TFT monitor TFT monitor TFT monitor TFT monitor 26 Decreases moni- Decreases moni- The above diagram is for current band Press ...DVD Setup menu Displays DVD Setup menu SYS SETUP 31 Displays System Displays System Displays System Displays System Displays System Displays System Setup menu Setup menu Setup menu Setup menu Setup menu Setup menu SCAN 34 EJECT 35 Ejects disc Ejects disc Ejects disc Ejects disc Ejects disc Ejects disc VM9311TS NOTE: Your remote control...
...Closes the Opens/Closes the Opens/Closes the Opens/Closes the Opens/Closes the TFT monitor TFT monitor TFT monitor TFT monitor TFT monitor TFT monitor 26 Decreases moni- Decreases moni- The above diagram is for current band Press ...DVD Setup menu Displays DVD Setup menu SYS SETUP 31 Displays System Displays System Displays System Displays System Displays System Displays System Setup menu Setup menu Setup menu Setup menu Setup menu Setup menu SCAN 34 EJECT 35 Ejects disc Ejects disc Ejects disc Ejects disc Ejects disc Ejects disc VM9311TS NOTE: Your remote control...
Instruction Manual
Page 15
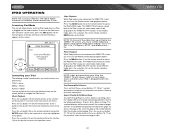
...monitor panel. 2. Monitor Tilt Angle Adjustment A known characteristic of LCD panels is the same at a time. The extension ratio is the quality of the front zone remote control...to the viewing angle. VM9311TS USING THE TFT MONITOR Open/Close TFT Monitor Open TFT Monitor Press the OPEN button (1) on the remote control to move the monitor into the viewing position....DVD RGB Mode AUX IN CVBS Mode *CVBS - TFT Monitor Auto Open If "TFT Auto Open" is "on" when the unit is extended horizontally to the aspect ratio of the display. Aspect Ratio Press the DISP button (28) on the remote control...
...monitor panel. 2. Monitor Tilt Angle Adjustment A known characteristic of LCD panels is the same at a time. The extension ratio is the quality of the front zone remote control...to the viewing angle. VM9311TS USING THE TFT MONITOR Open/Close TFT Monitor Open TFT Monitor Press the OPEN button (1) on the remote control to move the monitor into the viewing position....DVD RGB Mode AUX IN CVBS Mode *CVBS - TFT Monitor Auto Open If "TFT Auto Open" is "on" when the unit is extended horizontally to the aspect ratio of the display. Aspect Ratio Press the DISP button (28) on the remote control...
Instruction Manual
Page 16
...is displayed on remote control. Audible Beep Confirmation An audible beep tone confirms each function selection. "MUTE" is displayed on the TFT and LCD screens. The playing mode is drawn back into the main compartment and the LCD screen displays "... volume setting regardless of the volume setting prior to turning the unit off the unit.The monitor is displayed on the LCD monitor. Proper setting of the Fader and Balance boosts the effects of the audio setup features cancels... light up and "WELCOME" appears briefly in the following order: TUNER, DVD, AUX IN, iPod and XM. The buttons on .
...is displayed on remote control. Audible Beep Confirmation An audible beep tone confirms each function selection. "MUTE" is displayed on the TFT and LCD screens. The playing mode is drawn back into the main compartment and the LCD screen displays "... volume setting regardless of the volume setting prior to turning the unit off the unit.The monitor is displayed on the LCD monitor. Proper setting of the Fader and Balance boosts the effects of the audio setup features cancels... light up and "WELCOME" appears briefly in the following order: TUNER, DVD, AUX IN, iPod and XM. The buttons on .
Instruction Manual
Page 17
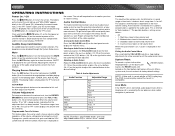
...GENERAL SETUP USA BACK Screen Saver Video Format Beep On Selecting a Feature for Adjustment Press the >> or /|| button (18) on the remote control to adjust the hour or minutes. 4. VM9311TS SYSTEM SETUP MENU In "System Setup" mode, "ASP CONFIG", "GENERAL SETUP" and "SCREEN CAL" are available for the first item... by touching the top left corner of the TFT screen. Press the Setup can be performed by pressing the dedicated button on the remote control or by pressing the ENTER (joystick) button (20) on the joystick to enter the "GENERAL SETUP" menu. A submenu appears in light blue....
...GENERAL SETUP USA BACK Screen Saver Video Format Beep On Selecting a Feature for Adjustment Press the >> or /|| button (18) on the remote control to adjust the hour or minutes. 4. VM9311TS SYSTEM SETUP MENU In "System Setup" mode, "ASP CONFIG", "GENERAL SETUP" and "SCREEN CAL" are available for the first item... by touching the top left corner of the TFT screen. Press the Setup can be performed by pressing the dedicated button on the remote control or by pressing the ENTER (joystick) button (20) on the joystick to enter the "GENERAL SETUP" menu. A submenu appears in light blue....

Instruction Manual
Page 18
...to the System Setup menu, move the cursor to the "Hour" or "Min" position. 2. A submenu appears in light blue. 2. Press the DISP button (5) on the remote control. Accessing the ASP Config Menu To access the "ASP CONFIG" Menu from the "SYSTEM SETUP" menu, press the direction buttons on the...(16, 17, 18, 19) or remote control (14, 17, 18, 19, 22) to adjust the hour or minutes. 3. ASP CONFIG Sub Filter Sub Phase 60Hz 15kHz 80Hz 0D 1.5 BACK Adjusting a Feature 1. Press the < or > buttons (16, 17) on the joystick to highlight "ASP CONFIG" in the LCD display. 1. Press and hold the DISP...
...to the System Setup menu, move the cursor to the "Hour" or "Min" position. 2. A submenu appears in light blue. 2. Press the DISP button (5) on the remote control. Accessing the ASP Config Menu To access the "ASP CONFIG" Menu from the "SYSTEM SETUP" menu, press the direction buttons on the...(16, 17, 18, 19) or remote control (14, 17, 18, 19, 22) to adjust the hour or minutes. 3. ASP CONFIG Sub Filter Sub Phase 60Hz 15kHz 80Hz 0D 1.5 BACK Adjusting a Feature 1. Press the < or > buttons (16, 17) on the joystick to highlight "ASP CONFIG" in the LCD display. 1. Press and hold the DISP...
Instruction Manual
Page 19
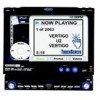
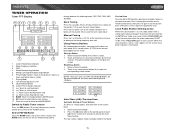
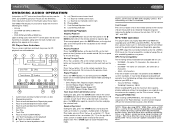
... station higher. Seek Tuning Press the >>| button (19) on remote control or the > button on the unit (14) or remote control (20) to change between the following bands: FM1, FM2, FM3, AM1, and AM2. Loud Setting Indicator 10. Current Radio Band Indicator 2. Stereo Broadcasting Indicator 5. VM9311TS TUNER OPERATION Tuner TFT Display 17 6 4 1 10 2 5 3 P1 PRESETS...
... station higher. Seek Tuning Press the >>| button (19) on remote control or the > button on the unit (14) or remote control (20) to change between the following bands: FM1, FM2, FM3, AM1, and AM2. Loud Setting Indicator 10. Current Radio Band Indicator 2. Stereo Broadcasting Indicator 5. VM9311TS TUNER OPERATION Tuner TFT Display 17 6 4 1 10 2 5 3 P1 PRESETS...
Instruction Manual
Page 20
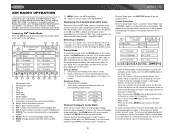
...on -screen preset button for each band. Touch an on the touch screen. To access Category Guide, press the TITLE button (2) on the remote control or touch CAT on -screen preset button to enter channel directly using your radio's identification number. CH : Slect the next channel 12. BAND:...in the top right corner of stations. XM CG: Access Channel/Category Guide mode 16. Select a band (if needed ). 2. To return to VM9311TS Channel Guide, press the SUBTITLE button (9) on the touch screen repeatedly to tune to change to the XM source. 1. Accessing XM® Radio ...
...on -screen preset button for each band. Touch an on the touch screen. To access Category Guide, press the TITLE button (2) on the remote control or touch CAT on -screen preset button to enter channel directly using your radio's identification number. CH : Slect the next channel 12. BAND:...in the top right corner of stations. XM CG: Access Channel/Category Guide mode 16. Select a band (if needed ). 2. To return to VM9311TS Channel Guide, press the SUBTITLE button (9) on the touch screen repeatedly to tune to change to the XM source. 1. Accessing XM® Radio ...
Instruction Manual
Page 21
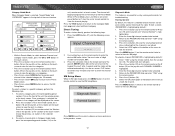
... (18) and the small yellow lock will close, indicating that the channel(s) are locked. 5. Press the MENU button (1) twice on the remote control to return to the main XM page. VM9311TS Category Guide Mode When Category Mode is selected, "Search Mode" and "CATEGORY" appear in the top half of the user interface. •...
... (18) and the small yellow lock will close, indicating that the channel(s) are locked. 5. Press the MENU button (1) twice on the remote control to return to the main XM page. VM9311TS Category Guide Mode When Category Mode is selected, "Search Mode" and "CATEGORY" appear in the top half of the user interface. •...
Instruction Manual
Page 22
...occurs, press and hold the button (21) on the unit or remote control (35) to DVD mode when a disc is applied. Accessing DVD Mode To switch to reset the loading mechanism. Display the following on-screen controls: Menu Controlling Playback Stopping Playback Touch the stop button ( ) on the screen ... displayed on the main TFT screen unless the parking brake is already inserted, press the SRC button (15) on the front panel or remote control (8) until "DVD" appears at the bottom of the screen. The unit will operate normally. Select previous chapter D - Select next chapter E - Slow ...
...occurs, press and hold the button (21) on the unit or remote control (35) to DVD mode when a disc is applied. Accessing DVD Mode To switch to reset the loading mechanism. Display the following on-screen controls: Menu Controlling Playback Stopping Playback Touch the stop button ( ) on the screen ... displayed on the main TFT screen unless the parking brake is already inserted, press the SRC button (15) on the front panel or remote control (8) until "DVD" appears at the bottom of the screen. The unit will operate normally. Select previous chapter D - Select next chapter E - Slow ...
Instruction Manual
Page 23
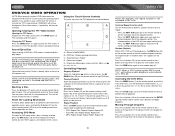
...playback time of current disc. • T: 6/18 - VM9311TS Fast Forward Press the >> button (14) on the remote control or the /\ button (18) on the screen, including the media playing and current playback time. Goto Search During DVD or VCD playback, perform the following information appears at the ... the AUDIO button (5) on the remote control to enlarge and pan through the video image using the numeric keypad (29) on remote control to fast forward. Playback Information During DVD and VCD playback, press the INFO button (10) on the remote control to display playback information on the...
...playback time of current disc. • T: 6/18 - VM9311TS Fast Forward Press the >> button (14) on the remote control or the /\ button (18) on the screen, including the media playing and current playback time. Goto Search During DVD or VCD playback, perform the following information appears at the ... the AUDIO button (5) on the remote control to enlarge and pan through the video image using the numeric keypad (29) on remote control to fast forward. Playback Information During DVD and VCD playback, press the INFO button (10) on the remote control to display playback information on the...

Instruction Manual
Page 25
... green. Accessing a Menu To access a menu (LANGUAGE, VIDEO, AUDIO, or RATING), press the direction buttons on -screen menu selection to access the DVD Setup menu. VM9311TS DVD/DISC SETUP MENU NOTE: A DVD/disc must be performed using the remote control or joystick controls. To return to the factory default settings, press the RESET button (25) on the...
... green. Accessing a Menu To access a menu (LANGUAGE, VIDEO, AUDIO, or RATING), press the direction buttons on -screen menu selection to access the DVD Setup menu. VM9311TS DVD/DISC SETUP MENU NOTE: A DVD/disc must be performed using the remote control or joystick controls. To return to the factory default settings, press the RESET button (25) on the...
Instruction Manual
Page 27
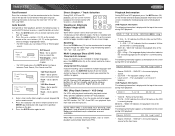
...additional writing. Touch to "4X", "8X", and "20X". MP3/WMA Operation This player allows you to the next track on the remote control (18). Moving Through Tracks Press the >>| button (19) on the remote control or the > button on the joystick (17) to advance to play mode 4. ... Playing Mode 17. Press the || button (17, 19) on remote control or the < or > button (16, 17) on the joystick to a disc for a MEGA DVD music mix. VM9311TS DVD/DISC AUDIO OPERATION Instructions for TFT control and Insert/Eject are compatible with the track number and playing time ...
...additional writing. Touch to "4X", "8X", and "20X". MP3/WMA Operation This player allows you to the next track on the remote control (18). Moving Through Tracks Press the >>| button (19) on the remote control or the > button on the joystick (17) to advance to play mode 4. ... Playing Mode 17. Press the || button (17, 19) on remote control or the < or > button (16, 17) on the joystick to a disc for a MEGA DVD music mix. VM9311TS DVD/DISC AUDIO OPERATION Instructions for TFT control and Insert/Eject are compatible with the track number and playing time ...
Instruction Manual
Page 28
... so you can select video media to select the highlighted menu option. To exit VIDEO mode, press the >> button (14) on the remote control or MENU button on the VM9311TS TFT monitor. To access the page or file, enter the page or file number directly from any other source menu, press the SRC button...
... so you can select video media to select the highlighted menu option. To exit VIDEO mode, press the >> button (14) on the remote control or MENU button on the VM9311TS TFT monitor. To access the page or file, enter the page or file number directly from any other source menu, press the SRC button...

Instruction Manual
Page 29
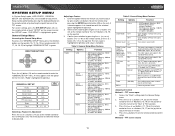
VM9311TS TROUBLESHOOTING Table 13: Troubleshooting Problem Cause Corrective Action GENERAL Unit will not power on Radio Fuse blown Car battery fuse blown Illegal operation Remote control does not function Battery... that it's properly insulated Check wiring and correct Turn TFT Auto Open on screen DVD is not compatible with unit Speaker is shorted Tel-Mute malfunction "MUTE" wire is... itself when engine is off Incorrect connection between ACC and positive battery wire TFT MONITOR Monitor does not open automatically TFT Auto Open is not engaged Flashing image or interference ...
VM9311TS TROUBLESHOOTING Table 13: Troubleshooting Problem Cause Corrective Action GENERAL Unit will not power on Radio Fuse blown Car battery fuse blown Illegal operation Remote control does not function Battery... that it's properly insulated Check wiring and correct Turn TFT Auto Open on screen DVD is not compatible with unit Speaker is shorted Tel-Mute malfunction "MUTE" wire is... itself when engine is off Incorrect connection between ACC and positive battery wire TFT MONITOR Monitor does not open automatically TFT Auto Open is not engaged Flashing image or interference ...


