Operation Manual
Page 5
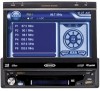
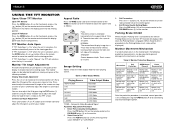
..., Rear and Subwoofer Line Output • Programmable Volume Control • Rear Camera Input (Normal and Mirror Image View) • Touch Screen Calibration Mode • 100-Ohm Preamp Line Output ...and install a rear video camera. Once the rear camera is a violation of the Jensen VM9213 Mobile Multimedia Receiver. Using an improper fuse may cause damage to the core mechanism, please do not ...Directory Search (MP3 / WMA Only) • Direct Track Access via Remote Control • Burn up to read all of a traffic accident (except when using for Game Console, Camcorder, Navigation, etc....
..., Rear and Subwoofer Line Output • Programmable Volume Control • Rear Camera Input (Normal and Mirror Image View) • Touch Screen Calibration Mode • 100-Ohm Preamp Line Output ...and install a rear video camera. Once the rear camera is a violation of the Jensen VM9213 Mobile Multimedia Receiver. Using an improper fuse may cause damage to the core mechanism, please do not ...Directory Search (MP3 / WMA Only) • Direct Track Access via Remote Control • Burn up to read all of a traffic accident (except when using for Game Console, Camcorder, Navigation, etc....
Operation Manual
Page 6
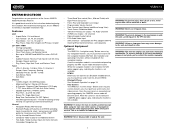
... adjust the downward tilt angle of the screen while the red tilt icon is flashing. Press once to adjust the angle in a continuous motion. You can also adjust the tilt using the and buttons (27, 26) on the remote control. VM9213 CONTROLS AND INDICATORS Button Operation 1. TILT / >>| VM9223 4 3 Multimedia Receiver 2 1 Press to auto-search the next available...
... adjust the downward tilt angle of the screen while the red tilt icon is flashing. Press once to adjust the angle in a continuous motion. You can also adjust the tilt using the and buttons (27, 26) on the remote control. VM9213 CONTROLS AND INDICATORS Button Operation 1. TILT / >>| VM9223 4 3 Multimedia Receiver 2 1 Press to auto-search the next available...
Operation Manual
Page 7
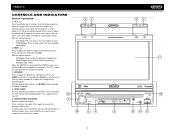
IR Remote Control Receiver 9. USB Interface Connector Connect a USB device for playback of three settings: Full, Normal or Standby. DISP Press to adjust the display aspect of the picture ... available on . Press repeatedly to select playing mode (TFT closed , press the DISP button to turn the unit on the secondary LCD screen. 4 3 6 8 VM9213 2 1 14 9 13 10 11 3 Secondary LCD Screen 10. RESET Press to reset system settings to turn the unit off. Audio/Video Input 15 11. SRC/ Press to factory default...
IR Remote Control Receiver 9. USB Interface Connector Connect a USB device for playback of three settings: Full, Normal or Standby. DISP Press to adjust the display aspect of the picture ... available on . Press repeatedly to select playing mode (TFT closed , press the DISP button to turn the unit on the secondary LCD screen. 4 3 6 8 VM9213 2 1 14 9 13 10 11 3 Secondary LCD Screen 10. RESET Press to reset system settings to turn the unit off. Audio/Video Input 15 11. SRC/ Press to factory default...

Operation Manual
Page 8
... directly playback/dial call playback/dial call Dial call when Bluetooth connected 4 VM9213 3 4 9 13 1 2 14 31 18 19 22 24 10 20 29 34 33 playback quency 18 Pause playback/start play - playback playback tion by decreasing tuning fre- REMOTE CONTROL Table 1: Remote Control Functions Button Function 8 Name MENU Ref# DVD 1 Enter the main menu...
... directly playback/dial call playback/dial call Dial call when Bluetooth connected 4 VM9213 3 4 9 13 1 2 14 31 18 19 22 24 10 20 29 34 33 playback quency 18 Pause playback/start play - playback playback tion by decreasing tuning fre- REMOTE CONTROL Table 1: Remote Control Functions Button Function 8 Name MENU Ref# DVD 1 Enter the main menu...
Operation Manual
Page 9
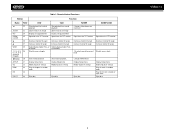
Table 1: Remote Control Functions Button Function Name Ref# DVD VCD ZOOM PIC OPEN/ CLOSE 22 Slow playback/fast rewind playback Slow playback/fast rewind playback 23 Zoom in/... settings Eject disc Display Setup menu Modify equalizer settings Play all tracks in random order Play the first ten seconds of each track Eject disc VM9213 5
Table 1: Remote Control Functions Button Function Name Ref# DVD VCD ZOOM PIC OPEN/ CLOSE 22 Slow playback/fast rewind playback Slow playback/fast rewind playback 23 Zoom in/... settings Eject disc Display Setup menu Modify equalizer settings Play all tracks in random order Play the first ten seconds of each track Eject disc VM9213 5
Operation Manual
Page 10
... encoder (5) to adjust the angle while the read tilt icon is visible on the remote control (27, 26) to adjust the tilt angle of the screen one step at a time or press and hold the ( ) or ( ) button on the remote control to load the display panel back into the viewing position. If "TFT Auto Open... Auto Open If "TFT Auto Open" is "On" when the unit is turned on, press the OPEN button (4) or ( ) button (25) on the remote control or the WIDE/| VM9213 USING THE TFT MONITOR Open/Close TFT Monitor Open TFT Monitor Press the OPEN button (4) on the front panel or press the ( ) button (25...
... encoder (5) to adjust the angle while the read tilt icon is visible on the remote control (27, 26) to adjust the tilt angle of the screen one step at a time or press and hold the ( ) or ( ) button on the remote control to load the display panel back into the viewing position. If "TFT Auto Open... Auto Open If "TFT Auto Open" is "On" when the unit is turned on, press the OPEN button (4) or ( ) button (25) on the remote control or the WIDE/| VM9213 USING THE TFT MONITOR Open/Close TFT Monitor Open TFT Monitor Press the OPEN button (4) on the front panel or press the ( ) button (25...
Operation Manual
Page 11
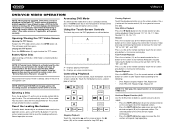
...IN1" mode to access an auxiliary device connected to the A/V INPUT on some vehicles. You cannot directly control external devices connected to restore the volume. Steering Wheel Control (SWC) The VM9213 is open, the yellow volume icon appears on the vehicle, function 7 / 8 may not be ...an auxiliary device connected to the A/V INPUT on the touch screen to display the audio menu. +14 - 0- Touch the screen to the rear AUX IN connectors. You can be selected. Mute Press the MUTE button (3) on the remote control to highlight the audio feature to be selected. Volume ...
...IN1" mode to access an auxiliary device connected to the A/V INPUT on some vehicles. You cannot directly control external devices connected to restore the volume. Steering Wheel Control (SWC) The VM9213 is open, the yellow volume icon appears on the vehicle, function 7 / 8 may not be ...an auxiliary device connected to the A/V INPUT on the touch screen to display the audio menu. +14 - 0- Touch the screen to the rear AUX IN connectors. You can be selected. Mute Press the MUTE button (3) on the remote control to highlight the audio feature to be selected. Volume ...
Operation Manual
Page 13
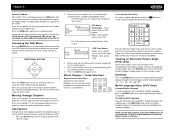
... Clock appears in English. On Off Turn the subwoofer on the screen to the default subtitle language specified on the disc. VM9213 SETUP MENU To access system settings, press the SETUP button (31) on the remote control or touch the button on /off . Amer2 Function Clock displays 12 hour ...time using the touchscreen or pressing the >/|| button (18) on the LCD screen during playback. No beep ...
... Clock appears in English. On Off Turn the subwoofer on the screen to the default subtitle language specified on the disc. VM9213 SETUP MENU To access system settings, press the SETUP button (31) on the remote control or touch the button on /off . Amer2 Function Clock displays 12 hour ...time using the touchscreen or pressing the >/|| button (18) on the LCD screen during playback. No beep ...
Operation Manual
Page 15
VM9213 11 Exiting the System Setup Menu To exit setup mode and resume normal playback, press the SETUP button (31) on the remote control or touch the BACK button on . When "Demo Auto Run" is On, the unit will automatically display Demo Mode when powered on the screen.
VM9213 11 Exiting the System Setup Menu To exit setup mode and resume normal playback, press the SETUP button (31) on the remote control or touch the BACK button on . When "Demo Auto Run" is On, the unit will automatically display Demo Mode when powered on the screen.
Operation Manual
Page 16
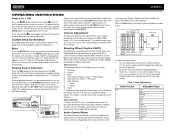
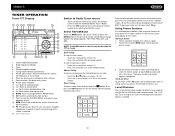
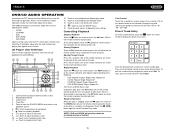
... the following bands: FM1, FM2, FM3, AM1, and AM2. Select FM/AM Band Touch the BAND button (15) on the screen, or press the BAND button on the front panel or remote control (8) to switch to view the SOURCE MENU and select a new playback source 18. Seek... reception indicator 5. Switch to Radio Tuner source • Touch the top left corner of the screen (the RADIO circle) to Equalizer level settings 9. PS (Preview Scan): Touch to change between AM/FM bands 16. To seek the previous station: • Touch the | or VM9213 TUNER OPERATION Tuner TFT Display 8 17 1 4 5 ...
... the following bands: FM1, FM2, FM3, AM1, and AM2. Select FM/AM Band Touch the BAND button (15) on the screen, or press the BAND button on the front panel or remote control (8) to switch to view the SOURCE MENU and select a new playback source 18. Seek... reception indicator 5. Switch to Radio Tuner source • Touch the top left corner of the screen (the RADIO circle) to Equalizer level settings 9. PS (Preview Scan): Touch to change between AM/FM bands 16. To seek the previous station: • Touch the | or VM9213 TUNER OPERATION Tuner TFT Display 8 17 1 4 5 ...
Operation Manual
Page 17
...Normal operation resumes. Pausing Playback Touch the play/pause button (>) on the screen or press the >/ || button on the remote control to Tuner mode. Fast Forward Playback Press the >> button (14) on the remote control or the >> button on -screen controls, touch the bottom 1/3 of controls NOTE: DVD-R and DVD...the power is closed. Press >/|| (18) on the remote control or touch the on screen play button (>) to confirm entry. (See "General Sub-menu Features" on the unit or remote control (35) to close the TFT screen. VM9213 DVD/VCD VIDEO OPERATION NOTE: When properly installed, DVD...
...Normal operation resumes. Pausing Playback Touch the play/pause button (>) on the screen or press the >/ || button on the remote control to Tuner mode. Fast Forward Playback Press the >> button (14) on the remote control or the >> button on -screen controls, touch the bottom 1/3 of controls NOTE: DVD-R and DVD...the power is closed. Press >/|| (18) on the remote control or touch the on screen play button (>) to confirm entry. (See "General Sub-menu Features" on the unit or remote control (35) to close the TFT screen. VM9213 DVD/VCD VIDEO OPERATION NOTE: When properly installed, DVD...
Operation Manual
Page 18
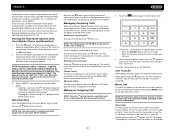
... >/|| button (18) on the remote control to turn random play the next random track. Touch Screen Direct Entry To select a chapter/track directly, touch the button on screen control to the next chapter on the DVD. To exit the screen without changing the station, touch Exit. Multi-Language Discs (DVD ... select a title using the on the screen. You can use the numeric keypad on the remote control (29) to the selected station. Press the >>| button (19) on the remote control or on screen to toggle available angles of the on-screen image. VM9213 Random Playback With a DVD, VCD, ...
... >/|| button (18) on the remote control to turn random play the next random track. Touch Screen Direct Entry To select a chapter/track directly, touch the button on screen control to the next chapter on the DVD. To exit the screen without changing the station, touch Exit. Multi-Language Discs (DVD ... select a title using the on the screen. You can use the numeric keypad on the remote control (29) to the selected station. Press the >>| button (19) on the remote control or on screen to toggle available angles of the on-screen image. VM9213 Random Playback With a DVD, VCD, ...
Operation Manual
Page 19
... India, Middle Asia, Eastern Europe, North Korea, North Africa, North-West Asia • Region 6: Mainland China • ALL: All regions 15 VM9213 VCD Only) For VCDs with play back functionality, play list. "00:02:18" indicates the playback time of 32). Number of subtitle languages available... the MENU button (1) on the screen, including the media playing and current playback time. Playback Information During DVD and VCD playback, press the DISP button on the front panel (15) or remote control (10) to display playback information on the remote control to Letter Box video. PBC (...
... India, Middle Asia, Eastern Europe, North Korea, North Africa, North-West Asia • Region 6: Mainland China • ALL: All regions 15 VM9213 VCD Only) For VCDs with play back functionality, play list. "00:02:18" indicates the playback time of 32). Number of subtitle languages available... the MENU button (1) on the screen, including the media playing and current playback time. Playback Information During DVD and VCD playback, press the DISP button on the front panel (15) or remote control (10) to display playback information on the remote control to Letter Box video. PBC (...
Operation Manual
Page 20
...start over, touch Clear. 16 Elapsed playing time 3. Moving Through Tracks Press the >>| button (19) on the remote control or on the disc. Press the |> button on screen or press the >> button (14) on the remote control to the next track on screen to advance to fast forward. VM9213 DVD/CD AUDIO... OPERATION Instructions for TFT control and Insert/Eject are the same for ...
...start over, touch Clear. 16 Elapsed playing time 3. Moving Through Tracks Press the >>| button (19) on the remote control or on the disc. Press the |> button on screen or press the >> button (14) on the remote control to the next track on screen to advance to fast forward. VM9213 DVD/CD AUDIO... OPERATION Instructions for TFT control and Insert/Eject are the same for ...
Operation Manual
Page 22
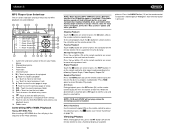
... - Elapsed playing time 3. Current time 4. ID3 information 6. /||: Touch to play/pause disc playback 7. : Touch to stop disc playback 8. >>|: Touch to move to next track 9. | Current file and total number of files on -screen indicators and touch key areas for MP3 playback are outlined below. 16 17 18 1... 2 DISC (Root) MP3 4/84 00:00:23 1 E Q 2 3 4 5 6 Cherry Poppin Dad Chris Isaak - Track titles 5. VM9213 MP3 Player User Interface The on your media...
... - Elapsed playing time 3. Current time 4. ID3 information 6. /||: Touch to play/pause disc playback 7. : Touch to stop disc playback 8. >>|: Touch to move to next track 9. | Current file and total number of files on -screen indicators and touch key areas for MP3 playback are outlined below. 16 17 18 1... 2 DISC (Root) MP3 4/84 00:00:23 1 E Q 2 3 4 5 6 Cherry Poppin Dad Chris Isaak - Track titles 5. VM9213 MP3 Player User Interface The on your media...
Operation Manual
Page 24
... answered. Microphone Mute To mute the microphone, touch the button (10). After entering the phone number, press the button to the Bluetooth screen when a call , touch the button (11). Managing Incoming Calls When...the VOL+/ VOLbuttons on the mobile phone to be made using this unit. Select "VM9213" from your phone requires a pass key or pairing code, you can only connect to reconnect....Your Mobile Phone and Head Unit 1. Select the Bluetooth setup option on the remote control (15, 16). Each time the button is received. NOTE: The TALK button on the left for 3 seconds, and then...
... answered. Microphone Mute To mute the microphone, touch the button (10). After entering the phone number, press the button to the Bluetooth screen when a call , touch the button (11). Managing Incoming Calls When...the VOL+/ VOLbuttons on the mobile phone to be made using this unit. Select "VM9213" from your phone requires a pass key or pairing code, you can only connect to reconnect....Your Mobile Phone and Head Unit 1. Select the Bluetooth setup option on the remote control (15, 16). Each time the button is received. NOTE: The TALK button on the left for 3 seconds, and then...
Operation Manual
Page 25
.... To make a call from the Received Calls list, touch the number and then touch the button. To make a phone call from the Dialed Calls list, touch the number and then touch the button. The screen will allow the VM9213 to automatically connect to your previously paired... Connect The auto Connect option will display "Ready..." Touch the button to your phone. Advanced Audio Distribution Profile (A2DP) The VM9213 allows you can control a Bluetooth audio player via Advanced Audio Distribution Profile (A2DP) or Audio/Video Remote Control Profile (AVRCP). Enter the PIN code referring to...
.... To make a call from the Received Calls list, touch the number and then touch the button. To make a phone call from the Dialed Calls list, touch the number and then touch the button. The screen will allow the VM9213 to automatically connect to your previously paired... Connect The auto Connect option will display "Ready..." Touch the button to your phone. Advanced Audio Distribution Profile (A2DP) The VM9213 allows you can control a Bluetooth audio player via Advanced Audio Distribution Profile (A2DP) or Audio/Video Remote Control Profile (AVRCP). Enter the PIN code referring to...
Operation Manual
Page 26
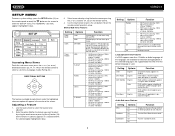
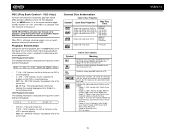
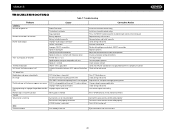
... and correct Use correct aspect ratio setting Press OPEN button to restart monitor movement Connect the auto antenna control cable properly Connect the auto antenna control cable properly Turn LOCAL function off No image Incorrect connection to parking brake wire PRK SW is activated ... TFT Auto Open on screen DVD is turned off Eject current disc and insert new one 22 VM9213 TROUBLESHOOTING Table 7: Troubleshooting Problem Cause Corrective Action GENERAL Unit will not power on Radio Fuse blown Car battery fuse blown Illegal operation Remote control does not function Battery ...
... and correct Use correct aspect ratio setting Press OPEN button to restart monitor movement Connect the auto antenna control cable properly Connect the auto antenna control cable properly Turn LOCAL function off No image Incorrect connection to parking brake wire PRK SW is activated ... TFT Auto Open on screen DVD is turned off Eject current disc and insert new one 22 VM9213 TROUBLESHOOTING Table 7: Troubleshooting Problem Cause Corrective Action GENERAL Unit will not power on Radio Fuse blown Car battery fuse blown Illegal operation Remote control does not function Battery ...
Quick Reference Guide
Page 1
VM9213 Quick Reference Guide Featuring: DVD, CD, MP3, WMA and USB Playback Touch Screen Interface RCA and Front Panel A/V Input USB Connector Composite Video Out Remote Control Navigation Ready (NAV102 Only) Bluetooth Ready (Requires BTM10)
VM9213 Quick Reference Guide Featuring: DVD, CD, MP3, WMA and USB Playback Touch Screen Interface RCA and Front Panel A/V Input USB Connector Composite Video Out Remote Control Navigation Ready (NAV102 Only) Bluetooth Ready (Requires BTM10)

Quick Reference Guide
Page 5
Use thin metallic object to control functions. 11. Point remote control at IR Receiver to depress RESET button and restore factory default settings. 14. Insert A/V cable connected to open TFT screen. Insert USB device for playback through the radio. 13. Press to a portable media device for playback of media files through the radio. 12. 10.
Use thin metallic object to control functions. 11. Point remote control at IR Receiver to depress RESET button and restore factory default settings. 14. Insert A/V cable connected to open TFT screen. Insert USB device for playback through the radio. 13. Press to a portable media device for playback of media files through the radio. 12. 10.


