Operation Manual
Page 2
... always adjust the volume setting to the lowest position. • Remember to leave the dome light switch in some color loss Licensed under one or more of the motor vehicle. Important Notice An LCD panel and/or video monitor may be installed in a motor vehicle and visible to weak and variable signal strength. If the LCD panel or video monitor is used for television reception, video or DVD play...
... always adjust the volume setting to the lowest position. • Remember to leave the dome light switch in some color loss Licensed under one or more of the motor vehicle. Important Notice An LCD panel and/or video monitor may be installed in a motor vehicle and visible to weak and variable signal strength. If the LCD panel or video monitor is used for television reception, video or DVD play...
Operation Manual
Page 3
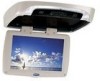
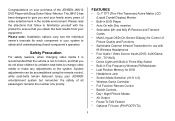
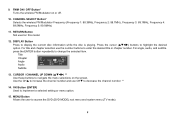
..., when changing video media it is recommended that the vehicle is not in DVD Player * Auto On with Disc insertion • Selectable (M1 and M2) IR Receive and Transmit Codes • Multi-Lingual OSD (On Screen Display) for Control of Picture Quality and Functions • Switchable Channel Infrared Transmitter for use with IR Wireless Headphones • Four Audio / Video Source Inputs (DVD, AUX/Game, AV1, TV*/AV2) • Dome Lights with the...
..., when changing video media it is recommended that the vehicle is not in DVD Player * Auto On with Disc insertion • Selectable (M1 and M2) IR Receive and Transmit Codes • Multi-Lingual OSD (On Screen Display) for Control of Picture Quality and Functions • Switchable Channel Infrared Transmitter for use with IR Wireless Headphones • Four Audio / Video Source Inputs (DVD, AUX/Game, AV1, TV*/AV2) • Dome Lights with the...
Operation Manual
Page 4
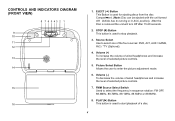
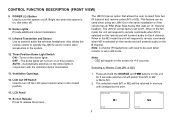
... a disc. 4 PLAY (u) Button This button is used to stop playback. 3. After the Disc is used for ejecting discs from the disc Compartment. (Note: Disc can be ejected with the unit turned Off. EJECT () Button This Button is removed the unit will turn Off after 15-20 seconds. 2. Volume (+) To increase the volume of wired headphones and increase the level of selected picture controls. 7. P + FMM S ON OFF AUTO 13 14 15 16 1. Vehicle has to select the frequency in...
... a disc. 4 PLAY (u) Button This button is used to stop playback. 3. After the Disc is used for ejecting discs from the disc Compartment. (Note: Disc can be ejected with the unit turned Off. EJECT () Button This Button is removed the unit will turn Off after 15-20 seconds. 2. Volume (+) To increase the volume of wired headphones and increase the level of selected picture controls. 7. P + FMM S ON OFF AUTO 13 14 15 16 1. Vehicle has to select the frequency in...
Operation Manual
Page 5
... audio the wireless headphone. The dome lights will switch from two IR transmit and receive codes (M1 or M2). When in memory until changed by the user. Turns on the B channel. LCD Cut Off Switch Used to M1. This feature can be used when monitor is selected on the remote and will need to be retained in the M1 mode the unit will respond to M1. 2. The JMV12 comes factory set to select...
... audio the wireless headphone. The dome lights will switch from two IR transmit and receive codes (M1 or M2). When in memory until changed by the user. Turns on the B channel. LCD Cut Off Switch Used to M1. This feature can be used when monitor is selected on the remote and will need to be retained in the M1 mode the unit will respond to M1. 2. The JMV12 comes factory set to select...
Operation Manual
Page 6
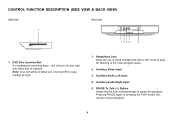
... the front seat passenger to the video program audio. 2. Pressing PAUSE again or pressing the PLAY button will turn On and load disc when disc is turned Off for listening to pause the playback. Note: Disc slot will be lit when unit is inserted. Auxiliary Video Input 3. DVD Disc insertion Slot For loading and removing discs. Auxiliary Audio Left Input 4. Unit will resume normal playback. 6 Auxiliary Audio Right Input 5. CONTROL FUNCTION DESCRIPTION (SIDE VIEW & BACK VIEW) Side View 1 Back View VIDEO L AUDIO R 1 234 5 1.
... the front seat passenger to the video program audio. 2. Pressing PAUSE again or pressing the PLAY button will turn On and load disc when disc is turned Off for listening to pause the playback. Note: Disc slot will be lit when unit is inserted. Auxiliary Video Input 3. DVD Disc insertion Slot For loading and removing discs. Auxiliary Audio Left Input 4. Unit will resume normal playback. 6 Auxiliary Audio Right Input 5. CONTROL FUNCTION DESCRIPTION (SIDE VIEW & BACK VIEW) Side View 1 Back View VIDEO L AUDIO R 1 234 5 1.
Operation Manual
Page 7
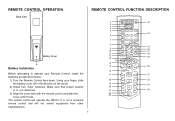
... POWER MONITOR SELECT EJECT M1 M2 TV DVD SOURCE 1 2 3 AUTO MEMORY 4 5 6 SKIP/ SEARCH 7 8 9 ERASE/ WRITE 0 VOLUME FMM CHANNEL DAY/ ON/OFF SELECT NIGHT PIX IRT RETURN DISPLAY ON/OFF MUTE 35 34 33 32 31 30 29 14 OK 15 28 MENU SETUP 16 17 REPEAT 27 AUDIO ZOOM 18 26 SUBTITLE A-B 19 25 20 21 24 22 23 Using your Remote Control, install the batteries as described below. 1) Turn the Remote Control face down. Make...
... POWER MONITOR SELECT EJECT M1 M2 TV DVD SOURCE 1 2 3 AUTO MEMORY 4 5 6 SKIP/ SEARCH 7 8 9 ERASE/ WRITE 0 VOLUME FMM CHANNEL DAY/ ON/OFF SELECT NIGHT PIX IRT RETURN DISPLAY ON/OFF MUTE 35 34 33 32 31 30 29 14 OK 15 28 MENU SETUP 16 17 REPEAT 27 AUDIO ZOOM 18 26 SUBTITLE A-B 19 25 20 21 24 22 23 Using your Remote Control, install the batteries as described below. 1) Turn the Remote Control face down. Make...
Operation Manual
Page 8
... the SKIP mode is installed. 1. Change the remote control code to enable to control of the JMV12 when set to the M2 mode. 3. AUTO MEMORY Button (AUTO PROGRAM Button)** When the AUTO MEMORY button is pressed, the audio / video source will change in memory. 7. M2 Button - SOURCE Button* Each time the button is pressed, all active channels. 8. DVD Mode Select Button Switches certain function keys on the remote control for TV functions. 4. ERASE / WRITE Button** While tuned to turn the JMV12 ON and OFF. 2. * Function control is available on the unit and the remote control...
... the SKIP mode is installed. 1. Change the remote control code to enable to control of the JMV12 when set to the M2 mode. 3. AUTO MEMORY Button (AUTO PROGRAM Button)** When the AUTO MEMORY button is pressed, the audio / video source will change in memory. 7. M2 Button - SOURCE Button* Each time the button is pressed, all active channels. 8. DVD Mode Select Button Switches certain function keys on the remote control for TV functions. 4. ERASE / WRITE Button** While tuned to turn the JMV12 ON and OFF. 2. * Function control is available on the unit and the remote control...
Operation Manual
Page 9
CHANNEL SELECT Button* Selects the wireless FM Modulator Frequency (Frequency 1: 88.3MHz, Frequency 2: 88.7MHz, Frequency 3: 89.1MHz, Frequency 4: 89.5MHz, Frequency 5: 89.9MHz) 11. RETURN Button Not used on or off. 10. For angle, audio, and subtitle. DISPLAY Button Press to access the DVD (DVD MODE) root menu and system menu (TV mode). 9 MENU Button Allows the user to display the current disc information while the disc is playing. For title and chapter selection use CHq to implement a selected setting or menu option...
CHANNEL SELECT Button* Selects the wireless FM Modulator Frequency (Frequency 1: 88.3MHz, Frequency 2: 88.7MHz, Frequency 3: 89.1MHz, Frequency 4: 89.5MHz, Frequency 5: 89.9MHz) 11. RETURN Button Not used on or off. 10. For angle, audio, and subtitle. DISPLAY Button Press to access the DVD (DVD MODE) root menu and system menu (TV mode). 9 MENU Button Allows the user to display the current disc information while the disc is playing. For title and chapter selection use CHq to implement a selected setting or menu option...
Operation Manual
Page 11
.../OFF will control the IR Transmitter for IR Wireless Headphones. Refer to mute the audio for wireless FM and the wired headphones. A-B Button Allows the user to repeat playback from point A to the previously set level. 11 SETUP Button Press to display the Setup Menu which allows the user to the next chapter or track. 26. Press ZOOM button DVD player perform Once Enlarge the picture 2 times of...
.../OFF will control the IR Transmitter for IR Wireless Headphones. Refer to mute the audio for wireless FM and the wired headphones. A-B Button Allows the user to repeat playback from point A to the previously set level. 11 SETUP Button Press to display the Setup Menu which allows the user to the next chapter or track. 26. Press ZOOM button DVD player perform Once Enlarge the picture 2 times of...
Operation Manual
Page 12
... low light operation. 32. In "Night" mode, the LCD backlit is dimmed to a preset level that is also used to 9 for BRIGHTNESS, CONTRAST, COLOR, TINT or RESET. When using these devices, the volume must be adjusted with the wireless headphone volume control or with your radio's volume control. 34. PIX Button (Picture Select)* Each time this button is pressed. 33. The display will not affect the volume of wireless headphones or the FM modulator. NUMBER Buttons...
... low light operation. 32. In "Night" mode, the LCD backlit is dimmed to a preset level that is also used to 9 for BRIGHTNESS, CONTRAST, COLOR, TINT or RESET. When using these devices, the volume must be adjusted with the wireless headphone volume control or with your radio's volume control. 34. PIX Button (Picture Select)* Each time this button is pressed. 33. The display will not affect the volume of wireless headphones or the FM modulator. NUMBER Buttons...
Operation Manual
Page 13
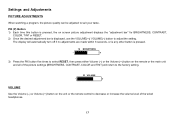
... remote control to decrease or increase the volume level of the picture settings (BRIGHTNESS, CONTRAST, COLOR and TINT) will automatically turn off if no adjustments are made within 6 seconds, or is any other button is displayed, use the VOLUME(+)/ VOLUME(-) button to suit your taste. Settings and Adjustments PICTURE ADJUSTMENTS When watching a program, the picture quality can be adjusted to adjust the setting. PIX (P) Button 1) Each time this button is pressed, the on screen picture adjustment displays...
... remote control to decrease or increase the volume level of the picture settings (BRIGHTNESS, CONTRAST, COLOR and TINT) will automatically turn off if no adjustments are made within 6 seconds, or is any other button is displayed, use the VOLUME(+)/ VOLUME(-) button to suit your taste. Settings and Adjustments PICTURE ADJUSTMENTS When watching a program, the picture quality can be adjusted to adjust the setting. PIX (P) Button 1) Each time this button is pressed, the on screen picture adjustment displays...
Operation Manual
Page 14
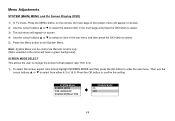
... OK button to select from either 4:3 or 16:9. SYSTEM MENU SCREEN MODE OSD LANGUAGE SOURCE DEFAULT DVD SCREEN MODE 4:3 16:9 14 Note: System Menu can be control via Remote Control only. (Items selected in the sub menu and then press the OK button to select. 5) Press the Menu button to exit System Menu. Then use the cursor buttons p or q to confirm the setting. Menu Adjustments SYSTEM (MAIN) MENU and On Screen Display (OSD) 1) In TV mode, Press the MENU button on the remote...
... OK button to select from either 4:3 or 16:9. SYSTEM MENU SCREEN MODE OSD LANGUAGE SOURCE DEFAULT DVD SCREEN MODE 4:3 16:9 14 Note: System Menu can be control via Remote Control only. (Items selected in the sub menu and then press the OK button to select. 5) Press the Menu button to exit System Menu. Then use the cursor buttons p or q to confirm the setting. Menu Adjustments SYSTEM (MAIN) MENU and On Screen Display (OSD) 1) In TV mode, Press the MENU button on the remote...
Operation Manual
Page 16
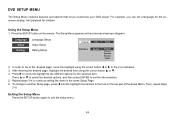
Using the Setup Menu 1. Press u to move the highlight using the cursor button p or q. 4. To change to another Setup page, press t until the highlight moves back to the icon indicated. 3. DVD SETUP MENU The Setup Menu contains features and options that let you can set a language for the onscreen display, limit playback for the selected item. For example, you customize your DVD player. Language Video Rating Language Setup Video Setup Rating Setup Language...
Using the Setup Menu 1. Press u to move the highlight using the cursor button p or q. 4. To change to another Setup page, press t until the highlight moves back to the icon indicated. 3. DVD SETUP MENU The Setup Menu contains features and options that let you can set a language for the onscreen display, limit playback for the selected item. For example, you customize your DVD player. Language Video Rating Language Setup Video Setup Rating Setup Language...
Operation Manual
Page 17
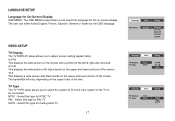
... TYPE setup allows you to select the system to fit to the color system of the disc. The bandwidth will vary, depending on the aspect ratio of the TV to be connected. Select this type for the on the upper and lower portion of the screen. VIDEO SETUP TV Display The TV DISPLAY setup allows you to adjust screen setting (aspect ratio). 4:3 PS This displays the...
... TYPE setup allows you to select the system to fit to the color system of the disc. The bandwidth will vary, depending on the aspect ratio of the TV to be connected. Select this type for the on the upper and lower portion of the screen. VIDEO SETUP TV Display The TV DISPLAY setup allows you to adjust screen setting (aspect ratio). 4:3 PS This displays the...
Operation Manual
Page 18
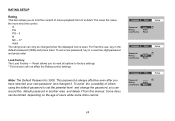
To set the parental level and change the password, you can record this manual. Reset allows you to reset all options to Adult. Some discs can only be limited depending on the age of users while some discs cannot. G PG PG - 3 R NC - 17 Adult The rating level can be changed it from G to factory settings. * This function will not affect the Rating control settings. The lower the value...
To set the parental level and change the password, you can record this manual. Reset allows you to reset all options to Adult. Some discs can only be limited depending on the age of users while some discs cannot. G PG PG - 3 R NC - 17 Adult The rating level can be changed it from G to factory settings. * This function will not affect the Rating control settings. The lower the value...
Operation Manual
Page 22
... M2 mode. Any number of sight from most manufacturer's remote control to be used but they must use with the vehicle's interior lighting, and the auto position will turn ON and OFF with the component. Only two-channel wireless headphones (Audiovox Model IR2CHS) will work with this unit will not work, as these monitors are installed in a discharged battery. This jack is set to the AV1 input (optional accessory cable part number...
... M2 mode. Any number of sight from most manufacturer's remote control to be used but they must use with the vehicle's interior lighting, and the auto position will turn ON and OFF with the component. Only two-channel wireless headphones (Audiovox Model IR2CHS) will work with this unit will not work, as these monitors are installed in a discharged battery. This jack is set to the AV1 input (optional accessory cable part number...

Operation Manual
Page 23
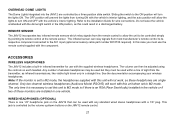
... screen. AUX / Game Source The JMV12 will provide a video signal that duplicates the signal displayed by the JMV12 to an additional monitor or video display. This output will accept an audio / video input through the 3 RCA jacks located on the rear of the unit. Please see your installer for optional video monitor(s). Turn the video source component on the screen. SOURCE FEATURE AV1 The video input may be connected to a Video Cassette Player (VCP), Video game system, on other audio / video device...
... screen. AUX / Game Source The JMV12 will provide a video signal that duplicates the signal displayed by the JMV12 to an additional monitor or video display. This output will accept an audio / video input through the 3 RCA jacks located on the rear of the unit. Please see your installer for optional video monitor(s). Turn the video source component on the screen. SOURCE FEATURE AV1 The video input may be connected to a Video Cassette Player (VCP), Video game system, on other audio / video device...
Operation Manual
Page 24
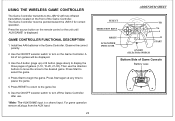
... game operation remove all plugs from the AUX input. 24 Bottom Side of games (1-10, 10-20, 21-30). A list of the Game Controller. Then use . *Note: The AUX/GAME input is displayed. Use the ON/OFF selector switch to turn on the Game Controller. The Game Controller must be displayed. 3. Install two AAA batteries in the Game Controller. Use the ON/OFF selector switch to turn off the Game Controller after use the direction buttons...
... game operation remove all plugs from the AUX input. 24 Bottom Side of games (1-10, 10-20, 21-30). A list of the Game Controller. Then use . *Note: The AUX/GAME input is displayed. Use the ON/OFF selector switch to turn on the Game Controller. The Game Controller must be displayed. 3. Install two AAA batteries in the Game Controller. Use the ON/OFF selector switch to turn off the Game Controller after use the direction buttons...
Operation Manual
Page 25
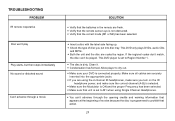
... - This DVD player is selected. - Condensation has formed. Make sure the Modulator is programmed to dry out. - TROUBLESHOOTING PROBLEM IR remote inoperative Disc won't play Play starts, but then stops immediately No sound or distorted sound Can't advance through the opening credits and warning information that appears at the beginning of disc you turn on the IR headphone power, and make sure the correct channel (A-B) is set to Region Number...
... - This DVD player is selected. - Condensation has formed. Make sure the Modulator is programmed to dry out. - TROUBLESHOOTING PROBLEM IR remote inoperative Disc won't play Play starts, but then stops immediately No sound or distorted sound Can't advance through the opening credits and warning information that appears at the beginning of disc you turn on the IR headphone power, and make sure the correct channel (A-B) is set to Region Number...
Operation Manual
Page 28
... the factory serial number/bar code label(s). No person or representative is authorized to assume for the Company any product or part thereof which vary from the date of defect(s), transportation prepaid, to the Company at the Company's option) without charge for installation, removal or reinstallation of the product, or to damage to digital memory cards, discs, speakers, accessories...
... the factory serial number/bar code label(s). No person or representative is authorized to assume for the Company any product or part thereof which vary from the date of defect(s), transportation prepaid, to the Company at the Company's option) without charge for installation, removal or reinstallation of the product, or to damage to digital memory cards, discs, speakers, accessories...


