Instruction Manual
Page 7
...Precautions 2 Main Features 6 Contents 7 Operating Environment 8 Cautionary Notes 8 Name and Function of Parts 10 Features 14 Setup Procedures 16 Removing the dome cover 17 Mounting the base 17 Cable connection 18 Mounting the camera 19 Mounting the camera via electrical box 21 Mounting... 26 LAN Cable Connection 26 Alarm Input/Output Cable Connection 27 Adjusting Images 28 Mounting the inner dome 30 Mounting the dome cover 30 Setting Network Requirements 32 IP Address Settings 33 Setting Using Internet Explorer ......... 39 JPEG View Page 42 Camera Page 44 Encoding ...
...Precautions 2 Main Features 6 Contents 7 Operating Environment 8 Cautionary Notes 8 Name and Function of Parts 10 Features 14 Setup Procedures 16 Removing the dome cover 17 Mounting the base 17 Cable connection 18 Mounting the camera 19 Mounting the camera via electrical box 21 Mounting... 26 LAN Cable Connection 26 Alarm Input/Output Cable Connection 27 Adjusting Images 28 Mounting the inner dome 30 Mounting the dome cover 30 Setting Network Requirements 32 IP Address Settings 33 Setting Using Internet Explorer ......... 39 JPEG View Page 42 Camera Page 44 Encoding ...

Instruction Manual
Page 16
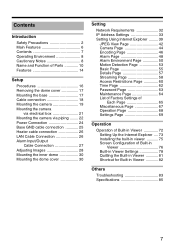
...-in viewer. 16 Operation of the heater carefully before mounting. Setup Procedures The connection and setup procedures are possible using the Internet Explorer. step 1 K step 2 K step 3 K step 4 Setup (A Pg. 16) Mount the camera and configure image settings. Network Settings (A Pg. 32) Configure the network settings of the camera do not drop on the floor when...
...-in viewer. 16 Operation of the heater carefully before mounting. Setup Procedures The connection and setup procedures are possible using the Internet Explorer. step 1 K step 2 K step 3 K step 4 Setup (A Pg. 16) Mount the camera and configure image settings. Network Settings (A Pg. 32) Configure the network settings of the camera do not drop on the floor when...
Instruction Manual
Page 17
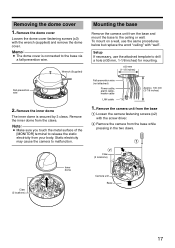
...base to the ceiling or wall. Static electricity may cause the camera to the base via a fall-prevention wire. Claw (3 locations) Inner dome Mounting the base Remove the camera unit from the claws. Noteɿ ● Make sure you touch the metal surface of the [MONITOR... the two claws. Setup If necessary, use the same procedures below but replace the word "ceiling" with the wrench (supplied) and remove the dome cover. Memoɿ ● The dome cover is secured by 3 claws. Remove the inner dome The inner dome is connected to malfunction. Removing the dome cover 1. R30 mm...
...base to the ceiling or wall. Static electricity may cause the camera to the base via a fall-prevention wire. Claw (3 locations) Inner dome Mounting the base Remove the camera unit from the claws. Noteɿ ● Make sure you touch the metal surface of the [MONITOR... the two claws. Setup If necessary, use the same procedures below but replace the word "ceiling" with the wrench (supplied) and remove the dome cover. Memoɿ ● The dome cover is secured by 3 claws. Remove the inner dome The inner dome is connected to malfunction. Removing the dome cover 1. R30 mm...

Instruction Manual
Page 18
... (j) upwards. ● R4 mm screws are for mounting. Mount the fall -prevention wire, the inside the base (j) in the shooting direction and mount the base. Setup Mounting the base (continued) 2.
... (j) upwards. ● R4 mm screws are for mounting. Mount the fall -prevention wire, the inside the base (j) in the shooting direction and mount the base. Setup Mounting the base (continued) 2.
Instruction Manual
Page 20
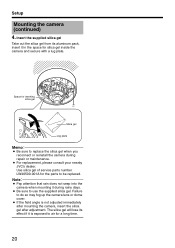
...gel will lose its aluminum pack, insert it in the space for the parts to be replaced. Setup Mounting the camera (continued) 4. Space for a long time. 20 Noteɿ ● Pay ... the camera during rainy days. ● Be sure to do so may fog up the camera lens or dome cover. ● If the field angle is not adjusted immediately after mounting the camera, insert the silica gel...effect if it during repair or maintenance. ● For replacement, please consult your nearby JVC's dealer. Use silica gel of service parts number LW40500-001A for silica gel inside the camera and secure with a...
...gel will lose its aluminum pack, insert it in the space for the parts to be replaced. Setup Mounting the camera (continued) 4. Space for a long time. 20 Noteɿ ● Pay ... the camera during rainy days. ● Be sure to do so may fog up the camera lens or dome cover. ● If the field angle is not adjusted immediately after mounting the camera, insert the silica gel...effect if it during repair or maintenance. ● For replacement, please consult your nearby JVC's dealer. Use silica gel of service parts number LW40500-001A for silica gel inside the camera and secure with a...
Instruction Manual
Page 22
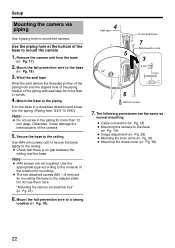
Setup Mounting the camera via electrical boxB (A Pg. 21) 6. Use the piping hole at the bottom of the location for mounting. ● The two attached screws (... mm screws (x2) to secure the base tightly to the base (A Pg. 19) ● Image adjustment (A Pg. 28) ● Mounting the inner dome (A Pg. 30) ● Mounting the dome cover (A Pg. 30) 22 Use the appropriate type according to the material of the base to the adapter plate. AMounting the camera via...
Setup Mounting the camera via electrical boxB (A Pg. 21) 6. Use the piping hole at the bottom of the location for mounting. ● The two attached screws (... mm screws (x2) to secure the base tightly to the base (A Pg. 19) ● Image adjustment (A Pg. 28) ● Mounting the inner dome (A Pg. 30) ● Mounting the dome cover (A Pg. 30) 22 Use the appropriate type according to the material of the base to the adapter plate. AMounting the camera via...

Instruction Manual
Page 24
... power cable (White, Gray) Memoɿ About the power cable ● When using 2-core VVF (Vinyl-insulated vinyl-sheath cable), the connection distance is complete. Setup Power Connection Electricity can be supplied to this product to the DC12 V power supply when not using the PoE. Noteɿ ● Make sure to...
... power cable (White, Gray) Memoɿ About the power cable ● When using 2-core VVF (Vinyl-insulated vinyl-sheath cable), the connection distance is complete. Setup Power Connection Electricity can be supplied to this product to the DC12 V power supply when not using the PoE. Noteɿ ● Make sure to...

Instruction Manual
Page 26
... installing. ● The AC 24 V power supply should conform to a computer Make use of a Category 5 (or higher) cable in advance. Setup Heater cable connection LAN Cable Connection Connect the camera to a hub or computer using a LAN cable. Ⅵ When connecting to a hub Make use... straight cable. Ⅵ When connecting to the following : Class 2 only (Fou USA), Isolated power supply only (For Europe). ● Please consult your nearest JVC dealer regarding heaters. ⅷ About heater cables Maximum extension Conductor Diameter (mm) 40 m (130 ft) R1.0 120 m (390 ft) R1.6 180 m ...
... installing. ● The AC 24 V power supply should conform to a computer Make use of a Category 5 (or higher) cable in advance. Setup Heater cable connection LAN Cable Connection Connect the camera to a hub or computer using a LAN cable. Ⅵ When connecting to a hub Make use... straight cable. Ⅵ When connecting to the following : Class 2 only (Fou USA), Isolated power supply only (For Europe). ● Please consult your nearest JVC dealer regarding heaters. ⅷ About heater cables Maximum extension Conductor Diameter (mm) 40 m (130 ft) R1.0 120 m (390 ft) R1.6 180 m ...

Instruction Manual
Page 28
... body. Noteɿ ● Make sure you touch the metal surface of the [MONITOR] terminal to adjust the camera shooting direction, field angle and focus. Setup Adjusting Images When the camera is wide, part of the camera may cause the camera to malfunction. 28 SPOT S ADJ S ADJ CE H IRIS EVEL Rotation...
... body. Noteɿ ● Make sure you touch the metal surface of the [MONITOR] terminal to adjust the camera shooting direction, field angle and focus. Setup Adjusting Images When the camera is wide, part of the camera may cause the camera to malfunction. 28 SPOT S ADJ S ADJ CE H IRIS EVEL Rotation...
Instruction Manual
Page 30
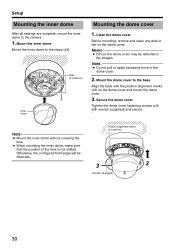
... any dust or dirt on the dome cover and mount the dome cover. 3. Mount the inner dome Mount the inner dome to the dome cover. 2. Position alignment marks (3 locations) 3 2 Wrench (Supplied) 30 Claw (3 locations) Inner dome Mounting the dome cover 1. Setup Mounting the inner dome After all settings are complete, mount the inner dome to the base Align the base...
... any dust or dirt on the dome cover and mount the dome cover. 3. Mount the inner dome Mount the inner dome to the dome cover. 2. Position alignment marks (3 locations) 3 2 Wrench (Supplied) 30 Claw (3 locations) Inner dome Mounting the dome cover 1. Setup Mounting the inner dome After all settings are complete, mount the inner dome to the base Align the base...

Instruction Manual
Page 39
...://192.168.0.2 ● Click [Trusted sites] under [Tools]-[Internet Options...]-[Security]. If ActiveX controls and plug-ins of the [Local Area Network(LAN)Settings] window. From the opened window, set to AEnableB, follow the steps below to enable it ● Click [Trusted sites]...]. Click on the computer 2. Setting Using Internet Explorer Setup 1. Launch the Internet Explorer on the [Sites...] button directly below, followed by deselecting the check for [Use a proxy server for all the items in the displayed window. Lastly, add VN-C215VP4U web site to [Enable]. 39
...://192.168.0.2 ● Click [Trusted sites] under [Tools]-[Internet Options...]-[Security]. If ActiveX controls and plug-ins of the [Local Area Network(LAN)Settings] window. From the opened window, set to AEnableB, follow the steps below to enable it ● Click [Trusted sites]...]. Click on the computer 2. Setting Using Internet Explorer Setup 1. Launch the Internet Explorer on the [Sites...] button directly below, followed by deselecting the check for [Use a proxy server for all the items in the displayed window. Lastly, add VN-C215VP4U web site to [Enable]. 39
Instruction Manual
Page 40
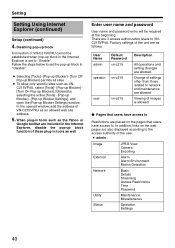
... add the address of VN-C215VP4U as VNC215VP4U, select [Tools... admin Image JPEG View Camera Encoding External Alarm Alarm Environment Motion Detection Network Basic Details Streaming Access Restrictions Time Password Utility Maintenance Miscellaneous Status Operation Settings... Follow the steps below to set the pop-up block to network and maintenance are allowed Viewing of these plug-in tools such ... to the access authority of VN-C215VP4U cannot be required at the beginning. User Name admin Default Password vn-c215 operator vn-c215 user vn-c215 Description All operations and ...
... add the address of VN-C215VP4U as VNC215VP4U, select [Tools... admin Image JPEG View Camera Encoding External Alarm Alarm Environment Motion Detection Network Basic Details Streaming Access Restrictions Time Password Utility Maintenance Miscellaneous Status Operation Settings... Follow the steps below to set the pop-up block to network and maintenance are allowed Viewing of these plug-in tools such ... to the access authority of VN-C215VP4U cannot be required at the beginning. User Name admin Default Password vn-c215 operator vn-c215 user vn-c215 Description All operations and ...

Instruction Manual
Page 77
... a JPEG file in viewer. This feature is based on the computer. Captures the currently displayed image on this setting screen are sent from VN-C215VP4U to the computer. The file name is created under [My Document] of year/month/day, hour/minute/second and the millisecond. A Alarm... B Display Size C Pause D Capture E Setup Appears blinking when alarm packets are not applied as settings to the VNC215VP4U unit. 77 Images captured will continue blinking until the auto clear operation...
... a JPEG file in viewer. This feature is based on the computer. Captures the currently displayed image on this setting screen are sent from VN-C215VP4U to the computer. The file name is created under [My Document] of year/month/day, hour/minute/second and the millisecond. A Alarm... B Display Size C Pause D Capture E Setup Appears blinking when alarm packets are not applied as settings to the VNC215VP4U unit. 77 Images captured will continue blinking until the auto clear operation...

Instruction Manual
Page 78
... 78 A B C D E F G H I J K L M N Select AOnB to display the camera ID. To use this is detected in a different color. The camera ID can be displayed upon clicking the [Setup] button. If the computer's capacity is stored in the JPEG data. This indicates the time that are applied may increase the load on the Camera.... 46) Select AOnB to display the image upside down. Operation Operation of Built-in Viewer (continued) Built-in Viewer Settings The setting window of the VN-C215VP4U unit. (A Pg. 44) Select AOnB to display the time.
... 78 A B C D E F G H I J K L M N Select AOnB to display the camera ID. To use this is detected in a different color. The camera ID can be displayed upon clicking the [Setup] button. If the computer's capacity is stored in the JPEG data. This indicates the time that are applied may increase the load on the Camera.... 46) Select AOnB to display the image upside down. Operation Operation of Built-in Viewer (continued) Built-in Viewer Settings The setting window of the VN-C215VP4U unit. (A Pg. 44) Select AOnB to display the time.

Instruction Manual
Page 84
...settings on the Encoding page of the VN-C215VP4U unit. ● Check the built-in viewer settings as well when a built-in viewer is in use of a network that the multicast address and port number of the built-in viewer. If - [Properties]-[Setup]-[Advanced][General]-[DPI Setting] is set to... alarm notification at the computer via TCP/UDP Causes and Countermeasures Reference Page ● Start multicast transmission manually from the Streaming page of VN-C215VP4U. ● In the case of multicast reception at the built-in viewer, check that supports IGMPv2 for which you want it to ...
...settings on the Encoding page of the VN-C215VP4U unit. ● Check the built-in viewer settings as well when a built-in viewer is in use of a network that the multicast address and port number of the built-in viewer. If - [Properties]-[Setup]-[Advanced][General]-[DPI Setting] is set to... alarm notification at the computer via TCP/UDP Causes and Countermeasures Reference Page ● Start multicast transmission manually from the Streaming page of VN-C215VP4U. ● In the case of multicast reception at the built-in viewer, check that supports IGMPv2 for which you want it to ...
