Instruction Manual
Page 5
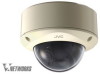
... the mounting screws or pipings are tightened appropriately and securely. ⅷ Do not install the camera near lighting fixtures of the camera. ⅷ JVC is required when installing this product. For basic usage of VN-C215VP4U. For latest information, please refer to AReadmeB file in the supplied CD-ROM. ● The supplied CD-ROM includes [INSTRUCTIONS (this camera. This manual describes detailed usage of VN-C215VP4U, please...
... the mounting screws or pipings are tightened appropriately and securely. ⅷ Do not install the camera near lighting fixtures of the camera. ⅷ JVC is required when installing this product. For basic usage of VN-C215VP4U. For latest information, please refer to AReadmeB file in the supplied CD-ROM. ● The supplied CD-ROM includes [INSTRUCTIONS (this camera. This manual describes detailed usage of VN-C215VP4U, please...
Instruction Manual
Page 6
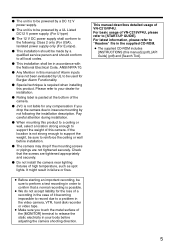
... the camera. Ⅵ High-power varifocal lens The built-in varifocal lens (optical zoom 3.6x) makes detailed surveillance possible. Ⅵ Night surveillance This product comes with the use of a rotation adjustment mechanism. Ⅵ Unblocked Design The dome-shaped design enables ease of use without lowering the frame rate. 6 Ⅵ Motion Detection Feature This feature enables output of an alarm upon detection of motion in viewer onto the computer. Ⅵ HTTP-based API...
... the camera. Ⅵ High-power varifocal lens The built-in varifocal lens (optical zoom 3.6x) makes detailed surveillance possible. Ⅵ Night surveillance This product comes with the use of a rotation adjustment mechanism. Ⅵ Unblocked Design The dome-shaped design enables ease of use without lowering the frame rate. 6 Ⅵ Motion Detection Feature This feature enables output of an alarm upon detection of motion in viewer onto the computer. Ⅵ HTTP-based API...
Instruction Manual
Page 7
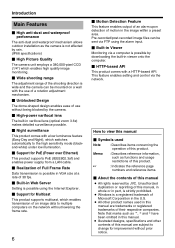
... Mounting the camera via piping ........ 22 Power Connection 24 Base GND cable connection 25 Heater cable connection 26 LAN Cable Connection 26 Alarm Input/Output Cable Connection 27 Adjusting Images 28 Mounting the inner dome 30 Mounting the dome cover 30 Setting Network Requirements 32 IP Address Settings 33 Setting Using Internet Explorer ......... 39 JPEG View Page 42 Camera Page 44 Encoding Page 46 Alarm Page 48 Alarm Environment Page 50 Motion Detection Page 53 Basic Page 55 Details Page 57 Streaming Page 58 Access Restrictions Page 60 Time...
... Mounting the camera via piping ........ 22 Power Connection 24 Base GND cable connection 25 Heater cable connection 26 LAN Cable Connection 26 Alarm Input/Output Cable Connection 27 Adjusting Images 28 Mounting the inner dome 30 Mounting the dome cover 30 Setting Network Requirements 32 IP Address Settings 33 Setting Using Internet Explorer ......... 39 JPEG View Page 42 Camera Page 44 Encoding Page 46 Alarm Page 48 Alarm Environment Page 50 Motion Detection Page 53 Basic Page 55 Details Page 57 Streaming Page 58 Access Restrictions Page 60 Time...
Instruction Manual
Page 8
... the user's computer meets the specification requirements. Memoɿ ● The above Video Card : 1024ן768 pixels or higher, True Color (24 or 32 bits) Web browser : Internet Explorer Version 6.0 Ⅵ LAN Environment ● 10BASE-T/100BASE-TX(PoE) network interconnected using an IEEE802.3compliant switching hub. ● IEEE802.3af-compliant switching hub when PoE is in use. ● IGMPv2-compliant network when multicast is free from...
... the user's computer meets the specification requirements. Memoɿ ● The above Video Card : 1024ן768 pixels or higher, True Color (24 or 32 bits) Web browser : Internet Explorer Version 6.0 Ⅵ LAN Environment ● 10BASE-T/100BASE-TX(PoE) network interconnected using an IEEE802.3compliant switching hub. ● IEEE802.3af-compliant switching hub when PoE is in use. ● IGMPv2-compliant network when multicast is free from...
Instruction Manual
Page 9
... addition, when color images are changed to black and white, bright areas of the screen are rights or rights holders of electrical supply. When the lens zoom is wide and the tilt angle is lowered by a lightning strike or by using the PoE or connecting to the DC12 V power supply. Be sure to check thoroughly the licensing conditions. In this case, adjust the field angle...
... addition, when color images are changed to black and white, bright areas of the screen are rights or rights holders of electrical supply. When the lens zoom is wide and the tilt angle is lowered by a lightning strike or by using the PoE or connecting to the DC12 V power supply. Be sure to check thoroughly the licensing conditions. In this case, adjust the field angle...

Instruction Manual
Page 10
... out the connection cable. You can also use this hole by default. (A Pg. 23) E Dome cover The dome cover is not supplied.) Noteɿ ● Connect the fall -prevention wire is fragile. A piping hole plug is attached to this hole to prevent the camera from the side. Introduction Name and Function of Parts Camera unit A B C D E F K J I H G A Mounting hole ן2 Use these when mounting the base to the...
... out the connection cable. You can also use this hole by default. (A Pg. 23) E Dome cover The dome cover is not supplied.) Noteɿ ● Connect the fall -prevention wire is fragile. A piping hole plug is attached to this hole to prevent the camera from the side. Introduction Name and Function of Parts Camera unit A B C D E F K J I H G A Mounting hole ן2 Use these when mounting the base to the...

Instruction Manual
Page 14
... a motion detection feature and dual alarm input. Combination of VN-C215VP4U images using multiple computers is possible by installing this built-in the computer's hard disk. AAlarm PageB (A Pg. 48) ABuilt-in Viewer SettingsB (A Pg. 78) VN-C215VP4U Alarm Device Computer IGMPv2 compliant Network 14 Computer Computer Sending images before and after alarm input Network Computer AFTPB (A Pg. 51) VN-C215VP4U VN-C215VP4U Sending latest images to the FTP server at regular intervals. Monitoring of alarm...
... a motion detection feature and dual alarm input. Combination of VN-C215VP4U images using multiple computers is possible by installing this built-in the computer's hard disk. AAlarm PageB (A Pg. 48) ABuilt-in Viewer SettingsB (A Pg. 78) VN-C215VP4U Alarm Device Computer IGMPv2 compliant Network 14 Computer Computer Sending images before and after alarm input Network Computer AFTPB (A Pg. 51) VN-C215VP4U VN-C215VP4U Sending latest images to the FTP server at regular intervals. Monitoring of alarm...

Instruction Manual
Page 16
.... Setup Procedures The connection and setup procedures are possible using the Internet Explorer. Operation of the heater carefully before mounting. Internet Explorer Settings (A Pg. 39) Configure the picture quality and alarm settings using the built-in Viewer (A Pg. 72) Monitoring and still image saving operations are described as below. ⅷ Make sure you touch the metal surface of the [MONITOR] terminal to the ceiling or connecting the cable of the camera unit. ⅷ When mounting...
.... Setup Procedures The connection and setup procedures are possible using the Internet Explorer. Operation of the heater carefully before mounting. Internet Explorer Settings (A Pg. 39) Configure the picture quality and alarm settings using the built-in Viewer (A Pg. 72) Monitoring and still image saving operations are described as below. ⅷ Make sure you touch the metal surface of the [MONITOR] terminal to the ceiling or connecting the cable of the camera unit. ⅷ When mounting...

Instruction Manual
Page 18
...; When mounting to a wall, be between R4.1 mm and R6.5 mm, and the outside diameter should conform to the following : Class 2 only (Fou USA), Isolated power supply only (For Europe). 3. Base Fall-prevention 3 wire 2 8 mm 2 mm Cable connection 1. Connect the power cable, alarm cable and heater cable (A Pg. 24)(A Pg. 26)(A Pg. 27) Memoɿ ● The power cable must not be below R12 mm. 3. Setup Mounting the base...
...; When mounting to a wall, be between R4.1 mm and R6.5 mm, and the outside diameter should conform to the following : Class 2 only (Fou USA), Isolated power supply only (For Europe). 3. Base Fall-prevention 3 wire 2 8 mm 2 mm Cable connection 1. Connect the power cable, alarm cable and heater cable (A Pg. 24)(A Pg. 26)(A Pg. 27) Memoɿ ● The power cable must not be below R12 mm. 3. Setup Mounting the base...
Instruction Manual
Page 25
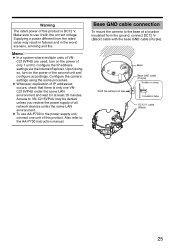
... to VN-C215VP4U may result in failures and in the power supply unit, connect one VNC215VP4U under the same LAN environment. ● To use it with the base GND cable (Purple). Base GND cable connection To mount the camera to configure the IP address settings via the Internet Explorer. Memoɿ ● In a system where multiple units of VNC215VP4U are used, turn on the power of only 1 unit to the base at least 10 minutes. Access to...
... to VN-C215VP4U may result in failures and in the power supply unit, connect one VNC215VP4U under the same LAN environment. ● To use it with the base GND cable (Purple). Base GND cable connection To mount the camera to configure the IP address settings via the Internet Explorer. Memoɿ ● In a system where multiple units of VNC215VP4U are used, turn on the power of only 1 unit to the base at least 10 minutes. Access to...

Instruction Manual
Page 26
... cables are recommended for outdoor use. ● Make use of a Cross Over cable. Setup Heater cable connection LAN Cable Connection Connect the camera to a hub or computer using a LAN cable. Ⅵ When connecting to a hub Make use of a straight cable. Ⅵ When connecting to a computer Make use of a Category 5 (or higher) cable in advance. Wind the waterproof tape AC24 V power supply Solder or crimp Insulation tape Heater power cable (White, Gray) 10BASE-T/ 100BASETX(PoE) terminal LAN cable...
... cables are recommended for outdoor use. ● Make use of a Cross Over cable. Setup Heater cable connection LAN Cable Connection Connect the camera to a hub or computer using a LAN cable. Ⅵ When connecting to a hub Make use of a straight cable. Ⅵ When connecting to a computer Make use of a Category 5 (or higher) cable in advance. Wind the waterproof tape AC24 V power supply Solder or crimp Insulation tape Heater power cable (White, Gray) 10BASE-T/ 100BASETX(PoE) terminal LAN cable...
Instruction Manual
Page 33
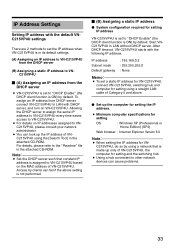
...-ROM. Access by default. IP address Subnet mask Default gateway : 192.168.0.2 : 255.255.255.0 : None Memoɿ ● To set a static IP address for VN-C215VP4U, connect VN-C215VP4U, switching hub and computer for setting using a straight LAN cable of Category 5 and above. ⅷ Set up the computer for setting the IP address. ● Minimum computer specifications for setting OS : Windows XP (Professional or Home Edition) (SP2) Web browser : Internet Explorer Version 6.0 Noteɿ ● When setting the IP address for setting IP address VN-C215VP4U is...
...-ROM. Access by default. IP address Subnet mask Default gateway : 192.168.0.2 : 255.255.255.0 : None Memoɿ ● To set a static IP address for VN-C215VP4U, connect VN-C215VP4U, switching hub and computer for setting using a straight LAN cable of Category 5 and above. ⅷ Set up the computer for setting the IP address. ● Minimum computer specifications for setting OS : Windows XP (Professional or Home Edition) (SP2) Web browser : Internet Explorer Version 6.0 Noteɿ ● When setting the IP address for setting IP address VN-C215VP4U is...

Instruction Manual
Page 35
... Internet Explorer is enabled in the Internet Explorer, follow the steps below becomes active. ⅷ Changing the IP address using the Internet Explorer 1. Deselect the check 3. If Active scripting of the [Security Settings] window that has been opened. Upon doing so, the [Sites...] button directly below to the zone. Next, add VNC215VP4U web site to enable it ● Select [Trusted sites] under [Tools]-[Internet Options...]-[Security]. Select [Enable] under [Tools]-[Internet Options...]-[Security...
... Internet Explorer is enabled in the Internet Explorer, follow the steps below becomes active. ⅷ Changing the IP address using the Internet Explorer 1. Deselect the check 3. If Active scripting of the [Security Settings] window that has been opened. Upon doing so, the [Sites...] button directly below to the zone. Next, add VNC215VP4U web site to enable it ● Select [Trusted sites] under [Tools]-[Internet Options...]-[Security]. Select [Enable] under [Tools]-[Internet Options...]-[Security...

Instruction Manual
Page 39
..., add VN-C215VP4U web site to enable it ● Click [Trusted sites] under [Tools]-[Internet Options...]-[Security]. Example: http://192.168.0.2 ● Click [Trusted sites] under [Tools]-[Internet Options...]-[Security]. From the opened window, set to AEnableB, follow the steps below to [Enable]. 39 If ActiveX controls and plug-ins of the [Local Area Network(LAN)Settings] window. Select the [Custom Level] button and open the [Security Settings] window. Setting Using Internet Explorer Setup 1. When proxy setting is enabled...
..., add VN-C215VP4U web site to enable it ● Click [Trusted sites] under [Tools]-[Internet Options...]-[Security]. Example: http://192.168.0.2 ● Click [Trusted sites] under [Tools]-[Internet Options...]-[Security]. From the opened window, set to AEnableB, follow the steps below to [Enable]. 39 If ActiveX controls and plug-ins of the [Local Area Network(LAN)Settings] window. Select the [Custom Level] button and open the [Security Settings] window. Setting Using Internet Explorer Setup 1. When proxy setting is enabled...
Instruction Manual
Page 40
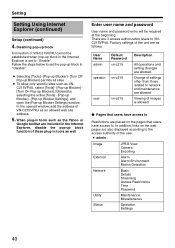
... allowed Viewing of the user. ● admin Image JPEG View Camera Encoding External Alarm Alarm Environment Motion Detection Network Basic Details Streaming Access Restrictions Time Password Utility Maintenance Miscellaneous Status Operation Settings 40 When plug-in tools such as well Enter user name and password User name and password entry will be required at the beginning. Setting Setting Using Internet Explorer (continued) Setup (continued) 4. Change of settings other than those related to Restrictions are as an allowed web site address. 5. In addition, links...
... allowed Viewing of the user. ● admin Image JPEG View Camera Encoding External Alarm Alarm Environment Motion Detection Network Basic Details Streaming Access Restrictions Time Password Utility Maintenance Miscellaneous Status Operation Settings 40 When plug-in tools such as well Enter user name and password User name and password entry will be required at the beginning. Setting Setting Using Internet Explorer (continued) Setup (continued) 4. Change of settings other than those related to Restrictions are as an allowed web site address. 5. In addition, links...
Instruction Manual
Page 63
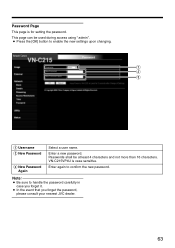
A B C A Username B New Password C New Password Again Select a user name. Enter a new password. Noteɿ ● Be sure to confirm the new password. This page can be at least 4 characters and not more than 16 characters. Passwords shall be used during access using AadminB. ● Press the [OK] button to enable the new settings upon changing. VN-C215VP4U is for setting the password. Enter again to handle the password carefully in...
A B C A Username B New Password C New Password Again Select a user name. Enter a new password. Noteɿ ● Be sure to confirm the new password. This page can be at least 4 characters and not more than 16 characters. Passwords shall be used during access using AadminB. ● Press the [OK] button to enable the new settings upon changing. VN-C215VP4U is for setting the password. Enter again to handle the password carefully in...

Instruction Manual
Page 65
... Factory Settings Camera ID VN-C215 AGC On Easy Day and Night Off Shutter Speed 1/60 Back Light Compensation Off White Balance Auto Ⅵ Encoding Page *UFN Frame Size Quality/Size FPS Fine Reverse Flag Factory Settings VGA VFS4 15 fps On Off Ⅵ Alarm Page Item Action 1st Trigger Max.Interval 2nd Trigger Mail Address Mail Text Attach Image TCP/UDP IP Address TCP/UDP Port Number...
... Factory Settings Camera ID VN-C215 AGC On Easy Day and Night Off Shutter Speed 1/60 Back Light Compensation Off White Balance Auto Ⅵ Encoding Page *UFN Frame Size Quality/Size FPS Fine Reverse Flag Factory Settings VGA VFS4 15 fps On Off Ⅵ Alarm Page Item Action 1st Trigger Max.Interval 2nd Trigger Mail Address Mail Text Attach Image TCP/UDP IP Address TCP/UDP Port Number...

Instruction Manual
Page 74
..., add the IP address of VN-C215VP4U as an allowed web site address. 5. If the setting is enabled, follow the steps below to enable it T The built-in viewer cannot be used when the pop-up Blocker] permits all sites in this zone] in the displayed window. If the pop-up block function of the Internet Explorer is AEnableB. ● Selecting [Tools]-[Pop-up Blocker]-[Turn Off...
..., add the IP address of VN-C215VP4U as an allowed web site address. 5. If the setting is enabled, follow the steps below to enable it T The built-in viewer cannot be used when the pop-up Blocker] permits all sites in this zone] in the displayed window. If the pop-up block function of the Internet Explorer is AEnableB. ● Selecting [Tools]-[Pop-up Blocker]-[Turn Off...
Instruction Manual
Page 83
... the Internet Explorer settings. When using the built-in viewer for the VN-C215VP4U unit using the IP address A192.168.0.2B. In such case, change the setting of multicast to a VN-C215VP4U unit. For this built-in viewer consists of a software component called ActiveX. The maximum number of TCP clients of VNC215VP4U is connected to the Internet, the authenticity of the viewer can be connected to monitor areas beyond the above number. For computers with a network...
... the Internet Explorer settings. When using the built-in viewer for the VN-C215VP4U unit using the IP address A192.168.0.2B. In such case, change the setting of multicast to a VN-C215VP4U unit. For this built-in viewer consists of a software component called ActiveX. The maximum number of TCP clients of VNC215VP4U is connected to the Internet, the authenticity of the viewer can be connected to monitor areas beyond the above number. For computers with a network...

Instruction Manual
Page 88
© 2006 Victor Company of Japan, Limited LST0529-001A VN-C215VP4U FIXED IP DOME CAMERA
© 2006 Victor Company of Japan, Limited LST0529-001A VN-C215VP4U FIXED IP DOME CAMERA


