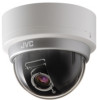
JVC TK-C2201U - Analog Mini-dome -- 580 Tv Lines Support and Manuals
Get Help and Manuals for this JVC item
View All Support Options Below
Free JVC TK-C2201U manuals!
Problems with JVC TK-C2201U?
Ask a Question
Free JVC TK-C2201U manuals!
Problems with JVC TK-C2201U?
Ask a Question
Popular JVC TK-C2201U Manual Pages
Instruction Manual - Page 1
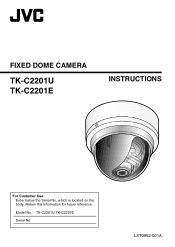
FIXED DOME CAMERA
TK-C2201U TK-C2201E
INSTRUCTIONS
For Customer Use: Enter below the Serial No. Retain this information for future reference. which is located on the body.
LST0952-001A Model No.
TK-C2201U,TK-C2201E
Serial No.
.
Instruction Manual - Page 2

Introduction Contents Introduction
Contents ...2 Features ...3 Operating Precautions 4 Name of Parts ...6 Setup Setting the Switches 9 About Connection Cables 10 Installation Mounting the Camera 12 Adjustment Adjusting Image 17 Adjusting the Auto White Balance 22 Mounting the Dome Cover 23 Others Specifications 25
2
Instruction Manual - Page 3
... Memo : Indicates reference data regarding limitations on functions, usage and the like. Any part or all of this product. R
v Design, specifications and other companies described in this manual are for TK-C2201U/TK-C2201E. These instructions are trademarks or registered trademarks of this manual v JVC holds the copyright to change for improvements without prior consent from the company...
Instruction Manual - Page 5
... grainy, but this camera is turned to "AUTO", the mode changes automatically to support wide range set to "ATW-N" or "ATW-W" and depending on the conditions of this is used... function of this case, leave the camera under high temperatures, vertical stripes may occur. Afterimage is set to lightning, turning on the air-conditioner or the like, image distortion or noise may appear on...
Instruction Manual - Page 7
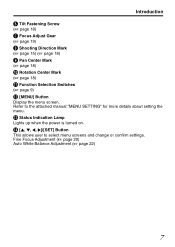
Introduction F Tilt Fastening Screw (A page 18) G Focus Adjust Gear (A page 19) H Shooting Direction Mark (A page 15) (A page 18) I ]/[SET] Button This allows user to the attached manual "MENU SETTING" for more details about setting the menu. M Status Indication Lamp Lights up when the power is turned on. Fine Focus Adjustment (A page 20) Auto White Balance...
Instruction Manual - Page 9
... to "ON" when shooting in the "MENU SETTING" (separate).
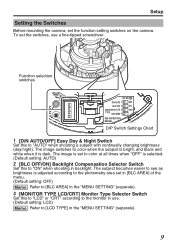
9 Setup
Setting the Switches
Before mounting the camera, set the switches, use . (Default setting: LCD) Memo Refer to [LCD TYPE] in backlight. ADJ
MENU
DIP SW
D/N AUTO 1
OFF
BLC OFF 2
ON
MONITOR LCD 3
CRT
TYPE NOT USED 4
SEE INSTRUCTION MANUAL
DIP Switch Settings Chart
.
1 [D/N AUTO/OFF] Easy Day & Night...
Instruction Manual - Page 10
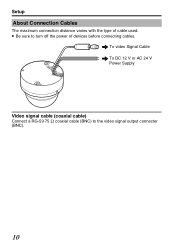
To video Signal Cable To DC 12 V or AC 24 V Power Supply
Video signal cable (coaxial cable) Connect a RG-59 75 K coaxial cable (BNC) to turn off the power of cable used.
v Be sure to the video signal output connecter (BNC).
10
Setup About Connection Cables The maximum connection distance varies with the type of devices before connecting cables. ..
Instruction Manual - Page 11
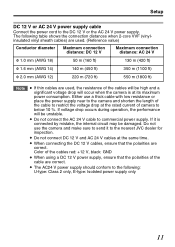
...same time. v Do not connect the AC 24 V cable to the DC 12 V or the AC 24 V power supply. Setup
DC 12 V or AC 24 V power supply cable Connect the power cord to commercial power supply. The following : U-type: Class...type: Isolated power supply only
11 Either use the camera and make sure to the nearest JVC dealer for inspection. If it to send it is at its maximum power consumption.
Instruction Manual - Page 12
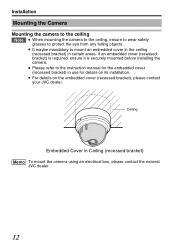
... (recessed bracket) is required, ensure it is securely mounted before installing the camera. v Please refer to the instruction manual for the embedded cover (recessed bracket) in use for details on the embedded cover (recessed bracket), please contact your JVC dealer.
v For details on its installation. Installation Mounting the Camera Mounting the camera to the ceiling Note...
Instruction Manual - Page 13
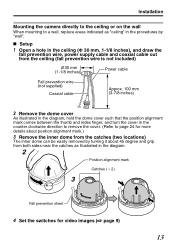
...Setup 1 Open a hole in the ceiling (Φ 30 mm, 1-1/8 inches), and draw the
fall prevention wire, power supply cable and coaxial cable out from both sides near the catches as "ceiling" in the diagram.
2
Position alignment mark
Catches ( 2)
3
Fall prevention sheet
4 Set...
13
Installation
Mounting the camera directly to the ceiling or on the wall When mounting to a wall, replace areas indicated ...
Instruction Manual - Page 20
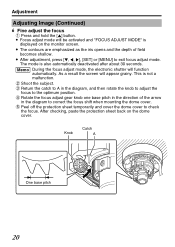
... in the direction of field becomes shallow. This is also automatically deactivated after about 30 seconds. Knob
Catch A
One base pitch
20 v After adjustment, press [K, H, I], [SET] or [MENU] to check the focus. Memo During the focus adjust mode, the electronic shutter will appear grainy. After checking, paste the protection sheet back...
Instruction Manual - Page 22
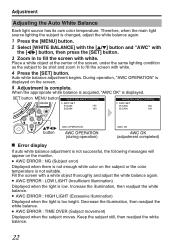
... [MENU] button. 2 Select [WHITE BALANCE] with the [J/K] button and "AWC" with
the [H/I] button, then press the [SET] button. 3 Zoom in to fill the screen with white. Error display
m
If auto white balance adjustment is low. v AWC ERROR : LOW LIGHT (Insufficient Illumination) Displayed when the light is not successful, the following messages will appear...
Instruction Manual - Page 23
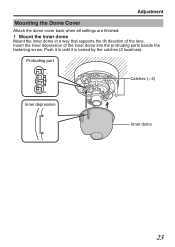
Push it in a way that supports the tilt direction of the inner dome into the protruding parts beside the fastening screw.
.. Adjustment Mounting the Dome Cover Attach the dome cover back when all settings are finished. 1 Mount the inner dome Mount the inner dome in until it is locked by the catches (2 locations). Protruding...
Instruction Manual - Page 25
Others
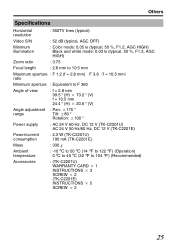
Specifications
Horizontal resolution
: 550TV lines ...TK-C2201U) AC 24 V 50 Hz/60 Hz, DC 12 V (TK-C2201E)
Power/current consumption
: 2.3 W (TK-C2201U) 190 mA (TK-C2201E)
Mass
: 330 g
Ambient temperature
: -10 f to 50 f (14 g to 122 g) (Operation) 0 f to 40 f (32 g to 104 g) (Recommended)
Accessories
: (TK-C2201U) WARRANTY CARD 1
2 INSTRUCTIONS 3
2 SCREW 2
2 (TK-C2201E) INSTRUCTIONS...
Instruction Manual - Page 28
2009 Victor Company of Japan, Limited Q
LST0952-001A
TK-C2201U/TK-C2201E FIXED DOME CAMERA
JVC TK-C2201U Reviews
We have not received any reviews for JVC yet.