
Instruction Manual
Page 5
...7 Name and Function of Parts 9 Front / Bottom / Side 9 Side / Rear 10 Features 11 Setup Procedures 12 Connection / Installation 13 Mounting the Lens 13 Power Connection 14 Using the PoE 14 Connecting to the AC 24 V power supply 15 LAN Cable Connection 16 Monitor Signal Output Terminal Connection... Output Terminal 17 Mounting the Camera 18 Mounting to the Housing Using the Inner Tripod Base 19 Back Focus Adjustment 20 Network Requirements 21 Network Settings 23 IP Address Settings 23 Setting the IP address for VN-V25U ..... 23 When the IP address of VN-V25U is known 28 When the...
...7 Name and Function of Parts 9 Front / Bottom / Side 9 Side / Rear 10 Features 11 Setup Procedures 12 Connection / Installation 13 Mounting the Lens 13 Power Connection 14 Using the PoE 14 Connecting to the AC 24 V power supply 15 LAN Cable Connection 16 Monitor Signal Output Terminal Connection... Output Terminal 17 Mounting the Camera 18 Mounting to the Housing Using the Inner Tripod Base 19 Back Focus Adjustment 20 Network Requirements 21 Network Settings 23 IP Address Settings 23 Setting the IP address for VN-V25U ..... 23 When the IP address of VN-V25U is known 28 When the...
Instruction Manual
Page 12
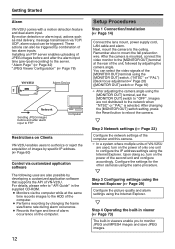
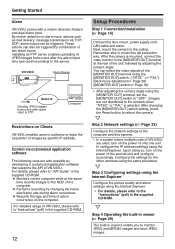
... uses are also possible by adjusting the camera angle. Images are used, turn on the computer. 12 Setup Procedures Step 1 Connection/Installation (A Page 14) Connect the lens mount, power supply cord, LAN cable and alarm. Upon doing so, turn on Clients VN-V25U enables users to authorize or reject the ...alarm input to FTP Computer Restrictions on the power of JPEG images before and after the alarm input time (pre-/post-recording) to the network when ANTSCB or APALB is mounted, connect the video monitor to the [MONITOR OUT] terminal at the same time records images to monitor...
... uses are also possible by adjusting the camera angle. Images are used, turn on the computer. 12 Setup Procedures Step 1 Connection/Installation (A Page 14) Connect the lens mount, power supply cord, LAN cable and alarm. Upon doing so, turn on Clients VN-V25U enables users to authorize or reject the ...alarm input to FTP Computer Restrictions on the power of JPEG images before and after the alarm input time (pre-/post-recording) to the network when ANTSCB or APALB is mounted, connect the video monitor to the [MONITOR OUT] terminal at the same time records images to monitor...
Startup Guide
Page 5
... Lens 13 Power Connection 14 Using the PoE 14 Connecting to the AC 24 V power supply 15 LAN Cable Connection 16 Monitor Signal Output Terminal Connection 16 Alarm Input/Output Terminal Connection 17 Alarm Input Terminal 17 Alarm Output Terminal 17 Mounting the Camera ... Back Focus Adjustment 20 Network Requirements 21 Network Settings 23 IP Address Settings 23 Setting the IP address for Built-in the supplied CD-ROM. Contents Getting Started 2 Safety Precautions 2 Main Features 6 Operating Environment 7 Cautionary Notes 7 Name and Function of VN-V25U is unknown 28 Setting ...
... Lens 13 Power Connection 14 Using the PoE 14 Connecting to the AC 24 V power supply 15 LAN Cable Connection 16 Monitor Signal Output Terminal Connection 16 Alarm Input/Output Terminal Connection 17 Alarm Input Terminal 17 Alarm Output Terminal 17 Mounting the Camera ... Back Focus Adjustment 20 Network Requirements 21 Network Settings 23 IP Address Settings 23 Setting the IP address for Built-in the supplied CD-ROM. Contents Getting Started 2 Safety Precautions 2 Main Features 6 Operating Environment 7 Cautionary Notes 7 Name and Function of VN-V25U is unknown 28 Setting ...
Startup Guide
Page 12
... the [MONITOR OUT] switch setting, press the Reset button to the ceiling. G Step 2 Network settings (A Page 23) Configure the network settings of VN-V25U. These actions can be triggered by adjusting the camera angle. Remember also to the HDD of the computer. ● Performs recording by changing the frame...in viewers enable you to AAPI GuideB in the supplied CD-ROM. 12 Setup Procedures Step 1 Connection/Installation (A Page 14) Connect the lens mount, power supply cord, LAN cable and alarm. For details, please refer to monitor JPEG and MPEG4 images and save JPEG images. After...
... the [MONITOR OUT] switch setting, press the Reset button to the ceiling. G Step 2 Network settings (A Page 23) Configure the network settings of VN-V25U. These actions can be triggered by adjusting the camera angle. Remember also to the HDD of the computer. ● Performs recording by changing the frame...in viewers enable you to AAPI GuideB in the supplied CD-ROM. 12 Setup Procedures Step 1 Connection/Installation (A Page 14) Connect the lens mount, power supply cord, LAN cable and alarm. For details, please refer to monitor JPEG and MPEG4 images and save JPEG images. After...
