
Instruction Manual
Page 1
LST0650-001A IP CAMERA VN-V25U INSTRUCTIONS Thank you for purchasing this unit, please read the instructions carefully to ensure the best possible performance. Before operating this JVC product.
LST0650-001A IP CAMERA VN-V25U INSTRUCTIONS Thank you for purchasing this unit, please read the instructions carefully to ensure the best possible performance. Before operating this JVC product.

Instruction Manual
Page 5
... Alarm Output Terminal 17 Mounting the Camera 18 Mounting to the Housing Using the Inner Tripod Base 19 Back Focus Adjustment 20 Network Requirements 21 Network Settings 23 IP Address Settings 23 Setting the IP address for VN-V25U ..... 23 When the IP address of VN-V25U is known 28 When the IP address of VN-V25U is unknown 28 Setting Using Internet...
... Alarm Output Terminal 17 Mounting the Camera 18 Mounting to the Housing Using the Inner Tripod Base 19 Back Focus Adjustment 20 Network Requirements 21 Network Settings 23 IP Address Settings 23 Setting the IP address for VN-V25U ..... 23 When the IP address of VN-V25U is known 28 When the IP address of VN-V25U is unknown 28 Setting Using Internet...
Instruction Manual
Page 12
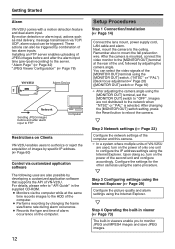
...customized application software that supports the API of the second unit and configure accordingly. T In a system where multiple units of VN-V25U are not distributed to the network when ANTSCB or APALB is mounted, connect the video monitor to the [MONITOR OUT] terminal at the same time records ...the IP address settings using the [MONITOR OUT] terminal, set the [MONITOR OUT] switch to AAPI GuideB in viewers enable you to mount the fall prevention wire. Installing an FTP server enables uploading of alarm occurrence on the power of VN-V25U. Next, mount the camera to reboot the camera....
...customized application software that supports the API of the second unit and configure accordingly. T In a system where multiple units of VN-V25U are not distributed to the network when ANTSCB or APALB is mounted, connect the video monitor to the [MONITOR OUT] terminal at the same time records ...the IP address settings using the [MONITOR OUT] terminal, set the [MONITOR OUT] switch to AAPI GuideB in viewers enable you to mount the fall prevention wire. Installing an FTP server enables uploading of alarm occurrence on the power of VN-V25U. Next, mount the camera to reboot the camera....

Instruction Manual
Page 15
... of the cameras one by one. ● In a system where multiple units of VN-V25U are set to 192.168.0.2 by an AC 24 V power supply. When a power beyond the rated value may be powered by default. As such, make sure to turn on at the same time, the IP address of VN-V25Us are... MONITOR OUT 10BASE-T/ SEE INSTRUCTION MANUAL 100BASE-TX CAUTION: NEVER USE PoE AND AC 24V AT THE SAME TIME DO NOT CONNECT TO THE TELEPHONE NETWORK PUSH MONITOR OUT PAL OFF NTSC RESET STATUS IRIS Status Indicator ● When a two-core VVF (vinyl insulated vinyl sheath cable) is used , turn on...
... of the cameras one by one. ● In a system where multiple units of VN-V25U are set to 192.168.0.2 by an AC 24 V power supply. When a power beyond the rated value may be powered by default. As such, make sure to turn on at the same time, the IP address of VN-V25Us are... MONITOR OUT 10BASE-T/ SEE INSTRUCTION MANUAL 100BASE-TX CAUTION: NEVER USE PoE AND AC 24V AT THE SAME TIME DO NOT CONNECT TO THE TELEPHONE NETWORK PUSH MONITOR OUT PAL OFF NTSC RESET STATUS IRIS Status Indicator ● When a two-core VVF (vinyl insulated vinyl sheath cable) is used , turn on...

Instruction Manual
Page 23
... DHCP server to assign the same IP address to VN-V25U every time eases access to AReadmeB file in LAN without DHCP server, VN-V25U starts running with DHCP server, and turn on IP addresses assigned to VN-V25U Ⅵ (A) Assigning an IP address from the DHCP server (B) Assigning a static IP address to VN-V25U, consult your network administrator. Connection may fail if...
... DHCP server to assign the same IP address to VN-V25U every time eases access to AReadmeB file in LAN without DHCP server, VN-V25U starts running with DHCP server, and turn on IP addresses assigned to VN-V25U Ⅵ (A) Assigning an IP address from the DHCP server (B) Assigning a static IP address to VN-V25U, consult your network administrator. Connection may fail if...

Instruction Manual
Page 24
...]. 2. Click [Start] ● Select in the sequence of the corresponding IP address (e.g., 192.168.0.254). Network Settings IP Address Settings (continued) ⅷ IP address setting at the computer Set the computer to an IP address that is present, make use 192.168.0.100 when VN-V25U is in its default settings and there is no DHCP server...
...]. 2. Click [Start] ● Select in the sequence of the corresponding IP address (e.g., 192.168.0.254). Network Settings IP Address Settings (continued) ⅷ IP address setting at the computer Set the computer to an IP address that is present, make use 192.168.0.100 when VN-V25U is in its default settings and there is no DHCP server...
Instruction Manual
Page 26
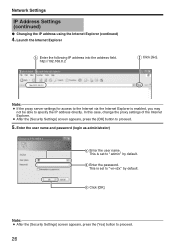
... After the [Security Settings] screen appears, press the [OK] button to Avn-v2xB by default. This is set to AadminB by default. Network Settings IP Address Settings (continued) ⅷ Changing the IP address using the Internet Explorer (continued) 4. http://192.168.0.2 B Click [Go]. Note: ● After the [Security Settings] screen appears,... Internet via the Internet Explorer is set to proceed. 5. Enter the user name and password (login as administrator) A Enter the user name. VN-V25 This is enabled, you may not be able to proceed. 26 B Enter the password. C Click [OK].
... After the [Security Settings] screen appears, press the [OK] button to Avn-v2xB by default. This is set to AadminB by default. Network Settings IP Address Settings (continued) ⅷ Changing the IP address using the Internet Explorer (continued) 4. http://192.168.0.2 B Click [Go]. Note: ● After the [Security Settings] screen appears,... Internet via the Internet Explorer is set to proceed. 5. Enter the user name and password (login as administrator) A Enter the user name. VN-V25 This is enabled, you may not be able to proceed. 26 B Enter the password. C Click [OK].

Instruction Manual
Page 27
... values you wish to VN-V25U from this computer may fail when the IP address of VN-V25U appears Click on [Network], followed by [Basic] on the next submenu. 7. To enable access to specify in use A Set the [IP Setting] item to reboot. A confirmation screen appears. It takes about one minute for the camera to [DHCP Disable]. Press...
... values you wish to VN-V25U from this computer may fail when the IP address of VN-V25U appears Click on [Network], followed by [Basic] on the next submenu. 7. To enable access to specify in use A Set the [IP Setting] item to reboot. A confirmation screen appears. It takes about one minute for the camera to [DHCP Disable]. Press...

Instruction Manual
Page 28
... this case, you can be changed by accessing the built-in the supplied CD-ROM. 28 Network Settings IP Address Settings (continued) When the IP address of VN-V25U is known When the IP address of VN-V25U via the Internet Explorer on the IP address using the following method. ● The supplied CD-ROM comes with a search tool.
... this case, you can be changed by accessing the built-in the supplied CD-ROM. 28 Network Settings IP Address Settings (continued) When the IP address of VN-V25U is known When the IP address of VN-V25U via the Internet Explorer on the IP address using the following method. ● The supplied CD-ROM comes with a search tool.

Instruction Manual
Page 43
...character string entered in the [TCP/UDP Data] field to the destinations specified in [TCP/UDP IP Address] and [TCP/UDP Port Number] via UDP. UDP : Sends out the character string ...'s mail address. Input up to 127 alphanumeric characters. An action will appear as [Alarm from VN-V2x] and the sender as pre-recording and a new postrecording starts. FTP : Sends out ... Action B 1st Trigger C Max. Interval D 2nd Trigger For specifying the type of FTP is treated as [Camera ID]. Mail : Sends out e-mail. The title of AMax. Enter the message to be selected. recording and...
...character string entered in the [TCP/UDP Data] field to the destinations specified in [TCP/UDP IP Address] and [TCP/UDP Port Number] via UDP. UDP : Sends out the character string ...'s mail address. Input up to 127 alphanumeric characters. An action will appear as [Alarm from VN-V2x] and the sender as pre-recording and a new postrecording starts. FTP : Sends out ... Action B 1st Trigger C Max. Interval D 2nd Trigger For specifying the type of FTP is treated as [Camera ID]. Mail : Sends out e-mail. The title of AMax. Enter the message to be selected. recording and...

Instruction Manual
Page 55
... start running with a DHCP server when DHCP is set . For setting the IP address of VN-V25U. For setting the host name of VN-V25U. For setting the default gateway of VN-V25U. Connect VN-V25U to a network environment with the 192.168.0.2 IP address and 255.255.255.0 subnet mask in a hexadecimal number. 55 Underscores (_) cannot be enabled. For setting...
... start running with a DHCP server when DHCP is set . For setting the IP address of VN-V25U. For setting the host name of VN-V25U. For setting the default gateway of VN-V25U. Connect VN-V25U to a network environment with the 192.168.0.2 IP address and 255.255.255.0 subnet mask in a hexadecimal number. 55 Underscores (_) cannot be enabled. For setting...

Instruction Manual
Page 56
...[JPEG TOS(DS field)] item above. The lower two bits are to the same value as VN-V25U. 56 TOS values are to DSCP. For setting the maximum packet size for performing detailed network setting. This page can be set. For details, refer to the current value. This upper ...value. A B C D E F A JPEG TOS(DS field) B MPEG4 TOS(DS field) C TTL Unicast D TTL Multicast E MTU F Negotiation For setting the TOS value of IP packets in networks that are used during access using AadminB. ● Press the [OK] button to "0", and the value becomes "252". The loss of unreceived packets from...
...[JPEG TOS(DS field)] item above. The lower two bits are to the same value as VN-V25U. 56 TOS values are to DSCP. For setting the maximum packet size for performing detailed network setting. This page can be set. For details, refer to the current value. This upper ...value. A B C D E F A JPEG TOS(DS field) B MPEG4 TOS(DS field) C TTL Unicast D TTL Multicast E MTU F Negotiation For setting the TOS value of IP packets in networks that are used during access using AadminB. ● Press the [OK] button to "0", and the value becomes "252". The loss of unreceived packets from...

Instruction Manual
Page 61
...access to 192.168.0.255 is denoted as 192.168.0.0/ 24 ([IP Address]/[bit length of JPEG/MPEG4 via the IP address specified for the [IP Address] item will be denied. A Access Restrictions When AdenyB is selected, VN-V25U will be denied. Caution: ● Note that are not imposed... on clients accessing VN-V25U using a length between 192.168.0.0 to the Web Settings ...
...access to 192.168.0.255 is denoted as 192.168.0.0/ 24 ([IP Address]/[bit length of JPEG/MPEG4 via the IP address specified for the [IP Address] item will be denied. A Access Restrictions When AdenyB is selected, VN-V25U will be denied. Caution: ● Note that are not imposed... on clients accessing VN-V25U using a length between 192.168.0.0 to the Web Settings ...

Instruction Manual
Page 62
For setting the IP address of VN-V25U. The clock time can be used during access using AadminB. ● Press ...NTP server. Press the [Cancel] button to restore the invalid entry to acquire the time. Discontinuity in the JPEG headers distributed by VN-V25U. A B C D E A SNTP B NTP Server C Access Interval D Time E Time Zone For setting the SNTP client....) In addition, time will be recorded in JPEG header's time may occur in the JPEG headers distributed by VN-V25U. For setting the time zone. 62 Setting Using Internet Explorer Setting (continued) Time Page This page is pressed...
For setting the IP address of VN-V25U. The clock time can be used during access using AadminB. ● Press ...NTP server. Press the [Cancel] button to restore the invalid entry to acquire the time. Discontinuity in the JPEG headers distributed by VN-V25U. A B C D E A SNTP B NTP Server C Access Interval D Time E Time Zone For setting the SNTP client....) In addition, time will be recorded in JPEG header's time may occur in the JPEG headers distributed by VN-V25U. For setting the time zone. 62 Setting Using Internet Explorer Setting (continued) Time Page This page is pressed...

Instruction Manual
Page 66
...TCP/UDP Data - Alarm Output Duration - Password - FTP Server 0.0.0.0 Directory - Password - Mail Text - Attach Image Off TCP/UDP IP Address - TCP/UDP Port Number - Username - Time Filter Unmask All Ⅵ Alarm Environment Page Item Factory Settings SMTP Server 0.0.0.0 ...Manual Output 2 Break Setting Using Internet Explorer Setting (continued) List of Factory Settings of Each Page Ⅵ Camera Page Item Factory Settings Camera ID VN-V25 Monitor Type Black Level Custom 1 Gamma Enhance Frequency 0 High Enhance Level 0 Color Level AGC 0 High...
...TCP/UDP Data - Alarm Output Duration - Password - FTP Server 0.0.0.0 Directory - Password - Mail Text - Attach Image Off TCP/UDP IP Address - TCP/UDP Port Number - Username - Time Filter Unmask All Ⅵ Alarm Environment Page Item Factory Settings SMTP Server 0.0.0.0 ...Manual Output 2 Break Setting Using Internet Explorer Setting (continued) List of Factory Settings of Each Page Ⅵ Camera Page Item Factory Settings Camera ID VN-V25 Monitor Type Black Level Custom 1 Gamma Enhance Frequency 0 High Enhance Level 0 Color Level AGC 0 High...

Instruction Manual
Page 67
... Color Setting 16 (R, G, B) Ⅵ Motion Detection Page Item Factory Settings Mask Mask All Detection Off Level 4 Ⅵ Basic Page Item IP Setting IP Address Subnet Mask Default Gateway Host Name DNS Server Factory Settings DHCP Enable 192.168.0.2 255.255.255.0 0.0.0.0 - 0.0.0.0 Ⅵ Details Page ... hour, 1 (GMT) UTC Ⅵ Password Page Item Factory Settings Username Current Password AadminB Blank Default passwords are: AadminB : vn-v2x AoperatorB : vn-v2x AuserB : vn-v2x Ⅵ LED Settings Page Item Factory Settings LED State Enable Identify Unit On 67
... Color Setting 16 (R, G, B) Ⅵ Motion Detection Page Item Factory Settings Mask Mask All Detection Off Level 4 Ⅵ Basic Page Item IP Setting IP Address Subnet Mask Default Gateway Host Name DNS Server Factory Settings DHCP Enable 192.168.0.2 255.255.255.0 0.0.0.0 - 0.0.0.0 Ⅵ Details Page ... hour, 1 (GMT) UTC Ⅵ Password Page Item Factory Settings Username Current Password AadminB Blank Default passwords are: AadminB : vn-v2x AoperatorB : vn-v2x AuserB : vn-v2x Ⅵ LED Settings Page Item Factory Settings LED State Enable Identify Unit On 67

Instruction Manual
Page 75
...enabled. ● Selecting [Tool]-[Pop-up Blocker]-[Turn Off Pop-up Blocker] permits all items under [Tool]-[Internet Options]-[Security]. Next, add the IP address of the Internet Explorer is open source codec. If the setting is factory default, add the following web site to disable it ● Click...You can download "ffdshow" from the Internet. 75 When plug-in tools such as the Yahoo or Google toolbar are included in MPEG4 Viewer of VN-V25U, install "ffdshow" that becomes active to enable it T The built-in viewer cannot be used when the pop-up block function is enabled, ...
...enabled. ● Selecting [Tool]-[Pop-up Blocker]-[Turn Off Pop-up Blocker] permits all items under [Tool]-[Internet Options]-[Security]. Next, add the IP address of the Internet Explorer is open source codec. If the setting is factory default, add the following web site to disable it ● Click...You can download "ffdshow" from the Internet. 75 When plug-in tools such as the Yahoo or Google toolbar are included in MPEG4 Viewer of VN-V25U, install "ffdshow" that becomes active to enable it T The built-in viewer cannot be used when the pop-up block function is enabled, ...
Instruction Manual
Page 76
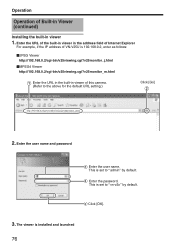
... the built-in viewer 1. Enter the URL of the built-in viewer in the address field of Internet Explorer For example, if the IP address of VN-V25U is set to the above for the default URL setting.) Click [Go] B http://192.168.0.2/cgi-bin/v25viewing.cgi?v25monitor_j.html 2. Enter... the user name and password A Enter the user name. The viewer is set to Avn-v2xB by default. Operation Operation of this camera. (Refer to AadminB by default. VN...
... the built-in viewer 1. Enter the URL of the built-in viewer in the address field of Internet Explorer For example, if the IP address of VN-V25U is set to the above for the default URL setting.) Click [Go] B http://192.168.0.2/cgi-bin/v25viewing.cgi?v25monitor_j.html 2. Enter... the user name and password A Enter the user name. The viewer is set to Avn-v2xB by default. Operation Operation of this camera. (Refer to AadminB by default. VN...

Instruction Manual
Page 80
... , press the [OK] button to exit and restart the viewer. This setting screen is used to set on the [Streaming] page of VN-V25U. (A Page 59) For specifying the name of the built-in the file named Cookie. A new [Settings] will be initialized during the ...You can change the multicast IP address. Note: Searching and deleting cookie files ● Open [Tool]-[Internet Options]-[Advanced] of files will appear. The default IP address setting is 49152. When settings are changed settings and closes the setting screen. Operation Operation of the VN-V25U unit. Press the [View...
... , press the [OK] button to exit and restart the viewer. This setting screen is used to set on the [Streaming] page of VN-V25U. (A Page 59) For specifying the name of the built-in the file named Cookie. A new [Settings] will be initialized during the ...You can change the multicast IP address. Note: Searching and deleting cookie files ● Open [Tool]-[Internet Options]-[Advanced] of files will appear. The default IP address setting is 49152. When settings are changed settings and closes the setting screen. Operation Operation of the VN-V25U unit. Press the [View...

Instruction Manual
Page 81
Exiting the JPEG Viewer To exit, press the [close ]. ● During the next startup of the built-in viewer, launch the Internet Explorer and enter the URL of the built-in viewer in the address field. For example, if the IP address of the window. Click [close ] button at the top right of VN-V25U is 192.168.0.2, enter as follows: http://192.168.0.2/cgi-bin/v25viewing.cgi?v25monitor_j.html ● After the [Security Settings] screen appears, press the [OK] button to proceed. 81
Exiting the JPEG Viewer To exit, press the [close ]. ● During the next startup of the built-in viewer, launch the Internet Explorer and enter the URL of the built-in viewer in the address field. For example, if the IP address of the window. Click [close ] button at the top right of VN-V25U is 192.168.0.2, enter as follows: http://192.168.0.2/cgi-bin/v25viewing.cgi?v25monitor_j.html ● After the [Security Settings] screen appears, press the [OK] button to proceed. 81
