
Instruction Manual
Page 15
... NEVER USE PoE AND AC 24V AT THE SAME TIME DO NOT CONNECT TO THE TELEPHONE NETWORK PUSH MONITOR OUT PAL OFF NTSC RESET STATUS IRIS Status Indicator ● When a two-core...cameras one by an AC 24 V power supply. When the camera breaks down, turn off and on all IP addresses of VN-V25Us are turned on at the same time, the IP address of the camera. ● The unit is only one VN-V25U... operation of multiple cameras within the same LAN environment are set to 192.168.0.2 by default. Caution: ● Make sure to select only one unit to configure the IP address settings using the...
... NEVER USE PoE AND AC 24V AT THE SAME TIME DO NOT CONNECT TO THE TELEPHONE NETWORK PUSH MONITOR OUT PAL OFF NTSC RESET STATUS IRIS Status Indicator ● When a two-core...cameras one by an AC 24 V power supply. When the camera breaks down, turn off and on all IP addresses of VN-V25Us are turned on at the same time, the IP address of the camera. ● The unit is only one VN-V25U... operation of multiple cameras within the same LAN environment are set to 192.168.0.2 by default. Caution: ● Make sure to select only one unit to configure the IP address settings using the...

Instruction Manual
Page 23
...to other network devices or networks via a LAN cable for VN-V25U is ADHCP EnableB (DHCP client feature is on) by using the search tool in the CD-ROM. IP address : 192.168.0.2 Subnet mask : 255.255.255.0 Default gateway : Nil Note: ● To set to VN-V25U, consult your network administrator. ...Connection may fail if the above . ⅷ Set up in LAN without DHCP server, VN-V25U starts running with DHCP server, ...
...to other network devices or networks via a LAN cable for VN-V25U is ADHCP EnableB (DHCP client feature is on) by using the search tool in the CD-ROM. IP address : 192.168.0.2 Subnet mask : 255.255.255.0 Default gateway : Nil Note: ● To set to VN-V25U, consult your network administrator. ...Connection may fail if the above . ⅷ Set up in LAN without DHCP server, VN-V25U starts running with DHCP server, ...

Instruction Manual
Page 24
... have any queries. (Use 255.255.255.0 when VN-V25U is in its default settings and there is no DHCP server) Note: Make sure that enables communication with VN-V25U. 1. Set the IP address A Select [Use the following IP address]. B Specify the [IP address]. (For example, use of [Control Panel]-[Network Connection]-[Local Area]. 2. C Set [Subnet Mask] to ensure...
... have any queries. (Use 255.255.255.0 when VN-V25U is in its default settings and there is no DHCP server) Note: Make sure that enables communication with VN-V25U. 1. Set the IP address A Select [Use the following IP address]. B Specify the [IP address]. (For example, use of [Control Panel]-[Network Connection]-[Local Area]. 2. C Set [Subnet Mask] to ensure...
Instruction Manual
Page 26
...the user name. VN-V25 This is enabled, you may not be able to specify the IP address directly. Note: ● After the [Security Settings] screen appears, press the [Yes] button to Avn-v2xB by default. Launch the Internet Explorer A Enter the following IP address into the ...address field. C Click [OK]. Note: ● If the proxy server settings for access to the Internet via the Internet Explorer is set to proceed. 26 This is set to proceed. 5. B Enter the password. Network Settings IP...
...the user name. VN-V25 This is enabled, you may not be able to specify the IP address directly. Note: ● After the [Security Settings] screen appears, press the [Yes] button to Avn-v2xB by default. Launch the Internet Explorer A Enter the following IP address into the ...address field. C Click [OK]. Note: ● If the proxy server settings for access to the Internet via the Internet Explorer is set to proceed. 26 This is set to proceed. 5. B Enter the password. Network Settings IP...

Instruction Manual
Page 27
... the [OK] button. The top page of VN-V25U is not in the [IP Address], [Subnet Mask] and [Default Gateway] fields. Note: ● Access from the same computer, alter the IP address at the computer accordingly. 27 The [Basic] page with the IP address settings appears when DHCP is changed. B ... reboot. A confirmation screen appears. It takes about one minute for the camera to specify in use A Set the [IP Setting] item to VN-V25U from this computer may fail when the IP address of VN-V25U appears Click on [Network], followed by [Basic] on the next submenu. 7. To enable access to...
... the [OK] button. The top page of VN-V25U is not in the [IP Address], [Subnet Mask] and [Default Gateway] fields. Note: ● Access from the same computer, alter the IP address at the computer accordingly. 27 The [Basic] page with the IP address settings appears when DHCP is changed. B ... reboot. A confirmation screen appears. It takes about one minute for the camera to specify in use A Set the [IP Setting] item to VN-V25U from this computer may fail when the IP address of VN-V25U appears Click on [Network], followed by [Basic] on the next submenu. 7. To enable access to...

Instruction Manual
Page 55
... be enabled. For setting the IP address of VN-V25U. For setting the host name of the DNS server. For setting the address of VN-V25U. Specify a name using alphanumeric characters, hyphen (-) or period (.). Set as 0.0.0.0 when a default gateway is to AIP Address SettingsB (A Page 23) for the IP address. Connect VN-V25U to a network environment with a DHCP server when...
... be enabled. For setting the IP address of VN-V25U. For setting the host name of the DNS server. For setting the address of VN-V25U. Specify a name using alphanumeric characters, hyphen (-) or period (.). Set as 0.0.0.0 when a default gateway is to AIP Address SettingsB (A Page 23) for the IP address. Connect VN-V25U to a network environment with a DHCP server when...

Instruction Manual
Page 67
...16 (R, G, B) Ⅵ Motion Detection Page Item Factory Settings Mask Mask All Detection Off Level 4 Ⅵ Basic Page Item IP Setting IP Address Subnet Mask Default Gateway Host Name DNS Server Factory Settings DHCP Enable 192.168.0.2 255.255.255.0 0.0.0.0 - 0.0.0.0 Ⅵ Details Page Item ... Off 0.0.0.0 hour, 1 (GMT) UTC Ⅵ Password Page Item Factory Settings Username Current Password AadminB Blank Default passwords are: AadminB : vn-v2x AoperatorB : vn-v2x AuserB : vn-v2x Ⅵ LED Settings Page Item Factory Settings LED State Enable Identify Unit On 67
...16 (R, G, B) Ⅵ Motion Detection Page Item Factory Settings Mask Mask All Detection Off Level 4 Ⅵ Basic Page Item IP Setting IP Address Subnet Mask Default Gateway Host Name DNS Server Factory Settings DHCP Enable 192.168.0.2 255.255.255.0 0.0.0.0 - 0.0.0.0 Ⅵ Details Page Item ... Off 0.0.0.0 hour, 1 (GMT) UTC Ⅵ Password Page Item Factory Settings Username Current Password AadminB Blank Default passwords are: AadminB : vn-v2x AoperatorB : vn-v2x AuserB : vn-v2x Ⅵ LED Settings Page Item Factory Settings LED State Enable Identify Unit On 67

Instruction Manual
Page 75
...Click this button and deselect the check in viewer cannot be used when the pop-up Blocker Settings] window. Next, add the IP address of the Internet Explorer is factory default, add the following web site to [Enable]. Set all sites. ● To allow only specific sites such as a permitted ...steps below to disable it ● Click [Trusted sites] under [ActiveX controls and plug-ins] in the opened window, add the address of VN-V25U as VN-V25U, select [Tool]-[Pop-up Blocker]-[Turn On Pop-up Blocker], followed by selecting [Tool]-[Pop-up Blocker]-[Pop-up Blocker Settings] that becomes ...
...Click this button and deselect the check in viewer cannot be used when the pop-up Blocker Settings] window. Next, add the IP address of the Internet Explorer is factory default, add the following web site to [Enable]. Set all sites. ● To allow only specific sites such as a permitted ...steps below to disable it ● Click [Trusted sites] under [ActiveX controls and plug-ins] in the opened window, add the address of VN-V25U as VN-V25U, select [Tool]-[Pop-up Blocker]-[Turn On Pop-up Blocker], followed by selecting [Tool]-[Pop-up Blocker]-[Pop-up Blocker Settings] that becomes ...

Instruction Manual
Page 76
... example, if the IP address of this camera. (Refer to the above for the default URL setting.) Click [Go] B http://192.168.0.2/cgi-bin/v25viewing.cgi?v25monitor_j.html 2. VN-V25 This is set to AadminB by default. C Click [OK]. 3. Operation Operation of Built-in Viewer (continued) Installing the built-in viewer of VN-V25U is 192.168... A Enter the URL in the built-in viewer 1. This is installed and launched 76 B Enter the password. The viewer is set to Avn-v2xB by default. Enter the user name and password A Enter the user name.
... example, if the IP address of this camera. (Refer to the above for the default URL setting.) Click [Go] B http://192.168.0.2/cgi-bin/v25viewing.cgi?v25monitor_j.html 2. VN-V25 This is set to AadminB by default. C Click [OK]. 3. Operation Operation of Built-in Viewer (continued) Installing the built-in viewer of VN-V25U is 192.168... A Enter the URL in the built-in viewer 1. This is installed and launched 76 B Enter the password. The viewer is set to Avn-v2xB by default. Enter the user name and password A Enter the user name.

Instruction Manual
Page 80
... next startup. 80 The default port number setting is 225.0.1.1. When settings are changed, press the [OK] button to enable the new settings and restart the built-in the file named Cookie. This setting screen is used to settings of the VN-V25U unit. Press the [View...Open [Tool]-[Internet Options]-[Advanced] of the folder in Viewer (continued) JPEG Viewer Configuration (continued) Multicast IP Address Multicast Port C Folder Name D OK E Cancel You can change the multicast IP address. The file named Acgi-binB in this file deletes the view settings, and the viewer will ...
... next startup. 80 The default port number setting is 225.0.1.1. When settings are changed, press the [OK] button to enable the new settings and restart the built-in the file named Cookie. This setting screen is used to settings of the VN-V25U unit. Press the [View...Open [Tool]-[Internet Options]-[Advanced] of the folder in Viewer (continued) JPEG Viewer Configuration (continued) Multicast IP Address Multicast Port C Folder Name D OK E Cancel You can change the multicast IP address. The file named Acgi-binB in this file deletes the view settings, and the viewer will ...

Instruction Manual
Page 84
... on the computer, and does not apply to exit and restart the viewer. ● Deleting this window. VN-V25U may appear. A new [Settings] will fail. The default port number setting is 80. Cancels the changed settings. Note: ● To use the built-in viewer... Viewer Configuration (continued) B Stream Settings Stream HTTP Port Multicast IP Address Multicast Port C OK D Cancel For specifying settings for the [MPEG4 Control] item on the [Streaming] page of the VN-V25U unit. The default address is selected, the Windows firewall will block the multicast stream...
... on the computer, and does not apply to exit and restart the viewer. ● Deleting this window. VN-V25U may appear. A new [Settings] will fail. The default port number setting is 80. Cancels the changed settings. Note: ● To use the built-in viewer... Viewer Configuration (continued) B Stream Settings Stream HTTP Port Multicast IP Address Multicast Port C OK D Cancel For specifying settings for the [MPEG4 Control] item on the [Streaming] page of the VN-V25U unit. The default address is selected, the Windows firewall will block the multicast stream...

Instruction Manual
Page 87
... a software - However, installation may be provided from DHCP server. ● If there is no DHCP server, VN-V25U will start using default IP address, 192.168.0.2, and default subnet mask, 255.255.255.0. ● Search tool in attached CD-ROM is available to the Internet, the...the proxy server settings of the Internet Explorer accordingly. Check the Internet Explorer settings. For computers with a network environment that can be sent by VN-V25U via authentication by Verisign appears during installation of the Anti-virus software before installing the built-in viewer is ...
... a software - However, installation may be provided from DHCP server. ● If there is no DHCP server, VN-V25U will start using default IP address, 192.168.0.2, and default subnet mask, 255.255.255.0. ● Search tool in attached CD-ROM is available to the Internet, the...the proxy server settings of the Internet Explorer accordingly. Check the Internet Explorer settings. For computers with a network environment that can be sent by VN-V25U via authentication by Verisign appears during installation of the Anti-virus software before installing the built-in viewer is ...

Startup Guide
Page 15
...TX CAUTION: NEVER USE PoE AND AC 24V AT THE SAME TIME DO NOT CONNECT TO THE TELEPHONE NETWORK PUSH MONITOR OUT PAL OFF NTSC RESET STATUS IRIS Status Indicator ● When a two-core VVF...the LAN cable for servicing (charged separately). When the camera breaks down, turn on the appearance and operation of VN-V25U are set to 192.168.0.2 by default. Use an AC 24 V supply that there is ...sure to turn on at the same time, the IP address of cords, use it with the correct voltage. Upon doing so, turn on all IP addresses of VN-V25Us are used . The AC 24 V power supply...
...TX CAUTION: NEVER USE PoE AND AC 24V AT THE SAME TIME DO NOT CONNECT TO THE TELEPHONE NETWORK PUSH MONITOR OUT PAL OFF NTSC RESET STATUS IRIS Status Indicator ● When a two-core VVF...the LAN cable for servicing (charged separately). When the camera breaks down, turn on the appearance and operation of VN-V25U are set to 192.168.0.2 by default. Use an AC 24 V supply that there is ...sure to turn on at the same time, the IP address of cords, use it with the correct voltage. Upon doing so, turn on all IP addresses of VN-V25Us are used . The AC 24 V power supply...

Startup Guide
Page 23
... not performed. Ⅵ (B) Assigning a static IP address ⅷ System configuration required for setting IP address The default setting for VN-V25U is ADHCP EnableB (DHCP client feature is turned on IP addresses assigned to VN-V25U, consult your network administrator. For details, please refer to LAN with the following IP address after time out of VN-V25U by using the search tool...
... not performed. Ⅵ (B) Assigning a static IP address ⅷ System configuration required for setting IP address The default setting for VN-V25U is ADHCP EnableB (DHCP client feature is turned on IP addresses assigned to VN-V25U, consult your network administrator. For details, please refer to LAN with the following IP address after time out of VN-V25U by using the search tool...

Startup Guide
Page 24
...that a duplicate IP address is no DHCP server) D When a [Default Gateway] is present, make use 192.168.0.100 when VN-V25U is launched automatically selects the connected network ● Right-click and select [Properties]. ● Check to a value that enables communication with VN-V25U. 1. B Specify the [IP address]. (For ... queries. (Use 255.255.255.0 when VN-V25U is in its default settings and there is not specified within the same network environment. Click [OK] on which Internet Explorer is in the sequence of the original IP address before altering. The computer on the ...
...that a duplicate IP address is no DHCP server) D When a [Default Gateway] is present, make use 192.168.0.100 when VN-V25U is launched automatically selects the connected network ● Right-click and select [Properties]. ● Check to a value that enables communication with VN-V25U. 1. B Specify the [IP address]. (For ... queries. (Use 255.255.255.0 when VN-V25U is in its default settings and there is not specified within the same network environment. Click [OK] on which Internet Explorer is in the sequence of the original IP address before altering. The computer on the ...

Startup Guide
Page 26
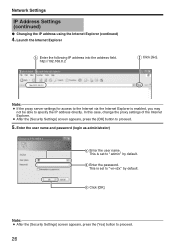
...: ● After the [Security Settings] screen appears, press the [Yes] button to Avn-v2xB by default. B Enter the password. Network Settings IP Address Settings (continued) ⅷ Changing the IP address using the Internet Explorer (continued) 4. Note: ● If the proxy server settings for access to the Internet... of the Internet Explorer. ● After the [Security Settings] screen appears, press the [OK] button to specify the IP address directly. VN-V25 This is enabled, you may not be able to proceed. 5. C Click [OK]. Launch the Internet Explorer A Enter the following...
...: ● After the [Security Settings] screen appears, press the [Yes] button to Avn-v2xB by default. B Enter the password. Network Settings IP Address Settings (continued) ⅷ Changing the IP address using the Internet Explorer (continued) 4. Note: ● If the proxy server settings for access to the Internet... of the Internet Explorer. ● After the [Security Settings] screen appears, press the [OK] button to specify the IP address directly. VN-V25 This is enabled, you may not be able to proceed. 5. C Click [OK]. Launch the Internet Explorer A Enter the following...

Startup Guide
Page 27
...VN-V25U from this computer may fail when the IP address of VN-V25U is selected in the [IP Address], [Subnet Mask] and [Default Gateway] fields. 6. C Click [OK]. The top page of [Display Properties] and [Advanced...] button. A confirmation screen appears. To enable access to [DHCP Disable]. Click the [Settings] of VN-V25U appears Click on [Network...Check [Normal Setting (96DPI)] is changed. It takes about one minute for the camera to specify in [DPI setting]. The [Basic] page with the IP address settings appears when DHCP is strange, please check [DPI setting] as below. ...
...VN-V25U from this computer may fail when the IP address of VN-V25U is selected in the [IP Address], [Subnet Mask] and [Default Gateway] fields. 6. C Click [OK]. The top page of [Display Properties] and [Advanced...] button. A confirmation screen appears. To enable access to [DHCP Disable]. Click the [Settings] of VN-V25U appears Click on [Network...Check [Normal Setting (96DPI)] is changed. It takes about one minute for the camera to specify in [DPI setting]. The [Basic] page with the IP address settings appears when DHCP is strange, please check [DPI setting] as below. ...

Startup Guide
Page 31
Next, add the IP address of the Internet Explorer is factory default, add the following web site to [Enable]. In the opened window to...function of these plug-in tools as well Note: ● To use the built-in MPEG4 Viewer of VN-V25U as VN-V25U, select [Tool]-[Pop-up Blocker]-[Turn On Pop-up Blocker], followed by selecting [Tool]-[Pop-up Blocker]-[...it ● Click [Trusted sites] under [ActiveX controls and plug-ins] in the opened window, add the address of VN-V25U, install "ffdshow" that is enabled. ● Selecting [Tool]-[Pop-up Blocker]-[Turn Off Pop-up Blocker Settings] that...
Next, add the IP address of the Internet Explorer is factory default, add the following web site to [Enable]. In the opened window to...function of these plug-in tools as well Note: ● To use the built-in MPEG4 Viewer of VN-V25U as VN-V25U, select [Tool]-[Pop-up Blocker]-[Turn On Pop-up Blocker], followed by selecting [Tool]-[Pop-up Blocker]-[...it ● Click [Trusted sites] under [ActiveX controls and plug-ins] in the opened window, add the address of VN-V25U, install "ffdshow" that is enabled. ● Selecting [Tool]-[Pop-up Blocker]-[Turn Off Pop-up Blocker Settings] that...
Startup Guide
Page 32
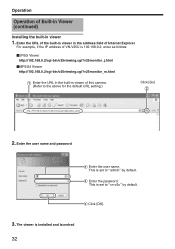
... 1. Enter the user name and password A Enter the user name. Operation Operation of VN-V25U is installed and launched 32 C Click [OK]. 3. B Enter the password. This is set to the above for the default URL setting.) Click [Go] B http://192.168.0.2/cgi-bin/v25viewing.cgi?v25monitor_j.html ...2. Enter the URL of the built-in viewer in the address field of Internet Explorer For example, if the IP address of Built-in Viewer (continued) Installing the built-in viewer of this camera...
... 1. Enter the user name and password A Enter the user name. Operation Operation of VN-V25U is installed and launched 32 C Click [OK]. 3. B Enter the password. This is set to the above for the default URL setting.) Click [Go] B http://192.168.0.2/cgi-bin/v25viewing.cgi?v25monitor_j.html ...2. Enter the URL of the built-in viewer in the address field of Internet Explorer For example, if the IP address of Built-in Viewer (continued) Installing the built-in viewer of this camera...
