
Instruction Manual
Page 1
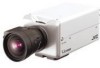
IP CAMERA VN-V25U INSTRUCTIONS Thank you for purchasing this unit, please read the instructions carefully to ensure the best possible performance. Before operating this JVC product. LST0650-001A
IP CAMERA VN-V25U INSTRUCTIONS Thank you for purchasing this unit, please read the instructions carefully to ensure the best possible performance. Before operating this JVC product. LST0650-001A

Instruction Manual
Page 5
... Terminal 17 Alarm Output Terminal 17 Mounting the Camera 18 Mounting to the Housing Using the Inner Tripod Base 19 Back Focus Adjustment 20 Network Requirements 21 Network Settings 23 IP Address Settings 23 Setting the IP address for VN-V25U ..... 23 When the IP address of VN-V25U is known 28 When the IP address of...
... Terminal 17 Alarm Output Terminal 17 Mounting the Camera 18 Mounting to the Housing Using the Inner Tripod Base 19 Back Focus Adjustment 20 Network Requirements 21 Network Settings 23 IP Address Settings 23 Setting the IP address for VN-V25U ..... 23 When the IP address of VN-V25U is known 28 When the IP address of...
Instruction Manual
Page 7
... operating humidity range of 20 % to 85 %. (condensation is in use . ● IGMPv2-compliant network when multicast is not allowed) ● Near equipment that emits strong magnetic fields, such as transformers or... of an equipment may cause malfunction or failure of the other, and result in MPEG4 Viewer of VN-V25U, install "ffdshow" that may trap heat, such as kitchens. ● Locations that emit radiation,...playback. ● To make use of the applications, and not a guarantee of the camera unit. Handling Precautions ⅷ Do not hang on the condition of this product at locations...
... operating humidity range of 20 % to 85 %. (condensation is in use . ● IGMPv2-compliant network when multicast is not allowed) ● Near equipment that emits strong magnetic fields, such as transformers or... of an equipment may cause malfunction or failure of the other, and result in MPEG4 Viewer of VN-V25U, install "ffdshow" that may trap heat, such as kitchens. ● Locations that emit radiation,...playback. ● To make use of the applications, and not a guarantee of the camera unit. Handling Precautions ⅷ Do not hang on the condition of this product at locations...
Instruction Manual
Page 12
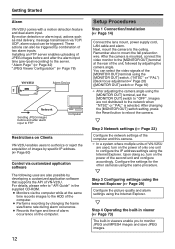
... the IP address settings using the [MONITOR OUT] terminal, set the [MONITOR OUT] switch to reboot the camera. G Step 2 Network settings (A Page 23) Configure the network settings of the second unit and configure accordingly. Upon doing so, turn on the computer. 12 Setup Procedures ...focus adjustment A Page 20) ([MONITOR OUT] switch A Page 10) T After adjusting the camera angle using the Internet Explorer. T In a system where multiple units of VN-V25U are used, turn on Clients VN-V25U enables users to authorize or reject the acquisition of images by specific IP address. (A Page ...
... the IP address settings using the [MONITOR OUT] terminal, set the [MONITOR OUT] switch to reboot the camera. G Step 2 Network settings (A Page 23) Configure the network settings of the second unit and configure accordingly. Upon doing so, turn on the computer. 12 Setup Procedures ...focus adjustment A Page 20) ([MONITOR OUT] switch A Page 10) T After adjusting the camera angle using the Internet Explorer. T In a system where multiple units of VN-V25U are used, turn on Clients VN-V25U enables users to authorize or reject the acquisition of images by specific IP address. (A Page ...

Instruction Manual
Page 15
... MONITOR OUT 10BASE-T/ SEE INSTRUCTION MANUAL 100BASE-TX CAUTION: NEVER USE PoE AND AC 24V AT THE SAME TIME DO NOT CONNECT TO THE TELEPHONE NETWORK PUSH MONITOR OUT PAL OFF NTSC RESET STATUS IRIS Status Indicator ● When a two-core VVF (vinyl insulated vinyl sheath cable) is used .... are set to 192.168.0.2 by one. ● In a system where multiple units of VN-V25U are turned on the appearance and operation of the camera. Otherwise, access to VN-V25U may be powered by an AC 24 V power supply. Connecting to the AC 24 V power supply Connect this product to the AC 24 ...
... MONITOR OUT 10BASE-T/ SEE INSTRUCTION MANUAL 100BASE-TX CAUTION: NEVER USE PoE AND AC 24V AT THE SAME TIME DO NOT CONNECT TO THE TELEPHONE NETWORK PUSH MONITOR OUT PAL OFF NTSC RESET STATUS IRIS Status Indicator ● When a two-core VVF (vinyl insulated vinyl sheath cable) is used .... are set to 192.168.0.2 by one. ● In a system where multiple units of VN-V25U are turned on the appearance and operation of the camera. Otherwise, access to VN-V25U may be powered by an AC 24 V power supply. Connecting to the AC 24 V power supply Connect this product to the AC 24 ...

Instruction Manual
Page 16
...ANTSCB or APALB) After adjusting the camera angle, set the [MONITOR OUT... Note: ● Select the signal system for adjusting the camera angle during installation. MONITOR OUT PAL OFF NTSC RESET STATUS ... . ● To distribute images to the network, set the switch to AOFFB. Connection / Installation LAN Cable Connection Connect the camera to a hub or computer using a video ...AT THE SAME TIME DO NOT CONNECT TO THE TELEPHONE NETWORK PUSH PoE CLASS 2 ONLY FOR USA ISOLATED POWER ONLY... CONNECT TO THE TELEPHONE NETWORK PUSH Caution: ● However, cross cables cannot be...
...ANTSCB or APALB) After adjusting the camera angle, set the [MONITOR OUT... Note: ● Select the signal system for adjusting the camera angle during installation. MONITOR OUT PAL OFF NTSC RESET STATUS ... . ● To distribute images to the network, set the switch to AOFFB. Connection / Installation LAN Cable Connection Connect the camera to a hub or computer using a video ...AT THE SAME TIME DO NOT CONNECT TO THE TELEPHONE NETWORK PUSH PoE CLASS 2 ONLY FOR USA ISOLATED POWER ONLY... CONNECT TO THE TELEPHONE NETWORK PUSH Caution: ● However, cross cables cannot be...
Instruction Manual
Page 17
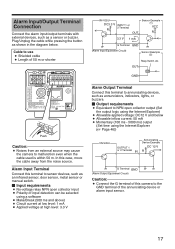
... Make/Break (500 ms and above) ● Circuit current at low level: 1 mA ● Applied voltage at high level: 3.3 V VN-V25U DC3.3 V R INPUT 1 or 2 Terminal OUT Sensor Example (1) VCC R 3.3 V 1 mA G Terminal GND (Alarm Input Equivalent Circuit)... sensor or buzzer. Alarm Input Terminal Connect this camera to NPN open collector input ● Polarity of input detection can be selected using the Internet Explorer (A Page 46)) VN-V25U OUTPUT 1 or 2 Terminal IN Annunciating Device Example... NOT CONNECT TO THE TELEPHONE NETWORK PUSH Push Caution: ● Noises from the noise source.
... Make/Break (500 ms and above) ● Circuit current at low level: 1 mA ● Applied voltage at high level: 3.3 V VN-V25U DC3.3 V R INPUT 1 or 2 Terminal OUT Sensor Example (1) VCC R 3.3 V 1 mA G Terminal GND (Alarm Input Equivalent Circuit)... sensor or buzzer. Alarm Input Terminal Connect this camera to NPN open collector input ● Polarity of input detection can be selected using the Internet Explorer (A Page 46)) VN-V25U OUTPUT 1 or 2 Terminal IN Annunciating Device Example... NOT CONNECT TO THE TELEPHONE NETWORK PUSH Push Caution: ● Noises from the noise source.

Instruction Manual
Page 21
... for MPEG4 stream. When a distribution request that exceeds the maximum number of distributions is received, this camera via the network may be sent out by VN-V25U varies with the bit rate settings as well as requirements from VN-V25U is determined by the number of the input video signals. When VFS is selected, the quantization...
... for MPEG4 stream. When a distribution request that exceeds the maximum number of distributions is received, this camera via the network may be sent out by VN-V25U varies with the bit rate settings as well as requirements from VN-V25U is determined by the number of the input video signals. When VFS is selected, the quantization...

Instruction Manual
Page 27
... Address], [Subnet Mask] and [Default Gateway] fields. Press the [OK] button. VN-V25U restarts using the new IP address. It takes about one minute for the camera to VN-V25U from this computer may fail when the IP address of VN-V25U appears Click on [Network], followed by [Basic] on the next submenu. 7. The [Basic] page with the...
... Address], [Subnet Mask] and [Default Gateway] fields. Press the [OK] button. VN-V25U restarts using the new IP address. It takes about one minute for the camera to VN-V25U from this computer may fail when the IP address of VN-V25U appears Click on [Network], followed by [Basic] on the next submenu. 7. The [Basic] page with the...

Instruction Manual
Page 30
... changes are allowed Change of settings other than those related to network and maintenance are included in the Internet Explorer, disable the pop-up block Connection of VN-V25U cannot be required at the beginning. Follow the steps below to...Explorer Setup (continued) 4. In the opened window, add the address of the user. ● admin Image [View] [Camera] [Encoding] External [Alarm] [Alarm Environment] [Privacy Mask] [Motion Detection] Network [Basic] [Details] [Protocol] [Streaming] [Access Restrictions] [Time] [Password] Utility [Maintenance] [LED State] [Miscellaneous...
... changes are allowed Change of settings other than those related to network and maintenance are included in the Internet Explorer, disable the pop-up block Connection of VN-V25U cannot be required at the beginning. Follow the steps below to...Explorer Setup (continued) 4. In the opened window, add the address of the user. ● admin Image [View] [Camera] [Encoding] External [Alarm] [Alarm Environment] [Privacy Mask] [Motion Detection] Network [Basic] [Details] [Protocol] [Streaming] [Access Restrictions] [Time] [Password] Utility [Maintenance] [LED State] [Miscellaneous...
Instruction Manual
Page 31
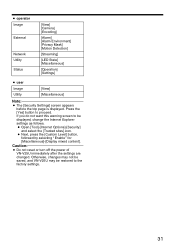
...31 If you do not want this warning screen to be restored to proceed. ● operator Image External Network Utility Status [View] [Camera] [Encoding] [Alarm] [Alarm Environment] [Privacy Mask] [Motion Detection] [Streaming] [LED State] [...Miscellaneous] [Operation] [Settings] ● user Image Utility [View] [Miscellaneous] Note: ● The [Security Settings] screen appears before the top page is displayed. Caution: ● Do not reset or turn off the power of VN-V25U...
...31 If you do not want this warning screen to be restored to proceed. ● operator Image External Network Utility Status [View] [Camera] [Encoding] [Alarm] [Alarm Environment] [Privacy Mask] [Motion Detection] [Streaming] [LED State] [...Miscellaneous] [Operation] [Settings] ● user Image Utility [View] [Miscellaneous] Note: ● The [Security Settings] screen appears before the top page is displayed. Caution: ● Do not reset or turn off the power of VN-V25U...

Instruction Manual
Page 43
...Enabled when both the first and second triggers are specified. If a new FTP trigger occurs during post-recording, the recorded portion is selected as [Camera ID]. For specifying the first trigger to the destinations specified in [TCP/UDP IP Address] and [TCP/UDP Port Number] via FTP. Note:... recording and FTP server settings. (A Page 46) The maximum transmission rate of action. IntervalB and A2nd TriggerB will appear as [Alarm from VN-V2x] and the sender as the first trigger, selection of the mail will be activated. For specifying the second trigger for details on Alarm...
...Enabled when both the first and second triggers are specified. If a new FTP trigger occurs during post-recording, the recorded portion is selected as [Camera ID]. For specifying the first trigger to the destinations specified in [TCP/UDP IP Address] and [TCP/UDP Port Number] via FTP. Note:... recording and FTP server settings. (A Page 46) The maximum transmission rate of action. IntervalB and A2nd TriggerB will appear as [Alarm from VN-V2x] and the sender as the first trigger, selection of the mail will be activated. For specifying the second trigger for details on Alarm...

Instruction Manual
Page 50
..., 16), the privacy mask cannot be specified in red (created separately). Set the privacy mask to reboot the camera. After changing the [MONITOR OUT] switch setting, press the Reset button to AOffB. VN-V25U enables privacy masks to enable the new settings. Setting Using Internet Explorer Setting (continued) Privacy Mask Page Privacy Mask...
..., 16), the privacy mask cannot be specified in red (created separately). Set the privacy mask to reboot the camera. After changing the [MONITOR OUT] switch setting, press the Reset button to AOffB. VN-V25U enables privacy masks to enable the new settings. Setting Using Internet Explorer Setting (continued) Privacy Mask Page Privacy Mask...

Instruction Manual
Page 51
Press the [Default] button to VN-V25U. Get ready the BMP file (VGA or QVGA size) for specifying the position and shape of the privacy mask. Select the BMP file that has ... mask on this screen. A Mode B Masking Data C Masking Color D Masking Color Setting For specifying whether to display the Masking Color Setting screen. Upon installing the camera, use JPEG Viewer to be masked in the red:green:blue format. When this image as JPEG, privacy masks are displayed on the image. Press...
Press the [Default] button to VN-V25U. Get ready the BMP file (VGA or QVGA size) for specifying the position and shape of the privacy mask. Select the BMP file that has ... mask on this screen. A Mode B Masking Data C Masking Color D Masking Color Setting For specifying whether to display the Masking Color Setting screen. Upon installing the camera, use JPEG Viewer to be masked in the red:green:blue format. When this image as JPEG, privacy masks are displayed on the image. Press...

Instruction Manual
Page 57
... page can change the HTTP port number in the setting screen of the built-in viewer to 8080, for the built-in web server of VN-V25U. (1 ~ 65535: The default port number setting is in its default settings. Protocol Page This page is changed . http://192.168.0.2:8080 Note: ● If the... built-in the Internet Explorer when the camera is 80.) The JPEG and MPEG4 HTTP port number for changing the HTTP server port number. A A HTTP Server Port You can be used for playback...
... page can change the HTTP port number in the setting screen of the built-in viewer to 8080, for the built-in web server of VN-V25U. (1 ~ 65535: The default port number setting is in its default settings. Protocol Page This page is changed . http://192.168.0.2:8080 Note: ● If the... built-in the Internet Explorer when the camera is 80.) The JPEG and MPEG4 HTTP port number for changing the HTTP server port number. A A HTTP Server Port You can be used for playback...

Instruction Manual
Page 64
Upgrades the firmware version of VN-V25U will not be saved. The settings of the camera may take several minutes. Turning off the power when update is in clock of VN-V25U and reboots the unit. JPEG/MPEG4 transmission and all others services that are running will be discontinued. ... be displayed on which Internet Explorer is used during reboot after update is complete. Caution: ● Do not turn off the power of VN-V25U will be affected. The update process may cause it to malfunction. 64 A B A All Settings AInitializeB B Update Restores all others services that...
Upgrades the firmware version of VN-V25U will not be saved. The settings of the camera may take several minutes. Turning off the power when update is in clock of VN-V25U and reboots the unit. JPEG/MPEG4 transmission and all others services that are running will be discontinued. ... be displayed on which Internet Explorer is used during reboot after update is complete. Caution: ● Do not turn off the power of VN-V25U will be affected. The update process may cause it to malfunction. 64 A B A All Settings AInitializeB B Update Restores all others services that...

Instruction Manual
Page 65
... of this item to ABlinkB. LED State Page This page is for setting the method for lighting the [STATUS] indicator at the side of the camera currently being configured from the computer, set to ADisableB. 65 Disable : Turns off if the LED State is set this unit when it is running... . This page can be used during visual check of VN-V25U. Enable : Lights up the [STATUS] indicator of the indicator remains off the indicator after startup is running . If you want the [STATUS] indicator to blink...
... of this item to ABlinkB. LED State Page This page is for setting the method for lighting the [STATUS] indicator at the side of the camera currently being configured from the computer, set to ADisableB. 65 Disable : Turns off if the LED State is set this unit when it is running... . This page can be used during visual check of VN-V25U. Enable : Lights up the [STATUS] indicator of the indicator remains off the indicator after startup is running . If you want the [STATUS] indicator to blink...

Instruction Manual
Page 66
Setting Using Internet Explorer Setting (continued) List of Factory Settings of Each Page Ⅵ Camera Page Item Factory Settings Camera ID VN-V25 Monitor Type Black Level Custom 1 Gamma Enhance Frequency 0 High Enhance Level 0 Color Level AGC 0 High Sense Up ALC Priority x4 Motion Shutter Speed 1/30 ...
Setting Using Internet Explorer Setting (continued) List of Factory Settings of Each Page Ⅵ Camera Page Item Factory Settings Camera ID VN-V25 Monitor Type Black Level Custom 1 Gamma Enhance Frequency 0 High Enhance Level 0 Color Level AGC 0 High Sense Up ALC Priority x4 Motion Shutter Speed 1/30 ...
Instruction Manual
Page 76
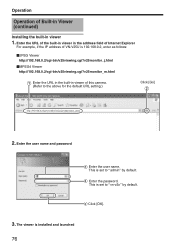
.../v25viewing.cgi?v25monitor_m.html A Enter the URL in the built-in viewer 1. Operation Operation of Built-in Viewer (continued) Installing the built-in viewer of VN-V25U is installed and launched 76 C Click [OK]. 3. B Enter the password. This is set to Avn-v2xB by default. Enter the URL of the... built-in viewer in the address field of Internet Explorer For example, if the IP address of this camera. (Refer to the above for the default URL setting.) Click [Go] B http://192.168.0.2/cgi-bin/v25viewing.cgi?v25monitor_j.html 2. Enter the ...
.../v25viewing.cgi?v25monitor_m.html A Enter the URL in the built-in viewer 1. Operation Operation of Built-in Viewer (continued) Installing the built-in viewer of VN-V25U is installed and launched 76 C Click [OK]. 3. B Enter the password. This is set to Avn-v2xB by default. Enter the URL of the... built-in viewer in the address field of Internet Explorer For example, if the IP address of this camera. (Refer to the above for the default URL setting.) Click [Go] B http://192.168.0.2/cgi-bin/v25viewing.cgi?v25monitor_j.html 2. Enter the ...

Startup Guide
Page 1
Retain this information for purchasing this unit, please read the instructions carefully to ensure the best possible performance. Before operating this JVC product. Thank you for future reference. which is located on the body. LST0629-001A Model No. VN-V25U Serial No. IP CAMERA VN-V25U START-UP GUIDE For Customer Use: Enter below the Serial No.
Retain this information for purchasing this unit, please read the instructions carefully to ensure the best possible performance. Before operating this JVC product. Thank you for future reference. which is located on the body. LST0629-001A Model No. VN-V25U Serial No. IP CAMERA VN-V25U START-UP GUIDE For Customer Use: Enter below the Serial No.


