
Instruction Manual America
Page 4
... time. Make sure your JVC receiver, please be sure to provide a clear explanation of explanation. For best results while pairing with a hard cloth or using a ball point pen or similar tool with a sharp tip. ÑÑCleaning the unit • If the faceplate of the phone, potentially affecting communication and performance. For this reason, they work in this manual • The screens...
... time. Make sure your JVC receiver, please be sure to provide a clear explanation of explanation. For best results while pairing with a hard cloth or using a ball point pen or similar tool with a sharp tip. ÑÑCleaning the unit • If the faceplate of the phone, potentially affecting communication and performance. For this reason, they work in this manual • The screens...
Instruction Manual America
Page 8
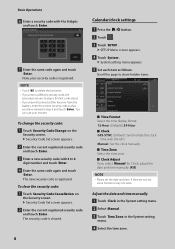
... screen. The new security code is cleared. 8 Calendar/clock settings 1 Press the [ ]/[ ] button. 2 Touch [ ]. 3 Touch [SETUP]. To clear the security code: 1 Touch [Security Code Cancellation] on the Security screen. hhSETUP Menu screen appears. 4 Touch [System]. hhSystem setting menu appears. 5 Set each item as that you have disconnected the Receiver from the battery, enter the correct security code as follows. Adjust the date and time manually 1 Touch [Clock] in the System setting menu. 2 Select [Manual]. 3 Touch [Time...
... screen. The new security code is cleared. 8 Calendar/clock settings 1 Press the [ ]/[ ] button. 2 Touch [ ]. 3 Touch [SETUP]. To clear the security code: 1 Touch [Security Code Cancellation] on the Security screen. hhSETUP Menu screen appears. 4 Touch [System]. hhSystem setting menu appears. 5 Set each item as that you have disconnected the Receiver from the battery, enter the correct security code as follows. Adjust the date and time manually 1 Touch [Clock] in the System setting menu. 2 Select [Manual]. 3 Touch [Time...
Instruction Manual America
Page 12
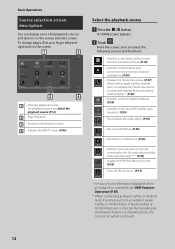
..., Android Auto, nor a Bluetooth Hands-Free phone is connected, displays Bluetooth pairing waiting dialog. *1 (P.52) • Switches to the HD Radio broadcast. (P.29) • Switches to the SiriusXM® satellite radio broadcast. (P.35) • Plays a Bluetooth audio player. (P.55) • Plays an iPod/iPhone. (P.26) • Plays files on a USB device. (P.23) • Switches to an external component connected to the AV Audio input and the Video input terminal. *2 *3 (P.49) • Displays the Wireless Mirroring screen. (P.22) • Turns off the AV source...
..., Android Auto, nor a Bluetooth Hands-Free phone is connected, displays Bluetooth pairing waiting dialog. *1 (P.52) • Switches to the HD Radio broadcast. (P.29) • Switches to the SiriusXM® satellite radio broadcast. (P.35) • Plays a Bluetooth audio player. (P.55) • Plays an iPod/iPhone. (P.26) • Plays files on a USB device. (P.23) • Switches to an external component connected to the AV Audio input and the Video input terminal. *2 *3 (P.49) • Displays the Wireless Mirroring screen. (P.22) • Turns off the AV source...
Instruction Manual America
Page 18
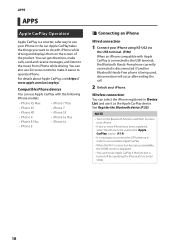
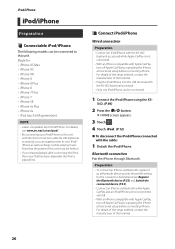
... can select the iPhone registered in [Device List] and use Siri voice control to make calls, send and receive messages, and listen to the music from iPhone while driving. See Register the Bluetooth device (P.52). You can get directions, make it as the [Apple CarPlay] source. (P.19) • It is necessary to connect the GPS antenna in the car. You can also use it easier to operate iPhone. If another Bluetooth Hands-Free phone...
... can select the iPhone registered in [Device List] and use Siri voice control to make calls, send and receive messages, and listen to the music from iPhone while driving. See Register the Bluetooth device (P.52). You can get directions, make it as the [Apple CarPlay] source. (P.19) • It is necessary to connect the GPS antenna in the car. You can also use it easier to operate iPhone. If another Bluetooth Hands-Free phone...
Instruction Manual America
Page 21
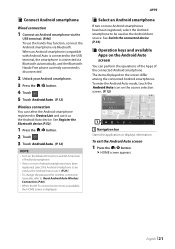
..., select the Android smartphone to be used as the Android Auto source. (P.21) • To change the password for wireless connection manually, refer to the USB terminal, the smartphone is displayed. See Switch the connected device (P.53). ÑÑOperation keys and available Apps on the Bluetooth function and Wi-Fi function of the connected Android smartphone. When an Android smartphone compatible with Android Auto is connected to [Reset Android Auto Wireless Connection] (P.64...
..., select the Android smartphone to be used as the Android Auto source. (P.21) • To change the password for wireless connection manually, refer to the USB terminal, the smartphone is displayed. See Switch the connected device (P.53). ÑÑOperation keys and available Apps on the Bluetooth function and Wi-Fi function of the connected Android smartphone. When an Android smartphone compatible with Android Auto is connected to [Reset Android Auto Wireless Connection] (P.64...
Instruction Manual America
Page 26
... operating the iPhone at functional setup before connecting iPhone. Preparation • To connect an iPhone via USB. • With an iPhone compatible with the iPod connection cable KS-U62 (optional accessory), you restart playback after connecting the iPod, the music that the power of iPod/iPhone. iPod/iPhone iPod/iPhone Preparation ÑÑConnectable iPod/iPhone The following models can be connected to your iPod/ iPhone as well as charge it as a Bluetooth device and do the profile setting for • iPhone XS Max • iPhone...
... operating the iPhone at functional setup before connecting iPhone. Preparation • To connect an iPhone via USB. • With an iPhone compatible with the iPod connection cable KS-U62 (optional accessory), you restart playback after connecting the iPod, the music that the power of iPod/iPhone. iPod/iPhone iPod/iPhone Preparation ÑÑConnectable iPod/iPhone The following models can be connected to your iPod/ iPhone as well as charge it as a Bluetooth device and do the profile setting for • iPhone XS Max • iPhone...
Instruction Manual America
Page 36
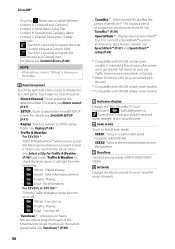
... display. 4 Function panel Touch the right side of songs from your city from the beginning. • (White) : Played already. • (Green) : New information arrived. • (Purple) : Playing. • (Gray) : No information. For details, see Select a City for 2 seconds to register the artist of the SiriusXM tuner. 6 Seek mode Touch to switch seek mode. • [SEEK1]: Tunes in the memorized stations one after power...
... display. 4 Function panel Touch the right side of songs from your city from the beginning. • (White) : Played already. • (Green) : New information arrived. • (Purple) : Playing. • (Gray) : No information. For details, see Select a City for 2 seconds to register the artist of the SiriusXM tuner. 6 Seek mode Touch to switch seek mode. • [SEEK1]: Tunes in the memorized stations one after power...
Instruction Manual America
Page 42
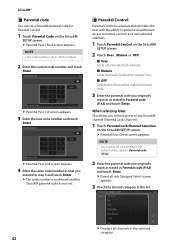
... code is set a SiriusXM parental code for Parental Control. 1 Touch [Parental Code] on the SiriusXM SETUP screen. hhParental Pass Check screen appears. NOTE • The code number is now set up a parental code beforehand as stated in Parental code (P.42). 2 Enter the parental code you to limit access to any SiriusXM channel (Parental Lock Channel). 1 Touch [Parental Lock Channel Selection] on the SiriusXM SETUP screen. When selecting [User] This allows you originally input...
... code is set a SiriusXM parental code for Parental Control. 1 Touch [Parental Code] on the SiriusXM SETUP screen. hhParental Pass Check screen appears. NOTE • The code number is now set up a parental code beforehand as stated in Parental code (P.42). 2 Enter the parental code you to limit access to any SiriusXM channel (Parental Lock Channel). 1 Touch [Parental Lock Channel Selection] on the SiriusXM SETUP screen. When selecting [User] This allows you originally input...
Instruction Manual America
Page 54
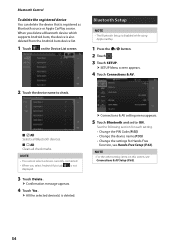
... delete a Bluetooth device which supports Android Auto, the device is also deleted from the Android Auto device list. 1 Touch [ ] on this screen, see Hands-Free Setup (P.62). See the following section for each setting. • Change the PIN Code (P.55) • Change the device name (P.55) • Change the settings for Hands-Free function, see Connections & AV Setup (P.63). 54 When you select Android Auto tab, [ ] is registered as Bluetooth source or Apple CarPlay source. Bluetooth Control To delete...
... delete a Bluetooth device which supports Android Auto, the device is also deleted from the Android Auto device list. 1 Touch [ ] on this screen, see Hands-Free Setup (P.62). See the following section for each setting. • Change the PIN Code (P.55) • Change the device name (P.55) • Change the settings for Hands-Free function, see Connections & AV Setup (P.63). 54 When you select Android Auto tab, [ ] is registered as Bluetooth source or Apple CarPlay source. Bluetooth Control To delete...
Instruction Manual America
Page 66
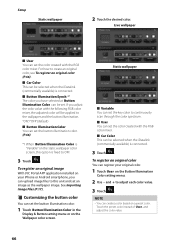
... iDatalink (commercially available) is "Variable" on a preset color. If you have selected at [Button Illumination Color] can set . Touch the preset color instead of [User], and adjust the color value. 66 Live wallpaper ■■ [User] You can set the color created with the RGB color mixer. To register an original image With JVC Portal APP application installed on the Button Illumination Color setting menu. 2 Use [-] and [+] to the wallpaper and the...
... iDatalink (commercially available) is "Variable" on a preset color. If you have selected at [Button Illumination Color] can set . Touch the preset color instead of [User], and adjust the color value. 66 Live wallpaper ■■ [User] You can set the color created with the RGB color mixer. To register an original image With JVC Portal APP application installed on the Button Illumination Color setting menu. 2 Use [-] and [+] to the wallpaper and the...
Instruction Manual America
Page 68
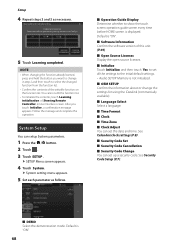
... change the settings for using the iDatalink (commercially available). ■■[Language Select] Select a language. ■■[Time Format] ■■ [Clock] ■■[Time Zone] ■■[Clock Adjust] You can setup System parameters. 1 Press the [ ]/[ ] button. 2 Touch [ ]. 3 Touch [SETUP]. You cannot edit the function list. • To initialize the contents, touch [Learning initialisation] of [Steering Remote Controller] in step 2 and then touch to select the changed function...
... change the settings for using the iDatalink (commercially available). ■■[Language Select] Select a language. ■■[Time Format] ■■ [Clock] ■■[Time Zone] ■■[Clock Adjust] You can setup System parameters. 1 Press the [ ]/[ ] button. 2 Touch [ ]. 3 Touch [SETUP]. You cannot edit the function list. • To initialize the contents, touch [Learning initialisation] of [Steering Remote Controller] in step 2 and then touch to select the changed function...

Instruction Manual America
Page 71
...; Set Volume Offset (P.78) • Set Sound Effect (P.78) • Use Audio Memory (P.82) NOTE • When the iDatalink (commercially available) is connected, the best audio settings are changed manually, touch [Audio SETUP Clear] in the Audio Memory setting menu. (P.82) Controlling Audio 3-way speaker system setup Select the appropriate crossover network mode for 1 second at the same time. 1 2 hhSpeaker system select screen appears. 5 Select the crossover network mode. Each parameter as audio balance or subwoofer level. 1 Press the [ ]/[ ] button. 2 Touch [ ]. 3 Touch [Audio...
...; Set Volume Offset (P.78) • Set Sound Effect (P.78) • Use Audio Memory (P.82) NOTE • When the iDatalink (commercially available) is connected, the best audio settings are changed manually, touch [Audio SETUP Clear] in the Audio Memory setting menu. (P.82) Controlling Audio 3-way speaker system setup Select the appropriate crossover network mode for 1 second at the same time. 1 2 hhSpeaker system select screen appears. 5 Select the crossover network mode. Each parameter as audio balance or subwoofer level. 1 Press the [ ]/[ ] button. 2 Touch [ ]. 3 Touch [Audio...
Instruction Manual America
Page 73
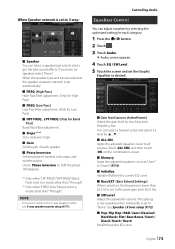
... SRC] Apply the adjusted equalizer curve to get the best sound effects. When the speaker type and size are selected, the speaker crossover network is set the Graphic Equalizer as "User1" to "User4". (P.74) ■■ [Initialize] Initialize (flatten) the current EQ curve. ■■[Bass EXT] (Bass Extend Settings) When turned on the confirmation screen. ■■ [Memory] Saves the adjusted equalizer curve as desired...
... SRC] Apply the adjusted equalizer curve to get the best sound effects. When the speaker type and size are selected, the speaker crossover network is set the Graphic Equalizer as "User1" to "User4". (P.74) ■■ [Initialize] Initialize (flatten) the current EQ curve. ■■[Bass EXT] (Bass Extend Settings) When turned on the confirmation screen. ■■ [Memory] Saves the adjusted equalizer curve as desired...
Instruction Manual America
Page 85
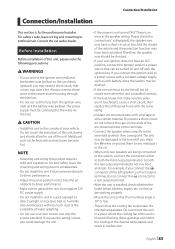
... ignition wires to direct sunlight or excessive heat or humidity. NOTE • Mounting and wiring this unit in the speaker wiring. Use only the screws provided. If you connect the ¢ connector of the left speaker to a front output terminal, do not connect the ¤ connector to both the front output terminals or to a rear output terminal. • After the unit is installed correctly. • If the fuse blows, first make...
... ignition wires to direct sunlight or excessive heat or humidity. NOTE • Mounting and wiring this unit in the speaker wiring. Use only the screws provided. If you connect the ¢ connector of the left speaker to a front output terminal, do not connect the ¤ connector to both the front output terminals or to a rear output terminal. • After the unit is installed correctly. • If the fuse blows, first make...

Instruction Manual America
Page 93
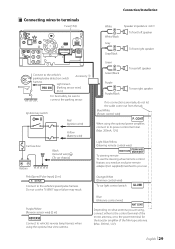
Blue/White (Power control wire) P. Purple/White (Reverse sensor wire) (2 m) REVERSE Connect to vehicle's reverse lamp harness when using the optional power amplifier, connect to its power control terminal. (Max. 200mA, 12V) Light Blue/Yellow (Steering remote control wire) REMOTE CONT STEERING WHEEL REMOTE INPUT To steering remote To use the steering wheel remote control feature, you are made, do not let the cable come out from the tab. Orange/White (Dimmer control wire) To car light control switch ILLUMI Blue (Antenna control wire) ANT CONT Depending on...
Blue/White (Power control wire) P. Purple/White (Reverse sensor wire) (2 m) REVERSE Connect to vehicle's reverse lamp harness when using the optional power amplifier, connect to its power control terminal. (Max. 200mA, 12V) Light Blue/Yellow (Steering remote control wire) REMOTE CONT STEERING WHEEL REMOTE INPUT To steering remote To use the steering wheel remote control feature, you are made, do not let the cable come out from the tab. Orange/White (Dimmer control wire) To car light control switch ILLUMI Blue (Antenna control wire) ANT CONT Depending on...
Instruction Manual America
Page 98
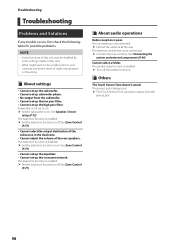
...; Cannot set up the subwoofer. • Cannot set to on. †† Set the subwoofer to be a malfunction in the dual zone. • Cannot adjust the volume of the rear speakers. The dual zone function is not set up subwoofer phase. • No output from the preout jack. 98 The preout jack is poor. See Zone Control (P.77). ÑÑAbout audio operations Radio reception is being used...
...; Cannot set up the subwoofer. • Cannot set to on. †† Set the subwoofer to be a malfunction in the dual zone. • Cannot adjust the volume of the rear speakers. The dual zone function is not set up subwoofer phase. • No output from the preout jack. 98 The preout jack is poor. See Zone Control (P.77). ÑÑAbout audio operations Radio reception is being used...
Quick Start Guide America
Page 7
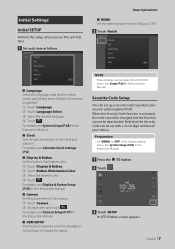
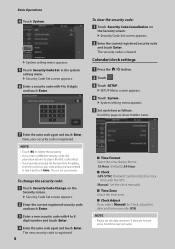
...be set up a security code to 8 digit number of the clock and adjusts it. For details, see Display & Button Setup (P.65) in the System setting menu. Initial Settings Initial SETUP Perform this setup when you use this unit first time. 1 Set each item and touch [ ]. Basic Operations ■■ [DEMO] Set the demonstration mode. For details, see Calendar/clock settings (P.8). ■■[Display & Button] Set the button illumination color. 1 Touch [Display & Button]. 2 Touch [Button Illumination Color]. 3 Select the desired color. 4 Touch [ ]. When the Security Code function...
...be set up a security code to 8 digit number of the clock and adjusts it. For details, see Display & Button Setup (P.65) in the System setting menu. Initial Settings Initial SETUP Perform this setup when you use this unit first time. 1 Set each item and touch [ ]. Basic Operations ■■ [DEMO] Set the demonstration mode. For details, see Calendar/clock settings (P.8). ■■[Display & Button] Set the button illumination color. 1 Touch [Display & Button]. 2 Touch [Button Illumination Color]. 3 Select the desired color. 4 Touch [ ]. When the Security Code function...
Quick Start Guide America
Page 8
... code is registered. 8 ■■[Time Format] Select the time display format. [12-Hour] (Default)/[24-Hour] ■■ [Clock] [GPS-SYNC] (Default): Synchronizes the clock time with 4 to step 6 (for Clock, adjust the date and time manually. (P.9) NOTE • Please set , some functions may not work. The new security code is registered. Now, your receiver. To clear the security code: 1 Touch [Security Code Cancellation] on the Security screen. hhSecurity Code Set screen...
... code is registered. 8 ■■[Time Format] Select the time display format. [12-Hour] (Default)/[24-Hour] ■■ [Clock] [GPS-SYNC] (Default): Synchronizes the clock time with 4 to step 6 (for Clock, adjust the date and time manually. (P.9) NOTE • Please set , some functions may not work. The new security code is registered. Now, your receiver. To clear the security code: 1 Touch [Security Code Cancellation] on the Security screen. hhSecurity Code Set screen...
Quick Start Guide America
Page 22
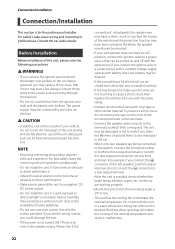
.... on the car are being connected to the system, connect the connectors either to both the rear output terminals (do not remove the caps on the ends of the vehicle and the protection function may be turned on and off with battery wires, the battery may start a fire. Do not mount the unit in a place where the cooling fan of the unit. Before Installation Before installation of the...
.... on the car are being connected to the system, connect the connectors either to both the rear output terminals (do not remove the caps on the ends of the vehicle and the protection function may be turned on and off with battery wires, the battery may start a fire. Do not mount the unit in a place where the cooling fan of the unit. Before Installation Before installation of the...
Quick Start Guide America
Page 29
... wire) Yellow (Battery wire) Car fuse box Black (Ground wire) ¤ (To car chassis) Battery Green Green/Black To rear left speaker To front right speaker Connect to the vehicle's parking brake detection switch Accessory 1 harness. Blue/White (Power control wire) P. Do not cut the "S SENS" tag or failure may result. Orange/White (Dimmer control wire) To car light control switch ILLUMI Blue (Antenna control wire) ANT CONT Depending on what antenna you need an exclusive remote adapter (not supplied) matched to your car. Light...
... wire) Yellow (Battery wire) Car fuse box Black (Ground wire) ¤ (To car chassis) Battery Green Green/Black To rear left speaker To front right speaker Connect to the vehicle's parking brake detection switch Accessory 1 harness. Blue/White (Power control wire) P. Do not cut the "S SENS" tag or failure may result. Orange/White (Dimmer control wire) To car light control switch ILLUMI Blue (Antenna control wire) ANT CONT Depending on what antenna you need an exclusive remote adapter (not supplied) matched to your car. Light...


