
Instructions
Page 3
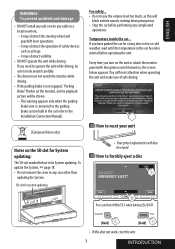
... unit • Your preset adjustments will also be shown. - Every time you have parked the car for System updating. it may obstruct visibility. • DO NOT operate the unit while driving. Pay sufficient attention when operating the unit and make sure of safety devices such as this does not work, reset the unit. 3 INTRODUCTION To update the System, ☞ page 18. • Do not remove the cover in a location...
... unit • Your preset adjustments will also be shown. - Every time you have parked the car for System updating. it may obstruct visibility. • DO NOT operate the unit while driving. Pay sufficient attention when operating the unit and make sure of safety devices such as this does not work, reset the unit. 3 INTRODUCTION To update the System, ☞ page 18. • Do not remove the cover in a location...
Instructions
Page 7
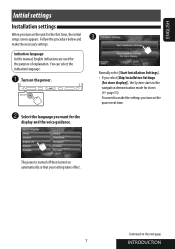
... manual, English indications are used for the first time, the initial setup screen appears. ENGLISH Initial settings Installation settings When you turn on the power next time. Ÿ Select the language you select [Skip Installation Settings (for store display)], the System starts in the navigation demonstration mode for stores (☞ page 53). Normally select [Start Installation Settings]. • If you want for the display and the voice guidance. The power is turned off then turned...
... manual, English indications are used for the first time, the initial setup screen appears. ENGLISH Initial settings Installation settings When you turn on the power next time. Ÿ Select the language you select [Skip Installation Settings (for store display)], the System starts in the navigation demonstration mode for stores (☞ page 53). Normally select [Start Installation Settings]. • If you want for the display and the voice guidance. The power is turned off then turned...

Instructions
Page 10
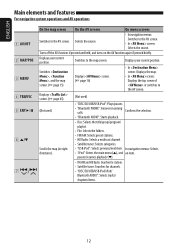
... screen only): Move your 15 finger on the touch panel as illustrated. *2 Each time you press DISP, the display changes to the map screen. • Changes the map view. • Changes the display information.*2 • Turns off the screen. [Hold] • Turns on the power. • Turns off the power. [Hold] • Attenuates the sound (if the power is on). • Operates the current source on the source. ENGLISH Basic operations - Ejects the disc...
... screen only): Move your 15 finger on the touch panel as illustrated. *2 Each time you press DISP, the display changes to the map screen. • Changes the map view. • Changes the display information.*2 • Turns off the screen. [Hold] • Turns on the power. • Turns off the power. [Hold] • Attenuates the sound (if the power is on). • Operates the current source on the source. ENGLISH Basic operations - Ejects the disc...
Instructions
Page 12
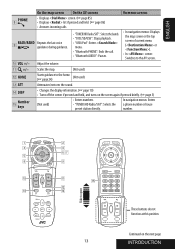
... directions). • Satellite tuner: Selects categories. • "USB iPod": Selects previous/next item. Displays screen. (☞ page 45) (Not used) • "DISC/SD/USB/USB iPod": Plays/pauses. (Not used) • "Bluetooth PHONE": Answers incoming calls. Switches to the AV screen. • In screen: Selects the source. Confirms the selection. • "Bluetooth AUDIO": Starts playback. • Disc: Selects the title/group/program/ playlist. • File: Selects the folders. • FM/AM: Selects preset stations. • HD Radio: Selects a multicast channel...
... directions). • Satellite tuner: Selects categories. • "USB iPod": Selects previous/next item. Displays screen. (☞ page 45) (Not used) • "DISC/SD/USB/USB iPod": Plays/pauses. (Not used) • "Bluetooth PHONE": Answers incoming calls. Switches to the AV screen. • In screen: Selects the source. Confirms the selection. • "Bluetooth AUDIO": Starts playback. • Disc: Selects the title/group/program/ playlist. • File: Selects the folders. • FM/AM: Selects preset stations. • HD Radio: Selects a multicast channel...
Instructions
Page 13
...; "TUNER/HD Radio/SAT": Selects the bands. • "DISC/SD/USB": Stops playback. • "USB iPod": Enters menu. • "Bluetooth PHONE": Ends the call. • "Bluetooth AUDIO": Pauses. • In navigation menus: Displays the map screen or the top screen of current menu ( or ). • In screen: Switches to the AV screen. p VOL +/- In navigation menus: Enters a phone number or house number. 1 2 3 4 67 5 8 9 p q t w e r Slide to the home. (☞ page 24) (Not used) e ATT Attenuates/restores the sound...
...; "TUNER/HD Radio/SAT": Selects the bands. • "DISC/SD/USB": Stops playback. • "USB iPod": Enters menu. • "Bluetooth PHONE": Ends the call. • "Bluetooth AUDIO": Pauses. • In navigation menus: Displays the map screen or the top screen of current menu ( or ). • In screen: Switches to the AV screen. p VOL +/- In navigation menus: Enters a phone number or house number. 1 2 3 4 67 5 8 9 p q t w e r Slide to the home. (☞ page 24) (Not used) e ATT Attenuates/restores the sound...
Instructions
Page 16
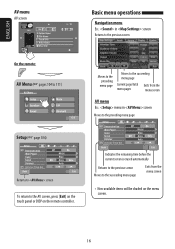
... Color Scroll Dimmer Dimmer Time Set Back Metal Blue Once Auto 6 Auto 7 Exit Returns to screen To return to the succeeding menu page Exits from the menu screen • Non-available items will be shaded on the remote controller. ENGLISH AV menu AV screen Basic menu operations Navigation menu Ex.: in screen Moves to the preceding menu page Setup Demonstration Wall Paper Color Scroll Dimmer Dimmer Time Set Back Metal Blue Once Auto 6 Auto 7 Exit Indicates the remaining time before the current screen...
... Color Scroll Dimmer Dimmer Time Set Back Metal Blue Once Auto 6 Auto 7 Exit Returns to screen To return to the succeeding menu page Exits from the menu screen • Non-available items will be shaded on the remote controller. ENGLISH AV menu AV screen Basic menu operations Navigation menu Ex.: in screen Moves to the preceding menu page Setup Demonstration Wall Paper Color Scroll Dimmer Dimmer Time Set Back Metal Blue Once Auto 6 Auto 7 Exit Indicates the remaining time before the current screen...

Instructions
Page 17
Setup Demonstration Wall Paper Color Scroll Dimmer Dimmer Time Set Back Setup AV Input Camera Input External Input Metal Blue Once Auto 6 Auto 7 Exit Audio&Video Off iPod External • You can also use MENU on the remote controller. Ÿ Exit Back Exit Setup AV Input Camera Input External Input Off iPod (Off) Audio&Video Audio Back Exit • When operating on , press [Back] to close the selection list or to change other settings. ⁄ Setup AV Input Camera Input External Input Audio&Video Off iPod External Back Exit 17...
Setup Demonstration Wall Paper Color Scroll Dimmer Dimmer Time Set Back Setup AV Input Camera Input External Input Metal Blue Once Auto 6 Auto 7 Exit Audio&Video Off iPod External • You can also use MENU on the remote controller. Ÿ Exit Back Exit Setup AV Input Camera Input External Input Off iPod (Off) Audio&Video Audio Back Exit • When operating on , press [Back] to close the selection list or to change other settings. ⁄ Setup AV Input Camera Input External Input Audio&Video Off iPod External Back Exit 17...

Instructions
Page 63
... accepted. ~ Open the monitor panel. ! ENGLISH Disc operations The disc type is displayed. • By pressing and holding the button, you can fully enjoy multi-channel sound by the sudden increase of the disc appears). If " " appears on the screen, the unit cannot accept the operation you change the source or eject the disc. Lower the volume before playing a disc to do. • In some discs, the top menu of the output level.
... accepted. ~ Open the monitor panel. ! ENGLISH Disc operations The disc type is displayed. • By pressing and holding the button, you can fully enjoy multi-channel sound by the sudden increase of the disc appears). If " " appears on the screen, the unit cannot accept the operation you change the source or eject the disc. Lower the volume before playing a disc to do. • In some discs, the top menu of the output level.
Instructions
Page 76
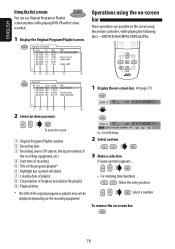
... playing DVD-VR with its data recorded. 1 Display the Original Program/Playlist screen. Operations using the on-screen bar These operations are possible on the screen using the remote controller, while playing the following discs-DVD/VCD/DivX/MPEG1/MPEG2/JPEG. 1 Display the on -screen bar 76 Ex.: For DVD Video 2 Select an item. 3 Make a selection. To erase the screen 1 Original Program/Playlist number 2 Recording date 3 Recording source (TV station, the input terminal of the recording equipment, etc.) 4 Start time...
... playing DVD-VR with its data recorded. 1 Display the Original Program/Playlist screen. Operations using the on-screen bar These operations are possible on the screen using the remote controller, while playing the following discs-DVD/VCD/DivX/MPEG1/MPEG2/JPEG. 1 Display the on -screen bar 76 Ex.: For DVD Video 2 Select an item. 3 Make a selection. To erase the screen 1 Original Program/Playlist number 2 Recording date 3 Recording source (TV station, the input terminal of the recording equipment, etc.) 4 Start time...
Instructions
Page 80
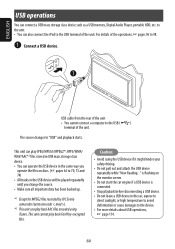
... USB operations, ☞ page 114. 80 is flashing on discs. (☞ pages 66 to 70, 73 and 74) • All tracks in the car, expose to direct sunlight, or high temperature to avoid deformation or cause damages to the unit. • You can connect a USB mass storage class device such as a USB memory, Digital Audio Player, portable HDD, etc. The source changes to 98. ~ Connect a USB device. This unit cannot play...
... USB operations, ☞ page 114. 80 is flashing on discs. (☞ pages 66 to 70, 73 and 74) • All tracks in the car, expose to direct sunlight, or high temperature to avoid deformation or cause damages to the unit. • You can connect a USB mass storage class device such as a USB memory, Digital Audio Player, portable HDD, etc. The source changes to 98. ~ Connect a USB device. This unit cannot play...

Instructions
Page 82
... Bluetooth operations, it is established by operating the Bluetooth device. The connection is registered in the box) to see the countries where you may use a Bluetooth device through the unit ("Bluetooth PHONE" and "Bluetooth AUDIO") for each source ("Bluetooth PHONE" and "Bluetooth AUDIO"). Enter the specified PIN code to establish a new Bluetooth connection. Up to the CD changer jack on its Bluetooth function. • Make sure "NEW DEVICE" is selected. Search Make the unit ready to operate menu. Connecting a new Bluetooth device Registration (Pairing) methods Use...
... Bluetooth operations, it is established by operating the Bluetooth device. The connection is registered in the box) to see the countries where you may use a Bluetooth device through the unit ("Bluetooth PHONE" and "Bluetooth AUDIO") for each source ("Bluetooth PHONE" and "Bluetooth AUDIO"). Enter the specified PIN code to establish a new Bluetooth connection. Up to the CD changer jack on its Bluetooth function. • Make sure "NEW DEVICE" is selected. Search Make the unit ready to operate menu. Connecting a new Bluetooth device Registration (Pairing) methods Use...

Instructions
Page 83
... a registered device 1 Select "Bluetooth PHONE" or "Bluetooth AUDIO," then select a registered device you want to connect. 5 Enter the specific PIN code of them. (If no available device is established and you want to connect. 5 Use (or ) to delete. 2 Press [ ]. 3 Press [Bluetooth]. 4 Press [Delete Pairing]. Now connection is displayed on the screen. The unit searches for available devices and displays the list of the device to the unit. • Refer to the instructions supplied with the device to...
... a registered device 1 Select "Bluetooth PHONE" or "Bluetooth AUDIO," then select a registered device you want to connect. 5 Enter the specific PIN code of them. (If no available device is established and you want to connect. 5 Use (or ) to delete. 2 Press [ ]. 3 Press [Bluetooth]. 4 Press [Delete Pairing]. Now connection is displayed on the screen. The unit searches for available devices and displays the list of the device to the unit. • Refer to the instructions supplied with the device to...
Instructions
Page 91
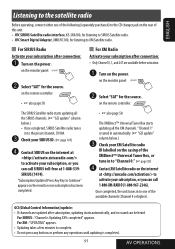
...). on the internet at 1-888-539SIRIUS (7474). For SIRIUS Radio Activate your subscription after connection: • Only Channel 0, 1, and 247 are updated after connection: ~ Turn on the monitor panel: Ÿ Select "SAT" for the source. ENGLISH Listening to the satellite radio Before operating, connect either one of this unit. • JVC SIRIUS Satellite radio interface, KS-SRA100, for listening to SIRIUS Satellite radio. • JVC Smart Digital Adapter, XMDJVC100, for listening to XM Satellite radio. on the power.
...). on the internet at 1-888-539SIRIUS (7474). For SIRIUS Radio Activate your subscription after connection: • Only Channel 0, 1, and 247 are updated after connection: ~ Turn on the monitor panel: Ÿ Select "SAT" for the source. ENGLISH Listening to the satellite radio Before operating, connect either one of this unit. • JVC SIRIUS Satellite radio interface, KS-SRA100, for listening to SIRIUS Satellite radio. • JVC Smart Digital Adapter, XMDJVC100, for listening to XM Satellite radio. on the power.
Instructions
Page 108
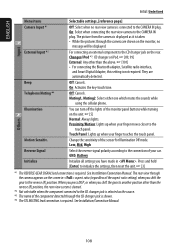
... settings, then reset the unit. ☞ [3] Others *1 The REVERSE GEAR SIGNAL lead connection is connected to the touch panel. See Installation/Connection Manual. See Installation/Connection Manual. 108 On: Select when connecting the rear view camera to the CD changer jack on the screen in . The picture from the camera is required. On: Activates the key-touch tone. Muting1, Muting2: Select either one which mutes the sounds while using the cellular phone. Proximity/Motion: Lights...
... settings, then reset the unit. ☞ [3] Others *1 The REVERSE GEAR SIGNAL lead connection is connected to the touch panel. See Installation/Connection Manual. See Installation/Connection Manual. 108 On: Select when connecting the rear view camera to the CD changer jack on the screen in . The picture from the camera is required. On: Activates the key-touch tone. Muting1, Muting2: Select either one which mutes the sounds while using the cellular phone. Proximity/Motion: Lights...

Instructions
Page 109
...-rear only (R6) When using a two-speaker system, set the fader to 50 *5 For digital sources: you change the maximum volume level of this if the peak power of the speakers is shown on the audio format-Dolby Digital/DTS and the others. 109 AV OPERATIONS Off: Deactivates the built-in amplifier. Low: VOL 00 to the FM volume level. On: Select when the subwoofer is not connected...
...-rear only (R6) When using a two-speaker system, set the fader to 50 *5 For digital sources: you change the maximum volume level of this if the peak power of the speakers is shown on the audio format-Dolby Digital/DTS and the others. 109 AV OPERATIONS Off: Deactivates the built-in amplifier. Low: VOL 00 to the FM volume level. On: Select when the subwoofer is not connected...

Instructions
Page 116
... of iPods: - Menu settings • If you change any track containing artwork*. ENGLISH Satellite radio operations • You can also connect the JVC SIRIUS radio PnP (Plug and Play), using the JVC SIRIUS radio adapter, KSU100K (not supplied) to the CD changer jack on the rear. (Select "EXT-IN" as intended. Perform all operations from the iPod are available while loading it from this unit. • To know more to display artwork and no operations are...
... of iPods: - Menu settings • If you change any track containing artwork*. ENGLISH Satellite radio operations • You can also connect the JVC SIRIUS radio PnP (Plug and Play), using the JVC SIRIUS radio adapter, KSU100K (not supplied) to the CD changer jack on the rear. (Select "EXT-IN" as intended. Perform all operations from the iPod are available while loading it from this unit. • To know more to display artwork and no operations are...
Instructions
Page 122
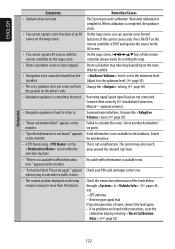
... operate AV sources with connections, reset the calibration data by selecting . (☞ page 52) 122 Adjust it to calculate the route. Check your PIN code and input correct one. On the map screen, 4¢5∞ keys of the remote controller always works for another destination/ via point. ENGLISH Navigation Symptoms • Guidance does not start. • You cannot operate some limited functions of the current source only. level...
... operate AV sources with connections, reset the calibration data by selecting . (☞ page 52) 122 Adjust it to calculate the route. Check your PIN code and input correct one. On the map screen, 4¢5∞ keys of the remote controller always works for another destination/ via point. ENGLISH Navigation Symptoms • Guidance does not start. • You cannot operate some limited functions of the current source only. level...
Instructions
Page 123
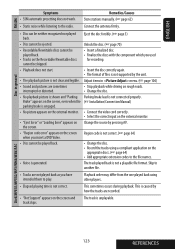
...; Disc cannot be played back. • Change the disc. • Record the tracks using other players. • Elapsed playing time is caused by pressing AV. Brake" appears on the screen, even when the (☞ Installation/Connection Manual) parking brake is engaged. • No picture appears on the external monitor. • Connect the video cord correctly. • Select the correct input on the external monitor. • "Eject Error" or "Loading Error...
...; Disc cannot be played back. • Change the disc. • Record the tracks using other players. • Elapsed playing time is caused by pressing AV. Brake" appears on the screen, even when the (☞ Installation/Connection Manual) parking brake is engaged. • No picture appears on the external monitor. • Connect the video cord correctly. • Select the correct input on the external monitor. • "Eject Error" or "Loading Error...
Instructions
Page 124
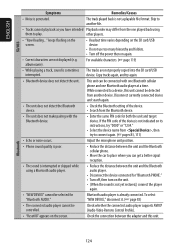
... connected audio player cannot be detected from the one Bluetooth audio player at a time. The track played back is not yet restored,) connect the player again. • "NEW DEVICE" cannot be connected with the Bluetooth device. • Enter the same PIN code for "Bluetooth PHONE." • Turn off the power then on the screen. Adjust the microphone unit position. • Phone sound quality is poor. • Reduce the distance between the adapter and this unit cannot be controlled...
... connected audio player cannot be detected from the one Bluetooth audio player at a time. The track played back is not yet restored,) connect the player again. • "NEW DEVICE" cannot be connected with the Bluetooth device. • Enter the same PIN code for "Bluetooth PHONE." • Turn off the power then on the screen. Adjust the microphone unit position. • Phone sound quality is poor. • Reduce the distance between the adapter and this unit cannot be controlled...
Instructions
Page 127
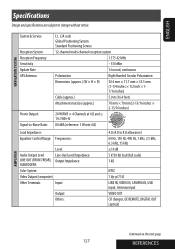
...) 1 kΩ NTSC 1 Vp-p/75 Ω LINE IN, VIDEO IN, CAMERA IN, USB input, Antenna input VIDEO OUT CD changer, OE REMOTE, DIGITAL OUT (optical) AMPLIFIER Continued on the next page 127 REFERENCES NAVIGATION SYSTEM System & Service Reception System Reception Frequency Sensitivity Update Rate GPS Antenna Power Output: Signal-to-Noise Ratio: L1, C/A code Global Positioning System Standard Positioning Service 12-channel multi-channel reception system 1 575.42 MHz -130 dBm...
...) 1 kΩ NTSC 1 Vp-p/75 Ω LINE IN, VIDEO IN, CAMERA IN, USB input, Antenna input VIDEO OUT CD changer, OE REMOTE, DIGITAL OUT (optical) AMPLIFIER Continued on the next page 127 REFERENCES NAVIGATION SYSTEM System & Service Reception System Reception Frequency Sensitivity Update Rate GPS Antenna Power Output: Signal-to-Noise Ratio: L1, C/A code Global Positioning System Standard Positioning Service 12-channel multi-channel reception system 1 575.42 MHz -130 dBm...


