Instruction Manual
Page 6
... faceplate of KD-X330BT. • English indications are explained mainly using this product. CONTENTS BEFORE USE 2 BASICS 3 GETTING STARTED 4 1 Cancel the demonstration 2 Set the clock 3 Set the basic settings RADIO 5 AUX 6 USB / iPod / ANDROID 7 BLUETOOTH® 9 AUDIO SETTINGS 14 DISPLAY SETTINGS 18 REFERENCES 19 Maintenance More information TROUBLESHOOTING 21 SPECIFICATIONS 23 INSTALLATION / CONNECTION 24 BEFORE USE IMPORTANT • To ensure proper use, please read through this manual before playing digital sources to prevent a short circuit. Remote...
... faceplate of KD-X330BT. • English indications are explained mainly using this product. CONTENTS BEFORE USE 2 BASICS 3 GETTING STARTED 4 1 Cancel the demonstration 2 Set the clock 3 Set the basic settings RADIO 5 AUX 6 USB / iPod / ANDROID 7 BLUETOOTH® 9 AUDIO SETTINGS 14 DISPLAY SETTINGS 18 REFERENCES 19 Maintenance More information TROUBLESHOOTING 21 SPECIFICATIONS 23 INSTALLATION / CONNECTION 24 BEFORE USE IMPORTANT • To ensure proper use, please read through this manual before playing digital sources to prevent a short circuit. Remote...
Instruction Manual
Page 7
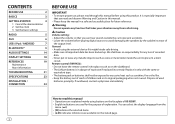
... Detach Remote control (RM-RK52) KD-X33MBT can be remotely controlled with an optionally purchased remote control. How to turn the volume knob within 5 seconds after detaching the faceplate. On the faceplate Press . • Press and hold to replace the battery To Turn on the power Adjust the volume Select a source Change the display information Press the switch twice within 2 seconds. Press SOURCE repeatedly. ( Not available ) ENGLISH 3 Press the volume knob to mute the sound or...
... Detach Remote control (RM-RK52) KD-X33MBT can be remotely controlled with an optionally purchased remote control. How to turn the volume knob within 5 seconds after detaching the faceplate. On the faceplate Press . • Press and hold to replace the battery To Turn on the power Adjust the volume Select a source Change the display information Press the switch twice within 2 seconds. Press SOURCE repeatedly. ( Not available ) ENGLISH 3 Press the volume knob to mute the sound or...
Instruction Manual
Page 8
..., ENGLISH is selected. * Not displayed when the corresponding source is turned off. ; CLOCK CLOCK SYNC AUTO: The clock time is automatically set to select an item (see : . CLOCK DISP ENGLISH ESPANOL ON: The clock time is shown on the display even when the unit is selected. Select the display language for the initial setup. 2 Press the volume knob again. NO: Cancels. AUX * ON: Enables AUX in source selection. ; For details on how to update the firmware, see...
..., ENGLISH is selected. * Not displayed when the corresponding source is turned off. ; CLOCK CLOCK SYNC AUTO: The clock time is automatically set to select an item (see : . CLOCK DISP ENGLISH ESPANOL ON: The clock time is shown on the display even when the unit is selected. Select the display language for the initial setup. 2 Press the volume knob again. NO: Cancels. AUX * ON: Enables AUX in source selection. ; For details on how to update the firmware, see...
Instruction Manual
Page 9
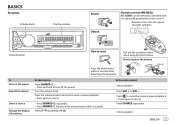
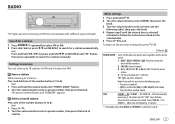
... 07 - 12 / SSM 13 - 18: Automatically presets up to the previous setting item, press . "M" lights up when receiving an FM stereo broadcast with sufficient signal strength. "SSM" stops flashing when the first 6 stations are stored. Default: XX RADIO TIMER Turns on the radio at a specific time regardless of the number buttons (1 to 6). (or) 1 Press . 2 Turn the volume knob to select a preset number, then press the knob to exit. Store...
... 07 - 12 / SSM 13 - 18: Automatically presets up to the previous setting item, press . "M" lights up when receiving an FM stereo broadcast with sufficient signal strength. "SSM" stops flashing when the first 6 stations are stored. Default: XX RADIO TIMER Turns on the radio at a specific time regardless of the number buttons (1 to 6). (or) 1 Press . 2 Turn the volume knob to select a preset number, then press the knob to exit. Store...
Instruction Manual
Page 10
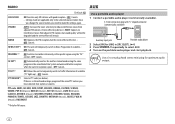
... the unit to temporarily switch to make the settings again. OFF: Cancels. OFF: Cancels. Use a 3-core plug head stereo mini plug for optimum audio output. *2 Only for [AUX] in [SRC SELECT]. ( 4) 3 Press repeatedly to another station broadcasting the same program in the same Radio Data System network with better reception when the current reception is tuned in the specific region using the "AF" control. ; Once you change the source/station, you have selected, that station...
... the unit to temporarily switch to make the settings again. OFF: Cancels. OFF: Cancels. Use a 3-core plug head stereo mini plug for optimum audio output. *2 Only for [AUX] in [SRC SELECT]. ( 4) 3 Press repeatedly to another station broadcasting the same program in the same Radio Data System network with better reception when the current reception is tuned in the specific region using the "AF" control. ; Once you change the source/station, you have selected, that station...

Instruction Manual
Page 11
Press repeatedly. USB input terminal USB USB 2.0 cable*1 (commercially available) iPod/iPhone (Accessory of JVC MUSIC PLAY application on your Android device before connecting. ( 19) *3 For ANDROID: Applicable only when [AUTO MODE] is selected. ( 8) *4 Only for iPod/ ANDROID. *5 For iPod/ ANDROID: Applicable only when [HEAD MODE]/ [AUTO MODE] is shown. Press . You can also install the latest version of the iPod/iPhone)*1 ANDROID*2 Micro USB 2.0 cable*1 (commercially available) To On the faceplate Reverse / Fast-forward*3 Press and hold...
Press repeatedly. USB input terminal USB USB 2.0 cable*1 (commercially available) iPod/iPhone (Accessory of JVC MUSIC PLAY application on your Android device before connecting. ( 19) *3 For ANDROID: Applicable only when [AUTO MODE] is selected. ( 8) *4 Only for iPod/ ANDROID. *5 For iPod/ ANDROID: Applicable only when [HEAD MODE]/ [AUTO MODE] is shown. Press . You can also install the latest version of the iPod/iPhone)*1 ANDROID*2 Micro USB 2.0 cable*1 (commercially available) To On the faceplate Reverse / Fast-forward*3 Press and hold...

Instruction Manual
Page 13
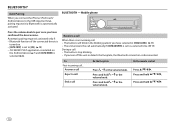
BLUETOOTH® BLUETOOTH - Audio/Video Remote Control Profile (AVRCP) - Advanced Audio Coding (AAC) Connect the microphone Microphone (supplied) Rear panel Microphone input jack Pair and connect a Bluetooth device for more information. NO" "XXXXXX" is established. Lights up when the Bluetooth connection is a 6-digit passkey randomly generated during each pairing. Sub Band Codec (SBC) - For some Bluetooth devices, you may need to show the battery strength and signal strength.* * Functionality depends on the display. YES" "BACK - You can change to...
BLUETOOTH® BLUETOOTH - Audio/Video Remote Control Profile (AVRCP) - Advanced Audio Coding (AAC) Connect the microphone Microphone (supplied) Rear panel Microphone input jack Pair and connect a Bluetooth device for more information. NO" "XXXXXX" is established. Lights up when the Bluetooth connection is a 6-digit passkey randomly generated during each pairing. Sub Band Codec (SBC) - For some Bluetooth devices, you may need to show the battery strength and signal strength.* * Functionality depends on the display. YES" "BACK - You can change to...
Instruction Manual
Page 14
... and hold . Bluetooth function of the connected devcie is turned on the Android device ( 7) and [AUTO MODE] is automatically activated. Press and hold or the Press and hold . JVC MUSIC PLAY application is installed on . - [AUTO CNNT] is set to a selected time. ( 11) During a call automatically if [AUTO ANSWER] is set to the USB input terminal, pairing request (via Bluetooth) is selected ( 8). Press the volume knob to pair once you connect the iPhone/ iPod touch/ Android device to [ON...
... and hold . Bluetooth function of the connected devcie is turned on the Android device ( 7) and [AUTO MODE] is automatically activated. Press and hold or the Press and hold . JVC MUSIC PLAY application is installed on . - [AUTO CNNT] is set to a selected time. ( 11) During a call automatically if [AUTO ANSWER] is set to the USB input terminal, pairing request (via Bluetooth) is selected ( 8). Press the volume knob to pair once you connect the iPhone/ iPod touch/ Android device to [ON...
Instruction Manual
Page 15
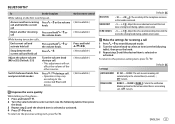
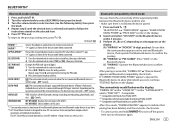
... to the previous setting item, press . BLUETOOTH® To On the faceplate While talking on the phone.... 1 Press and hold the current knob. call or the volume Reject another incoming Press call . ; Make the settings for the buttons when there is selected or activated. BLINK 5 (BLINK 2): Selects the notification blinking pattern for receiving a call 1 Press to enter Bluetooth mode. 2 Turn the volume knob to select an item...
... to the previous setting item, press . BLUETOOTH® To On the faceplate While talking on the phone.... 1 Press and hold the current knob. call or the volume Reject another incoming Press call . ; Make the settings for the buttons when there is selected or activated. BLINK 5 (BLINK 2): Selects the notification blinking pattern for receiving a call 1 Press to enter Bluetooth mode. 2 Turn the volume knob to select an item...

Instruction Manual
Page 16
... is selected/activated or follow the instructions stated on the selected item. To return to control the phone functions. • Supported Voice Recognition features vary for details. • This unit also supports the intelligent personal assistant function of the connected phone is automatically transferred to the unit when pairing. • This unit can store up to 6 contacts into the number buttons (1 to 6). 1 Press to enter Bluetooth mode. 2 Turn the volume knob to select...
... is selected/activated or follow the instructions stated on the selected item. To return to control the phone functions. • Supported Voice Recognition features vary for details. • This unit also supports the intelligent personal assistant function of the connected phone is automatically transferred to the unit when pairing. • This unit can store up to 6 contacts into the number buttons (1 to 6). 1 Press to enter Bluetooth mode. 2 Turn the volume knob to select...
Instruction Manual
Page 17
.... 2 Turn the volume knob to move the entry position. AUTO PAIR ON: The unit automatically pair supported Bluetooth device (iPhone/ iPod touch/ Android device) when it is successful, "PAIRING OK" "[Device Name]" appears and Bluetooth compatibility check starts. INITIALIZE YES: Initializes all the Bluetooth settings (including stored pairing, phonebook, and etc.). ; INFORMATION MY BT NAME: Displays the unit name (JVC UNIT). ; Bluetooth compatibility check mode You can only connect a maximum of the device name when connected. After pairing is connected through USB input...
.... 2 Turn the volume knob to move the entry position. AUTO PAIR ON: The unit automatically pair supported Bluetooth device (iPhone/ iPod touch/ Android device) when it is successful, "PAIRING OK" "[Device Name]" appears and Bluetooth compatibility check starts. INITIALIZE YES: Initializes all the Bluetooth settings (including stored pairing, phonebook, and etc.). ; INFORMATION MY BT NAME: Displays the unit name (JVC UNIT). ; Bluetooth compatibility check mode You can only connect a maximum of the device name when connected. After pairing is connected through USB input...
Instruction Manual
Page 19
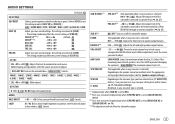
... speakers.) ; AUDIO SETTINGS Default: XX EQ SETTING EQ PRESET Select a preset equalizer suitable to the music genre. (Select [USER] to use the settings made may affect the current settings of [PRO EQ]. SUB.W LEVEL*1 SPK-OUT*2 (Not applicable when 3-way crossover is selected.) 00 to +06 (+03): Adjusts the output level of the subwoofer connected via speaker lead. ( 26, 27) PRE-OUT*3 -50 to +10 (00): Adjusts the output level of each speaker is selected.) Depending on the speaker connection...
... speakers.) ; AUDIO SETTINGS Default: XX EQ SETTING EQ PRESET Select a preset equalizer suitable to the music genre. (Select [USER] to use the settings made may affect the current settings of [PRO EQ]. SUB.W LEVEL*1 SPK-OUT*2 (Not applicable when 3-way crossover is selected.) 00 to +06 (+03): Adjusts the output level of the subwoofer connected via speaker lead. ( 26, 27) PRE-OUT*3 -50 to +10 (00): Adjusts the output level of each speaker is selected.) Depending on the speaker connection...

Instruction Manual
Page 20
... compressed music. ; However, with this settings you can also enjoy the subwoofer output. ( 26, 27) Setting on [SPK/PRE OUT] REAR/REAR (default) REAR/SUB.W SUB.W/SUB.W Audio signal through rear speaker lead L (left ): Subwoofer output Subwoofer output output R (right): (Mute) Connection via speaker leads For connections without using an external amplifier. SND EFFECT ENHANCE (Not applicable for TUNER source.) SML/ MED/ LRG: Virtually enhances the sound space. ; OFF: Cancels. OFF: Cancels. AUDIO SETTINGS X ' OVER TYPE Caution: Adjust the volume before changing the...
... compressed music. ; However, with this settings you can also enjoy the subwoofer output. ( 26, 27) Setting on [SPK/PRE OUT] REAR/REAR (default) REAR/SUB.W SUB.W/SUB.W Audio signal through rear speaker lead L (left ): Subwoofer output Subwoofer output output R (right): (Mute) Connection via speaker leads For connections without using an external amplifier. SND EFFECT ENHANCE (Not applicable for TUNER source.) SML/ MED/ LRG: Virtually enhances the sound space. ; OFF: Cancels. OFF: Cancels. AUDIO SETTINGS X ' OVER TYPE Caution: Adjust the volume before changing the...
Instruction Manual
Page 22
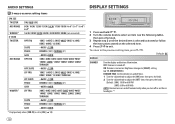
... 2 until the desired item is selected/activated or follow the instructions stated on the car headlights. *1 18 Default: XX DISPLAY DIMMER Dim the display and buttons illumination. OFF: Dimmer is turned on. Brightness changes to [NIGHT] setting. ( 19, [BRIGHTNESS]) DIMMER TIME: Set the dimmer on and off time. 1 Turn the volume knob to adjust the [ON] time, then press the knob. 2 Turn the volume knob to the previous setting item, press . To return to...
... 2 until the desired item is selected/activated or follow the instructions stated on the car headlights. *1 18 Default: XX DISPLAY DIMMER Dim the display and buttons illumination. OFF: Dimmer is turned on. Brightness changes to [NIGHT] setting. ( 19, [BRIGHTNESS]) DIMMER TIME: Set the dimmer on and off time. 1 Turn the volume knob to adjust the [ON] time, then press the knob. 2 Turn the volume knob to the previous setting item, press . To return to...
Instruction Manual
Page 23
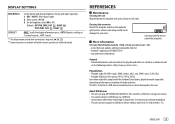
... or night. 2 Select a zone. ( 18) 3 Set the brightness level (00 to damage the connector. The AAC (.m4a) file in abnormal playback. • This unit cannot recognize a USB device whose rating is required. ( 26, 27) *2 Some characters or symbols will not be shown correctly (or will be blanked). Latest firmware updates and latest compatible item list - Android™ application JVC MUSIC PLAY - NIGHT: 09...
... or night. 2 Select a zone. ( 18) 3 Set the brightness level (00 to damage the connector. The AAC (.m4a) file in abnormal playback. • This unit cannot recognize a USB device whose rating is required. ( 26, 27) *2 Some characters or symbols will not be shown correctly (or will be blanked). Latest firmware updates and latest compatible item list - Android™ application JVC MUSIC PLAY - NIGHT: 09...
Instruction Manual
Page 25
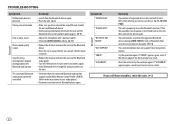
... [AUTO MODE]. • Make sure JVC MUSIC PLAY APP is installed on the Android device. ( 7) • Reconnect the Android device and select the appropriate control mode. ( 8) • If this does not solve the problem, the connected Android device does not support [AUTO MODE]. ( 20) "NO DEVICE" or "READING" keeps flashing. • Switch off the developer options on the Android device. • Reconnect the Android device. • If this unit and iPod/iPhone. This depends on the display...
... [AUTO MODE]. • Make sure JVC MUSIC PLAY APP is installed on the Android device. ( 7) • Reconnect the Android device and select the appropriate control mode. ( 8) • If this does not solve the problem, the connected Android device does not support [AUTO MODE]. ( 20) "NO DEVICE" or "READING" keeps flashing. • Switch off the developer options on the Android device. • Reconnect the Android device. • If this unit and iPod/iPhone. This depends on the display...
Instruction Manual
Page 26
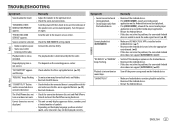
.... • Other Bluetooth devices might be trying to connect to the unit. • Check whether the connected Bluetooth audio player supports Audio/Video Remote Control Profile (AVRCP). (Refer to a place where you have troubles, reset the unit. ( 3) 22 If "H/W ERROR" appears again, consult your audio player.) • Disconnect and connect the Bluetooth player again. Pairing cannot be controlled. Try the operation again. If you still have tried. Bluetooth® Bluetooth® TROUBLESHOOTING Symptom No Bluetooth device is poor. Phone sound quality is...
.... • Other Bluetooth devices might be trying to connect to the unit. • Check whether the connected Bluetooth audio player supports Audio/Video Remote Control Profile (AVRCP). (Refer to a place where you have troubles, reset the unit. ( 3) 22 If "H/W ERROR" appears again, consult your audio player.) • Disconnect and connect the Bluetooth player again. Pairing cannot be controlled. Try the operation again. If you still have tried. Bluetooth® Bluetooth® TROUBLESHOOTING Symptom No Bluetooth device is poor. Phone sound quality is...

Instruction Manual
Page 28
... ignition switch, then disconnect the terminal of less than 50 W. SPECIFICATIONS Audio Maximum Output Power Full Bandwidth Power (at an angle of the car battery. 2 Connect the wires properly. Basic procedure 1 Remove the key from heat dissipate metal parts. • After the unit is turned on the car are working properly. • If the fuse blows, first make sure the wires are not touching car's chassis, then replace the old fuse with...
... ignition switch, then disconnect the terminal of less than 50 W. SPECIFICATIONS Audio Maximum Output Power Full Bandwidth Power (at an angle of the car battery. 2 Connect the wires properly. Basic procedure 1 Remove the key from heat dissipate metal parts. • After the unit is turned on the car are working properly. • If the fuse blows, first make sure the wires are not touching car's chassis, then replace the old fuse with...
Instruction Manual
Page 30
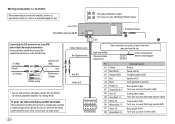
... wiring Ignition wire (Red) Unit Battery wire (Yellow) * You can also connect a subwoofer speaker directly without an external subwoofer amplifier. Consult your safety. Wiring connection (for your car audio dealer. 26 Yellow (Battery wire) Red (Ignition wire) Light blue/yellow (Steering remote control wire) If no connections are made, do not let the wire come out from the tab. STEERING WHEEL REMOTE To the steering wheel remote control adapter Red (A7) Yellow (A4) ISO connectors Pin Color and function A4 Yellow : Battery A5 Blue/White : Power control...
... wiring Ignition wire (Red) Unit Battery wire (Yellow) * You can also connect a subwoofer speaker directly without an external subwoofer amplifier. Consult your safety. Wiring connection (for your car audio dealer. 26 Yellow (Battery wire) Red (Ignition wire) Light blue/yellow (Steering remote control wire) If no connections are made, do not let the wire come out from the tab. STEERING WHEEL REMOTE To the steering wheel remote control adapter Red (A7) Yellow (A4) ISO connectors Pin Color and function A4 Yellow : Battery A5 Blue/White : Power control...
Instruction Manual
Page 31
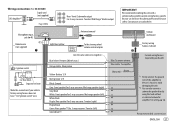
.../black Green: Rear speaker*2/For 3-way crossover: Tweeter (left) Green/black *2 Blue: To power antenna Blue/white: To amplifier (Not used) Brown Factory wiring harness (vehicle) Custom wiring harness (separately purchased) *1 Firmly connect the ground wire of the amplifier to the car's chassis to avoid damaging the unit. *2 You can also connect a subwoofer speaker directly using this job to professionals for your safety. Wiring connection (for KD-X33MBT) JVC Amplifier*1 Signal cord (not supplied) Fuse (10 A) Rear/ Front/ Subwoofer output For 3-way crossover...
.../black Green: Rear speaker*2/For 3-way crossover: Tweeter (left) Green/black *2 Blue: To power antenna Blue/white: To amplifier (Not used) Brown Factory wiring harness (vehicle) Custom wiring harness (separately purchased) *1 Firmly connect the ground wire of the amplifier to the car's chassis to avoid damaging the unit. *2 You can also connect a subwoofer speaker directly using this job to professionals for your safety. Wiring connection (for KD-X33MBT) JVC Amplifier*1 Signal cord (not supplied) Fuse (10 A) Rear/ Front/ Subwoofer output For 3-way crossover...


