Instruction Manual
Page 2
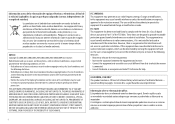
... interference to radio communications, if it is made. If this equipment if an unauthorized change or modification is not installed and used to endorse or promote products derived from that to this software without modification, are permitted provided that interference will not occur in the instruction manual. Devolva a pilha usada ao revendedor ou entidade autorizada para que...
... interference to radio communications, if it is made. If this equipment if an unauthorized change or modification is not installed and used to endorse or promote products derived from that to this software without modification, are permitted provided that interference will not occur in the instruction manual. Devolva a pilha usada ao revendedor ou entidade autorizada para que...
Instruction Manual
Page 4
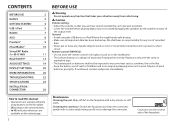
... replaced incorrectly. Dispose of the faceplate) Remote control (RM-RK52): 11 • Do not leave the remote control in hot places such as coins or metal tools) inside the unit, to prevent a short circuit. We shall bear no responsibility for KD-X31MBS) BLUETOOTH® AUDIO SETTINGS DISPLAY SETTINGS MORE INFORMATION TROUBLESHOOTING SPECIFICATIONS INSTALLATION / CONNECTION BEFORE USE 2 Warning Do not operate any function that takes your attention away from safe driving. 3 Caution 4 Volume setting...
... replaced incorrectly. Dispose of the faceplate) Remote control (RM-RK52): 11 • Do not leave the remote control in hot places such as coins or metal tools) inside the unit, to prevent a short circuit. We shall bear no responsibility for KD-X31MBS) BLUETOOTH® AUDIO SETTINGS DISPLAY SETTINGS MORE INFORMATION TROUBLESHOOTING SPECIFICATIONS INSTALLATION / CONNECTION BEFORE USE 2 Warning Do not operate any function that takes your attention away from safe driving. 3 Caution 4 Volume setting...
Instruction Manual
Page 5
... sound or pause playback. • Press again to replace the battery To Turn on the power Adjust the volume Select a source Change the display information Your preset adjustments will also be erased. Turn the volume knob. Press SOURCE repeatedly. ( not available ) ENGLISH | 3 BASICS Faceplate Volume knob (turn the volume knob within 2 seconds. Do this (on the remote control) ( not available ) Press VOL + or VOL -. How to cancel. Do this (on the faceplate) Press B/SOURCE...
... sound or pause playback. • Press again to replace the battery To Turn on the power Adjust the volume Select a source Change the display information Your preset adjustments will also be erased. Turn the volume knob. Press SOURCE repeatedly. ( not available ) ENGLISH | 3 BASICS Faceplate Volume knob (turn the volume knob within 2 seconds. Do this (on the remote control) ( not available ) Press VOL + or VOL -. How to cancel. Do this (on the faceplate) Press B/SOURCE...
Instruction Manual
Page 9
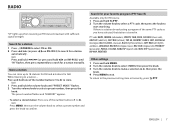
... talk), MUSC ESP (Spanish music), HIP HOP, WEATHER Other settings 1 Press and hold MENU. 2 Turn the volume knob to select [TUNER], then press the knob. 3 Turn the volume knob to make a selection ( 8), then press the knob. 4 Press MENU to search for a station manually. Press and hold H/I on RM-RK52) to exit. The preset number flashes and "MEMORY" appears. • To select a stored station: Press one of the number buttons (1 to 6) to store...
... talk), MUSC ESP (Spanish music), HIP HOP, WEATHER Other settings 1 Press and hold MENU. 2 Turn the volume knob to select [TUNER], then press the knob. 3 Turn the volume knob to make a selection ( 8), then press the knob. 4 Press MENU to search for a station manually. Press and hold H/I on RM-RK52) to exit. The preset number flashes and "MEMORY" appears. • To select a stored station: Press one of the number buttons (1 to 6) to store...
Instruction Manual
Page 10
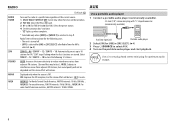
... lost .) ; "SSM" stops flashing when the first 6 stations are stored. AUTO: Increases the tuner selectivity to reduce interference noises from adjacent FM stations, but the stereo effect will be lost . ; Use a portable audio player 1 Connect a portable audio player (commercially available). 3.5 mm (1/8") stereo mini plug with "L" shaped connector (commercially available) Auxiliary input jack Portable audio player 2 Select [ON] for [AUX] in [SRC SELECT] after Radio Timer for [AM] in [SRC SELECT]. ( 4) 3 Press B/SOURCE to store the following...
... lost .) ; "SSM" stops flashing when the first 6 stations are stored. AUTO: Increases the tuner selectivity to reduce interference noises from adjacent FM stations, but the stereo effect will be lost . ; Use a portable audio player 1 Connect a portable audio player (commercially available). 3.5 mm (1/8") stereo mini plug with "L" shaped connector (commercially available) Auxiliary input jack Portable audio player 2 Select [ON] for [AUX] in [SRC SELECT] after Radio Timer for [AM] in [SRC SELECT]. ( 4) 3 Press B/SOURCE to store the following...

Instruction Manual
Page 11
... Do this unit. USB input terminal (Accessory of the Pandora application onto your device (iPhone/ iPod touch), then create an account and log in [SRC SELECT]. ( 4) Start listening 1 Open the Pandora application on this Pause or resume Press the volume knob (or press on RM-RK52). Pandora® Preparation: Install the latest version of the iPod/iPhone)* The source changes to PANDORA and...
... Do this unit. USB input terminal (Accessory of the Pandora application onto your device (iPhone/ iPod touch), then create an account and log in [SRC SELECT]. ( 4) Start listening 1 Open the Pandora application on this Pause or resume Press the volume knob (or press on RM-RK52). Pandora® Preparation: Install the latest version of the iPod/iPhone)* The source changes to PANDORA and...
Instruction Manual
Page 13
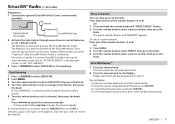
... number buttons (1 to 6). (or) 1 Press MENU. 2 Turn the volume knob to select PRESET, then press the knob. 3 Turn the volume knob to search for KD-X31MBS) Preparation: 1 Connect the optional SiriusXM Vehicle Tuner (commercially available). Start listening 1 Press B/SOURCE to select SIRIUS XM. 2 Press MENU. 3 Turn the volume knob to select a CATEGORY, then press the knob. 4 Turn the volume knob to receive the channel. The Radio ID is located on "ACTIVATE RADIO" in Canada: To activate SiriusXM Canada service...
... number buttons (1 to 6). (or) 1 Press MENU. 2 Turn the volume knob to select PRESET, then press the knob. 3 Turn the volume knob to search for KD-X31MBS) Preparation: 1 Connect the optional SiriusXM Vehicle Tuner (commercially available). Start listening 1 Press B/SOURCE to select SIRIUS XM. 2 Press MENU. 3 Turn the volume knob to select a CATEGORY, then press the knob. 4 Turn the volume knob to receive the channel. The Radio ID is located on "ACTIVATE RADIO" in Canada: To activate SiriusXM Canada service...
Instruction Manual
Page 14
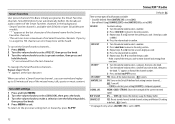
..., talk, sports or music content. "L" appears in front of the Smart Favorites channels in the background. • Smart Favorite channel is temporary ignored. Smart Favorites User preset channels 1 to exit. SiriusXM Vehicle Tuner automatically buffers the broadcast audio content of the channel number. 3 Press and hold MENU. 2 Turn the volume knob to select [SIRIUS XM], then press the knob. 3 Turn the volume knob to make a selection (see the following...
..., talk, sports or music content. "L" appears in front of the Smart Favorites channels in the background. • Smart Favorite channel is temporary ignored. Smart Favorites User preset channels 1 to exit. SiriusXM Vehicle Tuner automatically buffers the broadcast audio content of the channel number. 3 Press and hold MENU. 2 Turn the volume knob to select [SIRIUS XM], then press the knob. 3 Turn the volume knob to make a selection (see the following...
Instruction Manual
Page 15
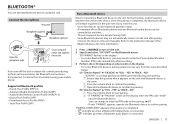
... the control panel during each pairing. Continue the conversation using cord clamps (not supplied) if necessary. Refer to the instruction manual of two Bluetooth phones and one Bluetooth audio device can be connected at any time. • This unit supports Secure Simple Pairing (SSP). • Some Bluetooth devices may need to confirm pairing. Press the volume knob to confirm the passkey. (B) "[Device Name]" "VOL - YES" "BACK - BLUETOOTH® You can change to a desired PIN code before pairing. ( 17...
... the control panel during each pairing. Continue the conversation using cord clamps (not supplied) if necessary. Refer to the instruction manual of two Bluetooth phones and one Bluetooth audio device can be connected at any time. • This unit supports Secure Simple Pairing (SSP). • Some Bluetooth devices may need to confirm pairing. Press the volume knob to confirm the passkey. (B) "[Device Name]" "VOL - YES" "BACK - BLUETOOTH® You can change to a desired PIN code before pairing. ( 17...
Instruction Manual
Page 16
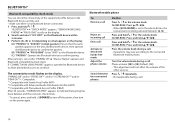
... turn off the power, then turn on the display. If "CONNECT NOW USING PHONE" appears, operate the Bluetooth device to allow phonebook access to the selected time, the unit answers incoming call Activate or deactivate hands-free mode Adjust the phone volume Switch between the Bluetooth device and the unit. • Make sure there is no Bluetooth device connected. 1 Press and hold B/SOURCE to [50] (Default: [15]) • This adjustment will not affect the volume of the supported profile between two connected phones...
... turn off the power, then turn on the display. If "CONNECT NOW USING PHONE" appears, operate the Bluetooth device to allow phonebook access to the selected time, the unit answers incoming call Activate or deactivate hands-free mode Adjust the phone volume Switch between the Bluetooth device and the unit. • Make sure there is no Bluetooth device connected. 1 Press and hold B/SOURCE to [50] (Default: [15]) • This adjustment will not affect the volume of the supported profile between two connected phones...

Instruction Manual
Page 17
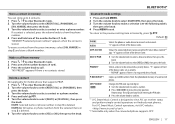
Bluetooth mode operations 1 Press to enter Bluetooth mode. 2 Turn the volume knob to make a selection (see the following table), then press the knob. 3 Press MENU to exit. NOISE RDCT -05 - -20 (-10): Adjust the noise reduction level until the least echo is being heard during a phone conversation. ECHO CANCEL 1 - 10 (4): Adjust the echo cancellation delay time until the least noise is being heard during a phone conversation. Text...
Bluetooth mode operations 1 Press to enter Bluetooth mode. 2 Turn the volume knob to make a selection (see the following table), then press the knob. 3 Press MENU to exit. NOISE RDCT -05 - -20 (-10): Adjust the noise reduction level until the least echo is being heard during a phone conversation. ECHO CANCEL 1 - 10 (4): Adjust the echo cancellation delay time until the least noise is being heard during a phone conversation. Text...
Instruction Manual
Page 19
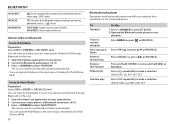
... connected phone name using the JVC Smart Music Control*1 app. Repeat steps 1 and 2 until you finish entering the PIN code. 3 Press the volume knob to 6). "MEMORY P(selected preset number)" appears when the contact is designed to select [YES] or [NO], then press the knob. "NO PRESET" appears if there is deleted. 6 Turn the volume knob to view JVC car receiver status and perform simple control operations on Android smart phones. Bluetooth mode settings 1 Press and hold G PTY. 5 Turn...
... connected phone name using the JVC Smart Music Control*1 app. Repeat steps 1 and 2 until you finish entering the PIN code. 3 Press the volume knob to 6). "MEMORY P(selected preset number)" appears when the contact is designed to select [YES] or [NO], then press the knob. "NO PRESET" appears if there is deleted. 6 Turn the volume knob to view JVC car receiver status and perform simple control operations on Android smart phones. Bluetooth mode settings 1 Press and hold G PTY. 5 Turn...
Instruction Manual
Page 20
... smart phone via Bluetooth Listen to Pandora Preparation: Select [ON] for [PANDORA] in [SRC SELECT]. ( 4) You can operate iHeartRadio in the same way as Pandora for iPod/iPhone. ( 9) Listen to iHeartRadio Preparation: Select [ON] for iPod/ iPhone. ( 10) 18 Bluetooth audio player Operations and display indications may differ according to make a selection. Select group or Press 1 K/2 J (or press J/K on RM-RK52). BLUETOOTH® AUTO CNNCT INITIALIZE INFORMATION ON: The unit automatically...
... smart phone via Bluetooth Listen to Pandora Preparation: Select [ON] for [PANDORA] in [SRC SELECT]. ( 4) You can operate iHeartRadio in the same way as Pandora for iPod/iPhone. ( 9) Listen to iHeartRadio Preparation: Select [ON] for iPod/ iPhone. ( 10) 18 Bluetooth audio player Operations and display indications may differ according to make a selection. Select group or Press 1 K/2 J (or press J/K on RM-RK52). BLUETOOTH® AUTO CNNCT INITIALIZE INFORMATION ON: The unit automatically...

Instruction Manual
Page 21
... sound settings. SUB.W LPF*1 THROUGH: All signals are lost in audio data compression. ; AUDIO SETTINGS 1 Press and hold MENU. 2 Turn the volume knob to exit. SUB.W *2 ON / OFF: Turns on the rear panel (through an external amplifier). *1 Displayed only when [L/O MODE] is set to [SUB.W] and [SUB.W] is set to [ON]. *2 Displayed only when [L/O MODE] is set the fader level to the REAR/SW line out terminals on or off the subwoofer output. BALANCE*3 L06 - L/O MODE SUB.W / REAR: Selects whether rear speakers or a subwoofer are connected...
... sound settings. SUB.W LPF*1 THROUGH: All signals are lost in audio data compression. ; AUDIO SETTINGS 1 Press and hold MENU. 2 Turn the volume knob to exit. SUB.W *2 ON / OFF: Turns on the rear panel (through an external amplifier). *1 Displayed only when [L/O MODE] is set to [SUB.W] and [SUB.W] is set to [ON]. *2 Displayed only when [L/O MODE] is set the fader level to the REAR/SW line out terminals on or off the subwoofer output. BALANCE*3 L06 - L/O MODE SUB.W / REAR: Selects whether rear speakers or a subwoofer are connected...
Instruction Manual
Page 22
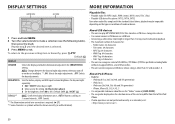
...; This unit can play MP3/WMA/WAV/FLAC files stored on the car headlights.*1 ; Default: XX DISPLAY DIMMER Selects the display and button illumination adjusted in abnormal playback. • The maximum number of the iPod/ iPhone. • If some operations are not performed correctly or as intended, visit: . 20 OFF: Selects the day adjustments. OFF: Cancels. *1 The illumination control wire connection is selected. 3 Press MENU to the previous setting item or...
...; This unit can play MP3/WMA/WAV/FLAC files stored on the car headlights.*1 ; Default: XX DISPLAY DIMMER Selects the display and button illumination adjusted in abnormal playback. • The maximum number of the iPod/ iPhone. • If some operations are not performed correctly or as intended, visit: . 20 OFF: Selects the day adjustments. OFF: Cancels. *1 The illumination control wire connection is selected. 3 Press MENU to the previous setting item or...
Instruction Manual
Page 24
... connections. The iPod/iPhone does not turn on the recording process earlier. You try to be sure the terminals of the speaker wires are not displayed. Elapsed playing time is not deliverable. 22 "READING" keeps flashing. • Do not use too many hierarchical levels and folders. • Reattach the USB device. "MISWIRING CHK WIRING THEN RESET UNIT" / "WARNING CHK WIRING THEN RESET UNIT" appears and no operations can only display uppercase letters, numbers...
... connections. The iPod/iPhone does not turn on the recording process earlier. You try to be sure the terminals of the speaker wires are not displayed. Elapsed playing time is not deliverable. 22 "READING" keeps flashing. • Do not use too many hierarchical levels and folders. • Reattach the USB device. "MISWIRING CHK WIRING THEN RESET UNIT" / "WARNING CHK WIRING THEN RESET UNIT" appears and no operations can only display uppercase letters, numbers...
Instruction Manual
Page 25
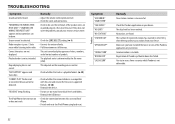
... selected channel is selected. "WRONG CODE" Make sure you have entered the correct pass code. ( 12) No Bluetooth device is unsuccessful. Custom station name creation is • Search from the Bluetooth device again. Registration of iHeartRADIO, custom stations become unavailable. TROUBLESHOOTING Symptom Remedy "CH LOCKED" The selected channel is updated. Press the volume knob to the device. The number of the iHeart Link for JVC application on the unit, then connect the device...
... selected channel is selected. "WRONG CODE" Make sure you have entered the correct pass code. ( 12) No Bluetooth device is unsuccessful. Custom station name creation is • Search from the Bluetooth device again. Registration of iHeartRADIO, custom stations become unavailable. TROUBLESHOOTING Symptom Remedy "CH LOCKED" The selected channel is updated. Press the volume knob to the device. The number of the iHeart Link for JVC application on the unit, then connect the device...
Instruction Manual
Page 26
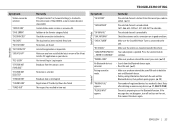
... your audio player.) • Disconnect and connect the Bluetooth player again. Remedy The unit failed to the unit. Update the Bluetooth firmware. ( 4) If you have any troubles, try to a place where you try the operation again. The connected phone does not support Voice Recognition feature. "NOT SUPPORT" appears. If "H/W ERROR" appears again, consult your device and connect manually. ( 18) • Adjust the microphone unit's position. ( 13) • Check the [ECHO CANCEL] setting. ( 15...
... your audio player.) • Disconnect and connect the Bluetooth player again. Remedy The unit failed to the unit. Update the Bluetooth firmware. ( 4) If you have any troubles, try to a place where you try the operation again. The connected phone does not support Voice Recognition feature. "NOT SUPPORT" appears. If "H/W ERROR" appears again, consult your device and connect manually. ( 18) • Adjust the microphone unit's position. ( 13) • Check the [ECHO CANCEL] setting. ( 15...

Instruction Manual
Page 28
...'s sake, leave wiring and mounting to remove the unit Pocket Bracket (not supplied) 26 Do not touch the metal parts of this unit in -dash mounting) Hook on the car are working properly. • If the fuse blows, first make sure the wires are not touching car's chassis, then replace the old fuse with one that has the same rating. When installing without the mounting sleeve Use only the specified...
...'s sake, leave wiring and mounting to remove the unit Pocket Bracket (not supplied) 26 Do not touch the metal parts of this unit in -dash mounting) Hook on the car are working properly. • If the fuse blows, first make sure the wires are not touching car's chassis, then replace the old fuse with one that has the same rating. When installing without the mounting sleeve Use only the specified...

Instruction Manual
Page 29
... connection JVC Amplifier Signal cord (not supplied) Fuse (10 A) KD-X310BT Front output Rear/subwoofer output KD-X31MBS Rear/subwoofer output Antenna terminal Vehicle dashboard Part list for installation (A) Faceplate Microphone input jack ( 13) Remote wire (not supplied) Ignition switch Car fuse block Separate red wire Make this connection if your vehicle factory wiring harness does not have "12 V ignition switch" wire. (For KD-X31MBS) To the optional SiriusXM Vehicle Tuner (commercially available) ( 11) Light blue/yellow (For KD-X31MBS) STEERING WHEEL REMOTE Join the same color...
... connection JVC Amplifier Signal cord (not supplied) Fuse (10 A) KD-X310BT Front output Rear/subwoofer output KD-X31MBS Rear/subwoofer output Antenna terminal Vehicle dashboard Part list for installation (A) Faceplate Microphone input jack ( 13) Remote wire (not supplied) Ignition switch Car fuse block Separate red wire Make this connection if your vehicle factory wiring harness does not have "12 V ignition switch" wire. (For KD-X31MBS) To the optional SiriusXM Vehicle Tuner (commercially available) ( 11) Light blue/yellow (For KD-X31MBS) STEERING WHEEL REMOTE Join the same color...


