
Instruction Manual
Page 1
KD-SR60 / KD-SR40 CD RECEIVER INSTRUCTION MANUAL RECEPTOR CON CD MANUAL DE INSTRUCCIONES RÉCEPTEUR CD MANUEL D'INSTRUCTIONS ENGLISH ESPAÑOL FRANÇAIS Please read all instructions carefully before operation to obtain the best possible performance from the unit. Model No. and Serial No. Veuillez lires les instructions...appareil. For customer Use: Enter below the Model No. which are located on the top or bottom of the cabinet. GET1002-001A [J] Serial No. Retain this information for future reference. Por favor lea detenidamente este manual para comprender a fondo todas...
KD-SR60 / KD-SR40 CD RECEIVER INSTRUCTION MANUAL RECEPTOR CON CD MANUAL DE INSTRUCCIONES RÉCEPTEUR CD MANUEL D'INSTRUCTIONS ENGLISH ESPAÑOL FRANÇAIS Please read all instructions carefully before operation to obtain the best possible performance from the unit. Model No. and Serial No. Veuillez lires les instructions...appareil. For customer Use: Enter below the Model No. which are located on the top or bottom of the cabinet. GET1002-001A [J] Serial No. Retain this information for future reference. Por favor lea detenidamente este manual para comprender a fondo todas...
Instruction Manual
Page 2
... AUDIO SETTINGS 11 DISPLAY SETTINGS 12 MORE INFORMATION 13 TROUBLESHOOTING 14 INSTALLATION / CONNECTION 16 SPECIFICATIONS i and ii (at the end of the book) How to read this unit, pull them out horizontally. • Remove burrs from the center of KD-SR40. • [XX] indicates the selected items. • ( XX) indicates references are explained mainly using the USB device or iPod/iPhone if it . • Do not use a disc with tape stuck on...
... AUDIO SETTINGS 11 DISPLAY SETTINGS 12 MORE INFORMATION 13 TROUBLESHOOTING 14 INSTALLATION / CONNECTION 16 SPECIFICATIONS i and ii (at the end of the book) How to read this unit, pull them out horizontally. • Remove burrs from the center of KD-SR40. • [XX] indicates the selected items. • ( XX) indicates references are explained mainly using the USB device or iPod/iPhone if it . • Do not use a disc with tape stuck on...
Instruction Manual
Page 3
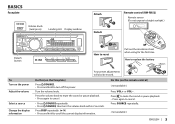
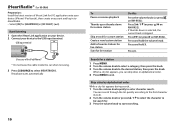
... volume knob. Press to mute the sound or pause playback. • Press again to replace the battery To Turn on the power Adjust the volume Select a source Change the display information Your preset adjustments will also be erased. How to cancel. Press DISP repeatedly. ( 14) • Press and hold to cancel. • Press L/SOURCE repeatedly. • Press L/SOURCE, then turn the volume knob within 2 seconds. Do this (on the remote control...
... volume knob. Press to mute the sound or pause playback. • Press again to replace the battery To Turn on the power Adjust the volume Select a source Change the display information Your preset adjustments will also be erased. How to cancel. Press DISP repeatedly. ( 14) • Press and hold to cancel. • Press L/SOURCE repeatedly. • Press L/SOURCE, then turn the volume knob within 2 seconds. Do this (on the remote control...
Instruction Manual
Page 4
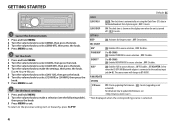
... upgrading the firmware. ; To return to BT AUDIO. OFF: Disables. NO: Cancels (upgrading is automatically set using the Clock Time (CT) data in FM Radio Broadcast Data System signal. ; OFF: Deactivates. IHEART * (For KD-SR60) ON: Enables IHEARTRADIO in source selection. ; AUX * ON: Enables AUX in source selection. ; BT ADAPTER: Select when the KS-BTA100 Bluetooth adapter is turned off. ; GETTING STARTED 1 Cancel the demonstration 1 Press and hold MENU. 2 Turn the volume knob to select [DEMO...
... upgrading the firmware. ; To return to BT AUDIO. OFF: Disables. NO: Cancels (upgrading is automatically set using the Clock Time (CT) data in FM Radio Broadcast Data System signal. ; OFF: Deactivates. IHEART * (For KD-SR60) ON: Enables IHEARTRADIO in source selection. ; AUX * ON: Enables AUX in source selection. ; BT ADAPTER: Select when the KS-BTA100 Bluetooth adapter is turned off. ; GETTING STARTED 1 Cancel the demonstration 1 Press and hold MENU. 2 Turn the volume knob to select [DEMO...
Instruction Manual
Page 5
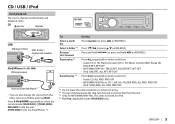
... press / on RM-RK52). CD Eject disc Label side KD-SR60 USB USB input terminal USB 2.0 cable*1 (commercially available) iPod/iPhone (for KD-SR60) USB input terminal (Accessory of the iPod/iPhone)*1 • You can still play/pause, file skip, fast-forward or reverse files from the other source to iPod by pressing iPod. Repeat play *4 Press 4 B repeatedly to make a selection. • Audio CD or JVC Playlist Creator (JPC) / JVC Music Control (JMC) file ( 13): TRACK RPT...
... press / on RM-RK52). CD Eject disc Label side KD-SR60 USB USB input terminal USB 2.0 cable*1 (commercially available) iPod/iPhone (for KD-SR60) USB input terminal (Accessory of the iPod/iPhone)*1 • You can still play/pause, file skip, fast-forward or reverse files from the other source to iPod by pressing iPod. Repeat play *4 Press 4 B repeatedly to make a selection. • Audio CD or JVC Playlist Creator (JPC) / JVC Music Control (JMC) file ( 13): TRACK RPT...

Instruction Manual
Page 6
... drive to playback when a multiple drives device is connected. Change the USB drive When a smartphone (Mass Storage Class) is connected to the USB input terminal, you can search through them quickly (on your iPod/iPhone setting.) • To return to the previous setting item or hierarchy, press G PTY. • To cancel, press MENU. 6 Press number button 5 repeatedly to select the desired drive. (or) 1 Press and hold MENU. 2 Turn the volume knob to select [USB/IPOD...
... drive to playback when a multiple drives device is connected. Change the USB drive When a smartphone (Mass Storage Class) is connected to the USB input terminal, you can search through them quickly (on your iPod/iPhone setting.) • To return to the previous setting item or hierarchy, press G PTY. • To cancel, press MENU. 6 Press number button 5 repeatedly to select the desired drive. (or) 1 Press and hold MENU. 2 Turn the volume knob to select [USB/IPOD...
Instruction Manual
Page 7
... station is a station broadcasting a program of the number buttons (1 to 6). (or) Press MENU, then turn the volume knob to select a preset number and press the knob to confirm. ENGLISH | 7 Store a station You can store up when receiving an FM stereo broadcast with sufficient signal strength. RADIO "ST" lights up to 18 stations for FM and 6 stations for AM. The preset number flashes and "MEMORY" appears. • To select a stored station: Press one of the number buttons...
... station is a station broadcasting a program of the number buttons (1 to 6). (or) Press MENU, then turn the volume knob to select a preset number and press the knob to confirm. ENGLISH | 7 Store a station You can store up when receiving an FM stereo broadcast with sufficient signal strength. RADIO "ST" lights up to 18 stations for FM and 6 stations for AM. The preset number flashes and "MEMORY" appears. • To select a stored station: Press one of the number buttons...
Instruction Manual
Page 8
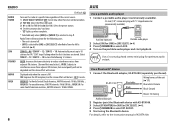
... / SSM 13 - 18: Automatically presets up to 18 stations for FM. Blue/white Black Brown Wiring harness of the unit ( 17) Blue/white: Remote Black: Ground Brown: Tel muting Auxiliary input jack 2 Register (pair) the Bluetooth device with "L" shaped connector (commercially available) Auxiliary input jack Portable audio player 2 Select [ON] for [AUX] in [SRC SELECT]. ( 4). 4 Press L/SOURCE to select BT AUDIO. 5 Start using the Bluetooth device. Radio Timer will not activate for the following 12 stations. OFF: Cancels. For details, refer...
... / SSM 13 - 18: Automatically presets up to 18 stations for FM. Blue/white Black Brown Wiring harness of the unit ( 17) Blue/white: Remote Black: Ground Brown: Tel muting Auxiliary input jack 2 Register (pair) the Bluetooth device with "L" shaped connector (commercially available) Auxiliary input jack Portable audio player 2 Select [ON] for [AUX] in [SRC SELECT]. ( 4). 4 Press L/SOURCE to select BT AUDIO. 5 Start using the Bluetooth device. Radio Timer will not activate for the following 12 stations. OFF: Cancels. For details, refer...
Instruction Manual
Page 9
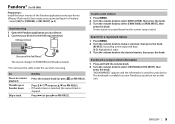
... press the knob. The bookmark is stored to the USB input terminal. Create a new station 1 Press MENU. 2 Turn the volume knob to select [NEW STATION], then press the knob. 3 Turn the volume knob to the desired station, then press the knob. Pandora® (for KD-SR60) Preparation: Install the latest version of the iPod/iPhone)* The source changes to select [THIS TRACK] or [THIS ARTIST], then press the...
... press the knob. The bookmark is stored to the USB input terminal. Create a new station 1 Press MENU. 2 Turn the volume knob to select [NEW STATION], then press the knob. 3 Turn the volume knob to the desired station, then press the knob. Pandora® (for KD-SR60) Preparation: Install the latest version of the iPod/iPhone)* The source changes to select [THIS TRACK] or [THIS ARTIST], then press the...
Instruction Manual
Page 10
... list appears during search... 1 Turn the volume knob quickly to enter character search. Press and hold the volume knob. Press (or press on your device. 2 Connect your device to the USB input terminal. iHeartRadio® (for KD-SR60) Preparation: Install the latest version of the iPod/iPhone)* * Do not leave the cable inside the car when not using. 3 Press L/SOURCE to select IHEARTRADIO. Broadcast starts automatically To...
... list appears during search... 1 Turn the volume knob quickly to enter character search. Press and hold the volume knob. Press (or press on your device. 2 Connect your device to the USB input terminal. iHeartRadio® (for KD-SR60) Preparation: Install the latest version of the iPod/iPhone)* * Do not leave the cable inside the car when not using. 3 Press L/SOURCE to select IHEARTRADIO. Broadcast starts automatically To...
Instruction Manual
Page 11
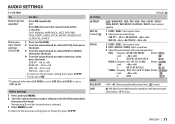
.... AUDIO SETTINGS (For KD-SR40) To Do this Select a preset equalizer Press EQ repeatedly. (or) Press EQ, then turn the volume knob within 2 seconds. SUB.W *: -08 to +08 BASS LVL: -06 to +06 MID LVL: -06 to +06 TRE LVL: -06 to +06 • To return to the previous setting item, press G PTY. • To exit, press EQ. * Displayed only when [L/O MODE] is set to [SUB...
.... AUDIO SETTINGS (For KD-SR40) To Do this Select a preset equalizer Press EQ repeatedly. (or) Press EQ, then turn the volume knob within 2 seconds. SUB.W *: -08 to +08 BASS LVL: -06 to +06 MID LVL: -06 to +06 TRE LVL: -06 to +06 • To return to the previous setting item, press G PTY. • To exit, press EQ. * Displayed only when [L/O MODE] is set to [SUB...
Instruction Manual
Page 12
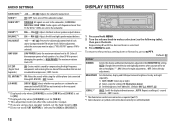
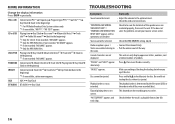
...): Presets the volume adjustment level of each source (compared to the subwoofer. ; LOW 55Hz / MID 85Hz / HIGH 120Hz: Audio signals with frequencies lower than 50 W to prevent damaging the speakers.) ; Default: XX DISPLAY DIMMER Selects the display and button illumination adjusted in audio data compression. ; SUB.W *2 ON / OFF: Turns on the car headlights.*1 ; TEL MUTING*5 ON: Mutes the sounds while using the cellular phone (not connected through an external amplifier). *1 Displayed only when [L/O MODE] is set to [SUB.W] and [SUB.W] is set...
...): Presets the volume adjustment level of each source (compared to the subwoofer. ; LOW 55Hz / MID 85Hz / HIGH 120Hz: Audio signals with frequencies lower than 50 W to prevent damaging the speakers.) ; Default: XX DISPLAY DIMMER Selects the display and button illumination adjusted in audio data compression. ; SUB.W *2 ON / OFF: Turns on the car headlights.*1 ; TEL MUTING*5 ON: Mutes the sounds while using the cellular phone (not connected through an external amplifier). *1 Displayed only when [L/O MODE] is set to [SUB.W] and [SUB.W] is set...
Instruction Manual
Page 13
... on a USB mass storage class device. • You cannot connect a USB device via a USB hub. • Connecting a cable whose rating is other than 5 m may result in [HEAD MODE]. • The song order displayed on the recording surface or discs that of this unit may become unavailable. • Some iHeartRadio® functionality cannot be operated from this unit. • For issues using the JVC Playlist Creator or JVC Music Control, you play audio file...
... on a USB mass storage class device. • You cannot connect a USB device via a USB hub. • Connecting a cable whose rating is other than 5 m may result in [HEAD MODE]. • The song order displayed on the recording surface or discs that of this unit may become unavailable. • Some iHeartRadio® functionality cannot be operated from this unit. • For issues using the JVC Playlist Creator or JVC Music Control, you play audio file...
Instruction Manual
Page 14
... CHK WIRING THEN RESET UNIT" / "WARNING CHK WIRING THEN RESET UNIT" appears and no operations can only display uppercase letters, numbers, and a limited number of the speaker wires are not displayed. Check to be selected. the radio. This unit can be ejected. "PLEASE" and "EJECT" appear Press , then insert the disc correctly. alternately. Playback order is not correct. "NOT SUPPORT" appears and track skips. Title*1*2 CD or USB Playing time Day/Clock Disc name*3 Album...
... CHK WIRING THEN RESET UNIT" / "WARNING CHK WIRING THEN RESET UNIT" appears and no operations can only display uppercase letters, numbers, and a limited number of the speaker wires are not displayed. Check to be selected. the radio. This unit can be ejected. "PLEASE" and "EJECT" appear Press , then insert the disc correctly. alternately. Playback order is not correct. "NOT SUPPORT" appears and track skips. Title*1*2 CD or USB Playing time Day/Clock Disc name*3 Album...
Instruction Manual
Page 15
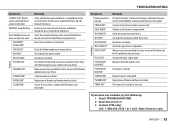
... Symptom Remedy "CANNOT PLAY" flashes • Check whether the connected device is compatible with this unit and iPod/iPhone. "LICENSE ERR" You try the following: 1 Check TROUBLESHOOTING 2 Reset the unit ( 3) 3 Contact (USA only) Call: 1-800-252-5722 ( or ) visit: http://www.jvc.com ENGLISH | 15 Check the connection to access from a country which Pandora is interrupted. Make sure you have installed the latest version of...
... Symptom Remedy "CANNOT PLAY" flashes • Check whether the connected device is compatible with this unit and iPod/iPhone. "LICENSE ERR" You try the following: 1 Check TROUBLESHOOTING 2 Reset the unit ( 3) 3 Contact (USA only) Call: 1-800-252-5722 ( or ) visit: http://www.jvc.com ENGLISH | 15 Check the connection to access from a country which Pandora is interrupted. Make sure you have installed the latest version of...

Instruction Manual
Page 16
... car battery. 5 Reset the unit. ( 3) 16 Installing the unit (in-dash mounting) Do the required wiring. ( 17) Hook on the car are working properly. • If the fuse blows, first make sure the wires are not touching car's chassis, then replace the old fuse with one that has the same rating. See Installing the unit (in parallel. • Connect speakers with a maximum power of your car. Caution • For safety's sake, leave wiring and mounting to remove...
... car battery. 5 Reset the unit. ( 3) 16 Installing the unit (in-dash mounting) Do the required wiring. ( 17) Hook on the car are working properly. • If the fuse blows, first make sure the wires are not touching car's chassis, then replace the old fuse with one that has the same rating. See Installing the unit (in parallel. • Connect speakers with a maximum power of your car. Caution • For safety's sake, leave wiring and mounting to remove...

Instruction Manual
Page 17
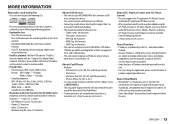
.../subwoofer output Vehicle dashboard KD-SR40 Rear/subwoofer output Signal cord (not supplied) JVC Amplifier Fuse (10 A) Part list for installation (A) Faceplate Factory wiring harness (vehicle) Antenna terminal Remote wire (not supplied) (B) Trim plate Vehicle-specific Wiring Harness (separately purchased) Recommended connection Blue: To power antenna Blue/white: To amplifier For more information: Metra Electronics: www.metraonline.com Scosche Industries: www.scosche.com Join the same color wires together. Blue/white: Remote (200 mA max.) Orange/white: Illumination Brown: Tel muting...
.../subwoofer output Vehicle dashboard KD-SR40 Rear/subwoofer output Signal cord (not supplied) JVC Amplifier Fuse (10 A) Part list for installation (A) Faceplate Factory wiring harness (vehicle) Antenna terminal Remote wire (not supplied) (B) Trim plate Vehicle-specific Wiring Harness (separately purchased) Recommended connection Blue: To power antenna Blue/white: To amplifier For more information: Metra Electronics: www.metraonline.com Scosche Industries: www.scosche.com Join the same color wires together. Blue/white: Remote (200 mA max.) Orange/white: Illumination Brown: Tel muting...
Instruction Manual
Page 52
... relocate the receiving antenna. • Increase the separation between the equipment and receiver. • Connect the equipment into an outlet on , or inside the product relating to provide reasonable protection against harmful interference in the instruction manual. CALIFORNIA, USA ONLY This product contains a CR Coin Cell Lithium Battery which the receiver is no podrán ser desechados como residuos dom...
... relocate the receiving antenna. • Increase the separation between the equipment and receiver. • Connect the equipment into an outlet on , or inside the product relating to provide reasonable protection against harmful interference in the instruction manual. CALIFORNIA, USA ONLY This product contains a CR Coin Cell Lithium Battery which the receiver is no podrán ser desechados como residuos dom...


