Comparison Chart
Page 1
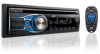
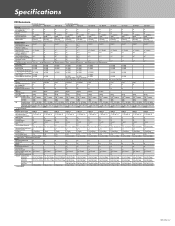
... General Motorized Slide-Out Face ✔ ✔ Detachable Control Panel ✔ ✔ ✔ ✔ Carrying Case ✔ ✔ ✔ ✔ Wireless Remote Control Type Ready Ready Ready Easy-Grip Steering Wheel Remote Ready ✔ ✔ ✔ ✔ Headunit Installation Size (W x H x D) 7 3/16" x 4 3/8" x 6 5/16" (182 x 111 x 160mm) 7 3/16" x 4 3/8" x 6 5/16" (182 x 111 x 160mm) 7 3/16" x 4 3/8" x 6 5/16...
... General Motorized Slide-Out Face ✔ ✔ Detachable Control Panel ✔ ✔ ✔ ✔ Carrying Case ✔ ✔ ✔ ✔ Wireless Remote Control Type Ready Ready Ready Easy-Grip Steering Wheel Remote Ready ✔ ✔ ✔ ✔ Headunit Installation Size (W x H x D) 7 3/16" x 4 3/8" x 6 5/16" (182 x 111 x 160mm) 7 3/16" x 4 3/8" x 6 5/16" (182 x 111 x 160mm) 7 3/16" x 4 3/8" x 6 5/16...
Comparison Chart
Page 2
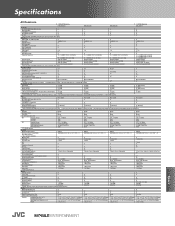
... Oval-Shaped Oval-Shaped Oval-Shaped Oval-Shaped Oval-Shaped Rotary Encoder ✔ ✔ ✔ ✔ ✔ ✔ ✔ ✔ ✔ ✔ ✔ Steering Wheel Remote Ready ✔ ✔ ✔ ✔ ✔ ✔ ✔ Headunit Installation Size 7 3/16" x 4 3/8" x 6 5/16" 7 3/16" x 4 3/8" x 6 5/16" 7 3/16" x 4 3/8" x 6 5/16" 7 3/16... CD Receivers 1-DIN CD Receivers KW-HDR720 KW-XR810 KW-XR610 KD-R820BT KD-R720 KD-HDR70 KD-HDR44 KD-R620 KD-R520 KD-R420 KD-R320 CD Player MP3/WMA Compatible with ID3 Tag/WMA Tag &#...
... Oval-Shaped Oval-Shaped Oval-Shaped Oval-Shaped Oval-Shaped Rotary Encoder ✔ ✔ ✔ ✔ ✔ ✔ ✔ ✔ ✔ ✔ ✔ Steering Wheel Remote Ready ✔ ✔ ✔ ✔ ✔ ✔ ✔ Headunit Installation Size 7 3/16" x 4 3/8" x 6 5/16" 7 3/16" x 4 3/8" x 6 5/16" 7 3/16" x 4 3/8" x 6 5/16" 7 3/16... CD Receivers 1-DIN CD Receivers KW-HDR720 KW-XR810 KW-XR610 KD-R820BT KD-R720 KD-HDR70 KD-HDR44 KD-R620 KD-R520 KD-R420 KD-R320 CD Player MP3/WMA Compatible with ID3 Tag/WMA Tag &#...
Instructions
Page 3
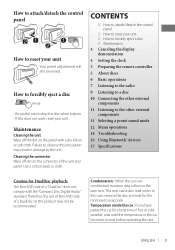
... attach/detach the control panel 3 How to reset your unit 3 How to forcibly eject a disc 3 Maintenance 4 Canceling the display demonstration 4 Setting the clock 5 Preparing the remote controller 5 About discs 6 Basic operations 7 Listening to the radio 9 Listening to a disc 10 Connecting the other external components 11 Listening to the other external components...
... attach/detach the control panel 3 How to reset your unit 3 How to forcibly eject a disc 3 Maintenance 4 Canceling the display demonstration 4 Setting the clock 5 Preparing the remote controller 5 About discs 6 Basic operations 7 Listening to the radio 9 Listening to a disc 10 Connecting the other external components 11 Listening to the other external components...

Instructions
Page 5
Handling discs: • Do not touch the recording surface of the remote controller decreases, replace the battery. Preparing the remote controller When you use the remote controller for a long time. • Store the battery in a place where children cannot reach. • Do not recharge, short, disassemble, heat the ...or dispose of it in a fire. • Do not leave the battery with other than CR2025 or its equivalent. • Do not leave the remote controller in a place (such as sunshine, fire, or the like. See www.dtsc. Warning (to direct sunlight for the first time, pull out ...
Handling discs: • Do not touch the recording surface of the remote controller decreases, replace the battery. Preparing the remote controller When you use the remote controller for a long time. • Store the battery in a place where children cannot reach. • Do not recharge, short, disassemble, heat the ...or dispose of it in a fire. • Do not leave the battery with other than CR2025 or its equivalent. • Do not leave the remote controller in a place (such as sunshine, fire, or the like. See www.dtsc. Warning (to direct sunlight for the first time, pull out ...
Instructions
Page 6
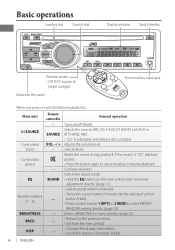
.... (page 10) Enters menu directly. (page 12) • Returns to bright sunlight. SOURCE VOL - / + - - Basic operations Loading slot Control dial Display window Ejects the disc Remote sensor • DO NOT expose to the previous menu. • Exit from the menu [Hold]. • Changes the display information. • Scrolls the display information...
.... (page 10) Enters menu directly. (page 12) • Returns to bright sunlight. SOURCE VOL - / + - - Basic operations Loading slot Control dial Display window Ejects the disc Remote sensor • DO NOT expose to the previous menu. • Exit from the menu [Hold]. • Changes the display information. • Scrolls the display information...
Instructions
Page 9
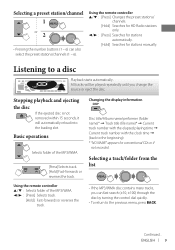
...Current track number with the clock time = (back to the previous menu, press BACK. Selecting a track/folder from the list Using the remote controller 5/∞ : Selects folder of the MP3/WMA [Press]Selects track. [Hold] Fast-forwards or reverses the track. ENGLISH 9 Basic...100) through the disc by turning the control dial quickly. • To return to the beginning) * "NO NAME" appears for stations manually. Using the remote controller 5/∞ : [Press] Changes the preset stations/ channels. [Hold] Searches for HD Radio stations only. 2/3 : [Press] Searches for stations automatically...
...Current track number with the clock time = (back to the previous menu, press BACK. Selecting a track/folder from the list Using the remote controller 5/∞ : Selects folder of the MP3/WMA [Press]Selects track. [Hold] Fast-forwards or reverses the track. ENGLISH 9 Basic...100) through the disc by turning the control dial quickly. • To return to the beginning) * "NO NAME" appears for stations manually. Using the remote controller 5/∞ : [Press] Changes the preset stations/ channels. [Hold] Searches for HD Radio stations only. 2/3 : [Press] Searches for stations automatically...


