Comparison Chart
Page 1
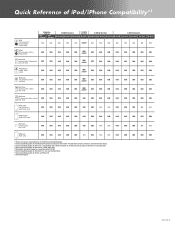
Compatibility depends on cell phone. *2 Bluetooth Adapter included *3 Receipt notification only *4 KS-BTA100 required iPod/iPhone Control iPod Control ✔ (USB) ✔ (USB) ✔ (USB) ✔ (USB/J-BUS*3) iPhone Control ✔ (USB) ✔ (USB) ✔ (USB) ✔ (USB) Battery Charge ✔ (USB) ✔ (USB) ✔ (USB) ✔ (USB/J-BUS*3) iPod/iPhone Video File Playback ✔*2 ✔*2 ✔*2 ✔*2 2-Way Control for iPod/iPhone*1 (Headunit/iPod or iPhone Mode) ✔ (USB) ✔ (USB) ✔ (USB) ✔...
Compatibility depends on cell phone. *2 Bluetooth Adapter included *3 Receipt notification only *4 KS-BTA100 required iPod/iPhone Control iPod Control ✔ (USB) ✔ (USB) ✔ (USB) ✔ (USB/J-BUS*3) iPhone Control ✔ (USB) ✔ (USB) ✔ (USB) ✔ (USB) Battery Charge ✔ (USB) ✔ (USB) ✔ (USB) ✔ (USB/J-BUS*3) iPod/iPhone Video File Playback ✔*2 ✔*2 ✔*2 ✔*2 2-Way Control for iPod/iPhone*1 (Headunit/iPod or iPhone Mode) ✔ (USB) ✔ (USB) ✔ (USB) ✔...
Comparison Chart
Page 2
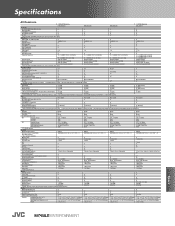
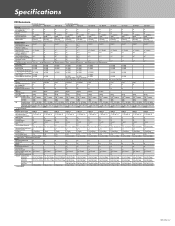
...;*2 *1 Available functions depend on your iPod/iPhone. Specifications CD Receivers 2-DIN CD Receivers 1-DIN CD Receivers KW-HDR720 KW-XR810 KW-XR610 KD-R820BT KD-R720 KD-HDR70 KD-HDR44 KD-R620 KD-R520 KD-R420 KD-R320 CD Player MP3/WMA Compatible with ID3 Tag/WMA Tag ✔ ✔ ✔ ✔ ✔ ✔ ✔ ✔ ✔ ✔ ✔...
...;*2 *1 Available functions depend on your iPod/iPhone. Specifications CD Receivers 2-DIN CD Receivers 1-DIN CD Receivers KW-HDR720 KW-XR810 KW-XR610 KD-R820BT KD-R720 KD-HDR70 KD-HDR44 KD-R620 KD-R520 KD-R420 KD-R320 CD Player MP3/WMA Compatible with ID3 Tag/WMA Tag ✔ ✔ ✔ ✔ ✔ ✔ ✔ ✔ ✔ ✔ ✔...
Compatibility Reference
Page 1
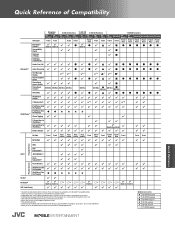
... ■ KS-BTA50 required ◆ KS-U39 required ★ KS-U30 required KT-HD300 required Quick Reference Please visit www.jvc.co.jp/english/car/ for details. *4 USB playback not supported for iPod/iPhone differs by model. KW- KW- KW- KW- Wired...● ✔ ▲ ✔✔ ✔ ✔ Hands Free Call 1-DIN CD Receivers KDR820BT Front KD-R720 Front KDHDR70 Front/ Rear KDHDR44 Front/ Rear KD-R620 KD-R520 KD-R420 KD-R320 Front/ Front/ Front/ Front/ Rear Rear Rear Rear ✔■ ✔■ ✔ Bluetooth® ...
... ■ KS-BTA50 required ◆ KS-U39 required ★ KS-U30 required KT-HD300 required Quick Reference Please visit www.jvc.co.jp/english/car/ for details. *4 USB playback not supported for iPod/iPhone differs by model. KW- KW- KW- KW- Wired...● ✔ ▲ ✔✔ ✔ ✔ Hands Free Call 1-DIN CD Receivers KDR820BT Front KD-R720 Front KDHDR70 Front/ Rear KDHDR44 Front/ Rear KD-R620 KD-R520 KD-R420 KD-R320 Front/ Front/ Front/ Front/ Rear Rear Rear Rear ✔■ ✔■ ✔ Bluetooth® ...
Compatibility Reference
Page 2
KW- NT50HDT NT30HD 2-DIN AV Receivers 1-DIN AV Receiver 2-DIN CD Receivers KW-AVX840 KW-AVX740 KW-AVX640 KD-AVX77 KW-HDR720 KW-XR810 KW-XR610 KD-R820BT 1-DIN CD Receivers KD-R720 KD-HDR70 KD-R620 KD-R520 *2 N/A N/A N/A N/A N/A J-BUS*8 N/A N/A N/A N/A N/A N/A N/A N/A USB USB USB USB USB USB/ J-... N/A USB USB USB N/A N/A USB USB USB USB USB N/A USB N/A N/A USB USB USB USB USB *1 Please visit www.jvc.co.jp/english/car/ for iPod/iPhone compatibility details. *2 Same compatibility applies for the following 4th generation and earlier iPod models: iPod...
KW- NT50HDT NT30HD 2-DIN AV Receivers 1-DIN AV Receiver 2-DIN CD Receivers KW-AVX840 KW-AVX740 KW-AVX640 KD-AVX77 KW-HDR720 KW-XR810 KW-XR610 KD-R820BT 1-DIN CD Receivers KD-R720 KD-HDR70 KD-R620 KD-R520 *2 N/A N/A N/A N/A N/A J-BUS*8 N/A N/A N/A N/A N/A N/A N/A N/A USB USB USB USB USB USB/ J-... N/A USB USB USB N/A N/A USB USB USB USB USB N/A USB N/A N/A USB USB USB USB USB *1 Please visit www.jvc.co.jp/english/car/ for iPod/iPhone compatibility details. *2 Same compatibility applies for the following 4th generation and earlier iPod models: iPod...
Printer Friendly Specs
Page 1
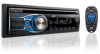
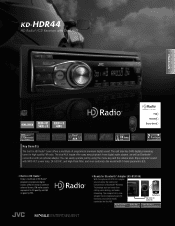
... adapter. Voice Dialing - Cell phone KS-BTA100 (optional) Hands-Free Calls - You can be easily connected via the AUX. Private Mode Audio Streaming - Redial Call - KD-HDR44 HD Radio®/CD Receiver with Dual AUX Headunits This HD Radio receiver enables: MP3/WMA MOS-FET 50W x 4 Recommended Features Ready for Bluetooth®...
... adapter. Voice Dialing - Cell phone KS-BTA100 (optional) Hands-Free Calls - You can be easily connected via the AUX. Private Mode Audio Streaming - Redial Call - KD-HDR44 HD Radio®/CD Receiver with Dual AUX Headunits This HD Radio receiver enables: MP3/WMA MOS-FET 50W x 4 Recommended Features Ready for Bluetooth®...
Printer Friendly Specs
Page 2
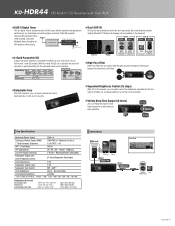
...for left and right in 32 steps, for increased safety or to suit the car environment. ✹Variety Beep Tone Support (6 tones) JVC's CD Receivers have 6-tone beep support for your ears. A separate setting for FM reception while driving. HD Radio®/CD Receiver ...5kHz Level -6~+6dB Q (band with you for security. ✹Separated Brightness Control (32 steps) With JVC's CD receivers, you can customize the sound for a safe drive and easy operation. HDR44 KD- Its advantages include the higher sensitivity 13µV AM reception, improved FM separation from 40dB to LPF figures...
...for left and right in 32 steps, for increased safety or to suit the car environment. ✹Variety Beep Tone Support (6 tones) JVC's CD Receivers have 6-tone beep support for your ears. A separate setting for FM reception while driving. HD Radio®/CD Receiver ...5kHz Level -6~+6dB Q (band with you for security. ✹Separated Brightness Control (32 steps) With JVC's CD receivers, you can customize the sound for a safe drive and easy operation. HDR44 KD- Its advantages include the higher sensitivity 13µV AM reception, improved FM separation from 40dB to LPF figures...
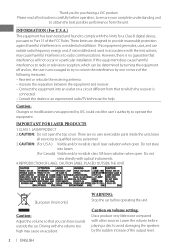
Instructions
Page 1
...the HD, HD Radio, and "Arc" logos are located on the top or bottom of Japan, Limited 1110DTSMDTJEIN ENGLISH ESPAÑOL FRANÇAIS KD-HDR44 CD RECEIVER / RECEPTOR CON CD / RÉCEPTEUR CD For canceling the display demonstration, see page 4. / Para cancelar la demostración en ... No. and Foreign Patents. EN, SP, FR © 2010 Victor Company of the cabinet. U.S. USA ONLY Call 1-800-252-5722 http://www.jvc.com We can help you! Pour l'installation et les raccordements, se référer au manuel séparé. INSTRUCTIONS MANUAL DE INSTRUCCIONES MANUEL...
...the HD, HD Radio, and "Arc" logos are located on the top or bottom of Japan, Limited 1110DTSMDTJEIN ENGLISH ESPAÑOL FRANÇAIS KD-HDR44 CD RECEIVER / RECEPTOR CON CD / RÉCEPTEUR CD For canceling the display demonstration, see page 4. / Para cancelar la demostración en ... No. and Foreign Patents. EN, SP, FR © 2010 Victor Company of the cabinet. U.S. USA ONLY Call 1-800-252-5722 http://www.jvc.com We can help you! Pour l'installation et les raccordements, se référer au manuel séparé. INSTRUCTIONS MANUAL DE INSTRUCCIONES MANUEL...
Instructions
Page 2
... LABEL: CAUTION LABEL, PLACED OUTSIDE THE UNIT. [European Union only] Caution: Adjust the volume so that you for purchasing a JVC product. Caution on volume setting: Discs produce very little noise compared with optical instruments. 4. This equipment generates, uses, and can...the instructions, may cause an accident. Reorient or relocate the receiving antenna. - There are designed to avoid damaging the speakers by JVC could void the user's authority to obtain the best possible performance from that interference will not occur in a residential installation. INFORMATION ...
... LABEL: CAUTION LABEL, PLACED OUTSIDE THE UNIT. [European Union only] Caution: Adjust the volume so that you for purchasing a JVC product. Caution on volume setting: Discs produce very little noise compared with optical instruments. 4. This equipment generates, uses, and can...the instructions, may cause an accident. Reorient or relocate the receiving antenna. - There are designed to avoid damaging the speakers by JVC could void the user's authority to obtain the best possible performance from that interference will not occur in a residential installation. INFORMATION ...
Instructions
Page 3
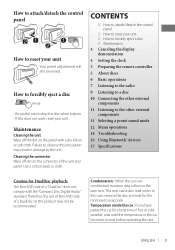
Maintenance Cleaning the unit Wipe off dirt on the laser lens. In this precaution may collect on the connector of a DualDisc on the panel with the "Compact Disc Digital Audio" standard. ENGLISH 3 Failure to observe this case, remove the disc and wait for the moisture to evaporate. This may not be erased. CONTENTS 3 How to attach/detach the control panel 3 How to reset your unit 3 How to forcibly eject a disc 3 Maintenance 4 Canceling the display demonstration 4 Setting the clock 5 Preparing the remote controller 5 About discs 6 Basic operations 7 Listening to the ...
Maintenance Cleaning the unit Wipe off dirt on the laser lens. In this precaution may collect on the connector of a DualDisc on the panel with the "Compact Disc Digital Audio" standard. ENGLISH 3 Failure to observe this case, remove the disc and wait for the moisture to evaporate. This may not be erased. CONTENTS 3 How to attach/detach the control panel 3 How to reset your unit 3 How to forcibly eject a disc 3 Maintenance 4 Canceling the display demonstration 4 Setting the clock 5 Preparing the remote controller 5 About discs 6 Basic operations 7 Listening to the ...
Instructions
Page 4
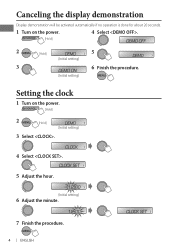
Canceling the display demonstration Display demonstration will be activated automatically if no operation is done for about 20 seconds. 1 Turn on the power. 4 Select . [Hold] 2 [Hold] 5 (Initial setting) 3 6 Finish the procedure. (Initial setting) Setting the clock 1 Turn on the power. [Hold] 2 [Hold] (Initial setting) 3 Select . 4 Select . 5 Adjust the hour. (Initial setting) 6 Adjust the minute. 7 Finish the procedure. 4 ENGLISH
Canceling the display demonstration Display demonstration will be activated automatically if no operation is done for about 20 seconds. 1 Turn on the power. 4 Select . [Hold] 2 [Hold] 5 (Initial setting) 3 6 Finish the procedure. (Initial setting) Setting the clock 1 Turn on the power. [Hold] 2 [Hold] (Initial setting) 3 Select . 4 Select . 5 Adjust the hour. (Initial setting) 6 Adjust the minute. 7 Finish the procedure. 4 ENGLISH

Instructions
Page 5
ca.gov/hazardouswaste/perchlorate If the effectiveness of explosion if battery is incorrectly replaced. About discs This unit can cause malfunction. on the disc, or use a disc with tape and insulate when throwing away or saving it in a fire. • Do not leave the battery with other than CR2025 or its equivalent. • Do not leave the remote controller in a place where children cannot reach. • Do not recharge, short, disassemble, heat the battery, or dispose of it . Replace only with the same or equivalent type. • Battery shall not be used : • Discs ...
ca.gov/hazardouswaste/perchlorate If the effectiveness of explosion if battery is incorrectly replaced. About discs This unit can cause malfunction. on the disc, or use a disc with tape and insulate when throwing away or saving it in a fire. • Do not leave the battery with other than CR2025 or its equivalent. • Do not leave the remote controller in a place where children cannot reach. • Do not recharge, short, disassemble, heat the battery, or dispose of it . Replace only with the same or equivalent type. • Battery shall not be used : • Discs ...
Instructions
Page 6
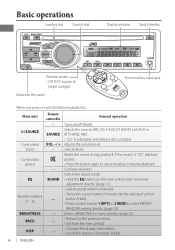
Detaches the panel Front auxiliary input jack When you press or hold the following button(s)... Selects the sound mode. • Hold the EQ button on /off [Hold]. Selects the sources (FM, CD, F-AUX, BT AUDIO or R-AUX or BT PHONE, AM). • "CD" is selectable only when a disc is "CD," playback pauses. • Press the button again to cancel muting or resume playback. Adjusts the volume level. Basic operations Loading slot Control dial Display window Ejects the disc Remote sensor • DO NOT expose to the previous menu. • Exit from the menu [Hold]. • ...
Detaches the panel Front auxiliary input jack When you press or hold the following button(s)... Selects the sound mode. • Hold the EQ button on /off [Hold]. Selects the sources (FM, CD, F-AUX, BT AUDIO or R-AUX or BT PHONE, AM). • "CD" is selectable only when a disc is "CD," playback pauses. • Press the button again to cancel muting or resume playback. Adjusts the volume level. Basic operations Loading slot Control dial Display window Ejects the disc Remote sensor • DO NOT expose to the previous menu. • Exit from the menu [Hold]. • ...
Instructions
Page 7
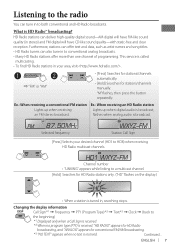
HD Radio stations can deliver high-quality digital sound-AM digital will have FM-like sound quality (in stereo) and FM digital will have CD-like sound quality-with static-free and clear reception. Ex.: When receiving a conventional FM station Ex.: When receiving an HD Radio station Lights up when receiving Lights up when digital audio is broadcast. Channel number • "LINKING" appears while linking to a multicast channel. [Hold] Searches for stations/channels manually. This service is tuned in, searching stops. an FM stereo broadcast. Selected frequency Station Call Sign [...
HD Radio stations can deliver high-quality digital sound-AM digital will have FM-like sound quality (in stereo) and FM digital will have CD-like sound quality-with static-free and clear reception. Ex.: When receiving a conventional FM station Ex.: When receiving an HD Radio station Lights up when receiving Lights up when digital audio is broadcast. Channel number • "LINKING" appears while linking to a multicast channel. [Hold] Searches for stations/channels manually. This service is tuned in, searching stops. an FM stereo broadcast. Selected frequency Station Call Sign [...
Instructions
Page 8
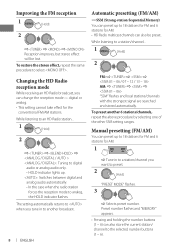
To restore the stereo effect, repeat the same procedure to analog, the HOLD indicator flashes. While listening to an HD Radio station... 1 [Hold] 2 ] ] ] : Tuning to digital audio or analog audio only. • HOLD indicator lights up to preset. 2 [Hold] "PRESET MODE" flashes. 3 ] Selects preset number. While listening to the selected number buttons (1 - 6). Preset number flashes and "MEMORY" appears. • Pressing and holding the number buttons (1 - 6) can preset up . : Switches between digital and analog audio automatically. • In the case when the radio ...
To restore the stereo effect, repeat the same procedure to analog, the HOLD indicator flashes. While listening to an HD Radio station... 1 [Hold] 2 ] ] ] : Tuning to digital audio or analog audio only. • HOLD indicator lights up to preset. 2 [Hold] "PRESET MODE" flashes. 3 ] Selects preset number. While listening to the selected number buttons (1 - 6). Preset number flashes and "MEMORY" appears. • Pressing and holding the number buttons (1 - 6) can preset up . : Switches between digital and analog audio automatically. • In the case when the radio ...
Instructions
Page 9
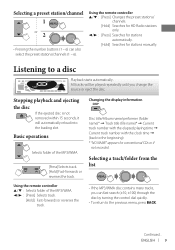
Listening to a disc Playback starts automatically. Changing the display information Disc title/Album name/performer (folder name)* = Track title (file name)* = Current track number with the elapsed playing time = Current track number with the clock time = (back to the beginning) * "NO NAME" appears for stations manually. All tracks will automatically reload into the loading slot. Continued... Selecting a track/folder from the list Using the remote controller 5/∞ : Selects folder of the MP3/WMA [Press]Selects track. [Hold] Fast-forwards or reverses the track. Basic ...
Listening to a disc Playback starts automatically. Changing the display information Disc title/Album name/performer (folder name)* = Track title (file name)* = Current track number with the elapsed playing time = Current track number with the clock time = (back to the beginning) * "NO NAME" appears for stations manually. All tracks will automatically reload into the loading slot. Continued... Selecting a track/folder from the list Using the remote controller 5/∞ : Selects folder of the MP3/WMA [Press]Selects track. [Hold] Fast-forwards or reverses the track. Basic ...
Instructions
Page 10
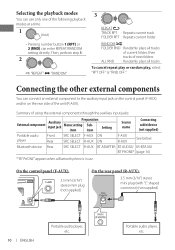
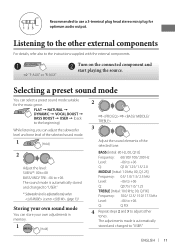
Bluetooth device Rear SRC SELECT R-AUX BT ADAPTER BT AUDIO/ KS-BTA100 BT PHONE* (page 16) * "BT PHONE" appears when a Bluetooth phone is in use only one of next folders ALL RND : Randomly plays all tracks To cancel repeat play or random play, select "RPT OFF" or "RND OFF." On the control panel (F-AUX): 3.5 mm (3/16") stereo mini plug (not supplied) On the rear panel (R-AUX): 3.5 mm (3/16") stereo mini plug (with "L" shaped connector) (not supplied) 10 ENGLISH Portable audio player, etc. Connecting the other external components You can connect an external component to the ...
Bluetooth device Rear SRC SELECT R-AUX BT ADAPTER BT AUDIO/ KS-BTA100 BT PHONE* (page 16) * "BT PHONE" appears when a Bluetooth phone is in use only one of next folders ALL RND : Randomly plays all tracks To cancel repeat play or random play, select "RPT OFF" or "RND OFF." On the control panel (F-AUX): 3.5 mm (3/16") stereo mini plug (not supplied) On the rear panel (R-AUX): 3.5 mm (3/16") stereo mini plug (with "L" shaped connector) (not supplied) 10 ENGLISH Portable audio player, etc. Connecting the other external components You can connect an external component to the ...
Instructions
Page 11
BASS [Initial: 80 Hz, 00, Q1.0] Frequency: 60/ 80/ 100/ 200 Hz Level: -06 to +06 Q: Q1.0/ 1.25/ 1.5/ 2.0 MIDDLE [Initial: 1.0 kHz, 00, Q1.25] Frequency: 0.5/ 1.0/ 1.5/ 2.5 kHz Level: -06 to +06 Q: Q0.75/ 1.0/ 1.25 TREBLE [Initial: 10.0 kHz, 00, Q FIX] Frequency: 10.0/ 12.5/ 15.0/ 17.5 kHz Level: -06 to +06 Q: Q FIX 4 Repeat steps 2 and 3 to adjust other external components For details, refer also to the instructions supplied with the external components. ~ ] "F-AUX" or "R-AUX" Ÿ Turn on the connected component and start playing the source. FLAT = NATURAL = ...
BASS [Initial: 80 Hz, 00, Q1.0] Frequency: 60/ 80/ 100/ 200 Hz Level: -06 to +06 Q: Q1.0/ 1.25/ 1.5/ 2.0 MIDDLE [Initial: 1.0 kHz, 00, Q1.25] Frequency: 0.5/ 1.0/ 1.5/ 2.5 kHz Level: -06 to +06 Q: Q0.75/ 1.0/ 1.25 TREBLE [Initial: 10.0 kHz, 00, Q FIX] Frequency: 10.0/ 12.5/ 15.0/ 17.5 kHz Level: -06 to +06 Q: Q FIX 4 Repeat steps 2 and 3 to adjust other external components For details, refer also to the instructions supplied with the external components. ~ ] "F-AUX" or "R-AUX" Ÿ Turn on the connected component and start playing the source. FLAT = NATURAL = ...
Instructions
Page 12
BALANCE *4 L06 - VOL ADJUST -05 - +05 [ 00 ] : Presets the volume adjustment level of each source (except "FM"), compared to produce a well-balanced sound at 5-second intervals). / OFF : Cancels. (Pressing DISP for more than . *2 Some characters or symbols will not be shown correctly (or will be blanked) on the display. Before adjustment, select the source you are using a two-speaker system, set the fader level to any other than one second can scroll the display regardless of the setting. *3 If you want to adjust. ("VOL ADJ FIX" appears on the display if "FM" is selected as ...
BALANCE *4 L06 - VOL ADJUST -05 - +05 [ 00 ] : Presets the volume adjustment level of each source (except "FM"), compared to produce a well-balanced sound at 5-second intervals). / OFF : Cancels. (Pressing DISP for more than . *2 Some characters or symbols will not be shown correctly (or will be blanked) on the display. Before adjustment, select the source you are using a two-speaker system, set the fader level to any other than one second can scroll the display regardless of the setting. *3 If you want to adjust. ("VOL ADJ FIX" appears on the display if "FM" is selected as ...
Instructions
Page 13
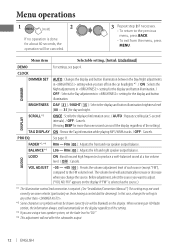
Menu item Selectable setting, [Initial: Underlined] L/O MODE SUB.W : Selects if the REAR/SW terminals are used for connecting a subwoofer (through an external amplifier). / REAR : Selects if the REAR/SW terminals are sent to prevent damaging the speakers.) / HIGH POWER : VOLUME 00 - AM interval is 50 kHz. R-AUX *9 ON / OFF : Enable or disable "R-AUX" in South American countries where FM interval is set to . *6 This setting does not work if is selected for connecting the speakers (through KS-BTA100). / OFF : Cancels. Low frequency signals are cut off from adjacent ...
Menu item Selectable setting, [Initial: Underlined] L/O MODE SUB.W : Selects if the REAR/SW terminals are used for connecting a subwoofer (through an external amplifier). / REAR : Selects if the REAR/SW terminals are sent to prevent damaging the speakers.) / HIGH POWER : VOLUME 00 - AM interval is 50 kHz. R-AUX *9 ON / OFF : Enable or disable "R-AUX" in South American countries where FM interval is set to . *6 This setting does not work if is selected for connecting the speakers (through KS-BTA100). / OFF : Cancels. Low frequency signals are cut off from adjacent ...
Instructions
Page 14
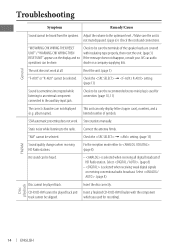
... back and Insert a finalized CD-R/CD-RW (finalize with insulating tape properly, then reset the unit. (page 3) If the message does not disappear, consult your JVC car audio dealer or a company supplying kits. Check to the auxiliary input jack. Reset the unit. (page 3) "F-AUX" or "R-AUX" cannot be selected. Check the...
... back and Insert a finalized CD-R/CD-RW (finalize with insulating tape properly, then reset the unit. (page 3) If the message does not disappear, consult your JVC car audio dealer or a company supplying kits. Check to the auxiliary input jack. Reset the unit. (page 3) "F-AUX" or "R-AUX" cannot be selected. Check the...
