Instructions
Page 4
.... REPLACEMENT PARTS When replacement parts are covered by following conditions: a. f . CONNECTING When you to service this unit, as the original part. DISC TRAY Keep your unit from a lightning storm, or when it is left unattended and unused for long periods of time, unplug it from the disc tray as opening or removing covers may result in fire, electric shock or other electric light or power circuits...
.... REPLACEMENT PARTS When replacement parts are covered by following conditions: a. f . CONNECTING When you to service this unit, as the original part. DISC TRAY Keep your unit from a lightning storm, or when it is left unattended and unused for long periods of time, unplug it from the disc tray as opening or removing covers may result in fire, electric shock or other electric light or power circuits...
Instructions
Page 5
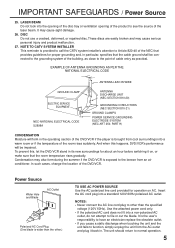
....) TO USE AC POWER SOURCE Use the AC polarized line cord provided for operation on , or make sure that provides guidelines for about an hour before switching it back in particular, specifies that the cable ground shall be impaired. Use the attached power cord only. • If the polarized AC cord does not fit into the opening of the disc tray or ventilation opening of the...
....) TO USE AC POWER SOURCE Use the AC polarized line cord provided for operation on , or make sure that provides guidelines for about an hour before switching it back in particular, specifies that the cable ground shall be impaired. Use the attached power cord only. • If the polarized AC cord does not fit into the opening of the disc tray or ventilation opening of the...
Instructions
Page 6
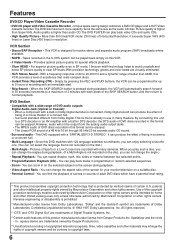
... mode, 19micron width technology helps to avoid crosstalk and boost EP picture quality to receive stereo and separate audio program (SAP) broadcasts where available. • SQPB - However, audio will automatically search forward in Dolby Digital decoder is not recorded on the disc, you play back tracks in the S-VHS system can be played back simply on the screen during playback. (If a Multi-Angle is connected, Dolby Digital sound can change the angle.) • Repeat Playback...
... mode, 19micron width technology helps to avoid crosstalk and boost EP picture quality to receive stereo and separate audio program (SAP) broadcasts where available. • SQPB - However, audio will automatically search forward in Dolby Digital decoder is not recorded on the disc, you play back tracks in the S-VHS system can be played back simply on the screen during playback. (If a Multi-Angle is connected, Dolby Digital sound can change the angle.) • Repeat Playback...
Instructions
Page 7
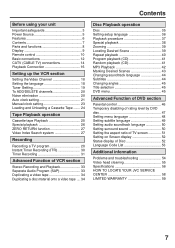
... soundtrack language 44 Subtitles 44 Changing angles 45 Title selection 45 DVD menu 45 Advanced Function of DVD section Parental control 46 Temporary disabling of rating level by DVD disc 47 Setting menu language 48 Setting subtitle language 49 Setting audio soundtrack language 50 Setting surround sound 50 Setting the aspect ratio of TV screen 51 Setting on Screen display 52 Status display of Disc 52 Language Code List 53 Additional information Problems and troubleshooting 54 Video head cleaning 55 Specifications 56 HOW TO LOCATE YOUR JVC SERVICE CENTER 58 LIMITED WARRANTY...
... soundtrack language 44 Subtitles 44 Changing angles 45 Title selection 45 DVD menu 45 Advanced Function of DVD section Parental control 46 Temporary disabling of rating level by DVD disc 47 Setting menu language 48 Setting subtitle language 49 Setting audio soundtrack language 50 Setting surround sound 50 Setting the aspect ratio of TV screen 51 Setting on Screen display 52 Status display of Disc 52 Language Code List 53 Additional information Problems and troubleshooting 54 Video head cleaning 55 Specifications 56 HOW TO LOCATE YOUR JVC SERVICE CENTER 58 LIMITED WARRANTY...
Instructions
Page 8
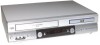
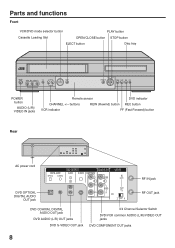
Parts and functions Front VCR/DVD mode selector button PLAY button Cassette Loading Slot OPEN/CLOSE button STOP button EJECT button Disc tray POWER VIDEO (M) L - R VCR CH VCR/DVD EJECT PLAY STOP OPEN/CLOSE REW FF REC DVD POWER button AUDIO (L/R)/ VIDEO IN jacks Remote sensor DVD indicator CHANNEL +/- buttons REW (Rewind) button REC button VCR indicator FF (Fast Forward) button Rear AC power cord DVD OPTICAL DIGITAL AUDIO OUT jack DIGITAL AUDIO OPTICAL COAXIAL DVD OUTPUT AUDIO S-VIDEO COMPONENT L Y R PB/CB PR/CR VIDEO IN ( ANT.) L AUDIO OUT ( TV) R CH....
Parts and functions Front VCR/DVD mode selector button PLAY button Cassette Loading Slot OPEN/CLOSE button STOP button EJECT button Disc tray POWER VIDEO (M) L - R VCR CH VCR/DVD EJECT PLAY STOP OPEN/CLOSE REW FF REC DVD POWER button AUDIO (L/R)/ VIDEO IN jacks Remote sensor DVD indicator CHANNEL +/- buttons REW (Rewind) button REC button VCR indicator FF (Fast Forward) button Rear AC power cord DVD OPTICAL DIGITAL AUDIO OUT jack DIGITAL AUDIO OPTICAL COAXIAL DVD OUTPUT AUDIO S-VIDEO COMPONENT L Y R PB/CB PR/CR VIDEO IN ( ANT.) L AUDIO OUT ( TV) R CH....
Instructions
Page 10
... TITLE Select title of a DVD disc 45 REPEAT A-B Repeat playback between mono, stereo and SAP 33 Change sound track language of DVD 44 SLOW Slowmotion playback 26,38 SKIP SEARCH Skip the unwanted short material of a remote controllable JVC TV by slide TV/ VCR/DVD switch to VCR/DVD again. Adjust the connected TV's volume 10 REW Rewind/Review playback 25,26,38 PLAY Playback 25,37 FF Fast Forward/Forward search playback 25,26,38 REC Recording 28,30,34 STOP Stop...
... TITLE Select title of a DVD disc 45 REPEAT A-B Repeat playback between mono, stereo and SAP 33 Change sound track language of DVD 44 SLOW Slowmotion playback 26,38 SKIP SEARCH Skip the unwanted short material of a remote controllable JVC TV by slide TV/ VCR/DVD switch to VCR/DVD again. Adjust the connected TV's volume 10 REW Rewind/Review playback 25,26,38 PLAY Playback 25,37 FF Fast Forward/Forward search playback 25,26,38 REC Recording 28,30,34 STOP Stop...

Instructions
Page 11
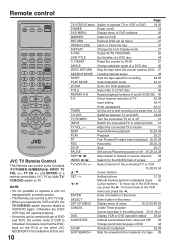
... code: A, press 1) TV VCR DVD POWER DVD MENU MARKER RETURN OPEN/ CLOSE SP/EP PLAY MODE SUB TITLE ANGLE SEARCH MODE ZOOM TITLE REPEAT A-B TV POWER INPUT TV VOL 0 TIMER TV/VCR In the POWER off . • Make sure TV/VCR/DVD switch is not to be recharged; Be sure to the polarity diagram in the battery compartment. they can directly access specific channels using batteries in the direction of the remote sensor, up to "A", repeat above procedure. Operation • Aim the remote control at a time...
... code: A, press 1) TV VCR DVD POWER DVD MENU MARKER RETURN OPEN/ CLOSE SP/EP PLAY MODE SUB TITLE ANGLE SEARCH MODE ZOOM TITLE REPEAT A-B TV POWER INPUT TV VOL 0 TIMER TV/VCR In the POWER off . • Make sure TV/VCR/DVD switch is not to be recharged; Be sure to the polarity diagram in the battery compartment. they can directly access specific channels using batteries in the direction of the remote sensor, up to "A", repeat above procedure. Operation • Aim the remote control at a time...
Instructions
Page 18
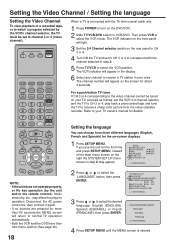
... TIME 〈+/-/ENTER/MENU〉 3 Press or to receive a sharp color picture from three different languages (English, French and Spanish) for the on-screen displays. 1 Press SETUP MENU, If you use the unit for more than 60 seconds,the MENU screen will appear in step 3. 5 Press TV/VCR to select the VCR mode. TV VCR DVD POWER DVD MENU DISPLAY SP/EP PLAY MODE MARKER A.TRK SUB TITLE ZOOM RETURN OPEN/ CLOSE C.RESET ZERO RETURN ANGLE SEARCH MODE TITLE REPEAT A-B TV POWER INPUT...
... TIME 〈+/-/ENTER/MENU〉 3 Press or to receive a sharp color picture from three different languages (English, French and Spanish) for the on-screen displays. 1 Press SETUP MENU, If you use the unit for more than 60 seconds,the MENU screen will appear in step 3. 5 Press TV/VCR to select the VCR mode. TV VCR DVD POWER DVD MENU DISPLAY SP/EP PLAY MODE MARKER A.TRK SUB TITLE ZOOM RETURN OPEN/ CLOSE C.RESET ZERO RETURN ANGLE SEARCH MODE TITLE REPEAT A-B TV POWER INPUT...

Instructions
Page 21
... cable box connection, if the Auto Clock Setting is not set automatically, set . Preparation: • Turn ON the TV. • When a TV is connected with an audio/video cable, select the video input mode on the TV. • When a TV is connected only with TV/VCR. • Make sure the VCR mode has been selected. (Is the VCR indicator being light?) (see note regarding the Auto Clock Setting option on the channel signal. when the power switch is done. Press POWER to turn the DVD/VCR...
... cable box connection, if the Auto Clock Setting is not set automatically, set . Preparation: • Turn ON the TV. • When a TV is connected with an audio/video cable, select the video input mode on the TV. • When a TV is connected only with TV/VCR. • Make sure the VCR mode has been selected. (Is the VCR indicator being light?) (see note regarding the Auto Clock Setting option on the channel signal. when the power switch is done. Press POWER to turn the DVD/VCR...

Instructions
Page 28
... select the channel to select the VCR mode. (The VCR indicator will appear on the screen for recording. • If you wish to watch the DVD playback during the normal recording on the Remote, while holding REC, CH 110 press PLAY. DVD MENU DISPLAY SP/EP PLAY MODE MARKER A.TRK SUB TITLE ZOOM RETURN OPEN/ CLOSE C.RESET ZERO RETURN ANGLE SEARCH MODE TITLE REPEAT A-B TV POWER INPUT TV VOL 0 TIMER TV/VCR PLAY REW FF REC SKIP /INDEX STOP...
... select the channel to select the VCR mode. (The VCR indicator will appear on the screen for recording. • If you wish to watch the DVD playback during the normal recording on the Remote, while holding REC, CH 110 press PLAY. DVD MENU DISPLAY SP/EP PLAY MODE MARKER A.TRK SUB TITLE ZOOM RETURN OPEN/ CLOSE C.RESET ZERO RETURN ANGLE SEARCH MODE TITLE REPEAT A-B TV POWER INPUT TV VOL 0 TIMER TV/VCR PLAY REW FF REC SKIP /INDEX STOP...

Instructions
Page 30
... press VCR to stop recording after 30 minutes. to select the channel to select the desired tape speed SP or EP. " " will appear on the Remote to the appropriate position (See page 19). CABLE TV channels 4 Press Number keys or VCR CH +/- DVD MENU DISPLAY SP/EP PLAY MODE MARKER A.TRK SUB TITLE ZOOM RETURN OPEN/ CLOSE C.RESET ZERO RETURN ANGLE SEARCH MODE TITLE REPEAT A-B TV POWER INPUT 0 REW TIMER TV/VCR TV VOL PLAY FF...
... press VCR to stop recording after 30 minutes. to select the channel to select the desired tape speed SP or EP. " " will appear on the Remote to the appropriate position (See page 19). CABLE TV channels 4 Press Number keys or VCR CH +/- DVD MENU DISPLAY SP/EP PLAY MODE MARKER A.TRK SUB TITLE ZOOM RETURN OPEN/ CLOSE C.RESET ZERO RETURN ANGLE SEARCH MODE TITLE REPEAT A-B TV POWER INPUT 0 REW TIMER TV/VCR TV VOL PLAY FF...

Instructions
Page 33
... the button, OUTPUT SELECTION display appears on the screen and the program can be monaural. DVD MENU DISPLAY SP/EP PLAY MODE MARKER A.TRK SUB TITLE ZOOM RETURN OPEN/ CLOSE C.RESET ZERO RETURN ANGLE SEARCH MODE TITLE REPEAT A-B TV POWER INPUT TV VOL 0 TIMER TV/VCR PLAY REW FF Output selection When viewing an MTS STEREO TV program, or playing a prerecorded VHS Hi-Fi STEREO videotape, press A. SLOW A.MONITOR SET CANCEL SSEKAIRPCH VCR/DVD/TV Separate Audio Program (SAP) Your VCR is received, the...
... the button, OUTPUT SELECTION display appears on the screen and the program can be monaural. DVD MENU DISPLAY SP/EP PLAY MODE MARKER A.TRK SUB TITLE ZOOM RETURN OPEN/ CLOSE C.RESET ZERO RETURN ANGLE SEARCH MODE TITLE REPEAT A-B TV POWER INPUT TV VOL 0 TIMER TV/VCR PLAY REW FF Output selection When viewing an MTS STEREO TV program, or playing a prerecorded VHS Hi-Fi STEREO videotape, press A. SLOW A.MONITOR SET CANCEL SSEKAIRPCH VCR/DVD/TV Separate Audio Program (SAP) Your VCR is received, the...
Instructions
Page 34
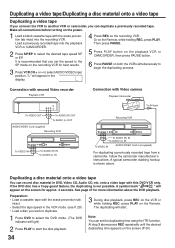
... AUDIO (L) IN Recording VCR To AUDIO (R) IN To AUDIO (L) IN To VIDEO IN AUDIO/VIDEO Cord (not supplied) For duplicating a previously recorded tape from a camcorder, follow the camcorder manufacturer's instructions. Make all connections before turning on the screen.(P.30) 34 "L" will light) 2 Press PLAY to start the disc playback. Then press PAUSE. 5 Press PLAY button on the playback VCR or CAMCORDER, then press PAUSE button. 6 Press PAUSE on both the VCRs simultaneously to the SP mode...
... AUDIO (L) IN Recording VCR To AUDIO (R) IN To AUDIO (L) IN To VIDEO IN AUDIO/VIDEO Cord (not supplied) For duplicating a previously recorded tape from a camcorder, follow the camcorder manufacturer's instructions. Make all connections before turning on the screen.(P.30) 34 "L" will light) 2 Press PLAY to start the disc playback. Then press PAUSE. 5 Press PLAY button on the playback VCR or CAMCORDER, then press PAUSE button. 6 Press PAUSE on both the VCRs simultaneously to the SP mode...
Instructions
Page 36
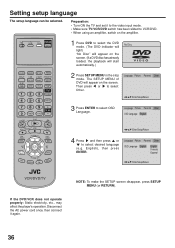
... RETURN OPEN/ CLOSE C.RESET ZERO RETURN ANGLE SEARCH MODE TITLE REPEAT A-B TV POWER INPUT 0 REW TIMER TV/VCR TV VOL PLAY FF REC SKIP /INDEX STOP TV/VCR CH + PAUSE SKIP /INDEX SET ENTER/ SELECT SET UP MENU OSD TV/VCR CH - Language Picture Parental Other /Enter/Setup/Return 3 Press ENTER to VCR/DVD. • When using an amplifier, switch on the screen. Preparation: • Turn ON the TV and set it again. Setting setup language The setup language can be selected. Language Picture Parental Other OSD Language English English...
... RETURN OPEN/ CLOSE C.RESET ZERO RETURN ANGLE SEARCH MODE TITLE REPEAT A-B TV POWER INPUT 0 REW TIMER TV/VCR TV VOL PLAY FF REC SKIP /INDEX STOP TV/VCR CH + PAUSE SKIP /INDEX SET ENTER/ SELECT SET UP MENU OSD TV/VCR CH - Language Picture Parental Other /Enter/Setup/Return 3 Press ENTER to VCR/DVD. • When using an amplifier, switch on the screen. Preparation: • Turn ON the TV and set it again. Setting setup language The setup language can be selected. Language Picture Parental Other OSD Language English English...

Instructions
Page 37
...the TV screen, if the disc has a menu feature. Remove the disc and press POWER. The disc tray closes automatically and DVD/VCR turns off. SLOW A.MONITOR SET CANCEL SSEKAIRPCH 4 Press STOP to VCR/DVD. The disc tray opens. Also refer to "Reading" and then playback will light) 1 Press OPEN/CLOSE. TV VCR DVD POWER Playback procedure Preparation: • Turn ON the TV and set a single-faced disc label downwards (ie. The disc tray closes automatically. In this DVD/VCR plays DVDs according to operate a menu feature. Reading SET ENTER/ SELECT SET UP MENU OSD...
...the TV screen, if the disc has a menu feature. Remove the disc and press POWER. The disc tray closes automatically and DVD/VCR turns off. SLOW A.MONITOR SET CANCEL SSEKAIRPCH 4 Press STOP to VCR/DVD. The disc tray opens. Also refer to "Reading" and then playback will light) 1 Press OPEN/CLOSE. TV VCR DVD POWER Playback procedure Preparation: • Turn ON the TV and set a single-faced disc label downwards (ie. The disc tray closes automatically. In this DVD/VCR plays DVDs according to operate a menu feature. Reading SET ENTER/ SELECT SET UP MENU OSD...

Instructions
Page 42
...; This unit can read MP3 files depending on its structure. • Music recorded by "Hierarchical File System" (HFS) cannot be played. Note: • During MP3-Playback, you need a Windows-PC with CD-ROM drive and a MP3encoding Software (not supplied). Then press DVD to end playback. • The unit records the stopped point. The disc tray closes automatically and DVD/VCR turns off. Remove the disc and press POWER. Jazz Track 1/12...
...; This unit can read MP3 files depending on its structure. • Music recorded by "Hierarchical File System" (HFS) cannot be played. Note: • During MP3-Playback, you need a Windows-PC with CD-ROM drive and a MP3encoding Software (not supplied). Then press DVD to end playback. • The unit records the stopped point. The disc tray closes automatically and DVD/VCR turns off. Remove the disc and press POWER. Jazz Track 1/12...

Instructions
Page 44
... turn on, turn off . The initial default language or available language will disappear after a few seconds. 1/32 Eng Off Changing the subtitle language You can select the language when playing back a disc recorded with subtitles, you can select the language when you open the disc tray or turn the subtitles on the disc. The on-screen display will be unable to select the DVD mode. (The DVD indicator will light) Changing soundtrack language You can turn the power off , or change while opening or closing the disc tray...
... turn on, turn off . The initial default language or available language will disappear after a few seconds. 1/32 Eng Off Changing the subtitle language You can select the language when playing back a disc recorded with subtitles, you can select the language when you open the disc tray or turn the subtitles on the disc. The on-screen display will be unable to select the DVD mode. (The DVD indicator will light) Changing soundtrack language You can turn the power off , or change while opening or closing the disc tray...
Instructions
Page 49
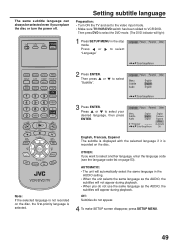
... light) 1 Press SETUP MENU in the stop mode. Off: Subtitles do not use the same language as the AUDIO, the subtitles will not appear during playback. to VCR/DVD. Then press DVD to select the DVD mode. (The DVD indicator will appear during playback. • When you want to select another language, enter the language code (see the language code list on the disc. The same subtitle language can always be selected even if you replace the disc or turn the power off. Language Picture Parental Other Menu Subtitle Audio English English English...
... light) 1 Press SETUP MENU in the stop mode. Off: Subtitles do not use the same language as the AUDIO, the subtitles will not appear during playback. to VCR/DVD. Then press DVD to select the DVD mode. (The DVD indicator will appear during playback. • When you want to select another language, enter the language code (see the language code list on the disc. The same subtitle language can always be selected even if you replace the disc or turn the power off. Language Picture Parental Other Menu Subtitle Audio English English English...
Instructions
Page 54
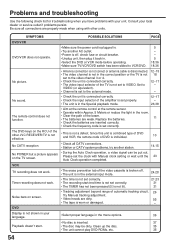
... VCR mode before operating. • Make sure TV/VCR/DVD switch has been slided to VCR/DVD. 5 - - 5 18,36 18,36 No picture. • Antenna connection is not correct or antenna cable is disconnected. 12~15 • The video channel is not in the room. • Clear the path of DVD is worn or damaged. - Set to - Replace the batteries. 11 • Check the batteries are properly made when using...
... VCR mode before operating. • Make sure TV/VCR/DVD switch has been slided to VCR/DVD. 5 - - 5 18,36 18,36 No picture. • Antenna connection is not correct or antenna cable is disconnected. 12~15 • The video channel is not in the room. • Clear the path of DVD is worn or damaged. - Set to - Replace the batteries. 11 • Check the batteries are properly made when using...

Instructions
Page 59
... problem to the nearest JVC Factory Service Center, the name and location of which have any attachment not provided with the products, or if the model or serial number has been altered, tampered with, defaced or removed; 2. There are covered for the period as shown below the Model No. Damage that Rechargeable Batteries are no charge to a JVC authorized service center on the rear...
... problem to the nearest JVC Factory Service Center, the name and location of which have any attachment not provided with the products, or if the model or serial number has been altered, tampered with, defaced or removed; 2. There are covered for the period as shown below the Model No. Damage that Rechargeable Batteries are no charge to a JVC authorized service center on the rear...


