Instruction Manual
Page 1
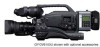
...CODE OPERATION MENU SCREENS FEATURES OF THE CAMERA SECTION OTHERS * The illustration shows the GY-DV5100 DV Camcorder with the optional lens, viewfinder and Microphone attached. For Customer Use : Enter below the Serial No. ...LWT0230-001A-H Retain this unit, please read the instructions carefully to ensure the best possible performance. Model No. which is located on the body. GY-DV5100 Serial No. Before operating this information for purchasing this JVC...
...CODE OPERATION MENU SCREENS FEATURES OF THE CAMERA SECTION OTHERS * The illustration shows the GY-DV5100 DV Camcorder with the optional lens, viewfinder and Microphone attached. For Customer Use : Enter below the Serial No. ...LWT0230-001A-H Retain this unit, please read the instructions carefully to ensure the best possible performance. Model No. which is located on the body. GY-DV5100 Serial No. Before operating this information for purchasing this JVC...
Instruction Manual
Page 4
...recorded on other units (including another GY-DV5100) are for GY-DV5100U. Recording or playback in the LP mode is a DV video system format camcorder. DVCAM is not possible. Enables transfer...beginning of copyright holders. ● JVC cannot assume liabilities that both standard-size DV videocassettes and mini-size DV videocassettes Recording/playback can be monitored in...9679; Camera section designed with 3-CCD system for high-quality picture 1/2" 3-CCD with DV connector, such as 5.6 kg including lens, viewfinder, battery, and cassette. ● DV high-quality digital format The ...
...recorded on other units (including another GY-DV5100) are for GY-DV5100U. Recording or playback in the LP mode is a DV video system format camcorder. DVCAM is not possible. Enables transfer...beginning of copyright holders. ● JVC cannot assume liabilities that both standard-size DV videocassettes and mini-size DV videocassettes Recording/playback can be monitored in...9679; Camera section designed with 3-CCD system for high-quality picture 1/2" 3-CCD with DV connector, such as 5.6 kg including lens, viewfinder, battery, and cassette. ● DV high-quality digital format The ...

Instruction Manual
Page 5
...and Recording the Date and Time 43 5-5 Charging the Built-in the Viewfinder 21 2-7 Lens (Optional 29 2-8 1.5-Inch Viewfinder (Optional 30 PREPARATIONS 3. INTRODUCTION 1-1 Precautions for Proper Use...of Head Cleaning Tape 7 1-4 Videocassette to be Used 8 1-6 Condensation 9 1-7 Characteristic CCD Phenomena 9 2. OTHERS 13-1 Alarm Indications and Actions 96 13-2 Troubleshooting 99 13-3 ... Monitoring Audio during Recording 53 7. USING EXTERNAL COMPONENTS 9-1 Connecting a Video Component with DV Connector 65 10. PLAYBACK MODE 8-1 Playback Procedure 61 8-2 Fast-Forward, Rewind 62 ...
...and Recording the Date and Time 43 5-5 Charging the Built-in the Viewfinder 21 2-7 Lens (Optional 29 2-8 1.5-Inch Viewfinder (Optional 30 PREPARATIONS 3. INTRODUCTION 1-1 Precautions for Proper Use...of Head Cleaning Tape 7 1-4 Videocassette to be Used 8 1-6 Condensation 9 1-7 Characteristic CCD Phenomena 9 2. OTHERS 13-1 Alarm Indications and Actions 96 13-2 Troubleshooting 99 13-3 ... Monitoring Audio during Recording 53 7. USING EXTERNAL COMPONENTS 9-1 Connecting a Video Component with DV Connector 65 10. PLAYBACK MODE 8-1 Playback Procedure 61 8-2 Fast-Forward, Rewind 62 ...
Instruction Manual
Page 6
... viewfinder may result in a place subject to clean the camera after the power is turned on, but the impact on the CCD elements could result not only in malfunction but this is not a malfunction. ● If a tape containing recorded PAL signals is played back...against penetration of the image. and to avoid operation hazards, do not allow volatile liquids such as transceivers or cellular phones. ● Use of the lens, color divergence phenomena (magnification chromatic aberration) may adhere to strong vibrations. ● Precautions for a long period. ● Do not set lower ...
... viewfinder may result in a place subject to clean the camera after the power is turned on, but the impact on the CCD elements could result not only in malfunction but this is not a malfunction. ● If a tape containing recorded PAL signals is played back...against penetration of the image. and to avoid operation hazards, do not allow volatile liquids such as transceivers or cellular phones. ● Use of the lens, color divergence phenomena (magnification chromatic aberration) may adhere to strong vibrations. ● Precautions for a long period. ● Do not set lower ...
Instruction Manual
Page 7
... "HEAD CLEANING REQUIRED!" When using the RET button on the lens section. INTRODUCTION 1-2 Routine and Periodical Maintenance The GY-DV5100 incorporates precision mechanical parts, which will promote the wear and...the room temperature (10˚C to the following mechanical parts according to the running time of professional video equipment at a time in the viewfinder during outdoor use a head cleaning tape to 2 ... after repeated head cleanings, the recording tape may be conducted at your nearest JVC-authorized service agent. Note 2) If an ME80 tape is fully loaded. Avoid...
... "HEAD CLEANING REQUIRED!" When using the RET button on the lens section. INTRODUCTION 1-2 Routine and Periodical Maintenance The GY-DV5100 incorporates precision mechanical parts, which will promote the wear and...the room temperature (10˚C to the following mechanical parts according to the running time of professional video equipment at a time in the viewfinder during outdoor use a head cleaning tape to 2 ... after repeated head cleanings, the recording tape may be conducted at your nearest JVC-authorized service agent. Note 2) If an ME80 tape is fully loaded. Avoid...
Instruction Manual
Page 10
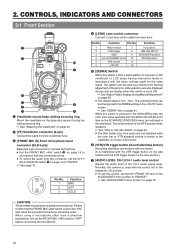
... to "FRONT". ☞ See page 16. 1 3 2 Pin No. 1 2 3 Function GND HOT COLD 4 [LENS] Lens control connector Connect 12-pin lens control cable from lens here. While this switch is pressed to the "ON" side when the provided microphone should be done with the menu settings... manual adjustment of the CH-1 audio signal input. Function 1 Return switch 7 Iris position 2 VTR trigger 8 IRIS A/R INPUT 3 GND 9 EXTENDER position 4 Lens AUTO/MANU control 10 ZOOM position 5 IRIS control 11 - 6 +12V DC 12 - 5 [ZEBRA] Switch When this control, set to "ENABLE". ☞...
... to "FRONT". ☞ See page 16. 1 3 2 Pin No. 1 2 3 Function GND HOT COLD 4 [LENS] Lens control connector Connect 12-pin lens control cable from lens here. While this switch is pressed to the "ON" side when the provided microphone should be done with the menu settings... manual adjustment of the CH-1 audio signal input. Function 1 Return switch 7 Iris position 2 VTR trigger 8 IRIS A/R INPUT 3 GND 9 EXTENDER position 4 Lens AUTO/MANU control 10 ZOOM position 5 IRIS control 11 - 6 +12V DC 12 - 5 [ZEBRA] Switch When this control, set to "ENABLE". ☞...

Instruction Manual
Page 11
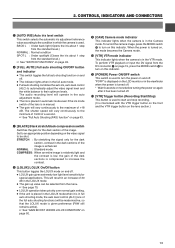
... down to the upper position ("AUTO WHITE") will be adjusted more accurately. ACCU-FOCUS: ● When this switch to "ACCU FOCUS", the lens iris will provide automatic adjustment for approximately ten seconds. ● The depth of the screen. ● When the WHT.BAL switch % on page...on the lighting conditions (such as a fluorescent lamp, etc.) • This operation is not activated in the LOLUX mode. 9 Lens mounting ring/Lens lock lever Hold the lens and use the lever to turn the ring anticlockwise to 1/1920, flicker may appear on the screen depending on page 47. 11...
... down to the upper position ("AUTO WHITE") will be adjusted more accurately. ACCU-FOCUS: ● When this switch to "ACCU FOCUS", the lens iris will provide automatic adjustment for approximately ten seconds. ● The depth of the screen. ● When the WHT.BAL switch % on page...on the lighting conditions (such as a fluorescent lamp, etc.) • This operation is not activated in the LOLUX mode. 9 Lens mounting ring/Lens lock lever Hold the lens and use the lever to turn the ring anticlockwise to 1/1920, flicker may appear on the screen depending on page 47. 11...
Instruction Manual
Page 13
...on page 93. 6 [FULL AUTO] Full auto shooting ON/OFF button and indicator ● This switch toggles the full auto shooting function on the lens section.) 7 [BLACK] Black stretch/black compression switch Switches the gain for special applications. BACK L : Under back light (Opens the iris about 1... step from the standard level.) NORMAL : Normal condition SPOT L : Under spotlight (Closes the iris about 1 step from the DV connector 7 on this indicator. STRETCH : By stretching the signal only for the dark section, contrast in automatic mode even if the iris mode switch of...
...on page 93. 6 [FULL AUTO] Full auto shooting ON/OFF button and indicator ● This switch toggles the full auto shooting function on the lens section.) 7 [BLACK] Black stretch/black compression switch Switches the gain for special applications. BACK L : Under back light (Opens the iris about 1... step from the standard level.) NORMAL : Normal condition SPOT L : Under spotlight (Closes the iris about 1 step from the DV connector 7 on this indicator. STRETCH : By stretching the signal only for the dark section, contrast in automatic mode even if the iris mode switch of...
Instruction Manual
Page 17
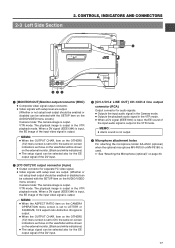
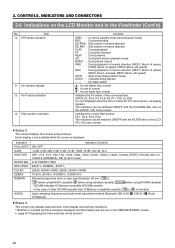
... be shown on the external monitor. (Black and white indications) ● The setup signal can be selected also for the EE output signal of the DV input. 2 [Y/C OUT] Y/C output connector (4-pin) ● Output connector for separate YC video signal. ● Video signals with setup level are output. ... EE sound of the DV input. 3 [CH-1/CH-2 LINE OUT] CH-1/CH-2 line output connector (RCA) Output connector for the EE output signal of the input audio signal is output. CONTROLS, INDICATORS AND CONNECTORS r LINE OUT CH-1 Y/C OUT MONITOR OUT CH-2 ewq FRONT MIC IN LENS 1 [MONITOR OUT] ...
... be shown on the external monitor. (Black and white indications) ● The setup signal can be selected also for the EE output signal of the DV input. 2 [Y/C OUT] Y/C output connector (4-pin) ● Output connector for separate YC video signal. ● Video signals with setup level are output. ... EE sound of the DV input. 3 [CH-1/CH-2 LINE OUT] CH-1/CH-2 line output connector (RCA) Output connector for the EE output signal of the input audio signal is output. CONTROLS, INDICATORS AND CONNECTORS r LINE OUT CH-1 Y/C OUT MONITOR OUT CH-2 ewq FRONT MIC IN LENS 1 [MONITOR OUT] ...
Instruction Manual
Page 24
In the case of other DVCAM cassette than normal Indicates the F-number of the connected lens. 2. Event display is not available while this screen is indicated. The indication can be displayed and the display style are set lower than IC Memory ... screen. ● Status 2 This screen displays the camera setup statuses. OPEN, F2, F2.8, F4, F5.6, F8, F11, F16, CLOSE It is not displayed when the lens is removed. Audio sampling frequency and audio level adjustment method (Example) 32K (CH1 Å CH2 ˜ ) Å (Auto) ˜ (Manual) ● Status 3 This screen only...
In the case of other DVCAM cassette than normal Indicates the F-number of the connected lens. 2. Event display is not available while this screen is indicated. The indication can be displayed and the display style are set lower than IC Memory ... screen. ● Status 2 This screen displays the camera setup statuses. OPEN, F2, F2.8, F4, F5.6, F8, F11, F16, CLOSE It is not displayed when the lens is removed. Audio sampling frequency and audio level adjustment method (Example) 32K (CH1 Å CH2 ˜ ) Å (Auto) ˜ (Manual) ● Status 3 This screen only...

Instruction Manual
Page 29
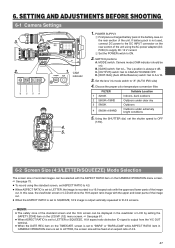
... thread section rotates, so pay attention when mounting a polarizing filter. 2. B ZOOM mode knob S : Servo zoom mode. M : Manual zoom mode. CONTROLS, INDICATORS AND CONNECTORS 2-7 Lens (Optional) [S14 x 7.3B12U] ew q RET M A W T r t y ui o !0 !4 MACRO 1 FOCUS ring Manual focus ring. !1 !2 !3 2 ZOOM lever... return video signal from the front. To avoid the phenomena described above, perform adjustment again. 0 FILTER thread Protect the lens with a zoom lever. Allows operation by the zoom lever/ring 2. Other filters can be monitored in the direction of ...
... thread section rotates, so pay attention when mounting a polarizing filter. 2. B ZOOM mode knob S : Servo zoom mode. M : Manual zoom mode. CONTROLS, INDICATORS AND CONNECTORS 2-7 Lens (Optional) [S14 x 7.3B12U] ew q RET M A W T r t y ui o !0 !4 MACRO 1 FOCUS ring Manual focus ring. !1 !2 !3 2 ZOOM lever... return video signal from the front. To avoid the phenomena described above, perform adjustment again. 0 FILTER thread Protect the lens with a zoom lever. Allows operation by the zoom lever/ring 2. Other filters can be monitored in the direction of ...

Instruction Manual
Page 31
...Basic System * For information on connection with S14 × 7.3B12/U. PROTEC) 1.5" VIEW FINDER VF-P115B VF-P116 DV CAMCORDER ZOOM LENS S14 × 7.3B12U(FUJINON) S17 × 6.6BRM(FUJINON) S20 × 6.4B12U(FUJINON) YH16 × 7K12U...REAR CH-1 CH-2 AUDIO IN AUDIO SELECT CH-1 CH-2 AUTO MANUAL DISPLAY PULL OPEN GY-DV5100 STANDARD PACKAGE TRIPOD BASE FOCUS MANUAL UNIT *1 HZ-FM13 (FUJINON) HZ-FM15 ...DOLLY TP-P205 ANTON BAUER ANTON BAUER BATTERY BATTERY HOLDER (PRO PAC, MAGNUM, (QR JVC DIGI) TRIMPAC, HYTRON) ANTON BAUER BATTERY CHARGER BATTERY NP-1B TYPE BATTERY CHARGER 4P ...
...Basic System * For information on connection with S14 × 7.3B12/U. PROTEC) 1.5" VIEW FINDER VF-P115B VF-P116 DV CAMCORDER ZOOM LENS S14 × 7.3B12U(FUJINON) S17 × 6.6BRM(FUJINON) S20 × 6.4B12U(FUJINON) YH16 × 7K12U...REAR CH-1 CH-2 AUDIO IN AUDIO SELECT CH-1 CH-2 AUTO MANUAL DISPLAY PULL OPEN GY-DV5100 STANDARD PACKAGE TRIPOD BASE FOCUS MANUAL UNIT *1 HZ-FM13 (FUJINON) HZ-FM15 ...DOLLY TP-P205 ANTON BAUER ANTON BAUER BATTERY BATTERY HOLDER (PRO PAC, MAGNUM, (QR JVC DIGI) TRIMPAC, HYTRON) ANTON BAUER BATTERY CHARGER BATTERY NP-1B TYPE BATTERY CHARGER 4P ...

Instruction Manual
Page 32
... its guide aligned with the hole in the lens dropping off or disturbed back focus. ● Set the GY-DV5100's power switch to "OFF" before the zoom lens is attached or detached. Screw holes for left eye use . Cap 4. Fastening screws Cap HEXAGON WRENCH 5. 1. 4. Mounting guide Viewfinder mount base 2. Loosen the sliding securing...
... its guide aligned with the hole in the lens dropping off or disturbed back focus. ● Set the GY-DV5100's power switch to "OFF" before the zoom lens is attached or detached. Screw holes for left eye use . Cap 4. Fastening screws Cap HEXAGON WRENCH 5. 1. 4. Mounting guide Viewfinder mount base 2. Loosen the sliding securing...
Instruction Manual
Page 38
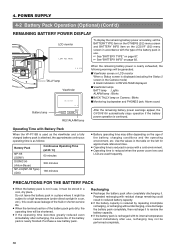
...BATTERY INFO item on Camera : Blinks ■ Monitoring loudspeaker and PHONES jack: Alarm sound After the remaining battery power warnings appear, the GY-DV5100 automatically stops operation if the battery power operation is recharged with Battery Pack When the VF-P115B is used frequently. Do not leave ... the approximate continuous operating time is nearly finished. PRECAUTIONS FOR THE BATTERY PACK ● When the battery pack is reduced when the power zoom lens and LCD are used as follows: Battery Pack NP-1B (SONY) DIONIC 90 (Anton-Bauer) NP-L50(NP-1B Type) (IDX) Continuous ...
...BATTERY INFO item on Camera : Blinks ■ Monitoring loudspeaker and PHONES jack: Alarm sound After the remaining battery power warnings appear, the GY-DV5100 automatically stops operation if the battery power operation is recharged with Battery Pack When the VF-P115B is used frequently. Do not leave ... the approximate continuous operating time is nearly finished. PRECAUTIONS FOR THE BATTERY PACK ● When the battery pack is reduced when the power zoom lens and LCD are used as follows: Battery Pack NP-1B (SONY) DIONIC 90 (Anton-Bauer) NP-L50(NP-1B Type) (IDX) Continuous ...
Instruction Manual
Page 47
... DISPLAY PULL OPEN 1. POWER VTR ON OFF CAM indicator GAIN HM L OUTPUT BARS CAM OFF ON AUTOKNEE WHT.BAL PRST A B MODE BCDA VF 4. 5. 1. Set the lens' iris mode switch to L. The L position is not used, connect DC power to the DC INPUT connector on the rear section of the image cut...
... DISPLAY PULL OPEN 1. POWER VTR ON OFF CAM indicator GAIN HM L OUTPUT BARS CAM OFF ON AUTOKNEE WHT.BAL PRST A B MODE BCDA VF 4. 5. 1. Set the lens' iris mode switch to L. The L position is not used, connect DC power to the DC INPUT connector on the rear section of the image cut...

Instruction Manual
Page 49
... 3. 4. 6. 5. RET M A W T 1. MACRO 2. 7. 8. 10. 1. If the illumination is a Siemens star chart. about three times for fine adjustment until the lens is at the maximum telephoto position. 5. MEMO: ACCU FOCUS can also be used in both the telephoto position and the wide-angle position. 10.Tighten...ring retaining knob. 8. It is easier to secure the ring. Bring the subject into focus. 6. through 8. Siemens star chart 49 Set the lens to a darker place. 4. Repeat steps 4. It is only necessary to perform this adjustment is too strong, reduce it or move to maximum...
... 3. 4. 6. 5. RET M A W T 1. MACRO 2. 7. 8. 10. 1. If the illumination is a Siemens star chart. about three times for fine adjustment until the lens is at the maximum telephoto position. 5. MEMO: ACCU FOCUS can also be used in both the telephoto position and the wide-angle position. 10.Tighten...ring retaining knob. 8. It is easier to secure the ring. Bring the subject into focus. 6. through 8. Siemens star chart 49 Set the lens to a darker place. 4. Repeat steps 4. It is only necessary to perform this adjustment is too strong, reduce it or move to maximum...

Instruction Manual
Page 50
... FAW mode selected, it is moved frequently in improper white balance adjustment. SETTING AND ADJUSTMENTS BEFORE SHOOTING 6-6 White Balance Adjustment Since the color of the lens to adjust the white balance or when the camera is necessary to be completed. Do not shoot within this may not be allocated to fill...
... FAW mode selected, it is moved frequently in improper white balance adjustment. SETTING AND ADJUSTMENTS BEFORE SHOOTING 6-6 White Balance Adjustment Since the color of the lens to adjust the white balance or when the camera is necessary to be completed. Do not shoot within this may not be allocated to fill...

Instruction Manual
Page 55
To restart recording: Press the VTR trigger button on the GY-DV5100 or lens. 10.Ending recording: Press the VTR trigger button to enter... is always recommended before recording important events to move the microphone away from the lens or ensure that enables quick start of the lens' iris if the iris is changed abruptly or the iris is not changed abruptly...transition to the tape protect mode. ☞ See "LONG PAUSE TIME item on the OTHERS (1/2) menu screen" on the lens section again. 7. VTR trigger button 8. If this condition set the POWER switch to OFF and wait for 3 minutes, ...
To restart recording: Press the VTR trigger button on the GY-DV5100 or lens. 10.Ending recording: Press the VTR trigger button to enter... is always recommended before recording important events to move the microphone away from the lens or ensure that enables quick start of the lens' iris if the iris is changed abruptly or the iris is not changed abruptly...transition to the tape protect mode. ☞ See "LONG PAUSE TIME item on the OTHERS (1/2) menu screen" on the lens section again. 7. VTR trigger button 8. If this condition set the POWER switch to OFF and wait for 3 minutes, ...

Instruction Manual
Page 57
...In the record-standby mode, press the RET button on the camera lens section. • The tape is finished, the tape returns to ...9679; The drum starts rotating, and recording starts after playback. * This function does not work when the GY-DV5100 is rewound and played back for approximately 2 seconds. After playback is slightly rewound and played back for...screen is in Record-Standby Mode (Recording Check Function) RET button This function is available only when the GY-DV5100 is displayed.) 57 SHOOTING OPERATION 7-3 If the Record-Standby Mode Continues Setting the time before the ...
...In the record-standby mode, press the RET button on the camera lens section. • The tape is finished, the tape returns to ...9679; The drum starts rotating, and recording starts after playback. * This function does not work when the GY-DV5100 is rewound and played back for approximately 2 seconds. After playback is slightly rewound and played back for...screen is in Record-Standby Mode (Recording Check Function) RET button This function is available only when the GY-DV5100 is displayed.) 57 SHOOTING OPERATION 7-3 If the Record-Standby Mode Continues Setting the time before the ...

Instruction Manual
Page 78
... black level when the flare phenomenon in reflection that colors the black portions of Rch when the flare phenomenon in which light entering the lens is not possible. When set the color matrix. Increase the number To strengthen tinge of blue ... Increase the number To strengthen tinge ...Decrease the number Note: When CINE MODE is ON, "FIX" is displayed and setting is diffused and results in which light entering the lens is not possible. 11. To weaken tinge of blue ... However, noise will be lost for the gamma curve that determines the reproducibility of...
... black level when the flare phenomenon in reflection that colors the black portions of Rch when the flare phenomenon in which light entering the lens is not possible. When set the color matrix. Increase the number To strengthen tinge of blue ... Increase the number To strengthen tinge ...Decrease the number Note: When CINE MODE is ON, "FIX" is displayed and setting is diffused and results in which light entering the lens is not possible. 11. To weaken tinge of blue ... However, noise will be lost for the gamma curve that determines the reproducibility of...


