Instruction Manual
Page 2
... Hz in the USA and Canada, AC 110 - 240 V`, 50/60 Hz in the following pages to the presence of this digital video camera. WARNING: TO PREVENT FIRE OR SHOCK HAZARD, DO NOT EXPOSE THIS UNIT TO RAIN OR MOISTURE. This camcorder is intended to alert the user...and safety caution are recommended to carefully read these as well. •Basic and advanced features/operation are separated for remote control unit) The battery used with button locations, etc. Before use, please read thoroughly the Safety Precautions and Safety Instructions that you for playback with Maxell, Panasonic ...
... Hz in the USA and Canada, AC 110 - 240 V`, 50/60 Hz in the following pages to the presence of this digital video camera. WARNING: TO PREVENT FIRE OR SHOCK HAZARD, DO NOT EXPOSE THIS UNIT TO RAIN OR MOISTURE. This camcorder is intended to alert the user...and safety caution are recommended to carefully read these as well. •Basic and advanced features/operation are separated for remote control unit) The battery used with button locations, etc. Before use, please read thoroughly the Safety Precautions and Safety Instructions that you for playback with Maxell, Panasonic ...
Instruction Manual
Page 3
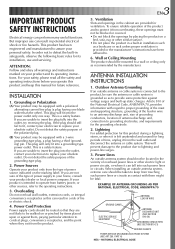
... or ceiling only as recommended by items placed upon or against voltage surges and built-up static charges. Power Sources Operate your product only from battery power, or other electric light or power circuits, or where it can fall into such power lines or circuits. ANTENNA INSTALLATION INSTRUCTIONS 1. Power Lines An...
... or ceiling only as recommended by items placed upon or against voltage surges and built-up static charges. Power Sources Operate your product only from battery power, or other electric light or power circuits, or where it can fall into such power lines or circuits. ANTENNA INSTALLATION INSTRUCTIONS 1. Power Lines An...
Instruction Manual
Page 5
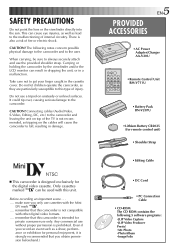
... this unit. sion beforehand.) 5 EN PROVIDED ACCESSORIES • AC Power Adapter/Charger AA-V20U TW •Remote Control Unit RM-V711U •Battery Pack BN-V207U • Lithium Battery CR2025 (for personal enjoyment, it is intended for the digital video cassette. Carrying or holding the camcorder by the viewfinder and/or the...
... this unit. sion beforehand.) 5 EN PROVIDED ACCESSORIES • AC Power Adapter/Charger AA-V20U TW •Remote Control Unit RM-V711U •Battery Pack BN-V207U • Lithium Battery CR2025 (for personal enjoyment, it is intended for the digital video cassette. Carrying or holding the camcorder by the viewfinder and/or the...
Instruction Manual
Page 6
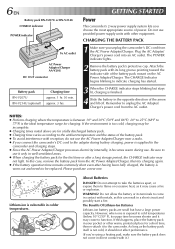
...in contact with reception, do not use the AC Power Adapter/Charger near a radio. ● If you 're using a heating pad, make sure the battery pack does not come in the opposite direction of power. Be sure to use provided power supply units with its terminals to cold temperatures (below...176;C (50°F and 86°F). 20° to 25°C (68°F to 77°F) is the ideal temperature range for a fully discharged battery pack. ● Charging time varies according to unplug the AC Adapter/ Charger's power cord from the AC outlet. However, when one . Plug the AC Adapter...
...in contact with reception, do not use the AC Power Adapter/Charger near a radio. ● If you 're using a heating pad, make sure the battery pack does not come in the opposite direction of power. Be sure to use provided power supply units with its terminals to cold temperatures (below...176;C (50°F and 86°F). 20° to 25°C (68°F to 77°F) is the ideal temperature range for a fully discharged battery pack. ● Charging time varies according to unplug the AC Adapter/ Charger's power cord from the AC outlet. However, when one . Plug the AC Adapter...
Instruction Manual
Page 7
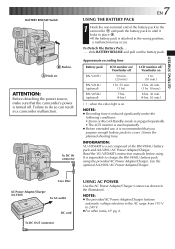
...20 min. (1 hr. 10 min.) 8 hrs. 30 min. (4 hrs. 30 min.) ( ) : when the video light is a set composed of the battery pack to cover 3 times the planned shooting time. NOTES: ● The provided AC Power Adapter/Charger features automatic voltage selection in the AC range from...to do so can result in the wrong position, a malfunction may occur. GETTING STARTED BATTERY RELEASE Switch B Push in the illustration). slide BATTERY RELEASE and pull out the battery pack. Approximate recording time Battery pack BN-V207U BN-V214U (optional) BN-V856U (optional) LCD monitor on/ Viewfinder...
...20 min. (1 hr. 10 min.) 8 hrs. 30 min. (4 hrs. 30 min.) ( ) : when the video light is a set composed of the battery pack to cover 3 times the planned shooting time. NOTES: ● The provided AC Power Adapter/Charger features automatic voltage selection in the AC range from...to do so can result in the wrong position, a malfunction may occur. GETTING STARTED BATTERY RELEASE Switch B Push in the illustration). slide BATTERY RELEASE and pull out the battery pack. Approximate recording time Battery pack BN-V207U BN-V214U (optional) BN-V856U (optional) LCD monitor on/ Viewfinder...
Instruction Manual
Page 8
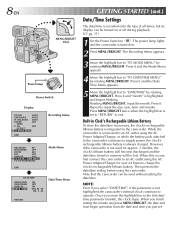
...", if the parameter is integrated in the camcorder. When this occurs, first connect the camcorder to charge the clock's rechargeable lithium battery. Repeat to operate. Then perform the date/time setting before using the AC Power Adapter/Charger for approx. 3 months, the clock's lithium...time. Note that the camcorder can be lost. The Recording Menu appears. 3 Move the highlight bar to supply power, the clock's rechargeable lithium battery is set . Rotating MENU/BRIGHT, input the month. Press MENU/BRIGHT twice when the highlight bar is always charged. While the camcorder is ...
...", if the parameter is integrated in the camcorder. When this occurs, first connect the camcorder to charge the clock's rechargeable lithium battery. Repeat to operate. Then perform the date/time setting before using the AC Power Adapter/Charger for approx. 3 months, the clock's lithium...time. Note that the camcorder can be lost. The Recording Menu appears. 3 Move the highlight bar to supply power, the clock's rechargeable lithium battery is set . Rotating MENU/BRIGHT, input the month. Press MENU/BRIGHT twice when the highlight bar is always charged. While the camcorder is ...
Instruction Manual
Page 9
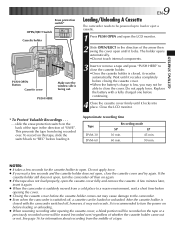
...PUSH HERE" to close the cassette holder. •Once the cassette holder is closed with a fully charged one before loading it. Replace the battery with the camcorder switched off, however, it locks. Approximate recording time Tape DVM-30 DVM-60 Recording mode SP LP 30 min. 45 min... or unloading. ● When resuming recording after opening the cover. ● Closing the cassette cover before closing the cassette cover. •When the battery's charge is recommended to load or eject a cassette. 1 Press PUSH OPEN and open the LCD monitor. 2 Slide OPEN/EJECT in the direction of...
...PUSH HERE" to close the cassette holder. •Once the cassette holder is closed with a fully charged one before loading it. Replace the battery with the camcorder switched off, however, it locks. Approximate recording time Tape DVM-30 DVM-60 Recording mode SP LP 30 min. 45 min... or unloading. ● When resuming recording after opening the cover. ● Closing the cassette cover before closing the cassette cover. •When the battery's charge is recommended to load or eject a cassette. 1 Press PUSH OPEN and open the LCD monitor. 2 Slide OPEN/EJECT in the direction of...
Instruction Manual
Page 15
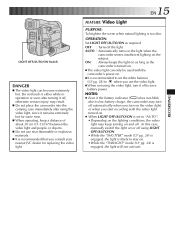
...; pg. 28) to "AUTO": •Depending on the lighting conditions, the video light may turn on the video light, or when you consult your nearest JVC dealer for some time. Ⅲ When operating, keep a distance of about 30 cm (11-13/16") between the video light and people or objects. &#...While the "TWILIGHT" mode (੬ pg. 24) is recommended that you start recording with the camcorder's power on the subject. NOTES: ● Even if the battery indicator ( ) does not blink due to low battery charge, the camcorder may keep turning on or off using the video light, turn it off to save...
...; pg. 28) to "AUTO": •Depending on the lighting conditions, the video light may turn on the video light, or when you consult your nearest JVC dealer for some time. Ⅲ When operating, keep a distance of about 30 cm (11-13/16") between the video light and people or objects. &#...While the "TWILIGHT" mode (੬ pg. 24) is recommended that you start recording with the camcorder's power on the subject. NOTES: ● Even if the battery indicator ( ) does not blink due to low battery charge, the camcorder may keep turning on or off using the video light, turn it off to save...
Instruction Manual
Page 28
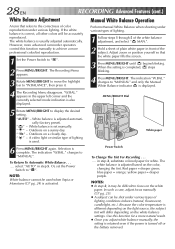
... Balance Operation A term that the white paper fills the screen. 3 Press MENU/BRIGHT until begins blinking. If the white balance is turned off or the battery removed. "W.BAL." MENU/BRIGHT Dial 5 Rotate MENU/BRIGHT to " ". 2 Press MENU/BRIGHT. " " - However, more advanced camcorder operators control this function for white. When the setting...
... Balance Operation A term that the white paper fills the screen. 3 Press MENU/BRIGHT until begins blinking. If the white balance is turned off or the battery removed. "W.BAL." MENU/BRIGHT Dial 5 Rotate MENU/BRIGHT to " ". 2 Press MENU/BRIGHT. " " - However, more advanced camcorder operators control this function for white. When the setting...
Instruction Manual
Page 29
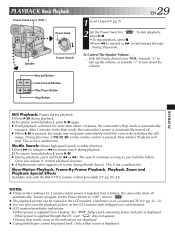
...During playback, press and hold the button. NOTES: ● If Stop mode continues for 5 minutes when power is supplied from a battery: the " " battery pack remaining power indicator is pressed, the image may not pause immediately while the camcorder stabilizes the still image. To turn down the ...continues as long as you release it flipped over and retracted. ● LCD monitor/viewfinder indications: •When power is supplied from a battery, the camcorder shuts off . ● When 4/6 is displayed. Slow-Motion Playback, Frame-By-Frame Playback, Playback Zoom and Playback Special ...
...During playback, press and hold the button. NOTES: ● If Stop mode continues for 5 minutes when power is supplied from a battery: the " " battery pack remaining power indicator is pressed, the image may not pause immediately while the camcorder stabilizes the still image. To turn down the ...continues as long as you release it flipped over and retracted. ● LCD monitor/viewfinder indications: •When power is supplied from a battery, the camcorder shuts off . ● When 4/6 is displayed. Slow-Motion Playback, Frame-By-Frame Playback, Playback Zoom and Playback Special ...
Instruction Manual
Page 33
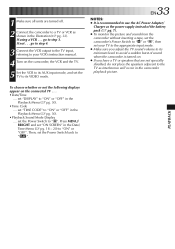
...; Make sure you have a TV or speakers that are turned off. 2 Connect the camcorder to a TV or VCR as the power supply instead of the battery pack (੬ pg. 7). ● To monitor the picture and sound from the camcorder without inserting a tape, set the camcorder's Power Switch to " " or " ", then set...
...; Make sure you have a TV or speakers that are turned off. 2 Connect the camcorder to a TV or VCR as the power supply instead of the battery pack (੬ pg. 7). ● To monitor the picture and sound from the camcorder without inserting a tape, set the camcorder's Power Switch to " " or " ", then set...
Instruction Manual
Page 34
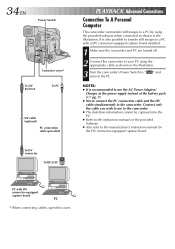
... recommended to use to the camcorder. ● The date/time information cannot be captured into the PC. ● Refer to the instruction manuals of the battery pack (੬ pg. 7). ● Never connect the PC connection cable and the DV cable simultaneously to a PC with DV connector-equipped capture board PC * When...
... recommended to use to the camcorder. ● The date/time information cannot be captured into the PC. ● Refer to the instruction manuals of the battery pack (੬ pg. 7). ● Never connect the PC connection cable and the DV cable simultaneously to a PC with DV connector-equipped capture board PC * When...
Instruction Manual
Page 35
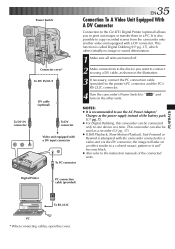
... Switch to " turn on an effect similar to a colored mosaic pattern or it will become black. ● Also refer to the instruction manuals of the battery pack (੬ pg. 7). ● For Digital Dubbing, this cover. To DV IN connector Power Switch Connector cover* To DV IN/OUT DV cable (optional) To...
... Switch to " turn on an effect similar to a colored mosaic pattern or it will become black. ● Also refer to the instruction manuals of the battery pack (੬ pg. 7). ● For Digital Dubbing, this cover. To DV IN connector Power Switch Connector cover* To DV IN/OUT DV cable (optional) To...
Instruction Manual
Page 37
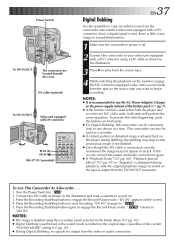
... monitor, engage the DV connector-equipped video unit's record mode from the video or audio connectors. Power Switch To DV IN/OUT The connectors are JVC video units, both units. ● For Digital Dubbing, this occurs, turn off . 2 Connect the camcorder to your video unit equipped with a DV... image or sound deterioration. 1 Make sure the camcorder's power is used as shown in the sound mode recorded on the original tape, regardless of the battery pack ( ੬ pg. 7). ● If the remote control is off the power and make connections again. ● If "Playback Zoom" (੬ pg....
... monitor, engage the DV connector-equipped video unit's record mode from the video or audio connectors. Power Switch To DV IN/OUT The connectors are JVC video units, both units. ● For Digital Dubbing, this occurs, turn off . 2 Connect the camcorder to your video unit equipped with a DV... image or sound deterioration. 1 Make sure the camcorder's power is used as shown in the sound mode recorded on the original tape, regardless of the battery pack ( ੬ pg. 7). ● If the remote control is off the power and make connections again. ● If "Playback Zoom" (੬ pg....
Instruction Manual
Page 38
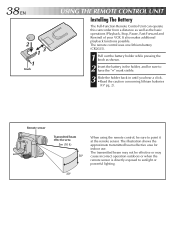
... be sure to have the "+" mark visible. 3 Slide the holder back in until you hear a click. •Read the caution concerning lithium batteries (੬ pg. 2). The transmitted beam may not be effective or may cause incorrect operation outdoors or when the remote sensor is directly exposed to point... it at the remote sensor. The remote control uses one lithium battery (CR2025). 1 Pull out the battery holder while pressing the knob as the basic operations (Playback, Stop, Pause, Fast-Forward and Rewind) of your VCR. It...
... be sure to have the "+" mark visible. 3 Slide the holder back in until you hear a click. •Read the caution concerning lithium batteries (੬ pg. 2). The transmitted beam may not be effective or may cause incorrect operation outdoors or when the remote sensor is directly exposed to point... it at the remote sensor. The remote control uses one lithium battery (CR2025). 1 Pull out the battery holder while pressing the knob as the basic operations (Playback, Stop, Pause, Fast-Forward and Rewind) of your VCR. It...
Instruction Manual
Page 42
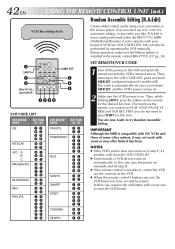
... in the remote control RM-V711U (੬ pg. 38). 3 SHIFT 1 6 RM-V711U (provided) TW 789` MBR SET 2 4 5 VCR CODE LIST VCR BRAND NAME GE HITACHI JVC A B C MAGNAVOX MITSUBISHI NEC PHILIPS BUTTONS (A) (B) 1 1 9 2 9 ` 9 4 6 6 6 3 9 1 9 6 9 3 9 5 1 1 7 1 7 6 6 7 6 8 3 7 3 8 1 9 9 5 1 1 9 4 9 1 9 6 1 2 VCR BRAND NAME BUTTONS (A) (B) PHILIPS 3 3 7 2 PANASONIC 1 3 1 7 1 1 9 4 1 8 RCA 9 2 9 4 6 6 6 3 9 ` SANYO 3 6 3 5 SHARP 1 5 ... SHIFT, press the button on the VCR. ● When the remote control's battery runs out, the VCR brand you release MBR SET, and the VCR's power comes...
... in the remote control RM-V711U (੬ pg. 38). 3 SHIFT 1 6 RM-V711U (provided) TW 789` MBR SET 2 4 5 VCR CODE LIST VCR BRAND NAME GE HITACHI JVC A B C MAGNAVOX MITSUBISHI NEC PHILIPS BUTTONS (A) (B) 1 1 9 2 9 ` 9 4 6 6 6 3 9 1 9 6 9 3 9 5 1 1 7 1 7 6 6 7 6 8 3 7 3 8 1 9 9 5 1 1 9 4 9 1 9 6 1 2 VCR BRAND NAME BUTTONS (A) (B) PHILIPS 3 3 7 2 PANASONIC 1 3 1 7 1 1 9 4 1 8 RCA 9 2 9 4 6 6 6 3 9 ` SANYO 3 6 3 5 SHARP 1 5 ... SHIFT, press the button on the VCR. ● When the remote control's battery runs out, the VCR brand you release MBR SET, and the VCR's power comes...
Instruction Manual
Page 49
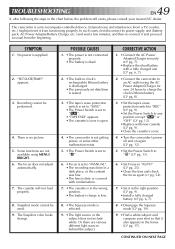
... outlet using MENU/ BRIGHT. 6. Or there are not available using the AC Power Adapter/Charger for over 24 hours to charge the clock's lithium battery (੬ pg. 8). 3. •Set the tape's erase protection switch to "REC" (੬ pg. 9). •Set the Power Switch ...;Set it in the right position (੬ pg. 9). •Install a fully charged battery (੬ pg. 6, 7). 8. •Disengage the Squeeze mode (੬ pg. 19). 9. •Find a white subject and compose your nearest JVC dealer. "SET DATE/TIME!" The focus does not adjust automatically. 7. TROUBLESHOOTING EN49 If,...
... outlet using MENU/ BRIGHT. 6. Or there are not available using the AC Power Adapter/Charger for over 24 hours to charge the clock's lithium battery (੬ pg. 8). 3. •Set the tape's erase protection switch to "REC" (੬ pg. 9). •Set the Power Switch ...;Set it in the right position (੬ pg. 9). •Install a fully charged battery (੬ pg. 6, 7). 8. •Disengage the Squeeze mode (੬ pg. 19). 9. •Find a white subject and compose your nearest JVC dealer. "SET DATE/TIME!" The focus does not adjust automatically. 7. TROUBLESHOOTING EN49 If,...
Instruction Manual
Page 53
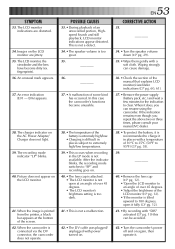
... with power turned on again, then operate it does, you repeat the above two or three times, please consult your nearest JVC dealer. 38. •To protect the battery, it is recommended to "SP" and recording goes on the LCD monitor are distorted. 34. EN53 CORRECTIVE ACTION 33. ----...38. •The temperature of the manual that explains LCD monitor/viewfinder indications (੬ pg. 60, 61). 37. •Remove the power supply (battery pack, etc.) and wait a few minutes for the indication to extremely high/low temperatures. 39. •This occurs when recording in places with a soft...
... with power turned on again, then operate it does, you repeat the above two or three times, please consult your nearest JVC dealer. 38. •To protect the battery, it is recommended to "SP" and recording goes on the LCD monitor are distorted. 34. EN53 CORRECTIVE ACTION 33. ----...38. •The temperature of the manual that explains LCD monitor/viewfinder indications (੬ pg. 60, 61). 37. •Remove the power supply (battery pack, etc.) and wait a few minutes for the indication to extremely high/low temperatures. 39. •This occurs when recording in places with a soft...
Instruction Manual
Page 54
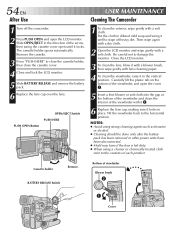
...the horizontal position. NOTES: ● Avoid using strong cleaning agents such as benzine or alcohol. ● Cleaning should be done only after the battery pack has been removed or other power units have been disconnected. ● Mold may form if the lens is left dirty. ● When using.... 2 Press PUSH OPEN and open until it locks in place. The cassette holder opens automatically. Tilt the viewfinder back to damage the monitor. BATTERY RELEASE Switch Bottom of each product. Remove the cassette. 3 Press "PUSH HERE" to the vertical position. Put the cloth in the direction of...
...the horizontal position. NOTES: ● Avoid using strong cleaning agents such as benzine or alcohol. ● Cleaning should be done only after the battery pack has been removed or other power units have been disconnected. ● Mold may form if the lens is left dirty. ● When using.... 2 Press PUSH OPEN and open until it locks in place. The cassette holder opens automatically. Tilt the viewfinder back to damage the monitor. BATTERY RELEASE Switch Bottom of each product. Remove the cassette. 3 Press "PUSH HERE" to the vertical position. Put the cloth in the direction of...
Instruction Manual
Page 55
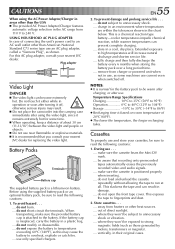
...176;C (-14°F to read the following cautions: 1. Cassettes To properly use and store your nearest JVC dealer. make sure the provided battery cap is a lithium-ion battery. do not load and unload the cassette repeatedly without allowing the tape to high temperatures will increase natural discharge... or an optional battery pack, be subject to the battery. When transporting, make sure the cassette bears the Mini DV mark. .... be exposed to temperatures exceeding 60°C (140°F), as shown. where they won 't be aware that you consult your nearest JVC dealer for some ...
...176;C (-14°F to read the following cautions: 1. Cassettes To properly use and store your nearest JVC dealer. make sure the provided battery cap is a lithium-ion battery. do not load and unload the cassette repeatedly without allowing the tape to high temperatures will increase natural discharge... or an optional battery pack, be subject to the battery. When transporting, make sure the cassette bears the Mini DV mark. .... be exposed to temperatures exceeding 60°C (140°F), as shown. where they won 't be aware that you consult your nearest JVC dealer for some ...


