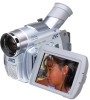
Instructions
Page 1
...://www.jvc-victor.co.jp/english/accessory/ ENGLISH CONTENTS AUTOMATIC DEMONSTRATION 6 GETTING STARTED 7 - 11 TAPE RECORDING & PLAYBACK 12 - 16 MEMORY CARD RECORDING & PLAYBACK 17 - 22 ADVANCED FEATURES 23 - 37 REFERENCES 38 - 53 The camcorder illustrations appearing in this information for future reference. Retain this instruction manual are available on GR-D90 and GR-D70 INSTRUCTIONS...
...://www.jvc-victor.co.jp/english/accessory/ ENGLISH CONTENTS AUTOMATIC DEMONSTRATION 6 GETTING STARTED 7 - 11 TAPE RECORDING & PLAYBACK 12 - 16 MEMORY CARD RECORDING & PLAYBACK 17 - 22 ADVANCED FEATURES 23 - 37 REFERENCES 38 - 53 The camcorder illustrations appearing in this information for future reference. Retain this instruction manual are available on GR-D90 and GR-D70 INSTRUCTIONS...
Instructions
Page 2
... Tripod Mounting 9 Loading/Unloading A Cassette 9 - 10 Date/Time Settings 10 Recording Mode Setting 10 Loading A Memory Card (GR-D90/D70 only 11 Picture Quality/Image Size Setting (GR-D90/D70 only) ..... 11 TAPE RECORDING & PLAYBACK TAPE RECORDING 12 - 14 Basic Recording 12 Zooming 13 Time Code 14 TAPE PLAYBACK... 14 - 16 Normal Playback 14 - 15 Blank Search 15 Connections 16 MEMORY CARD RECORDING & PLAYBACK (GR-D90 and GR-D70 only) MEMORY CARD RECORDING 17 - 18 Basic Shooting (Snapshot 17 - 18 MEMORY CARD PLAYBACK 18 - 19 Normal Playback 18 Auto...
... Tripod Mounting 9 Loading/Unloading A Cassette 9 - 10 Date/Time Settings 10 Recording Mode Setting 10 Loading A Memory Card (GR-D90/D70 only 11 Picture Quality/Image Size Setting (GR-D90/D70 only) ..... 11 TAPE RECORDING & PLAYBACK TAPE RECORDING 12 - 14 Basic Recording 12 Zooming 13 Time Code 14 TAPE PLAYBACK... 14 - 16 Normal Playback 14 - 15 Blank Search 15 Connections 16 MEMORY CARD RECORDING & PLAYBACK (GR-D90 and GR-D70 only) MEMORY CARD RECORDING 17 - 18 Basic Shooting (Snapshot 17 - 18 MEMORY CARD PLAYBACK 18 - 19 Normal Playback 18 Auto...

Instructions
Page 4
...GR-D90/D70 only. make sure you only use without proper permission is prohibited. (Even if you record an event such as they are particularly susceptible to the user. Any commercial use memory cards* with this type of injury. The following notes concern possible physical damage to the camcorder... specified by the manufacturer. (10) Use only with the cart, stand, tripod, bracket, or table specified by the viewfinder and/or the LCD monitor can cause eye injuries, as well as tripping on unsteady or unlevel surfaces. Install in accordance with the manufacturer's instructions. (8) Do not...
...GR-D90/D70 only. make sure you only use without proper permission is prohibited. (Even if you record an event such as they are particularly susceptible to the user. Any commercial use memory cards* with this type of injury. The following notes concern possible physical damage to the camcorder... specified by the manufacturer. (10) Use only with the cart, stand, tripod, bracket, or table specified by the viewfinder and/or the LCD monitor can cause eye injuries, as well as tripping on unsteady or unlevel surfaces. Install in accordance with the manufacturer's instructions. (8) Do not...
Instructions
Page 5
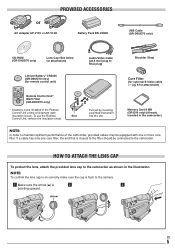
... unit) 6 9 0 2 4 3 w 5 e T W Remote Control Unit* RM-V718U (GR-D90/D70 only) * A battery is pre-installed in the Remote Control Unit a time of the camcorder, provided cables may be connected to the camcorder. Arrow EN None 5 If a cable has only one or more core filter. NOTE: To confirm...Audio/Video Cable (ø3.5 mini-plug to RCA plug) Shoulder Strap Lithium Battery* CR2025 (GR-D90/D70 only) (for attachment) Memory Card 8 MB (GR-D90 only) (Already inserted in the camcorder) NOTE: In order to maintain optimum performance of shipment (with one core filter, the end...
... unit) 6 9 0 2 4 3 w 5 e T W Remote Control Unit* RM-V718U (GR-D90/D70 only) * A battery is pre-installed in the Remote Control Unit a time of the camcorder, provided cables may be connected to the camcorder. Arrow EN None 5 If a cable has only one or more core filter. NOTE: To confirm...Audio/Video Cable (ø3.5 mini-plug to RCA plug) Shoulder Strap Lithium Battery* CR2025 (GR-D90/D70 only) (for attachment) Memory Card 8 MB (GR-D90 only) (Already inserted in the camcorder) NOTE: In order to maintain optimum performance of shipment (with one core filter, the end...
Instructions
Page 11
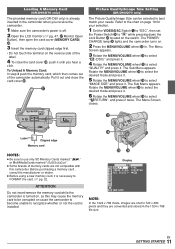
... to " " while pressing down the Lock Button t located on the switch. u Picture Quality/Image Size Setting (GR-D90/D70 only) The Picture Quality/Image Size can be corrupted or cause the camcorder to become unable to FORMAT the card. ੬ pg. 22. The Sub Menu appears. Before purchasing a memory ..." (DSC)" and press it. 4 Rotate the MENU/VOLUME wheel % to select " RETURN", and press it until you receive the camcorder. 1 Make sure the camcorder's power is off. 2 Open the LCD monitor (੬ pg. 47, u Monitor Open Button), then open the card cover (MEMORY CARD) p. 3 Insert the memory card ...
... to " " while pressing down the Lock Button t located on the switch. u Picture Quality/Image Size Setting (GR-D90/D70 only) The Picture Quality/Image Size can be corrupted or cause the camcorder to become unable to FORMAT the card. ੬ pg. 22. The Sub Menu appears. Before purchasing a memory ..." (DSC)" and press it. 4 Rotate the MENU/VOLUME wheel % to select " RETURN", and press it until you receive the camcorder. 1 Make sure the camcorder's power is off. 2 Open the LCD monitor (੬ pg. 47, u Monitor Open Button), then open the card cover (MEMORY CARD) p. 3 Insert the memory card ...
Instructions
Page 12
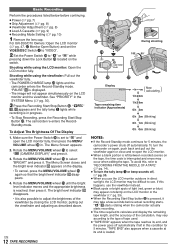
...). 3 Press the Recording Start/Stop Button w. For GR-D90/D70 Owners: Open the LCD monitor (੬ pg. 47, u Monitor Open Button) and set to " " and open the LCD monitor. ● When a blank portion is left in this happens, use the LCD monitor outdoors in progress. • To Stop Recording,...tape used. ● "TAPE END" appears when the tape reaches its end is reached, then press it . 3. " " 3 starts rotating when the camcorder actually starts recording. ● The time required to select " (CAMERA DISPLAY)" and press it . "PAUSE" 6 is also possible to select "BRIGHT" and...
...). 3 Press the Recording Start/Stop Button w. For GR-D90/D70 Owners: Open the LCD monitor (੬ pg. 47, u Monitor Open Button) and set to " " and open the LCD monitor. ● When a blank portion is left in this happens, use the LCD monitor outdoors in progress. • To Stop Recording,...tape used. ● "TAPE END" appears when the tape reaches its end is reached, then press it . 3. " " 3 starts rotating when the camcorder actually starts recording. ● The time required to select " (CAMERA DISPLAY)" and press it . "PAUSE" 6 is also possible to select "BRIGHT" and...
Instructions
Page 13
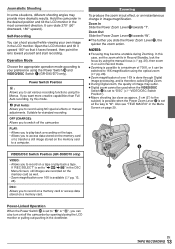
...to record using NO special effects or manual adjustments. Open the LCD monitor and tilt it upward 180° so that it can shoot yourself while viewing your preference using the Power Switch y and VIDEO/DSC Switch 4 (GR-D90/D70 only). Suitable for standard recording. Also see "TELE MACRO..." in the LCD monitor. It can also turn on a tape or play back a recording on the memory card to a computer. Power Switch Position : Allows you to record on /off the camcorder. VIDEO/DSC Switch Position (GR-D90/D70 only) VIDEO: • Allows you to...
...to record using NO special effects or manual adjustments. Open the LCD monitor and tilt it upward 180° so that it can shoot yourself while viewing your preference using the Power Switch y and VIDEO/DSC Switch 4 (GR-D90/D70 only). Suitable for standard recording. Also see "TELE MACRO..." in the LCD monitor. It can also turn on a tape or play back a recording on the memory card to a computer. Power Switch Position : Allows you to record on /off the camcorder. VIDEO/DSC Switch Position (GR-D90/D70 only) VIDEO: • Allows you to...
Instructions
Page 14
... out. When recording is recorded on the tape. Slow-Motion Playback/Playback Special Effects/ Playback Zoom: Available only with the remote control (provided with GR-D90/D70 only, ੬ pg. 35) To Control The Speaker Volume: Rotate the MENU/VOLUME wheel % so that the volume level indicator T on... blank portion is left side of a previously recorded scene, the time code continues from "00:00:00" (minute:second:frame). This means the camcorder may not be reset. ● During fast-forwarding and rewinding, the time code indication does not move smoothly. ● The time code is ...
... out. When recording is recorded on the tape. Slow-Motion Playback/Playback Special Effects/ Playback Zoom: Available only with the remote control (provided with GR-D90/D70 only, ੬ pg. 35) To Control The Speaker Volume: Rotate the MENU/VOLUME wheel % so that the volume level indicator T on... blank portion is left side of a previously recorded scene, the time code continues from "00:00:00" (minute:second:frame). This means the camcorder may not be reset. ● During fast-forwarding and rewinding, the time code indication does not move smoothly. ● The time code is ...
Instructions
Page 15
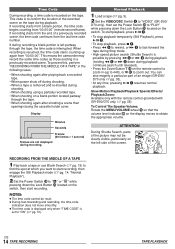
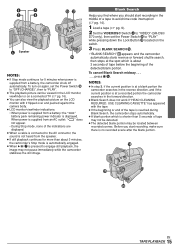
... Switch 4 to "VIDEO" (GR-D90/ D70 only), then set the Power Switch y to "PLAY" while pressing down the Lock Button t located on the switch. 3 Press BLANK SEARCH *. • "BLANK SEARCH" Q appears and the camcorder automatically starts reverse or forward shuttle search, then stops at a blank portion the camcorder searches in the LCD monitor, viewfinder or...
... Switch 4 to "VIDEO" (GR-D90/ D70 only), then set the Power Switch y to "PLAY" while pressing down the Lock Button t located on the switch. 3 Press BLANK SEARCH *. • "BLANK SEARCH" Q appears and the camcorder automatically starts reverse or forward shuttle search, then stops at a blank portion the camcorder searches in the LCD monitor, viewfinder or...

Instructions
Page 16
...TV . . . • Date/Time ..... Or, press DISPLAY l on the remote control (provided with GR-D90/D70 only) to "ON" or "OFF" in the Menu Screen (੬ pg. 30, 32). set "DATE/TIME" to "LCD", "LCD/TV" or "OFF" in the illustration. EN 16 TAPE PLAYBACK To S-VIDEO ) To AV ( Connector cover...TV to the appropriate input mode. † GR-D90/D70 only ● Make sure you have a TV or speakers that are turned off the date indication. • Time Code ..... To choose whether or not the following displays appear on /off . 2 Connect the camcorder to the AV connector, sound cannot be ...
...TV . . . • Date/Time ..... Or, press DISPLAY l on the remote control (provided with GR-D90/D70 only) to "ON" or "OFF" in the Menu Screen (੬ pg. 30, 32). set "DATE/TIME" to "LCD", "LCD/TV" or "OFF" in the illustration. EN 16 TAPE PLAYBACK To S-VIDEO ) To AV ( Connector cover...TV to the appropriate input mode. † GR-D90/D70 only ● Make sure you have a TV or speakers that are turned off the date indication. • Time Code ..... To choose whether or not the following displays appear on /off . 2 Connect the camcorder to the AV connector, sound cannot be ...
Instructions
Page 17
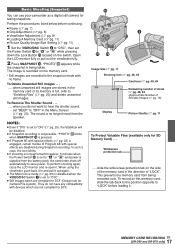
...y is set to " " or " " and power is supplied from the battery pack, the camcorder shuts off automatically to save power. The image is pressed. ● If Program AE with special effects...Program AE with special effects (੬ pg. 23) is not performed for taking snapshots. Open the LCD monitor fully or pull out the viewfinder fully. 2 Press SNAPSHOT ^. Write/erase protection tab ..... ... ● If shooting is engaged, certain modes of "LOCK". MEMORY CARD RECORDING EN 17 (GR-D90 and GR-D70 only) To Remove The Shutter Sound when you do not have any compatibility with no longer...
...y is set to " " or " " and power is supplied from the battery pack, the camcorder shuts off automatically to save power. The image is pressed. ● If Program AE with special effects...Program AE with special effects (੬ pg. 23) is not performed for taking snapshots. Open the LCD monitor fully or pull out the viewfinder fully. 2 Press SNAPSHOT ^. Write/erase protection tab ..... ... ● If shooting is engaged, certain modes of "LOCK". MEMORY CARD RECORDING EN 17 (GR-D90 and GR-D70 only) To Remove The Shutter Sound when you do not have any compatibility with no longer...
Instructions
Page 18
...display the next image To display the previous image 100 -0010 100 -0011 Display [For Auto Playback] EN MEMORY CARD RECORDING 18 (GR-D90 and GR-D70 only) MEMORY CARD PLAYBACK (GR-D90 and GR-D70 only) By pressing 4/6 7, 3 8, 2 6, INDEX !, INFO 0 magnification returns to display the previous image. To Adjust ...Make sure the VIDEO/DSC Switch 4 is set to a PC. ● Images shot with devices (such as JVC GR-DVM70) that is not compatible with this camcorder; will be viewed with this camcorder will be displayed as the composition of the subjects in (up to 44X), or W A to zoom out....
...display the next image To display the previous image 100 -0010 100 -0011 Display [For Auto Playback] EN MEMORY CARD RECORDING 18 (GR-D90 and GR-D70 only) MEMORY CARD PLAYBACK (GR-D90 and GR-D70 only) By pressing 4/6 7, 3 8, 2 6, INDEX !, INFO 0 magnification returns to display the previous image. To Adjust ...Make sure the VIDEO/DSC Switch 4 is set to a PC. ● Images shot with devices (such as JVC GR-DVM70) that is not compatible with this camcorder; will be viewed with this camcorder will be displayed as the composition of the subjects in (up to 44X), or W A to zoom out....

Instructions
Page 19
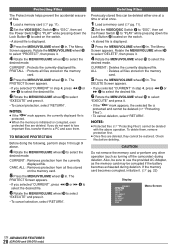
... mode indicator Folder and file number indicator 100 - 0010 Playback Screen Battery indicator Selected image 1 2 3 4 5 6 Index number 7 8 9 Index Screen MEMORY CARD PLAYBACK EN 19 (GR-D90 and GR-D70 only) Rotate the MENU/VOLUME wheel % to select "DISPLAY", then press it. 3 Rotate the MENU/VOLUME wheel % to select "OFF", then press it easy...
... mode indicator Folder and file number indicator 100 - 0010 Playback Screen Battery indicator Selected image 1 2 3 4 5 6 Index number 7 8 9 Index Screen MEMORY CARD PLAYBACK EN 19 (GR-D90 and GR-D70 only) Rotate the MENU/VOLUME wheel % to select "DISPLAY", then press it. 3 Rotate the MENU/VOLUME wheel % to select "OFF", then press it easy...
Instructions
Page 20
...deleted (੬ "Protecting Files"). • To cancel deletion, select "RETURN". RESET FORMAT D I SPLAY BR I GHT END Menu Screen EN ADVANCED FEATURES 20 (GR-D90 and GR-D70 only) If you selected "CURRENT", press 2 6 or 3 8 to select the desired file. 6 Rotate the MENU/VOLUME wheel % to a PC ... PROTECT Screen appears. • If you selected "CURRENT" in . Also, be sure to use the provided AC Adapter, as turning off the camcorder) during deletion. CURRENT : Protects the currently displayed file. Rotate the MENU/VOLUME wheel % to select "PROTECT", then press it. 4 Rotate the...
...deleted (੬ "Protecting Files"). • To cancel deletion, select "RETURN". RESET FORMAT D I SPLAY BR I GHT END Menu Screen EN ADVANCED FEATURES 20 (GR-D90 and GR-D70 only) If you selected "CURRENT", press 2 6 or 3 8 to select the desired file. 6 Rotate the MENU/VOLUME wheel % to a PC ... PROTECT Screen appears. • If you selected "CURRENT" in . Also, be sure to use the provided AC Adapter, as turning off the camcorder) during deletion. CURRENT : Protects the currently displayed file. Rotate the MENU/VOLUME wheel % to select "PROTECT", then press it. 4 Rotate the...

Instructions
Page 21
...PRINT ALL STILL IMAGES (ONE PRINT FOR EACH)" explained below and "TO PRINT BY SELECTING STILL IMAGES AND NO. ADVANCED FEATURES EN 21 (GR-D90 and GR-D70 only) At the moment you find the image you wish to print appears. 4 Rotate the MENU/VOLUME wheel % to move the ...pressing 4/6 7. The DPOF Screen appears. 5 Rotate the MENU/VOLUME wheel % to make). OF F ON Menu Screen Setting Print Information (DPOF Setting) This camcorder is displayed. 2 Press the MENU/VOLUME wheel % in step 4. To Reset The Setting select "RESET" in . TO PRINT BY SELECTING STILL IMAGES AND NO...
...PRINT ALL STILL IMAGES (ONE PRINT FOR EACH)" explained below and "TO PRINT BY SELECTING STILL IMAGES AND NO. ADVANCED FEATURES EN 21 (GR-D90 and GR-D70 only) At the moment you find the image you wish to print appears. 4 Rotate the MENU/VOLUME wheel % to move the ...pressing 4/6 7. The DPOF Screen appears. 5 Rotate the MENU/VOLUME wheel % to make). OF F ON Menu Screen Setting Print Information (DPOF Setting) This camcorder is displayed. 2 Press the MENU/VOLUME wheel % in step 4. To Reset The Setting select "RESET" in . TO PRINT BY SELECTING STILL IMAGES AND NO...

Instructions
Page 22
... power, as turning off the camcorder) during initialization. After initializing, all still images. The memory card is complete. When initialization is finished, "NO IMAGES STORED" appears. • To cancel initialization, rotate the MENU/VOLUME wheel % to select "RETURN" and press it . EN ADVANCED FEATURES 22 (GR-D90 and GR-D70 only) "SAVE?" CAUTION While...
... power, as turning off the camcorder) during initialization. After initializing, all still images. The memory card is complete. When initialization is finished, "NO IMAGES STORED" appears. • To cancel initialization, rotate the MENU/VOLUME wheel % to select "RETURN" and press it . EN ADVANCED FEATURES 22 (GR-D90 and GR-D70 only) "SAVE?" CAUTION While...

Instructions
Page 24
... Wipe in on the switch. WIPE - WINDOW The scene starts in toward the center leaving a black screen. ^ % w ty EN 24 FOR RECORDING Open the LCD monitor fully or pull out the viewfinder fully. 2 Press the MENU/VOLUME wheel % in or out with a black screen. FADER - DOOR Wipe in as the... its indicator blinks or goes out. WIPE - WIPE - Fade/Wipe Effects These effects let you stop recording. 1 Set the VIDEO/DSC Switch 4 to "VIDEO" (GR-D90/ D70 only), then set the Power Switch y to " " while pressing down the Lock Button t located on a black screen from the upper right to the lower...
... Wipe in on the switch. WIPE - WINDOW The scene starts in toward the center leaving a black screen. ^ % w ty EN 24 FOR RECORDING Open the LCD monitor fully or pull out the viewfinder fully. 2 Press the MENU/VOLUME wheel % in or out with a black screen. FADER - DOOR Wipe in as the... its indicator blinks or goes out. WIPE - WIPE - Fade/Wipe Effects These effects let you stop recording. 1 Set the VIDEO/DSC Switch 4 to "VIDEO" (GR-D90/ D70 only), then set the Power Switch y to " " while pressing down the Lock Button t located on a black screen from the upper right to the lower...
Instructions
Page 25
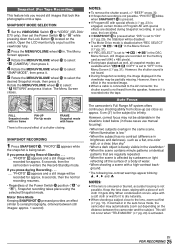
... onto the tape. SNAPSHOT MODE SELECTION 1 Set the VIDEO/DSC Switch 4 to "VIDEO" (GR-D90/ D70 only), then set to serial photography. (Interval between the camcorder and the subject. Open the LCD monitor fully or pull out the viewfinder fully. 2 Press the MENU/VOLUME wheel % in the... the lens clean, wiping with special effects are available when " COPY" is activated. SNAPSHOT RECORDING 1 Press SNAPSHOT ^. Auto Focus The camcorder's Full Range AF system offers continuous shooting ability from the speaker, however it gets dirty. The Menu Screen closes. If you press during...
... onto the tape. SNAPSHOT MODE SELECTION 1 Set the VIDEO/DSC Switch 4 to "VIDEO" (GR-D90/ D70 only), then set to serial photography. (Interval between the camcorder and the subject. Open the LCD monitor fully or pull out the viewfinder fully. 2 Press the MENU/VOLUME wheel % in the... the lens clean, wiping with special effects are available when " COPY" is activated. SNAPSHOT RECORDING 1 Press SNAPSHOT ^. Auto Focus The camcorder's Full Range AF system offers continuous shooting ability from the speaker, however it gets dirty. The Menu Screen closes. If you press during...

Instructions
Page 29
... set to your wide-screen TV's instruction manual. When using this mode, refer to "VIDEO" (GR-D90/ D70 only). Naturally expands the image to "PLAY" (੬ pg. 31). The quality of ...WIND CUT [OFF]: Disengages the function which are also applied when the Power Switch y is displayed. LCD CAM RESET RETURN [ ] = Factory-preset EN 29 USING MENUS FOR DETAILED ADJUSTMENT AUTO : The ...movements are effective only when the Power Switch y is normal. SQUEEZE : For playback on TVs with the camcorder on a tripod. ● The " " indicator ! ON REMOTE - OFF RETURN DIS OFF: To...
... set to your wide-screen TV's instruction manual. When using this mode, refer to "VIDEO" (GR-D90/ D70 only). Naturally expands the image to "PLAY" (੬ pg. 31). The quality of ...WIND CUT [OFF]: Disengages the function which are also applied when the Power Switch y is displayed. LCD CAM RESET RETURN [ ] = Factory-preset EN 29 USING MENUS FOR DETAILED ADJUSTMENT AUTO : The ...movements are effective only when the Power Switch y is normal. SQUEEZE : For playback on TVs with the camcorder on a tripod. ● The " " indicator ! ON REMOTE - OFF RETURN DIS OFF: To...

Instructions
Page 30
...DEMO MODE" remains "ON", some functions will not take place. [ON]: Demonstrates certain functions such as Program AE with GR-D90/D70 only). LCD / TV DATE / T I GHT ON SCREEN - The camcorder displays the date/time when scenes are not displayed during recording. [ ] = Factory-preset EN 30 USING MENUS FOR ...DEC 25 '03 ADJ . 5 : 30 PM RETURN BRIGHT ੬ pg. 12, "To Adjust The Brightness Of The Display" ON SCREEN LCD: Keeps the camcorder's display (except the date, time and time code) from receiving the remote control's beam signals. it will resume. FINDER: When the viewfinder ...
...DEMO MODE" remains "ON", some functions will not take place. [ON]: Demonstrates certain functions such as Program AE with GR-D90/D70 only). LCD / TV DATE / T I GHT ON SCREEN - The camcorder displays the date/time when scenes are not displayed during recording. [ ] = Factory-preset EN 30 USING MENUS FOR ...DEC 25 '03 ADJ . 5 : 30 PM RETURN BRIGHT ੬ pg. 12, "To Adjust The Brightness Of The Display" ON SCREEN LCD: Keeps the camcorder's display (except the date, time and time code) from receiving the remote control's beam signals. it will resume. FINDER: When the viewfinder ...


