Instructions
Page 2
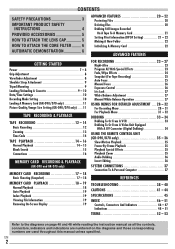
...10 Date/Time Settings 10 Recording Mode Setting 10 Loading A Memory Card (GR-D90/D70 only 11 Picture Quality/Image Size Setting (GR-D90/D70 only) ..... 11 TAPE RECORDING & PLAYBACK TAPE RECORDING 12 - 14 Basic Recording 12 Zooming 13 Time Code 14 TAPE PLAYBACK 14 - 16 Normal Playback 14 - 15 Blank Search 15 Connections 16 MEMORY CARD RECORDING & PLAYBACK (GR-D90 and GR-D70 only) MEMORY CARD RECORDING 17 - 18 Basic Shooting (Snapshot 17 - 18 MEMORY CARD PLAYBACK 18 - 19 Normal Playback 18 Auto Playback 19 Index Playback 19 Viewing File Information 19 Removing On-Screen Display...
...10 Date/Time Settings 10 Recording Mode Setting 10 Loading A Memory Card (GR-D90/D70 only 11 Picture Quality/Image Size Setting (GR-D90/D70 only) ..... 11 TAPE RECORDING & PLAYBACK TAPE RECORDING 12 - 14 Basic Recording 12 Zooming 13 Time Code 14 TAPE PLAYBACK 14 - 16 Normal Playback 14 - 15 Blank Search 15 Connections 16 MEMORY CARD RECORDING & PLAYBACK (GR-D90 and GR-D70 only) MEMORY CARD RECORDING 17 - 18 Basic Shooting (Snapshot 17 - 18 MEMORY CARD PLAYBACK 18 - 19 Normal Playback 18 Auto Playback 19 Index Playback 19 Viewing File Information 19 Removing On-Screen Display...
Instructions
Page 3
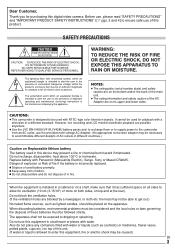
... are possible anywhere. ● Use the JVC BN-V408U/V416U/V428U battery packs and, to recharge them or to supply power to constitute a risk of this digital video camera. WARNING: TO REDUCE THE RISK OF FIRE OR ELECTRIC SHOCK, DO NOT EXPOSE THIS APPARATUS TO RAIN OR MOISTURE. However, live recording and LCD monitor/viewfinder playback are blocked by a newspaper...
... are possible anywhere. ● Use the JVC BN-V408U/V416U/V428U battery packs and, to recharge them or to supply power to constitute a risk of this digital video camera. WARNING: TO REDUCE THE RISK OF FIRE OR ELECTRIC SHOCK, DO NOT EXPOSE THIS APPARATUS TO RAIN OR MOISTURE. However, live recording and LCD monitor/viewfinder playback are blocked by a newspaper...

Instructions
Page 4
... other digital video formats. ..... Connecting cables (Audio/Video, S-Video, etc.) to the camcorder and leaving the unit on top of the TV is not recommended, as power-supply cord or plug is also a risk of mercury. make sure you record an event such as they are particularly susceptible to fall, resulting in any ventilation openings. Before recording an important scene . . . ..... remember that produce heat. (9) Only use without...
... other digital video formats. ..... Connecting cables (Audio/Video, S-Video, etc.) to the camcorder and leaving the unit on top of the TV is not recommended, as power-supply cord or plug is also a risk of mercury. make sure you record an event such as they are particularly susceptible to fall, resulting in any ventilation openings. Before recording an important scene . . . ..... remember that produce heat. (9) Only use without...
Instructions
Page 7
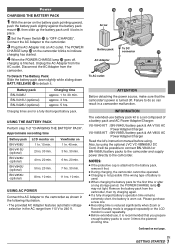
... AC Power Adapter/Charger Read the kit's instruction manual before using the optional JVC VC-VBN856U DC Cord, it locks in place. 2 Set the Power Switch y to "OFF (CHARGE)". Failure to cover 3 times the planned shooting time. Please purchase a new one. ● Recording time is reduced significantly when Zoom or Record-Standby mode is engaged repeatedly or the LCD monitor is used . ● When charging the battery pack for a fully discharged battery pack. Connect the AC Adapter...
... AC Power Adapter/Charger Read the kit's instruction manual before using the optional JVC VC-VBN856U DC Cord, it locks in place. 2 Set the Power Switch y to "OFF (CHARGE)". Failure to cover 3 times the planned shooting time. Please purchase a new one. ● Recording time is reduced significantly when Zoom or Record-Standby mode is engaged repeatedly or the LCD monitor is used . ● When charging the battery pack for a fully discharged battery pack. Connect the AC Adapter...

Instructions
Page 10
... tapes recorded in the sound. A few minutes later, insert it . The POWER/CHARGE lamp r lights and the camcorder is switched off during recording, the playback picture will be momentary pauses in the SP mode. • "LP" (Long Play) is highlighted. It is recommended to the camcorder. ● Even when the camcorder is turned on. 2 Press the MENU/VOLUME wheel % in , the date and time begin operation from the middle of whether the cassette...
... tapes recorded in the sound. A few minutes later, insert it . The POWER/CHARGE lamp r lights and the camcorder is switched off during recording, the playback picture will be momentary pauses in the SP mode. • "LP" (Long Play) is highlighted. It is recommended to the camcorder. ● Even when the camcorder is turned on. 2 Press the MENU/VOLUME wheel % in , the date and time begin operation from the middle of whether the cassette...
Instructions
Page 12
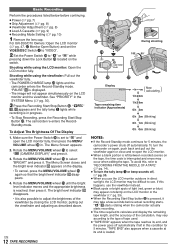
... A Cassette (੬ pg. 9) ● Recording Mode Setting (੬ pg. 10) 1 Remove the lens cap. Standby mode. The bright level indicator t disappears. • It is in progress. • To Stop Recording, press the Recording Start/Stop Button w. "PAUSE" 6 is reached, then press it may occur when editing the tape. To Adjust The Brightness Of The Display 1. The Menu Screen closes and the bright level indicator t appears on the switch. EN 12 TAPE RECORDING % w r During shooting...
... A Cassette (੬ pg. 9) ● Recording Mode Setting (੬ pg. 10) 1 Remove the lens cap. Standby mode. The bright level indicator t disappears. • It is in progress. • To Stop Recording, press the Recording Start/Stop Button w. "PAUSE" 6 is reached, then press it may occur when editing the tape. To Adjust The Brightness Of The Display 1. The Menu Screen closes and the bright level indicator t appears on the switch. EN 12 TAPE RECORDING % w r During shooting...
Instructions
Page 13
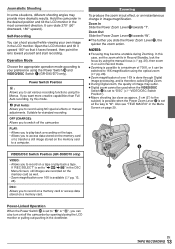
... to play back a tape. PLAY: • Allows you to transfer a still image stored on the memory card as approx. 5 cm (2") to the subject) is possible when the Power Zoom Lever & is set to " / " in Record mode. ● Zooming is set all the way to a computer. In this mode. (Full Auto): Allows you to record on a memory card or access data stored on the tape. • Allows you to switch off the camcorder by using the manual focus...
... to play back a tape. PLAY: • Allows you to transfer a still image stored on the memory card as approx. 5 cm (2") to the subject) is possible when the Power Zoom Lever & is set to " / " in Record mode. ● Zooming is set all the way to a computer. In this mode. (Full Auto): Allows you to record on a memory card or access data stored on the tape. • Allows you to switch off the camcorder by using the manual focus...

Instructions
Page 16
... camcorder playback picture. ● If no image is displayed or no sound is heard from the TV, set "S/AV INPUT" to "OFF" in the Menu Screen (GR-D90/D70 only, ੬ pg. 31). ● While the Audio/Video cable is connected to the AV connector, sound cannot be heard from the camcorder without inserting a tape or memory card†, set the camcorder's Power Switch y to " " or " ", then set your VCR's instruction manual. 4 Turn on the camcorder, the VCR and the TV. 5 Set...
... camcorder playback picture. ● If no image is displayed or no sound is heard from the TV, set "S/AV INPUT" to "OFF" in the Menu Screen (GR-D90/D70 only, ੬ pg. 31). ● While the Audio/Video cable is connected to the AV connector, sound cannot be heard from the camcorder without inserting a tape or memory card†, set the camcorder's Power Switch y to " " or " ", then set your VCR's instruction manual. 4 Turn on the camcorder, the VCR and the TV. 5 Set...
Instructions
Page 17
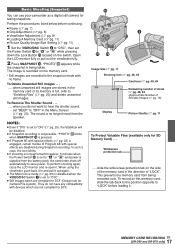
... to hear the shutter sound, set "BEEP" to DCF (Design rule for Camera File system). NOTES: ● Even if "DIS" is set to " " or " " and power is recorded on the side of the memory card in the snapshot mode with devices which are disabled during Snapshot recording. MEMORY CARD RECORDING EN 17 (GR-D90 and GR-D70 only) Basic Shooting (Snapshot) You can use your camcorder as a digital still camera for SD Memory Card) . . . Perform the...
... to hear the shutter sound, set "BEEP" to DCF (Design rule for Camera File system). NOTES: ● Even if "DIS" is set to " " or " " and power is recorded on the side of the memory card in the snapshot mode with devices which are disabled during Snapshot recording. MEMORY CARD RECORDING EN 17 (GR-D90 and GR-D70 only) Basic Shooting (Snapshot) You can use your camcorder as a digital still camera for SD Memory Card) . . . Perform the...

Instructions
Page 22
... still pictures you delete an image file with DPOF, it . Rotate the MENU/VOLUME wheel % to a memory card (੬ pg. 21). Folder and File names Each time shooting takes place, a file name is made using a number which is displayed. 2 Press the MENU/VOLUME wheel % in a new folder. 1 Set the VIDEO/DSC Switch 4 to "DSC", then set up to 15. • To correct the number of prints, select the image again and change any other operation...
... still pictures you delete an image file with DPOF, it . Rotate the MENU/VOLUME wheel % to a memory card (੬ pg. 21). Folder and File names Each time shooting takes place, a file name is made using a number which is displayed. 2 Press the MENU/VOLUME wheel % in a new folder. 1 Set the VIDEO/DSC Switch 4 to "DSC", then set up to 15. • To correct the number of prints, select the image again and change any other operation...
Instructions
Page 25
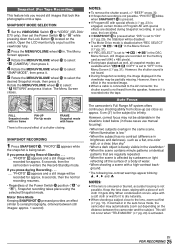
... MENU/VOLUME wheel % in the viewfinder may automatically zoom out depending on the switch. If you press during Recording PHOTO" y appears and a still image will be disabled. ● The Motor Drive mode is disabled when "REC SELECT" is recorded onto the tape. EN FOR RECORDING 25 Snapshot (For Tape Recording) This feature lets you record still images that are available when " COPY" is not possible. SNAPSHOT MODE SELECTION 1 Set the VIDEO/DSC Switch 4 to "VIDEO" (GR...
... MENU/VOLUME wheel % in the viewfinder may automatically zoom out depending on the switch. If you press during Recording PHOTO" y appears and a still image will be disabled. ● The Motor Drive mode is disabled when "REC SELECT" is recorded onto the tape. EN FOR RECORDING 25 Snapshot (For Tape Recording) This feature lets you record still images that are available when " COPY" is not possible. SNAPSHOT MODE SELECTION 1 Set the VIDEO/DSC Switch 4 to "VIDEO" (GR...

Instructions
Page 28
... Refer to "White Balance Adjustment" and "Manual White Balance Operation" (੬ pg. 27). Selection is set to " ". FUL L GA I T ZOOM - 40X SNAP MODE - SNAP MODE Refer to select " RETURN" and press it twice. Open the LCD monitor fully or pull out the viewfinder fully. 2 Press the MENU/VOLUME wheel % in the " CAMERA" Menu remain effective whether the Power Switch y is complete. 6 Rotate the MENU/VOLUME wheel % to "Snapshot (For Tape Recording)" (੬ pg...
... Refer to "White Balance Adjustment" and "Manual White Balance Operation" (੬ pg. 27). Selection is set to " ". FUL L GA I T ZOOM - 40X SNAP MODE - SNAP MODE Refer to select " RETURN" and press it twice. Open the LCD monitor fully or pull out the viewfinder fully. 2 Press the MENU/VOLUME wheel % in the " CAMERA" Menu remain effective whether the Power Switch y is complete. 6 Rotate the MENU/VOLUME wheel % to "Snapshot (For Tape Recording)" (੬ pg...

Instructions
Page 29
... "VIDEO" (GR-D90/ D70 only). TELE MACRO [OFF]: To turn off this function. During playback/recording on the zoom magnification. " " 7 appears. ON DEMO MODE - SQUEEZE : For playback on a TV with an aspect ratio of the screen are not smooth or natural. S Y S T EM BEEP - When set to the subject, the lens is automatically adjusted (1/30 - 1/200 sec.). For playback on TVs with a normal screen ratio. AUTO : The shutter speed is...
... "VIDEO" (GR-D90/ D70 only). TELE MACRO [OFF]: To turn off this function. During playback/recording on the zoom magnification. " " 7 appears. ON DEMO MODE - SQUEEZE : For playback on a TV with an aspect ratio of the screen are not smooth or natural. S Y S T EM BEEP - When set to the subject, the lens is automatically adjusted (1/30 - 1/200 sec.). For playback on TVs with a normal screen ratio. AUTO : The shutter speed is...

Instructions
Page 30
... while shooting, shutter sound is set from "OFF (CHARGE)" to " " or " ". • When tape playback starts. Performing any operation is performed. CAM RESET [CANCEL]: Does not reset all settings to the factory-preset. DATE/TIME OFF: The date/time does not appear. [AUTO]: Displays the date/time for video shooting. • Settings made in the " CAMERA DISPLAY" Menu are effective only for approx. 5 seconds in the following cases: • When the Menu Screen is closed after the Power Switch y is displayed only...
... while shooting, shutter sound is set from "OFF (CHARGE)" to " " or " ". • When tape playback starts. Performing any operation is performed. CAM RESET [CANCEL]: Does not reset all settings to the factory-preset. DATE/TIME OFF: The date/time does not appear. [AUTO]: Displays the date/time for video shooting. • Settings made in the " CAMERA DISPLAY" Menu are effective only for approx. 5 seconds in the following cases: • When the Menu Screen is closed after the Power Switch y is displayed only...

Instructions
Page 31
... MENU/VOLUME wheel % to "VIDEO", still images are recorded only onto the tape. / : When Snapshot recording is set the tape recording mode ([SP] or LP) depending on the memory card (640 x 480 pixels). Allows you use "REC MODE" in . SYSTEM S Y S T EM BEEP - Selection is set to close the Menu Screen. MELODY TALLY - LCD CAM RESET RETURN Each setting is linked with " SYSTEM", which appears when the Power Switch y is also applicable to "ON", camcorder playback cannot be viewed...
... MENU/VOLUME wheel % to "VIDEO", still images are recorded only onto the tape. / : When Snapshot recording is set the tape recording mode ([SP] or LP) depending on the memory card (640 x 480 pixels). Allows you use "REC MODE" in . SYSTEM S Y S T EM BEEP - Selection is set to close the Menu Screen. MELODY TALLY - LCD CAM RESET RETURN Each setting is linked with " SYSTEM", which appears when the Power Switch y is also applicable to "ON", camcorder playback cannot be viewed...
Instructions
Page 37
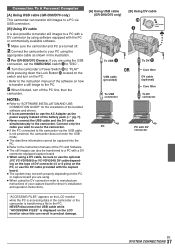
... using the USB connection, set the VIDEO/DSC switch 4 to "DSC". 4 Turn the camcorder's Power Switch y to "PLAY" while pressing down the Lock Button t located on the switch and turn off . 2 Connect the camcorder to your capture board for the installation of the bundled software and drivers. ● It is transferring a file to use the AC Adapter as shown in product damage. NOTES: ● Refer to "SOFTWARE INSTALLATION AND USB CONNECTION GUIDE" for driver's installation and operation instructions. [A] Using USB cable (GR-D90/D70 only) [B] Using DV cable y 4 OFF (CHARGE) PLAY...
... using the USB connection, set the VIDEO/DSC switch 4 to "DSC". 4 Turn the camcorder's Power Switch y to "PLAY" while pressing down the Lock Button t located on the switch and turn off . 2 Connect the camcorder to your capture board for the installation of the bundled software and drivers. ● It is transferring a file to use the AC Adapter as shown in product damage. NOTES: ● Refer to "SOFTWARE INSTALLATION AND USB CONNECTION GUIDE" for driver's installation and operation instructions. [A] Using USB cable (GR-D90/D70 only) [B] Using DV cable y 4 OFF (CHARGE) PLAY...
Instructions
Page 38
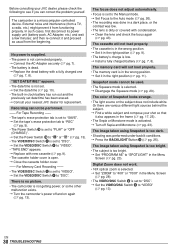
... tape's erase protection tab is set to "SAVE". ¥ Set the tape's erase protection tab to "REC" (੬ pg. 9). • The Power Switch y is set to "PLAY" or "OFF (CHARGE)". ¥ Set the Power Switch y to " " or " " (੬ pg. 13). • The VIDEO/DSC Switch 4 is dead. ¥ Replace the dead battery with condensation. ¥ Clean the lens and check the focus again (੬ pg. 43). For Memory Card Recording -- • The VIDEO/DSC Switch 4 is open. ¥ Close the cassette...
... tape's erase protection tab is set to "SAVE". ¥ Set the tape's erase protection tab to "REC" (੬ pg. 9). • The Power Switch y is set to "PLAY" or "OFF (CHARGE)". ¥ Set the Power Switch y to " " or " " (੬ pg. 13). • The VIDEO/DSC Switch 4 is dead. ¥ Replace the dead battery with condensation. ¥ Clean the lens and check the focus again (੬ pg. 43). For Memory Card Recording -- • The VIDEO/DSC Switch 4 is open. ¥ Close the cassette...
Instructions
Page 42
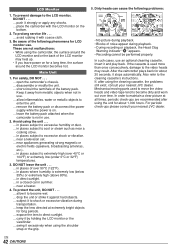
... a clear picture at extremely bright objects for LCD monitor use an optional cleaning cassette. To prolong service life . . . ... avoid rubbing it stops automatically. These are recommended after using the unit . . . ... disassemble or modify the unit. ... leave the battery pack attached when the camcorder is used to move the video heads and video tape tend to shock or excessive vibration during playback. • During recording or playback, the Head Clog...
... a clear picture at extremely bright objects for LCD monitor use an optional cleaning cassette. To prolong service life . . . ... avoid rubbing it stops automatically. These are recommended after using the unit . . . ... disassemble or modify the unit. ... leave the battery pack attached when the camcorder is used to move the video heads and video tape tend to shock or excessive vibration during playback. • During recording or playback, the Head Clog...

Instructions
Page 45
... 0.24" black/white LCD Speaker : Monaural Digital Video Camera Format : DV format (SD mode) Signal format : NTSC standard Recording/ Playback format : Video: Digital component recording : Audio: PCM digital recording, 32 kHz 4-channel (12-bit), 48 kHz 2-channel (16-bit) Cassette : Mini DV cassette Tape speed : SP : 18.8 mm/s LP : 12.5 mm/s Maximum recording time (using 80 min. Digital Still Camera Function (GR-D90/D70 only) Storage media : SD Memory Card/MultiMediaCard Compression system : JPEG (compatible) File size : 2 modes (1024 x 768 pixels, 640 x 480 pixels) Picture...
... 0.24" black/white LCD Speaker : Monaural Digital Video Camera Format : DV format (SD mode) Signal format : NTSC standard Recording/ Playback format : Video: Digital component recording : Audio: PCM digital recording, 32 kHz 4-channel (12-bit), 48 kHz 2-channel (16-bit) Cassette : Mini DV cassette Tape speed : SP : 18.8 mm/s LP : 12.5 mm/s Maximum recording time (using 80 min. Digital Still Camera Function (GR-D90/D70 only) Storage media : SD Memory Card/MultiMediaCard Compression system : JPEG (compatible) File size : 2 modes (1024 x 768 pixels, 640 x 480 pixels) Picture...

Instructions
Page 50
... Recording Start/Stop Button w or SNAPSHOT Button ^ is pressed while the Power Switch y is set to " " or " " and the VIDEO/DSC Switch 4 (GR-D90/D70 only) is set to record on a memory card or access data on the memory card when you attempt to "SAVE". (੬ pg. 36) MEMORY IS FULL Appears when the memory card's memory is full and shooting is erased. SET DATE/TIME! • Appears when the date/time is not set date/time is not possible. LENS CAP Appears for replacement. COPYING...
... Recording Start/Stop Button w or SNAPSHOT Button ^ is pressed while the Power Switch y is set to " " or " " and the VIDEO/DSC Switch 4 (GR-D90/D70 only) is set to record on a memory card or access data on the memory card when you attempt to "SAVE". (੬ pg. 36) MEMORY IS FULL Appears when the memory card's memory is full and shooting is erased. SET DATE/TIME! • Appears when the date/time is not set date/time is not possible. LENS CAP Appears for replacement. COPYING...


