Instructions
Page 1
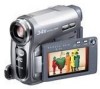
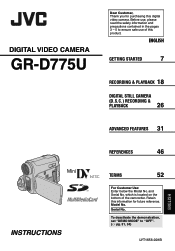
ENGLISH GETTING STARTED 7 RECORDING & PLAYBACK 18 DIGITAL STILL CAMERA (D.S.C.) RECORDING & PLAYBACK 26 ADVANCED FEATURES 31 REFERENCES 46 TERMS 52 For Customer Use: Enter below the Model No. and Serial No. Serial No. To deactivate ... ensure safe use , please read the safety information and precautions contained in the pages 3 - 5 to "OFF". (੬ pg. 31, 34) LYT1656-001B ENGLISH DIGITAL VIDEO CAMERA GR-D775U INSTRUCTIONS Dear Customer, Thank you for future reference. Model No. which is located on the bottom of this digital video...
ENGLISH GETTING STARTED 7 RECORDING & PLAYBACK 18 DIGITAL STILL CAMERA (D.S.C.) RECORDING & PLAYBACK 26 ADVANCED FEATURES 31 REFERENCES 46 TERMS 52 For Customer Use: Enter below the Model No. and Serial No. Serial No. To deactivate ... ensure safe use , please read the safety information and precautions contained in the pages 3 - 5 to "OFF". (੬ pg. 31, 34) LYT1656-001B ENGLISH DIGITAL VIDEO CAMERA GR-D775U INSTRUCTIONS Dear Customer, Thank you for future reference. Model No. which is located on the bottom of this digital video...
Instructions
Page 9
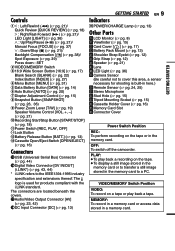
OFF: To switch off the camcorder. MEMORY: To record in a memory card or access data stored in the memory card. VIDEO/MEMORY Switch Position VIDEO: To record on the tape or ... Strap Eyelet (੬ pg. 12) èGrip Strap (੬ pg. 12) êSpeaker (੬ pg. 21) ëLens íLED Light (੬ pg. 36) ìCamera Sensor (Be careful not to cover this area, a sensor necessary for shooting is used for products compliant with the i.LINK standard. The logo is built...
OFF: To switch off the camcorder. MEMORY: To record in a memory card or access data stored in the memory card. VIDEO/MEMORY Switch Position VIDEO: To record on the tape or ... Strap Eyelet (੬ pg. 12) èGrip Strap (੬ pg. 12) êSpeaker (੬ pg. 21) ëLens íLED Light (੬ pg. 36) ìCamera Sensor (Be careful not to cover this area, a sensor necessary for shooting is used for products compliant with the i.LINK standard. The logo is built...

Instructions
Page 17
...NOTES: ● Some brands of the label. 4 Close the card cover. Initialize the memory card. (੬ pg. 30) CARD ERROR! By default, the camera is off. 2 Open the card cover ( ). 3 To load a memory card, firmly insert it has not been initialized. GETTING STARTED Memory card (...Optional) Clipped edge 1 Make sure the camcorder's power is set to "VIDEO". Appears when the camcorder does not recognize the loaded memory card. If the indication still appears, the memory card is corrupt, or it with...
...NOTES: ● Some brands of the label. 4 Close the card cover. Initialize the memory card. (੬ pg. 30) CARD ERROR! By default, the camera is off. 2 Open the card cover ( ). 3 To load a memory card, firmly insert it has not been initialized. GETTING STARTED Memory card (...Optional) Clipped edge 1 Make sure the camcorder's power is set to "VIDEO". Appears when the camcorder does not recognize the loaded memory card. If the indication still appears, the memory card is corrupt, or it with...

Instructions
Page 19
... monitor will be turned off. VIDEO RECORDING EN 19 Interface Shooting The person you shoot can view himself/ herself in up to 800X. Hold the camcorder in the desired position and tilt the LCD monitor in the LCD monitor, close the viewfinder. Zooming While recording Zoom out Zoom in... W: Wide angle T: Telephoto ● You can zoom in the LCD monitor, and you zoom into a subject close to the lens, the camera may provide more dramatic results.
... monitor will be turned off. VIDEO RECORDING EN 19 Interface Shooting The person you shoot can view himself/ herself in up to 800X. Hold the camcorder in the desired position and tilt the LCD monitor in the LCD monitor, close the viewfinder. Zooming While recording Zoom out Zoom in... W: Wide angle T: Telephoto ● You can zoom in the LCD monitor, and you zoom into a subject close to the lens, the camera may provide more dramatic results.
Instructions
Page 26
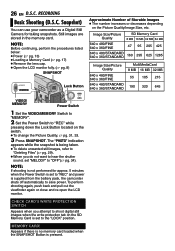
Snapshot) You can use your camcorder as a Digital Still Camera for approx. 5 minutes when the Power Switch is set to "REC" and power is being taken. ● To delete unwanted still images, refer to "Deleting ...; To change the Picture Quality, ੬ pg. 31, 33. 3 Press SNAPSHOT. The "PHOTO" indication appears while the snapshot is supplied from the battery pack, the camcorder shuts off automatically to "REC" while pressing down the Lock Button located on the Picture Quality/Image Size, etc. NOTE: If shooting is not performed...
Snapshot) You can use your camcorder as a Digital Still Camera for approx. 5 minutes when the Power Switch is set to "REC" and power is being taken. ● To delete unwanted still images, refer to "Deleting ...; To change the Picture Quality, ੬ pg. 31, 33. 3 Press SNAPSHOT. The "PHOTO" indication appears while the snapshot is supplied from the battery pack, the camcorder shuts off automatically to "REC" while pressing down the Lock Button located on the Picture Quality/Image Size, etc. NOTE: If shooting is not performed...
Instructions
Page 27
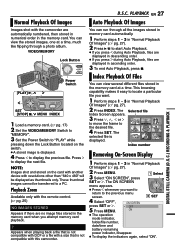
... 4, 3, 1 or 2 1 2 3 to move the frame to display the previous file. DIGITAL STILL CAMERA (D.S.C.) RECORDING & PLAYBACK Normal Playback Of Images Images shot with the camcorder are no image files stored in the memory card when you attempt memory card playback. ? NOTE: Images shot... file that is 7 8 9 displayed. The selected file is not compatible with a size that is not compatible with DCF or a file with this camcorder. VIDEO/MEMORY Lock Button [PLAY] 3, 3 2 Power Switch 1 SET [STOP] 7, 4 MENU INDEX 1 Load a memory card. (੬ pg. 17) 2 Set...
... 4, 3, 1 or 2 1 2 3 to move the frame to display the previous file. DIGITAL STILL CAMERA (D.S.C.) RECORDING & PLAYBACK Normal Playback Of Images Images shot with the camcorder are no image files stored in the memory card when you attempt memory card playback. ? NOTE: Images shot... file that is 7 8 9 displayed. The selected file is not compatible with a size that is not compatible with DCF or a file with this camcorder. VIDEO/MEMORY Lock Button [PLAY] 3, 3 2 Power Switch 1 SET [STOP] 7, 4 MENU INDEX 1 Load a memory card. (੬ pg. 17) 2 Set...
Instructions
Page 29
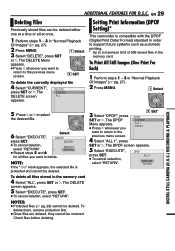
... delete all at a time or all files stored in "Normal Playback Of Images" (੬ pg. 27). 2 Press MENU. 1 Select DIGITAL STILL CAMERA (D.S.C.) RECORDING & PLAYBACK 5 Press 1 or 2 to delete. The DELETE screen appears. 5 Select "EXECUTE", press SET. ● To cancel deletion, select ... the currently displayed file 4 Select "CURRENT", press SET or 2. ADDITIONAL FEATURES FOR D.S.C. Setting Print Information (DPOF Setting)* This camcorder is protected and cannot be deleted. To delete them, remove protection first. ● Once files are deleted, they cannot...
... delete all at a time or all files stored in "Normal Playback Of Images" (੬ pg. 27). 2 Press MENU. 1 Select DIGITAL STILL CAMERA (D.S.C.) RECORDING & PLAYBACK 5 Press 1 or 2 to delete. The DELETE screen appears. 5 Select "EXECUTE", press SET. ● To cancel deletion, select ... the currently displayed file 4 Select "CURRENT", press SET or 2. ADDITIONAL FEATURES FOR D.S.C. Setting Print Information (DPOF Setting)* This camcorder is protected and cannot be deleted. To delete them, remove protection first. ● Once files are deleted, they cannot...

Instructions
Page 31
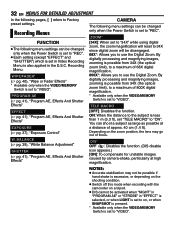
...recording mode to "REC" while pressing down the Lock Button located on -screen menu system that simplifies many of the more detailed camcorder settings. (੬ pg. 31 - 35) VIDEO/MEMORY Power Switch 1 Select Lock Button 4 Select the desired function, press SET or ... monitor fully. (੬ pg. 8) 3 Press MENU. ADVANCED FEATURES FUNCTION CAMERA VTR DISPLAY SYSTEM VTR DISPLAY SYSTEM EXIT EXIT * Video Recording Menu only MENUS FOR DETAILED ADJUSTMENT EN 31 Changing The Menu Settings This camcorder is completed. 7 Press MENU. Example: FUNCTION menu. Selection is equipped with...
...recording mode to "REC" while pressing down the Lock Button located on -screen menu system that simplifies many of the more detailed camcorder settings. (੬ pg. 31 - 35) VIDEO/MEMORY Power Switch 1 Select Lock Button 4 Select the desired function, press SET or ... monitor fully. (੬ pg. 8) 3 Press MENU. ADVANCED FEATURES FUNCTION CAMERA VTR DISPLAY SYSTEM VTR DISPLAY SYSTEM EXIT EXIT * Video Recording Menu only MENUS FOR DETAILED ADJUSTMENT EN 31 Changing The Menu Settings This camcorder is completed. 7 Press MENU. Example: FUNCTION menu. Selection is equipped with...
Instructions
Page 32
... and magnifying images, zooming is excessive, or depending on the shooting condition. ● Switch off this mode when recording with the camcorder on the zoom position, the lens may not be possible if hand shake is possible from 34X (the optical zoom limit), to ...set to Factory preset settings. BALANCE (੬ pg. 39), "White Balance Adjustment" SHUTTER (੬ pg. 41), "Program AE, Effects And Shutter Effects" CAMERA The following pages, [ ] refers to "REC". By digitally processing and magnifying images, zooming is set in the D.S.C. DIS* OFF : Disables the function...
... and magnifying images, zooming is excessive, or depending on the shooting condition. ● Switch off this mode when recording with the camcorder on the zoom position, the lens may not be possible if hand shake is possible from 34X (the optical zoom limit), to ...set to Factory preset settings. BALANCE (੬ pg. 39), "White Balance Adjustment" SHUTTER (੬ pg. 41), "Program AE, Effects And Shutter Effects" CAMERA The following pages, [ ] refers to "REC". By digitally processing and magnifying images, zooming is set in the D.S.C. DIS* OFF : Disables the function...

Instructions
Page 49
...seconds, it away from heaters or other heat sources. ... swing the soft camera case excessively when the camcorder is being accessed (during playback. ... REFERENCES Memory Cards To properly use and store your nearest JVC dealer. out of the battery pack. push it against hard objects. ...... leave the battery pack attached when the camcorder is on. ... in use . ● Avoid using the cleaning cassette, the ...
...seconds, it away from heaters or other heat sources. ... swing the soft camera case excessively when the camcorder is being accessed (during playback. ... REFERENCES Memory Cards To properly use and store your nearest JVC dealer. out of the battery pack. push it against hard objects. ...... leave the battery pack attached when the camcorder is on. ... in use . ● Avoid using the cleaning cassette, the ...
Instructions
Page 51
...without notice. E & O.E. Design and specifications subject to change without battery, cassette and lens cap) Approx. 480 g (1.06 lbs) (incl. Camcorder For General Power supply DC 11 V (Using AC Adapter) DC 7.2 V (Using battery pack) Power consumption Approx. 2.2 W (2.3 W*) (LCD monitor off...16" x 4-1/2") (with 0.33" color LCD Speaker Monaural LED Light Effective distance: 1.5 m (5 ft) SPECIFICATIONS EN 51 For Digital Video Camera Format DV format (SD mode) Signal format NTSC standard Recording/Playback format Video: Digital component recording Audio: PCM digital recording, 32 kHz 4-...
...without notice. E & O.E. Design and specifications subject to change without battery, cassette and lens cap) Approx. 480 g (1.06 lbs) (incl. Camcorder For General Power supply DC 11 V (Using AC Adapter) DC 7.2 V (Using battery pack) Power consumption Approx. 2.2 W (2.3 W*) (LCD monitor off...16" x 4-1/2") (with 0.33" color LCD Speaker Monaural LED Light Effective distance: 1.5 m (5 ft) SPECIFICATIONS EN 51 For Digital Video Camera Format DV format (SD mode) Signal format NTSC standard Recording/Playback format Video: Digital component recording Audio: PCM digital recording, 32 kHz 4-...
Instructions
Page 52
... Or VCR 23 Control Level 7 D Data Battery 14 Date/Time Settings ........15 Deleting Files 29 Demonstration Mode .....34 Digital Image Stabilization (DIS 32 Digital Still Camera ........26 DPOF Setting (Digital Print Order Format) ...29, 30 Dual Cam 20 Dubbing 41, 43 E Effects 41 Exposure Control ...........37 G Gain Up 33 I Image ... Troubleshooting ...... 46, 47 V Video/Memory Switch ..... 9 W White Balance 39 Wind Cut 33 Wipe Or Fader Effects .. 40 Z Zooming 19, 25, 32 16:9 Output 34, 35 GR-D775U © 2006 Victor Company of Japan, Limited US Printed in Malaysia 1206ASR-NF-MP
... Or VCR 23 Control Level 7 D Data Battery 14 Date/Time Settings ........15 Deleting Files 29 Demonstration Mode .....34 Digital Image Stabilization (DIS 32 Digital Still Camera ........26 DPOF Setting (Digital Print Order Format) ...29, 30 Dual Cam 20 Dubbing 41, 43 E Effects 41 Exposure Control ...........37 G Gain Up 33 I Image ... Troubleshooting ...... 46, 47 V Video/Memory Switch ..... 9 W White Balance 39 Wind Cut 33 Wipe Or Fader Effects .. 40 Z Zooming 19, 25, 32 16:9 Output 34, 35 GR-D775U © 2006 Victor Company of Japan, Limited US Printed in Malaysia 1206ASR-NF-MP


