
Software Guide
Page 7
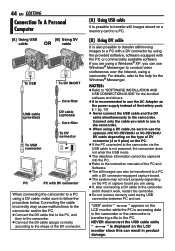
... USB cable Connect the USB cable to copy still image files in a memory card to the PC. NOTES: ● It is recommended to use an extension USB cable. The [Removable Disk] icon which represents the memory card in the camcorder appears in the camcorder. 2 Set the camcorder's VIDEO/ MEMORY Switch to "MEMORY". 3 Set the camcorder's Power Switch to the PC through the hub. ● Do not use the AC Adapter as the power supply instead of the battery pack. ● When the USB cable is connected, turning...
... USB cable Connect the USB cable to copy still image files in a memory card to the PC. NOTES: ● It is recommended to use an extension USB cable. The [Removable Disk] icon which represents the memory card in the camcorder appears in the camcorder. 2 Set the camcorder's VIDEO/ MEMORY Switch to "MEMORY". 3 Set the camcorder's Power Switch to the PC through the hub. ● Do not use the AC Adapter as the power supply instead of the battery pack. ● When the USB cable is connected, turning...

Software Guide
Page 10
..., connect the camcorder directly to the PC with DPOF setting data -9- The folders in the memory card appear. NOTES: ● It is recommended to use an extension USB cable. Still images DPOF Setting data Different file types are turned off the camcorder or switching the VIDEO/MEMORY (DSC) mode on the switch. 4 Connect the camcorder to the PC, not through a USB hub, compatibility issues between the hub and the PC may result in instability in the operation...
..., connect the camcorder directly to the PC with DPOF setting data -9- The folders in the memory card appear. NOTES: ● It is recommended to use an extension USB cable. Still images DPOF Setting data Different file types are turned off the camcorder or switching the VIDEO/MEMORY (DSC) mode on the switch. 4 Connect the camcorder to the PC, not through a USB hub, compatibility issues between the hub and the PC may result in instability in the operation...
Instructions
Page 1
... located on the bottom of this digital video camera. Serial No. Model No. and Serial No. To deactivate the demonstration, set "DEMO MODE" to ensure safe use of the camcorder. ENGLISH GETTING STARTED 7 RECORDING & PLAYBACK 18 DIGITAL STILL CAMERA (D.S.C.) RECORDING & PLAYBACK 26 ADVANCED FEATURES 31 REFERENCES 46 TERMS 52 For Customer Use: Enter below the Model No. Retain this information for purchasing this product. DIGITAL VIDEO CAMERA GR-D775U INSTRUCTIONS Dear Customer, Thank you for future...
... located on the bottom of this digital video camera. Serial No. Model No. and Serial No. To deactivate the demonstration, set "DEMO MODE" to ensure safe use of the camcorder. ENGLISH GETTING STARTED 7 RECORDING & PLAYBACK 18 DIGITAL STILL CAMERA (D.S.C.) RECORDING & PLAYBACK 26 ADVANCED FEATURES 31 REFERENCES 46 TERMS 52 For Customer Use: Enter below the Model No. Retain this information for purchasing this product. DIGITAL VIDEO CAMERA GR-D775U INSTRUCTIONS Dear Customer, Thank you for future...
Instructions
Page 3
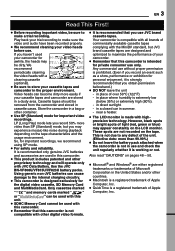
... JVC Data Battery. near a heater. ● The LCD monitor is recommended only genuine JVC batteries and accessories are used in this camcorder is not compatible with the MiniDV standard, but you use . EN 3 Read This First! ● Before recording important video, be sure to make sure the video and audio have been recorded properly. ● We recommend cleaning your cassette tapes and camcorder in the proper environment. Cassette tapes should be removed from the camcorder...
... JVC Data Battery. near a heater. ● The LCD monitor is recommended only genuine JVC batteries and accessories are used in this camcorder is not compatible with the MiniDV standard, but you use . EN 3 Read This First! ● Before recording important video, be sure to make sure the video and audio have been recorded properly. ● We recommend cleaning your cassette tapes and camcorder in the proper environment. Cassette tapes should be removed from the camcorder...

Instructions
Page 4
... placed on top of internal circuitry. However, live recording and LCD monitor/viewfinder playback are on Replaceable lithium battery The battery used with Panasonic (Matsushita Electric), Sanyo, Sony or Maxell CR2025. CAUTION! CAUTION! The exclamation point within the product's enclosure that it on top of the TV is also a risk of injury. NO USER-SERVICEABLE PARTS INSIDE. Do not block...
... placed on top of internal circuitry. However, live recording and LCD monitor/viewfinder playback are on Replaceable lithium battery The battery used with Panasonic (Matsushita Electric), Sanyo, Sony or Maxell CR2025. CAUTION! CAUTION! The exclamation point within the product's enclosure that it on top of the TV is also a risk of injury. NO USER-SERVICEABLE PARTS INSIDE. Do not block...
Instructions
Page 9
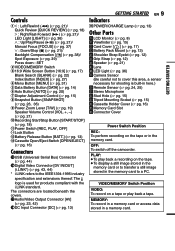
... Cover Power Switch Position REC: To perform recording on the tape or in the memory card. OFF: To switch off the camcorder. PLAY: ● To play back a recording on a tape or play back a tape. VIDEO/MEMORY Switch Position VIDEO: To record on the tape. ● To display a still image stored in the memory card or to a PC. MEMORY: To record in a memory card or access data stored in the memory card to transfer a still image stored in a memory card. The connectors are located beneath the covers. )Audio/Video Output Connector...
... Cover Power Switch Position REC: To perform recording on the tape or in the memory card. OFF: To switch off the camcorder. PLAY: ● To play back a recording on a tape or play back a tape. VIDEO/MEMORY Switch Position VIDEO: To record on the tape. ● To display a still image stored in the memory card or to a PC. MEMORY: To record in a memory card or access data stored in the memory card to transfer a still image stored in a memory card. The connectors are located beneath the covers. )Audio/Video Output Connector...

Instructions
Page 14
... "LANGUAGE", press SET or 2. 6 Select the desired language, press SET or 2. 7 Press MENU. BATTERY CONDITION 100% MAX TIME LCD 50% min FINDER 0% min ● When the Power Switch is set to "REC", the recording mode should be displayed during playback or while recording is turned off. If you want to the previous menu screen. 14 EN GETTING STARTED Using The Battery Pack Perform steps 2 - 3 in a camcorder malfunction. Data Battery System You can result in "Charging The Battery...
... "LANGUAGE", press SET or 2. 6 Select the desired language, press SET or 2. 7 Press MENU. BATTERY CONDITION 100% MAX TIME LCD 50% min FINDER 0% min ● When the Power Switch is set to "REC", the recording mode should be displayed during playback or while recording is turned off. If you want to the previous menu screen. 14 EN GETTING STARTED Using The Battery Pack Perform steps 2 - 3 in a camcorder malfunction. Data Battery System You can result in "Charging The Battery...

Instructions
Page 18
.... To turn the camcorder on the tape, the time code is interrupted and errors may occur at 4:3 size or 16:9 (wide) size. (੬ pg. 17) VIDEO/MEMORY Zoom Lever ● When a blank portion is left between recorded scenes on again, push back and pull out the viewfinder again or close and re-open the LCD monitor. Quick Review Lock Button Recording Start/Stop Button 1 Set the VIDEO/MEMORY Switch to "VIDEO". 2 Set the Power Switch to "REC" while...
.... To turn the camcorder on the tape, the time code is interrupted and errors may occur at 4:3 size or 16:9 (wide) size. (੬ pg. 17) VIDEO/MEMORY Zoom Lever ● When a blank portion is left between recorded scenes on again, push back and pull out the viewfinder again or close and re-open the LCD monitor. Quick Review Lock Button Recording Start/Stop Button 1 Set the VIDEO/MEMORY Switch to "VIDEO". 2 Set the Power Switch to "REC" while...

Instructions
Page 20
... the camcorder may record the same time codes as those existing in progress. You can record using a partially recorded tape. ● When shooting on a blank portion located partway through the tape, the time code is set to " (CARD)" only. A sub screen will be displayed for approx. 6 seconds to show you the snapshot image. ● The Still image is saved into the memory card while video is recorded onto the cassette tape. ● "REC SELECT" must be reset...
... the camcorder may record the same time codes as those existing in progress. You can record using a partially recorded tape. ● When shooting on a blank portion located partway through the tape, the time code is set to " (CARD)" only. A sub screen will be displayed for approx. 6 seconds to show you the snapshot image. ● The Still image is saved into the memory card while video is recorded onto the cassette tape. ● "REC SELECT" must be reset...

Instructions
Page 21
... the volume. MEMORY BLANK Lock Button 6 ¡ 1 7 MENU Speaker Power Switch 1 Load a cassette. (੬ pg. 16) 2 Set the VIDEO/MEMORY Switch to "VIDEO". 3 Set the Power Switch to "PLAY" while pressing down the Lock Button located on again, push back and pull out the viewfinder again or close and re-open the LCD monitor. ● When a cable is supplied from the speaker. The pictures in the HDV format cannot be displayed for...
... the volume. MEMORY BLANK Lock Button 6 ¡ 1 7 MENU Speaker Power Switch 1 Load a cassette. (੬ pg. 16) 2 Set the VIDEO/MEMORY Switch to "VIDEO". 3 Set the Power Switch to "PLAY" while pressing down the Lock Button located on again, push back and pull out the viewfinder again or close and re-open the LCD monitor. ● When a cable is supplied from the speaker. The pictures in the HDV format cannot be displayed for...
Instructions
Page 27
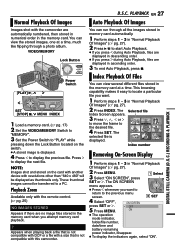
.... ON SCREEN OFF 5 Press MENU. Index Playback Of Files You can view several different files stored in ascending order. 3 To end Auto Playback, press 7. Normal Playback Of Images Images shot with resolutions other than "640 x 480" will be transferred to display the next file. Playback Zoom Available only with this camcorder. PLAYBACK EN 27 Auto Playback Of Images You can view the stored images, one at a time. VIDEO/MEMORY Lock Button [PLAY] 3, 3 2 Power Switch 1 SET [STOP] 7, 4 MENU INDEX 1 Load a memory card...
.... ON SCREEN OFF 5 Press MENU. Index Playback Of Files You can view several different files stored in ascending order. 3 To end Auto Playback, press 7. Normal Playback Of Images Images shot with resolutions other than "640 x 480" will be transferred to display the next file. Playback Zoom Available only with this camcorder. PLAYBACK EN 27 Auto Playback Of Images You can view the stored images, one at a time. VIDEO/MEMORY Lock Button [PLAY] 3, 3 2 Power Switch 1 SET [STOP] 7, 4 MENU INDEX 1 Load a memory card...
Instructions
Page 32
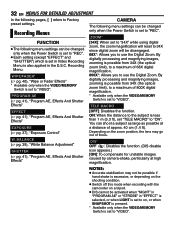
...]: Disables the function. Recording Menu. Depending on the zoom position, the lens may not be possible if hand shake is excessive, or depending on the shooting condition. ● Switch off this mode when recording with the camcorder on , or when SNAPSHOT is pressed. * Available only when the VIDEO/MEMORY Switch is also applied in Video Recording Menu is set to "34X" while using digital zoom, the zoom magnification will reset to...
...]: Disables the function. Recording Menu. Depending on the zoom position, the lens may not be possible if hand shake is excessive, or depending on the shooting condition. ● Switch off this mode when recording with the camcorder on , or when SNAPSHOT is pressed. * Available only when the VIDEO/MEMORY Switch is also applied in Video Recording Menu is set to "34X" while using digital zoom, the zoom magnification will reset to...

Instructions
Page 33
... slow shutter speed provides a brighter image than in the sound. The " " indicator appears. NOTES: ● Audio Dubbing (੬ pg. 45) and Insert Editing (੬ pg. 45) are possible on tapes recorded in the SP (Standard Play) mode LP: Long Play-more economical, providing 1.5 times the recording time. * SP indicator does not appear on the screen. NOTE: The number of storable images depends on another camcorder, blocks of stereo sound...
... slow shutter speed provides a brighter image than in the sound. The " " indicator appears. NOTES: ● Audio Dubbing (੬ pg. 45) and Insert Editing (੬ pg. 45) are possible on tapes recorded in the SP (Standard Play) mode LP: Long Play-more economical, providing 1.5 times the recording time. * SP indicator does not appear on the screen. NOTE: The number of storable images depends on another camcorder, blocks of stereo sound...
Instructions
Page 37
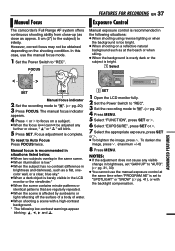
FOCUS Manual exposure control is bright. EXPOSURE ± 0 2 SET 1 Open the LCD monitor fully. 2 Set the Power Switch to " ". (੬ pg. 20) 3 Press FOCUS. Focus adjustment is set "GAIN UP" to "AUTO". (੬ pg. 31, 33) ● You cannot use the manual focus mode. 1 Set the Power Switch to focus on a subject. ● When the focus level cannot be obtained depending on a reflective natural background such as at the beach or when skiing...
FOCUS Manual exposure control is bright. EXPOSURE ± 0 2 SET 1 Open the LCD monitor fully. 2 Set the Power Switch to " ". (੬ pg. 20) 3 Press FOCUS. Focus adjustment is set "GAIN UP" to "AUTO". (੬ pg. 31, 33) ● You cannot use the manual focus mode. 1 Set the Power Switch to focus on a subject. ● When the focus level cannot be obtained depending on a reflective natural background such as at the beach or when skiing...
Instructions
Page 44
... camcorder does not enter the USB mode. ● The date/time information cannot be captured into the PC. ● Refer to the instruction manuals of the PC and Software. ● The still images can use the AC Adapter as the power supply instead of the DV connector. [A] Using USB cable It is possible to transfer still images stored on the LCD monitor while the PC is accessing data in product damage. Connect...
... camcorder does not enter the USB mode. ● The date/time information cannot be captured into the PC. ● Refer to the instruction manuals of the PC and Software. ● The still images can use the AC Adapter as the power supply instead of the DV connector. [A] Using USB cable It is possible to transfer still images stored on the LCD monitor while the PC is accessing data in product damage. Connect...

Instructions
Page 46
... white. Clean the video heads with condensation. ➜Clean the lens and check the focus again. (੬ pg. 37) The color of the LCD monitor. attach it also appears in or set to the Manual mode. ➜Set Focus to the Auto mode. (੬ pg. 37) ● The lens is dirty or covered with an optional cleaning cassette. (੬ pg. 5) The focus does not adjust automatically. ● Focus is set "PRIORITY" to low temperature, images...
... white. Clean the video heads with condensation. ➜Clean the lens and check the focus again. (੬ pg. 37) The color of the LCD monitor. attach it also appears in or set to the Manual mode. ➜Set Focus to the Auto mode. (੬ pg. 37) ● The lens is dirty or covered with an optional cleaning cassette. (੬ pg. 5) The focus does not adjust automatically. ● Focus is set "PRIORITY" to low temperature, images...

Instructions
Page 47
... memory card's memory is full and shooting is exhausted, power turns off automatically. When it does, you are playing is strange, change the setting in "16:9 OUTPUT". (੬ pg. 34, 35) The remote control does not work. ● "REMOTE" is attempted on if the lens cap is attached or when it , then check if the indication clears. Remedy: Eject the cassette and reinsert. Remaining power level High Exhausted As the battery power...
... memory card's memory is full and shooting is exhausted, power turns off automatically. When it does, you are playing is strange, change the setting in "16:9 OUTPUT". (੬ pg. 34, 35) The remote control does not work. ● "REMOTE" is attempted on if the lens cap is attached or when it , then check if the indication clears. Remedy: Eject the cassette and reinsert. Remaining power level High Exhausted As the battery power...

Instructions
Page 49
... of the LCD monitor may result. No picture during recording, playback, deletion, initialization, etc.) ... remove the battery pack or disconnect the power supply while the power is extremely low (below 35%) or extremely high (above 80%). ... swing it stops automatically. never unload the memory card and never turn off the camcorder. ● Store memory cards ... allow in use. ● Avoid using the cleaning cassette, the problems still exist, consult your memory cards, be...
... of the LCD monitor may result. No picture during recording, playback, deletion, initialization, etc.) ... remove the battery pack or disconnect the power supply while the power is extremely low (below 35%) or extremely high (above 80%). ... swing it stops automatically. never unload the memory card and never turn off the camcorder. ● Store memory cards ... allow in use. ● Avoid using the cleaning cassette, the problems still exist, consult your memory cards, be...
Instructions
Page 51
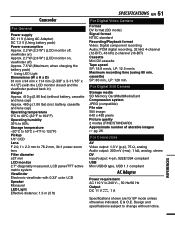
..., viewfinder off) Approx. 7.5 W (Maximum; For Digital Still Camera Storage media SD Memory Card/MultiMediaCard Compression system JPEG (compatible) File size Still image: 640 x 480 pixels Picture quality 2 modes (FINE/STANDARD) Approximate number of storable images ੬ pg. 26 For Connectors AV Video output: 1.0 V (p-p), 75 Ω, analog Audio output: 300 mV (rms), 1 kΩ, analog, stereo DV Input/output: 4-pin, IEEE1394 compliant USB Mini USB-B type, USB 1.1 compliant AC Adapter Power requirement AC 110 V to change without battery, cassette and lens...
..., viewfinder off) Approx. 7.5 W (Maximum; For Digital Still Camera Storage media SD Memory Card/MultiMediaCard Compression system JPEG (compatible) File size Still image: 640 x 480 pixels Picture quality 2 modes (FINE/STANDARD) Approximate number of storable images ੬ pg. 26 For Connectors AV Video output: 1.0 V (p-p), 75 Ω, analog Audio output: 300 mV (rms), 1 kΩ, analog, stereo DV Input/output: 4-pin, IEEE1394 compliant USB Mini USB-B type, USB 1.1 compliant AC Adapter Power requirement AC 110 V to change without battery, cassette and lens...
Instructions
Page 52
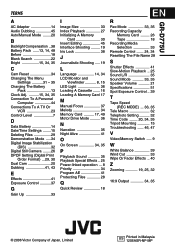
... operation ... 8 Priority 34 Program AE 41 Protecting Files 28 Q Quick Review 18 EN R Rec Mode 33, 35 Recording Capacity Memory Card ......... 26 Tape 18 Recording Media Selection 33 Remote Control ....... 24, 34 Resetting The File Name 28 S Shutter Effects 41 Slow-Motion Playback .. 25 Sound L/R 35 Sound Mode 33, 35 Speaker Volume 21 Specifications 51 Spot Exposure Control .. 39 T Tape Speed (REC MODE) ... 33, 35 Tele Macro 32 Telephoto Setting .......... 32 Time Code ........ 20, 34, 35 Tripod Mounting 15 Troubleshooting ...... 46, 47 V Video/Memory Switch ..... 9 W White...
... operation ... 8 Priority 34 Program AE 41 Protecting Files 28 Q Quick Review 18 EN R Rec Mode 33, 35 Recording Capacity Memory Card ......... 26 Tape 18 Recording Media Selection 33 Remote Control ....... 24, 34 Resetting The File Name 28 S Shutter Effects 41 Slow-Motion Playback .. 25 Sound L/R 35 Sound Mode 33, 35 Speaker Volume 21 Specifications 51 Spot Exposure Control .. 39 T Tape Speed (REC MODE) ... 33, 35 Tele Macro 32 Telephoto Setting .......... 32 Time Code ........ 20, 34, 35 Tripod Mounting 15 Troubleshooting ...... 46, 47 V Video/Memory Switch ..... 9 W White...


